- Step 1: Install WooCommerce, DriveHub and DriveHub Pro
- Step 2: Connect Your Google Drive Account
- Step 3: Turn On Customer Uploads
- Step 4: Choose When and Where the Upload Box Shows
- Step 5: Choose Folders and File Names
- Step 6: Let Customers Describe or Sort Their Files (Optional)
- Step 7: Make a Product Uploadable
- Step 8: Set Up the Upload Box (Upload to Google Drive Tab)
- Step 9: The Customer Uploads Files
- Step 10: Review the Files (Order Screen)
- Step 11: Find the Files in Google Drive
- Benefits of Letting Customers Upload to Google Drive
- Troubleshooting
Do you sell something that needs a file from the customer, like a portfolio for a review session, a logo for a custom print or a document to check? You can easily collect those files with DriveHub and WooCommerce.
Each upload goes straight into your Google Drive, in its own folder for every order, so your server stays light and you never have to dig through email attachments. You then approve or decline each file right from the order screen.
Here is an easy, step-by-step guide to help you set it all up!
Note: This needs DriveHub Pro.
Step 1: Install WooCommerce, DriveHub and DriveHub Pro #
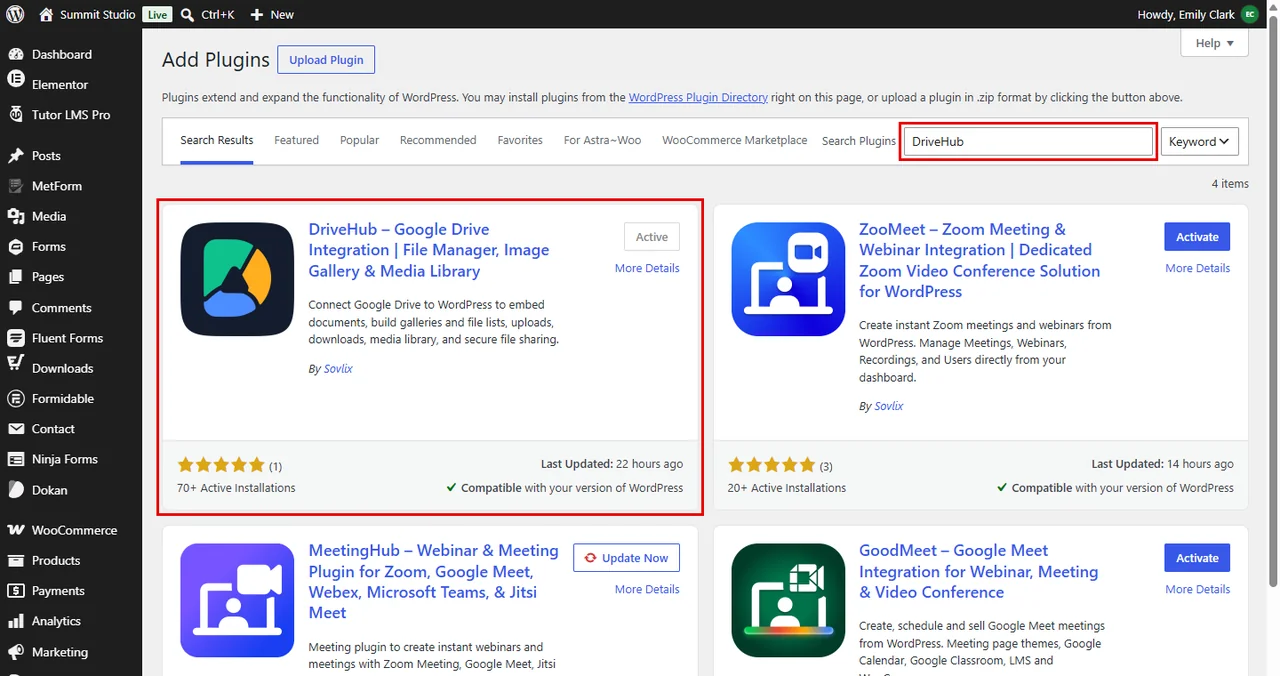
First, make sure all three plugins are ready:
- From your WordPress admin, click on Plugins > Add New Plugin.
- Search for WooCommerce, click Install Now and then Activate.
- Do the same for DriveHub.
- Add DriveHub Pro on top. Read How to Install and Activate DriveHub Pro if you haven’t done that yet.
Step 2: Connect Your Google Drive Account #
Customer files can only go to a connected Google account:
- Open DriveHub and click on Start Setup.
- Click on Add Account.
- Choose the Google account that should receive the uploads and allow the permissions.
Read our step by step setup guide to avoid any confusion.
Step 3: Turn On Customer Uploads #
Now open the WooCommerce settings in DriveHub:
- Go to DriveHub > Integrations.
- Find the WooCommerce card under Stores and courses.
- Click on Set up (or, if the card already has a switch, the small settings icon next to it).
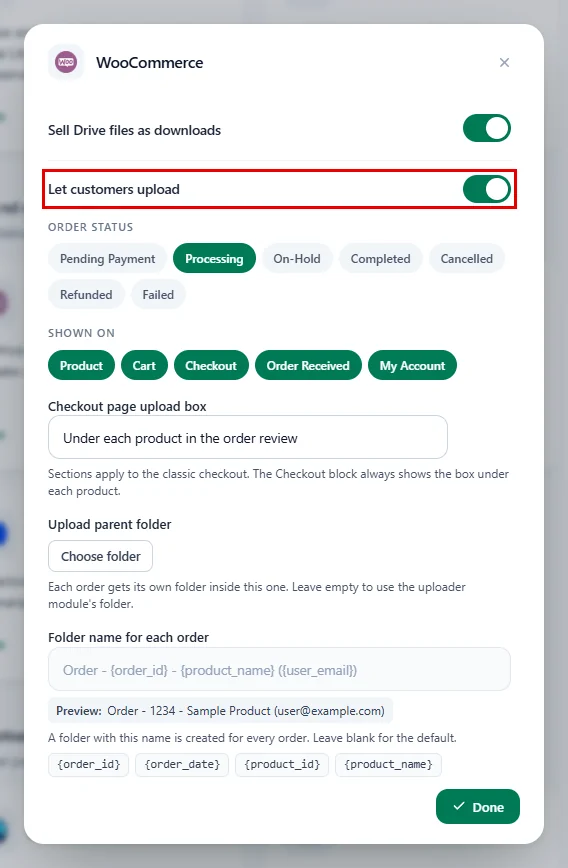
- In the WooCommerce window, turn on Let customers upload. More options appear below it.
Step 4: Choose When and Where the Upload Box Shows #
These options decide when customers see the upload box:
- Order status: Click the statuses that allow uploads on the order pages (for example Processing and Completed). If you leave them all off, DriveHub uses Pending Payment, Processing and On-Hold.
- Shown on: Click the places the box appears: Product, Cart, Checkout, Order Received and My Account.
- Checkout page upload box: Choose where the box sits on the classic checkout, for example Under each product in the order review or Before the payment section. The Checkout block always shows it under each product.
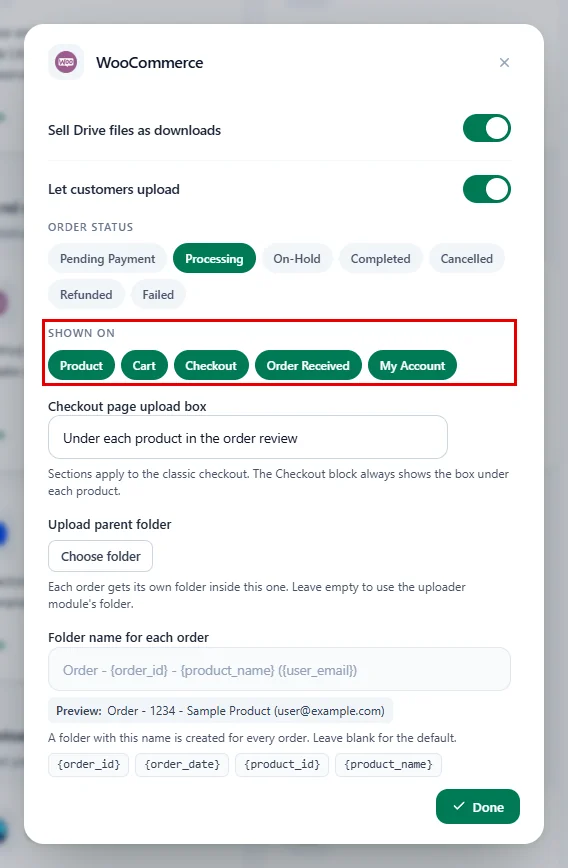
Tip: The Order status list only applies to the Order Received and My Account pages. The product, cart and checkout boxes show before an order exists.
Step 5: Choose Folders and File Names #
Next, decide where the files land in Google Drive and how they are named:
- Upload parent folder: Click on Choose folder and pick the folder that will hold every order folder (for example Client Uploads). Leave it empty to use the folder from the product’s uploader module instead.
- Folder name for each order: The name of the folder made for every order. If you leave it blank, DriveHub uses
Order - {order_id} - {product_name} ({user_email}). - File name template: Renames uploaded files, for example to add the order number. Leave it blank to keep the customer’s own file name.
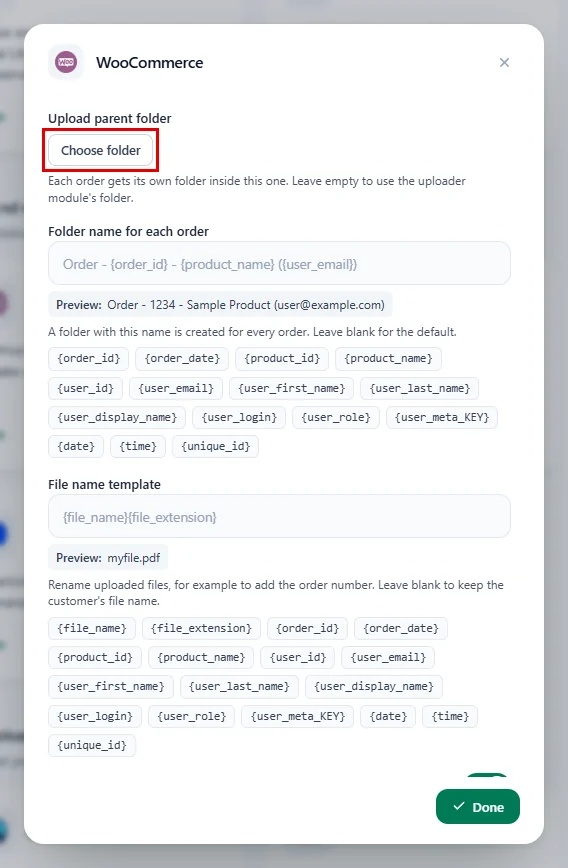
Click a tag under either template to add it where your cursor is. A Preview line shows how the name will look. These tags are available:
| Tag | Inserts |
|---|---|
{order_id}, {order_date} |
The order number and date |
{product_id}, {product_name} |
The product |
{user_id}, {user_email}, {user_login}, {user_role} |
The customer’s account details |
{user_first_name}, {user_last_name}, {user_display_name} |
The customer’s name |
{user_meta_KEY} |
Any customer meta field. Replace KEY with the meta key. |
{date}, {time}, {unique_id} |
The upload date, time and a unique code |
{file_name}, {file_extension} |
The original file name and extension (file name template only) |
Step 6: Let Customers Describe or Sort Their Files (Optional) #
Two more switches give customers a little more control:
- Customers can describe each file: Adds a short description field to each uploaded file. It is on by default.
- Customers choose the upload folder: Lets customers pick one of the folders inside your upload parent folder. Fill in Label above the folder list (for example “Choose a folder”), then click on Choose default to set the Default folder for customers who don’t pick one.
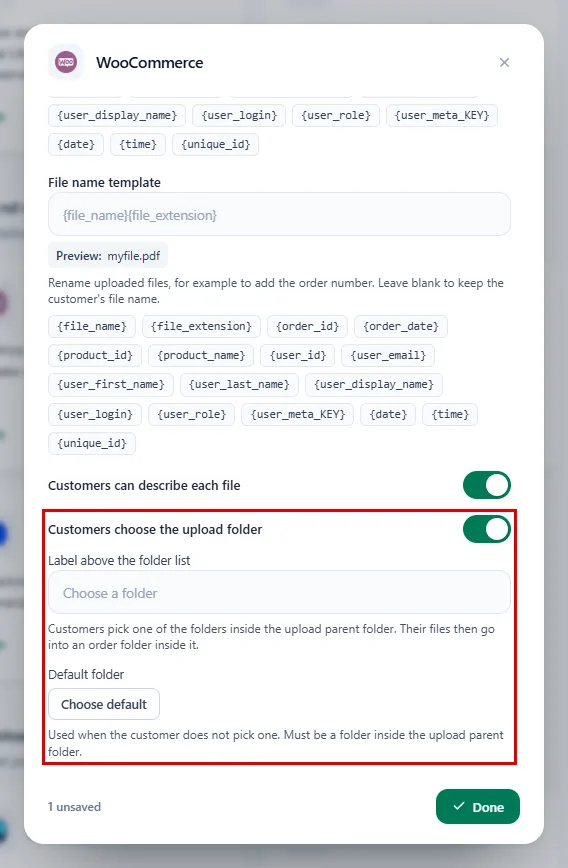
When you’re done:
- Click on Done.
- Click on Save changes in the bar at the bottom of the screen.
Don’t forget to click Save changes. Done only closes the window.
Step 7: Make a Product Uploadable #
Now open the product that needs files from the customer:
- Go to Products > Add New Product, or open an existing product (we’ll use Live Workshop Ticket at $49.00).
- In the Product data box, tick Uploadable.
- Open the Upload to Google Drive tab on the left.
- Tick Show Upload Box.
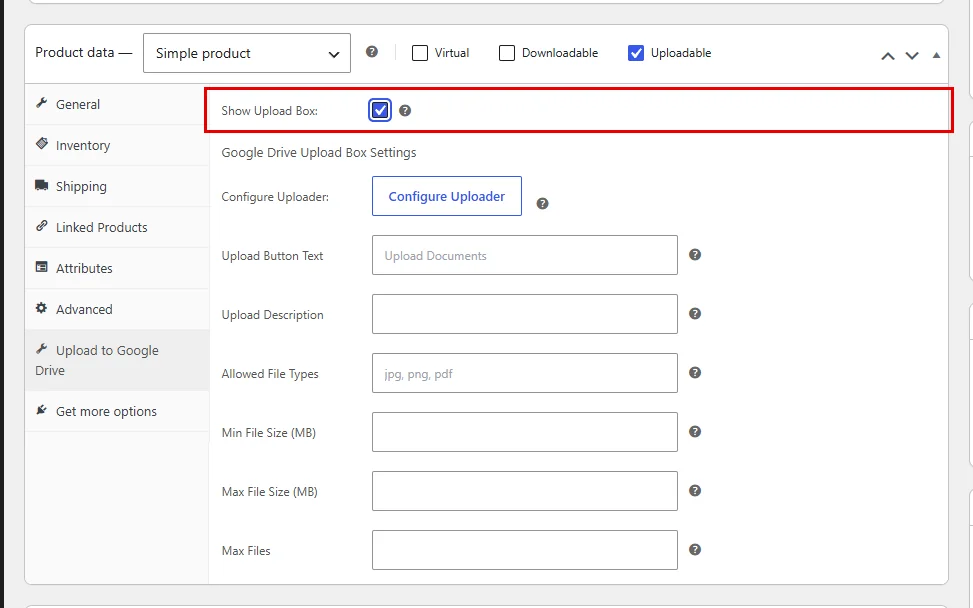
Step 8: Set Up the Upload Box (Upload to Google Drive Tab) #
Under Google Drive Upload Box Settings, set how the box behaves for this product:
- Click on Configure Uploader. The Insert DriveHub Module window opens. Pick a File Uploader module and click on Insert module, or create a new one there. The module’s folder is used when you left Upload parent folder empty in Step 5.
- Upload Button Text: The text on the upload button, for example “Upload Your Portfolio”.
- Upload Description: A short note shown with the box.
- Allowed File Types: Comma separated extensions, for example
jpg, png, pdf. Leave it blank to allow all types. - Min File Size (MB) and Max File Size (MB): Size limits. Leave them blank for no limit.
- Max Files: The most files a customer can upload for this product.
- Click on Publish (or Update).
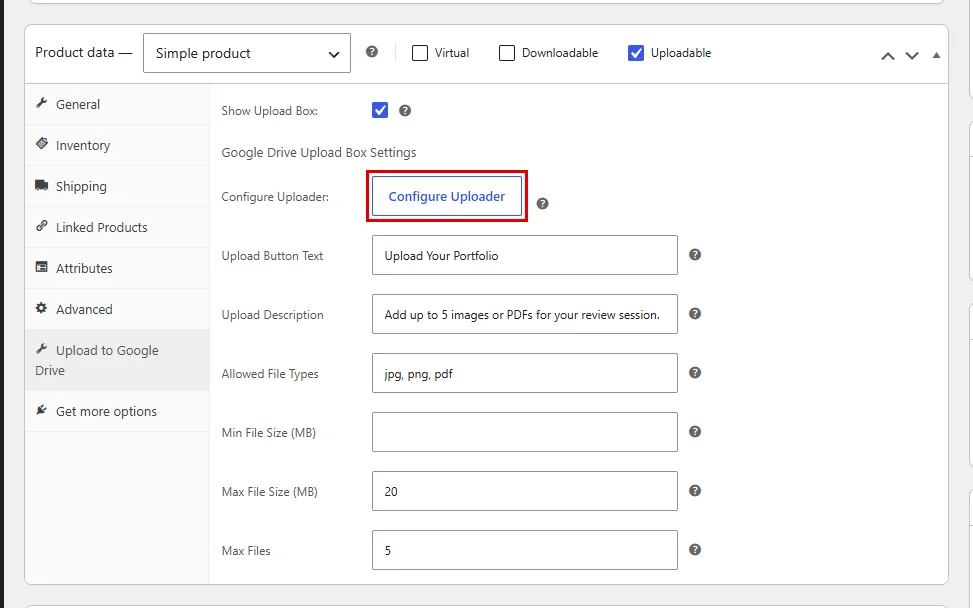
Read How to Use the File Uploader Module to learn more about uploader modules.
Step 9: The Customer Uploads Files #
And that’s it for the setup. Depending on Shown on, the customer sees the upload box:
- On the Product page, before adding to cart.
- On the Cart and Checkout pages.
- On the Order Received (thank you) page. When both Order Received and My Account are on, the thank you message also says “You can now start uploading your documents.”
- In My Account > Orders > View. The orders list also gets an Upload Documents button (or your own Upload Button Text).
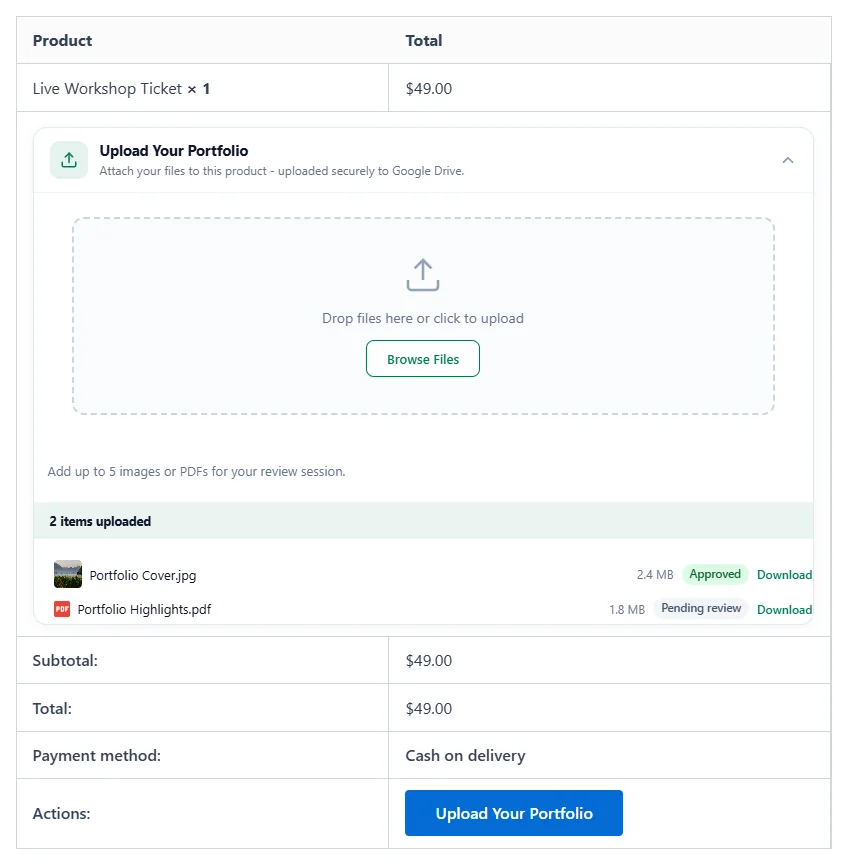
The customer clicks Browse Files or drags files onto the box. Files that break your rules (wrong type, too big, too many) are refused with a message. Each uploaded file shows a thumbnail or icon, its size, a Pending review badge, a Download link and a Remove button. Customers can remove a file until you approve it.
Files uploaded before checkout are linked to the order when it is placed, and moved into that order’s folder.
Step 10: Review the Files (Order Screen) #
Now check what the customer sent:
- Go to WooCommerce > Orders and open the order.
- Under the product, the Uploaded Files list shows each file with a thumbnail, size, type, image size and upload date.
- Click on View to open a file in Google Drive, or Download to save a copy.
- Click on Approve to accept a file.
- Click on Decline to reject it, type a Reason for declining, then click on Decline file.
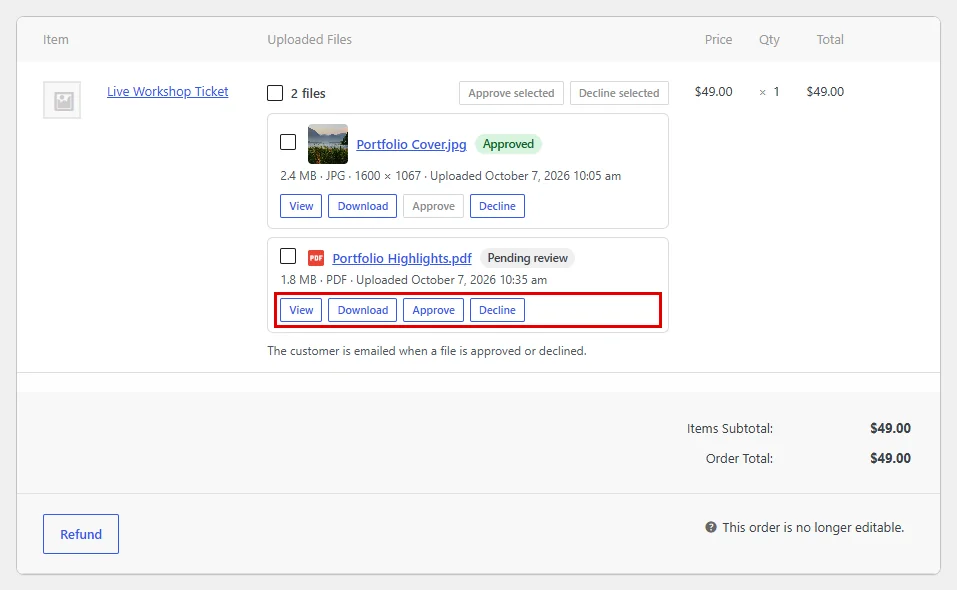
Tip: To handle many files at once, tick them and click on Approve selected or Decline selected.
The customer gets an email when a file is approved or declined. A declined file shows your reason, and the customer can upload a replacement on the order page.
Step 11: Find the Files in Google Drive #
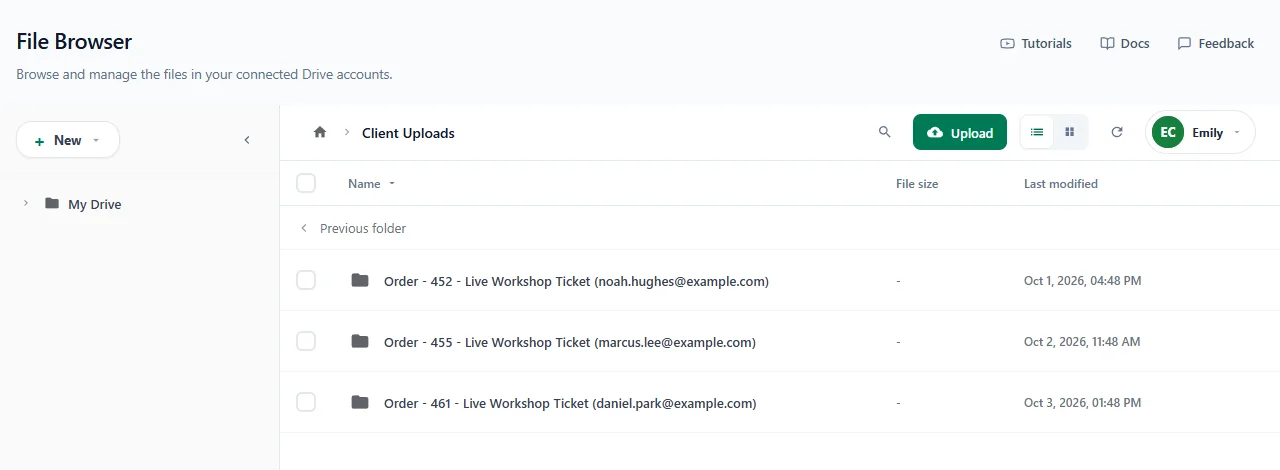
Open your upload folder in Google Drive. Each order has its own folder, named with your Folder name for each order template, for example Order – 461 – Live Workshop Ticket ([email protected]).
Benefits of Letting Customers Upload to Google Drive #
- No more email attachments: Every file arrives with its order, in the right folder.
- Save hosting space: Uploads go straight to Google Drive, not your server.
- Stay organized: One folder per order, named the way you want.
- Review in one place: Approve or decline files right from the WooCommerce order.
- Keep customers in the loop: They get an email for every decision and can send a replacement.
With DriveHub and WooCommerce, collecting customer files takes just a few clicks.
Troubleshooting #
- No upload box on the order page: Check that the order’s status is on under Order status, and that Order Received or My Account is on under Shown on.
- No box on the cart or checkout: Turn on Cart or Checkout under Shown on.
- A file is refused: It breaks the product’s Allowed file types, size limits or Max files.
Related guides:


