- Before you begin
- What you need from Zoom
- Step 1: Open Zoom Recordings
- Step 2: Pick the host
- Step 3: Choose the dates and click Show
- Step 4: Read the results
- Step 5: Play, download or share a recording
- Step 6: Show recordings on your site
- Step 7: Delete a recording you no longer need
- Benefits of the Zoom Recordings screen
- Troubleshooting
- Frequently asked questions
- Security best practices
- You're ready to share your Zoom recordings
When a Zoom meeting is recorded to the cloud, the video stays in your Zoom account. The Zoom Recordings screen brings those recordings into WordPress, so you can play, download and share them without signing in to Zoom.
Use it after a class or a webinar, when students ask for the replay, or when you want to show a recordings archive on your site.
By the end of this guide, you will have:
- The Zoom Recordings screen open for the right host and dates
- A list of cloud recordings you can search, sort and export
- Play and download links for every file in a recording
- The recording passcode, ready to copy and share
- With ZooMeet Pro, a shortcode that shows the recordings on your site
Estimated setup time: 3 minutes. The screen only reads from Zoom, so looking around changes nothing.
Before you begin #
Make sure you have:
- ZooMeet installed and activated, with Zoom connected. See How to connect Zoom with ZooMeet using Server-to-Server OAuth.
- An administrator account on your WordPress site
- A paid Zoom plan with cloud recording turned on. Free Zoom accounts can only record locally, and local recordings never appear here.
- Meetings recorded to the cloud, for example with Automatically record set to In the cloud on the meeting form
- ZooMeet Pro, if you want to embed recordings on your site
What you need from Zoom #
| You want to | Zoom needs |
|---|---|
| Record to the cloud | A licensed host on a Pro, Business or Enterprise plan. Cloud recording is on by default for paid accounts. |
| Store the recordings | Space in your cloud storage. Pro and Business plans include 10 GB per licensed user, pooled across the account. |
| Start a cloud recording | The host or a co-host. Other participants can only record to their own computer. |
| Let ZooMeet read recordings | The recording scopes on your Server-to-Server OAuth app. |
Step 1: Open Zoom Recordings #
The Zoom Recordings item appears in the ZooMeet menu once Zoom is connected.
- In the WordPress admin menu, go to ZooMeet > Zoom Recordings.
- Check the heading Zoom Recordings and the line Cloud recordings from your Zoom account, by host and date.
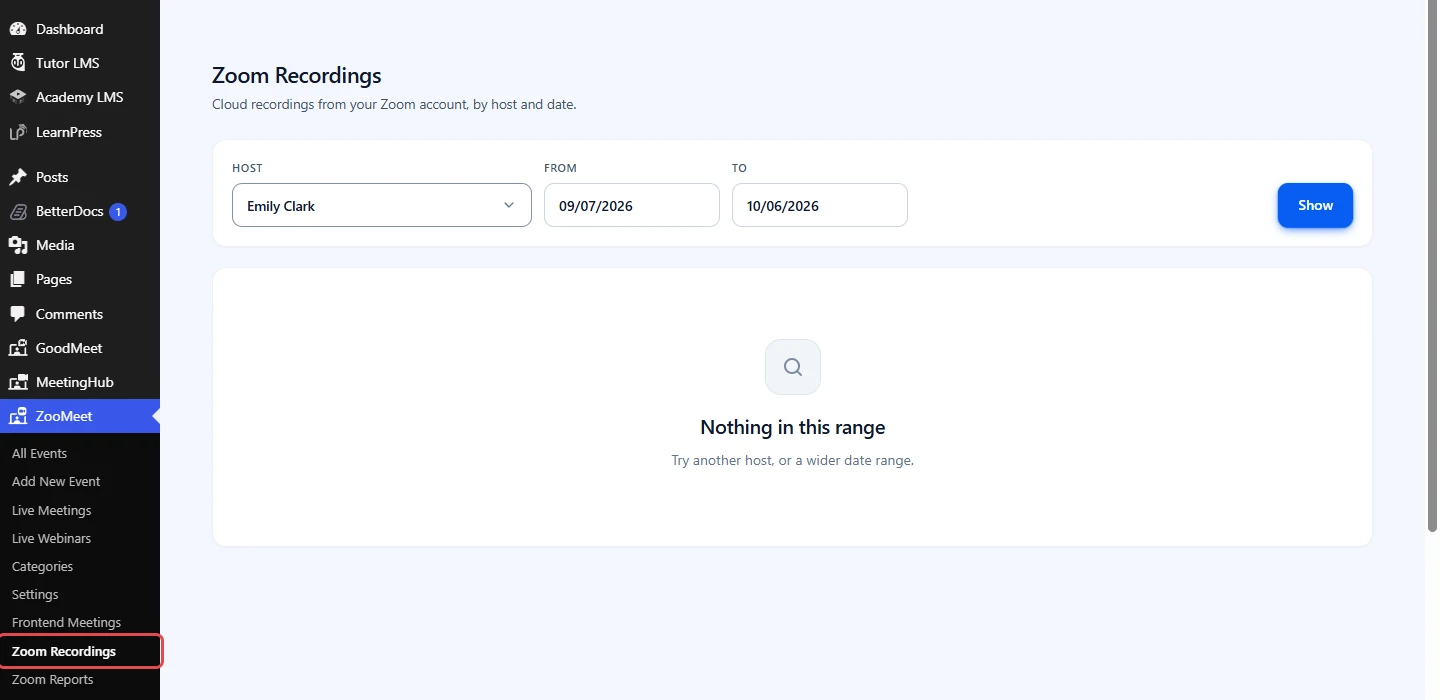
Note: If you do not see Zoom Recordings in the menu, Zoom is not connected yet. Connect it first, then reload the page.
Step 2: Pick the host #
Zoom keeps recordings per Zoom user, so the screen asks whose recordings to show.
- Click the Host field.
- Pick a host. Each one shows the name with the email address under it.

Tip: ZooMeet remembers the last host you picked in this browser. On an account with one Zoom user, that user is picked for you.
Step 3: Choose the dates and click Show #
- Click From and pick the first day you want to see.
- Click To and pick the last day. To cannot be earlier than From, and neither can be in the future.
- Click Show.
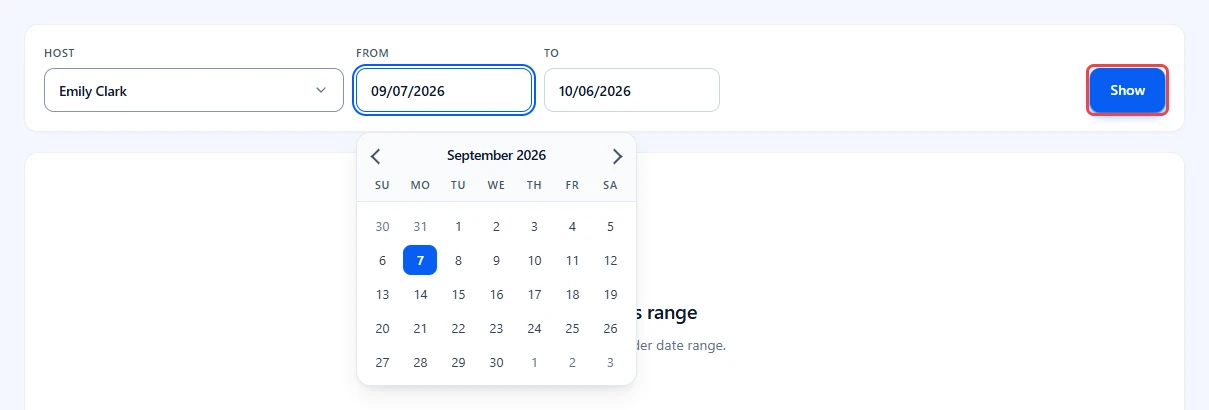
Note: Zoom searches one month at a time, so ZooMeet walks a long range month by month. If the range is very wide, you see This range was too wide to fetch in full. Narrow the dates to see the rest.
The host and dates are saved in the page address, so you can bookmark the screen or send the link to another administrator.
Step 4: Read the results #
When Zoom has no cloud recordings for that host and range, you see Nothing in this range and Try another host, or a wider date range.
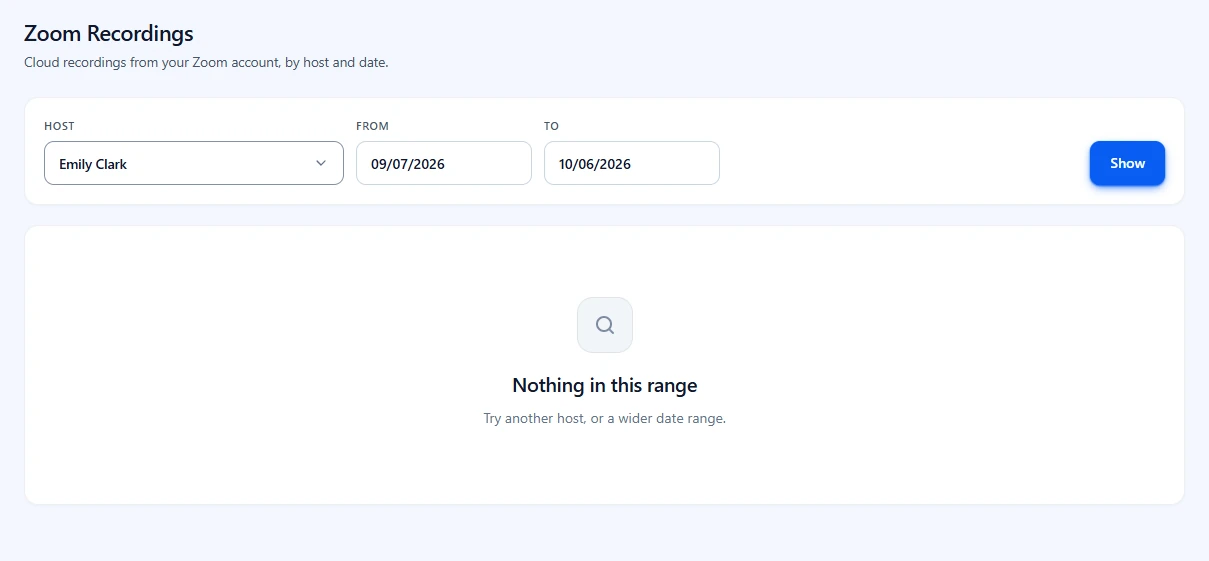
Once the host has cloud recordings in the range, the empty state is replaced by a table with one row per recording.
Note: Screens below use sample data. Your own list fills in once your Zoom plan includes this feature.
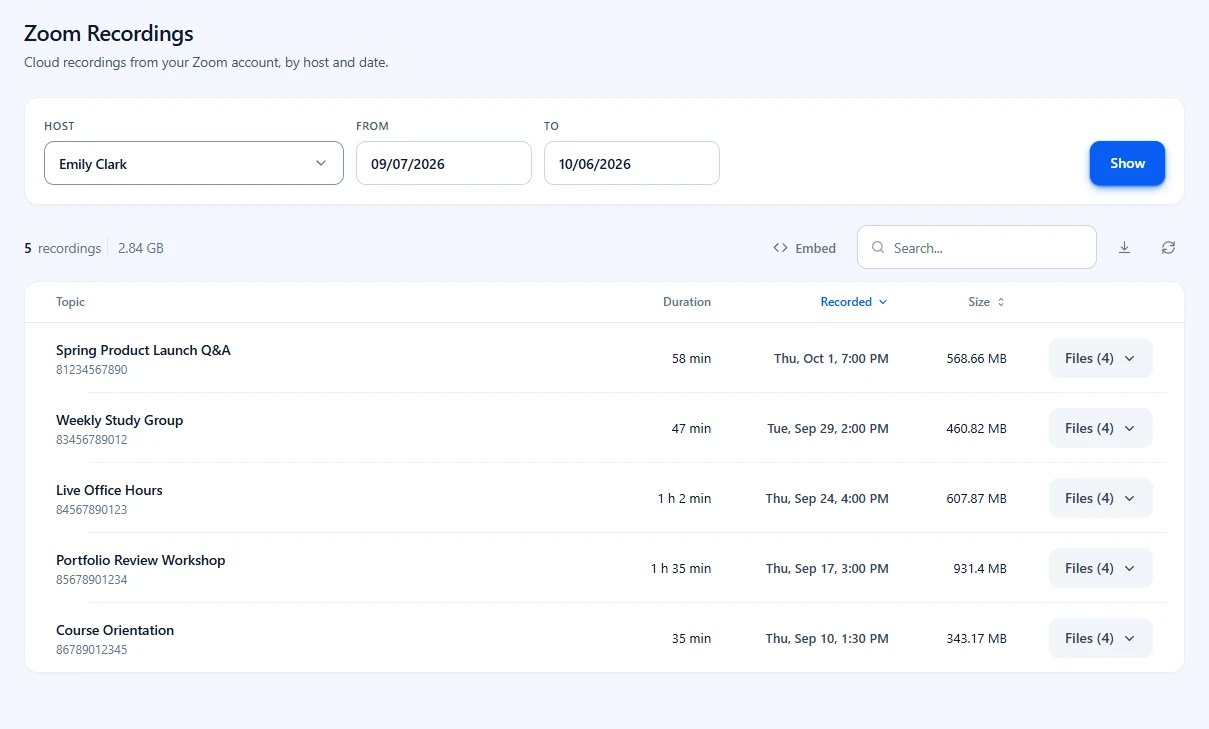
Each row shows the Topic, Duration, Recorded date and Size. When the recording belongs to a meeting on your site, the topic links to that meeting.
- Type in the Search… field to find a recording by topic.
- Click the Recorded or Size column heading to sort by it.
- Click the export icon to download the list as a CSV file.
- Click the refresh icon to fetch the list from Zoom again.
- Use Previous and Next at the bottom when the list has more than one page.
If you change the host or a date without clicking Show, the table is marked Filters changed, so you always know the rows still answer the old question.
Step 5: Play, download or share a recording #
A recording is made of several files, such as the video, the audio only file and the chat.
- In the recording’s row, click Files (the number in brackets is the file count).
- Under Recording files, click Play to watch a file, or the download icon to save it. Files that cannot play in place have Open instead.
- Click the copy icon next to Passcode to copy the recording passcode. People who open the link need it.
Note: Screens below use sample data. Your own list fills in once your Zoom plan includes this feature.
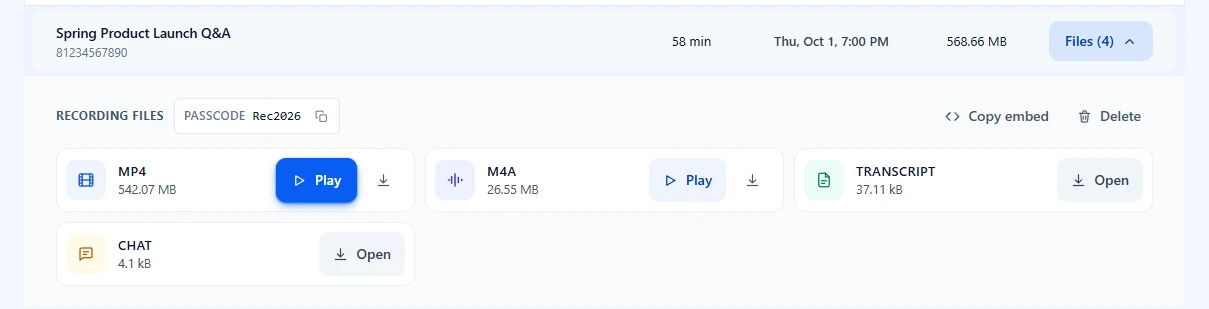
Note: Play, Download and Open lead to Zoom. Zoom may ask the viewer to sign in, depending on your Zoom recording settings.
Step 6: Show recordings on your site #
With ZooMeet Pro, you can place recordings on any page or post with a shortcode.
- Click Embed in the toolbar above the table.
- Click Copy next to the Recordings archive shortcode. It is filled in with the host and dates on screen.
- Paste it into a page or post.
Note: Screens below use sample data. Your own list fills in once your Zoom plan includes this feature.

[zmeet-zoom-recording-archive host_email="[email protected]" from_date="2026-09-07" to_date="2026-10-06" limit="10" show_upload="true" show_passcode="true"]
Your actual shortcode may look different. Always copy it from your own ZooMeet screen.
For one recording only, open its Files panel and click Copy embed. This button appears when the recording belongs to a meeting or webinar created on your site.
Note: Embed and Copy embed require ZooMeet Pro. Without Pro, Embed shows a Pro badge and opens the upgrade window. See How to use ZooMeet shortcodes and embeds.
Step 7: Delete a recording you no longer need #
Deleting moves the recording to the Zoom trash. Do this only when you are sure nobody needs the replay.
- Open the recording’s Files panel.
- Click Delete.
- Read Delete this recording? The recording stops playing anywhere it is embedded or shared.
- Click Delete recording to confirm, or Keep it to cancel.
Important: Zoom keeps a deleted recording in its trash for 30 days, where you can restore it from your Zoom account. After that it is gone for good.
Benefits of the Zoom Recordings screen #
- No Zoom sign-in: Find any cloud recording from WordPress.
- Ready to share: The passcode sits next to the play link, so you copy both at once.
- A list you can keep: Export the recordings to a CSV file for your records.
- Replays on your site: With ZooMeet Pro, students watch recordings on your pages.
Troubleshooting #
“Nothing in this range” #
Zoom returned no cloud recordings for that host and range.
Check that:
- The right host is picked. Recordings belong to the Zoom user who hosted the meeting.
- The range covers the day of the meeting. Click Show after changing a date.
- The meeting was recorded to the cloud, not on a computer.
- Your Zoom plan includes cloud recording. Free Zoom plans record locally only.
- Zoom has finished processing the recording. A long recording can take a while after the meeting ends.
A red message appears above the Host field #
Zoom refused the request, and the message is Zoom’s own. It often means the Zoom app is missing the recording scope, or the connection needs to be checked.
- Read the message, then click the cross to close it.
- Go to ZooMeet > Settings > Connect and check that Zoom is connected.
- In the Zoom App Marketplace, check that your Server-to-Server OAuth app has the recording scopes. See How to connect Zoom with ZooMeet using Server-to-Server OAuth.
“Select a Host to get recording data.” #
You clicked Show before picking a host. Pick one in Host, and the list loads.
“Zoom is not connected” #
The screen has no Zoom credentials to ask with. Click Connect Zoom and finish the connection.
The Host list is empty #
ZooMeet could not load the Zoom users. Open ZooMeet > Zoom Users once to check that your users load, then come back.
Frequently asked questions #
Do local recordings show up here? #
No. Local recordings are saved on the host’s computer, so Zoom does not have them. Only cloud recordings appear.
Does ZooMeet copy the video files to my site? #
No. The files stay in Zoom. ZooMeet shows links to them.
Can students see this screen? #
No. Only administrators can open Zoom Recordings. To share recordings with students, use the Pro shortcode on a page.
Is deleting a recording permanent? #
No, not at first. It goes to the Zoom trash for 30 days, and you can restore it from Zoom during that time.
Security best practices #
- Share recording links and passcodes only with the people who attended or paid.
- Put an embedded recordings archive on a page your students must log in to see, if the content is private.
- Remove recordings you no longer need, so old classes cannot be passed around.
You’re ready to share your Zoom recordings #
You can now find any cloud recording by host and date, play or download its files, and copy the passcode. With ZooMeet Pro, you can also show recordings on your site. Next, look at how your meetings were attended, or record your next meeting to the cloud.
- How to use Zoom Reports in ZooMeet
- How to create your first Zoom meeting with ZooMeet
- How to use ZooMeet shortcodes and embeds
Sources for the Zoom plan details in this guide: Zoom Support, Starting a cloud recording, Enabling cloud recording and Cloud recording storage capacity.


