- Before you begin
- Step 1: Open the MeetingHub dashboard
- Step 2: Read the stat cards
- Step 3: Change the date range
- Step 4: Follow your events over time
- Step 5: Join the next call from Up next
- Step 6: Clear your To do list
- Step 7: Share a booking page
- Step 8: See your top pages, busiest day and platforms
- Step 9: Export the figures (optional)
- Troubleshooting
- Frequently asked questions
- You're ready to run your day from the Dashboard
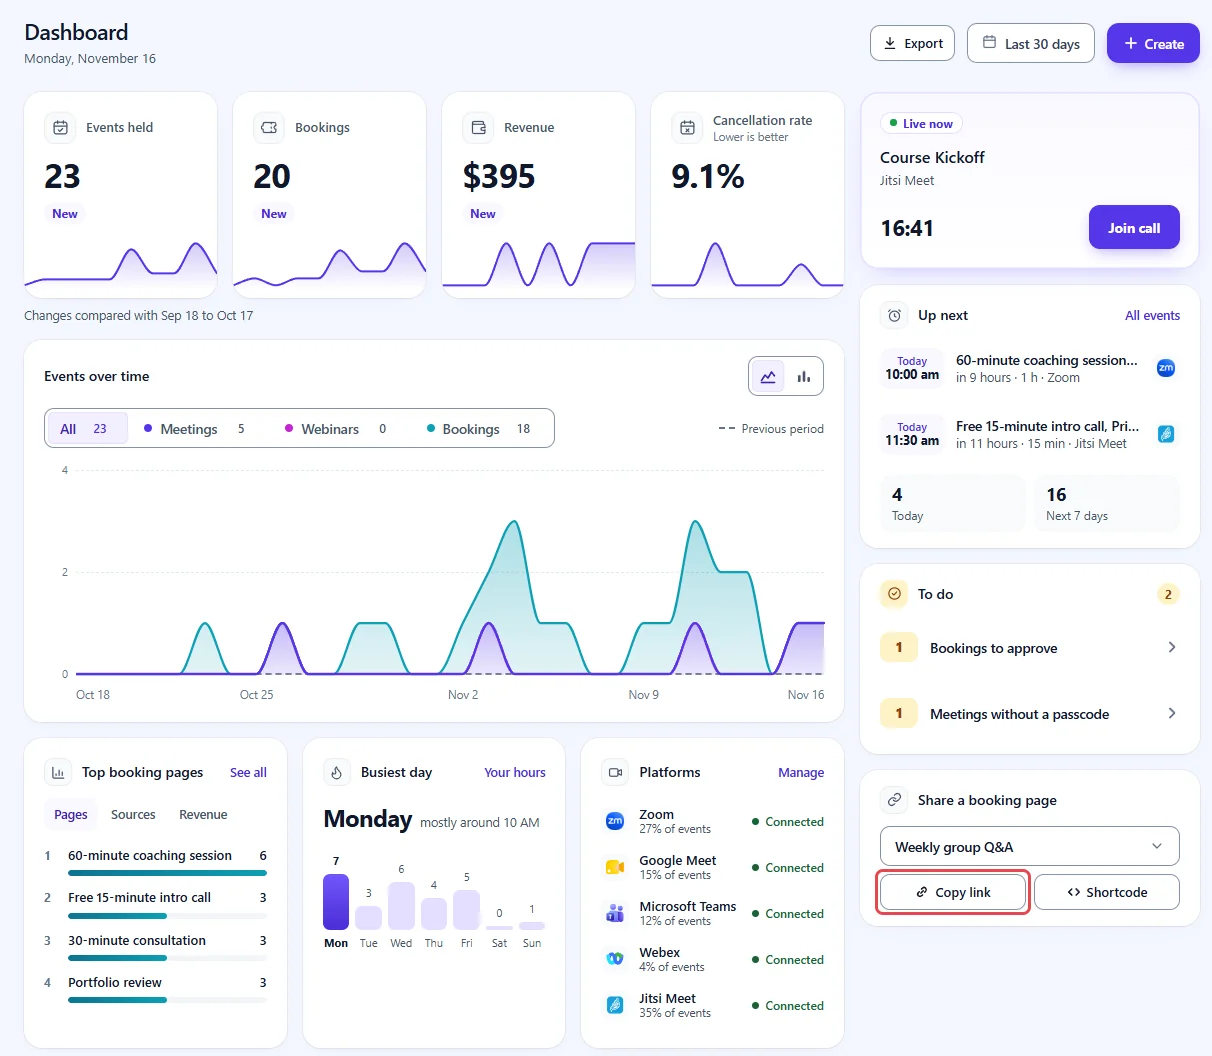
The MeetingHub dashboard is the first screen under MeetingHub > Dashboard in your WordPress admin. It shows how many meetings, webinars and bookings took place, how that compares with the period before, what is coming up next, and anything that needs you, all on one screen.
Use it as your morning check: join the next call, clear the to-do list, copy a booking link to share, and see which days and platforms keep you busy. It never repeats the event list; for every single event, open All Events.
By the end of this guide, you will have:
- A clear read of the stat cards and how they compare with the previous period
- The date range set to the period you want to see
- A one-click way to join a call that is about to start
- A To do list you know how to clear
- A booking page link or shortcode copied in two clicks
- A view of your busiest day, top booking pages and platform health
Estimated setup time: 5 minutes. Nothing on this screen changes your settings, so click around as much as you like.
Before you begin #
Make sure you have:
- MeetingHub installed and active. See How to install MeetingHub and finish the Get Started setup.
- An administrator account. Hosts who are not administrators do not see the Dashboard; MeetingHub opens on All Events for them.
- At least one meeting, webinar or booking. Until then, the Dashboard shows a short setup checklist instead of figures.
Step 1: Open the MeetingHub dashboard #
- In the WordPress admin menu, click MeetingHub. The Dashboard opens first.
- Check the date under the Dashboard title. It is today’s date in your site’s timezone.
The header holds three controls: Export, the date range (Last 30 days to start with), and Create, which opens the form for a new meeting.

Tip: On a brand-new site, the Dashboard shows Setup progress with four steps: Connect a video platform, Set your meeting defaults, Create your first meeting and Publish a booking page. The figures replace it as soon as you have a meeting or a booking.
Step 2: Read the stat cards #
The row of cards at the top sums up the period you picked. Each card has a small chart of the period, and a line under the row names the period they are compared with, for example Changes compared with Sep 18 to Oct 17.
- Events held: meetings, webinars and bookings that took place in this period. Cancelled ones and requests never approved are left out.
- Bookings: appointments clients booked for this period, cancelled ones left out.
- Revenue: payments received for bookings in this period, in your current currency.
- Cancellation rate: bookings cancelled, out of all bookings in this period. Lower is better.
A New tag means there was nothing to compare with in the previous period. Otherwise the card shows the change and whether it is better or worse than before. Hover over a card to read its definition.

Note: Revenue requires MeetingHub Pro. On a site that does not take bookings, an Hours on calls card shows the scheduled length of the events held instead.
Step 3: Change the date range #
Every figure on the screen follows the date range in the header.
- Click Last 30 days in the header.
- Pick a period under Period, or pick a start date and then an end date in the calendar.
- Click Apply if you picked dates by hand.

Note: The free plugin shows Last 30 days. Last 7 days, Last 90 days, Last 12 months, This month, Last month, This year and your own dates require MeetingHub Pro.
Step 4: Follow your events over time #
Events over time draws one line per type, so you can see whether booked calls or your own meetings drive the busy weeks.
- Click All, Meetings, Webinars or Bookings at the top of the chart to show one type. Each tab shows its total for the period.
- Compare with the dashed Previous period line.
- Use the two buttons at the top right to switch between a line chart and a bar chart.

Step 5: Join the next call from Up next #
Up next, at the top of the right column, lists the next events and how many you have Today and in the Next 7 days. Click either count to open those events in All Events.
From 15 minutes before an event starts, a card appears at the top of the right column that reads Starting soon, then Live now once it has begun.
- Click Join call on that card to open the meeting.
- To see every event instead, click All events.

Step 6: Clear your To do list #
To do collects the things that need a decision. Each row shows how many items it covers; click it to open them in All Events. Rows you might see:
- Reconnect followed by a platform name, when a platform that upcoming events use has stopped working
- Bookings without a meeting link
- Client emails that did not send, for the last 7 days
- Bookings to approve
- Booking pages with no free hours, for the next 14 days
- Clashes ahead, for the next 30 days
- Meetings without a date
- Meetings without a passcode
When nothing needs you, the card reads All clear. Nothing needs you.

Step 7: Share a booking page #
Share a booking page gives you a booking link without leaving the Dashboard.
- Pick the booking page in the Booking page list.
- Click Copy link to copy its address, or Shortcode to copy the shortcode for a page or post. The button reads Link copied or Shortcode copied for a moment.
Paste the link into an email, a social post or your email signature. For more ways to share, see How to share or embed your booking page anywhere.
Step 8: See your top pages, busiest day and platforms #
The cards under the chart answer three questions about the period.
- Top booking pages ranks the pages that brought the most bookings. Switch between Pages and Sources (where clients came from, such as an ad or a newsletter), plus Revenue once paid bookings come in. Click See all to open your booking pages. Requires MeetingHub Pro.
- Busiest day names the weekday with the most events and the hour it usually peaks, with a bar for each day. Click Your hours to open your availability and make sure you are free when clients want you.
- Platforms lists each video platform with its status and its share of your events. A platform reads Connected, Reconnect, Finish setup or Set up. Click Manage to open Integrations.

Two more cards complete the picture:
- Peak hours shows which hour of which day is busiest, as a grid.
- Attendance shows who came and who did not show, once appointments in the period have finished.
Note: Top booking pages, Peak hours and Attendance require MeetingHub Pro.
Step 9: Export the figures (optional) #
Need the numbers in a spreadsheet or a report?
- Click Export in the header.
- Open the CSV file your browser downloads. It holds the figures for the period on screen.
Note: Requires MeetingHub Pro.
Troubleshooting #
“These figures did not load” #
The site did not answer in time, often on a busy or slow host. Your data is safe. Click Try again. If it keeps happening, pick a shorter date range.
A platform shows Reconnect #
The platform is connected in name, but MeetingHub can no longer use it, for example after a password change or a revoked app. Click the row in To do or Manage on Platforms, then connect the platform again. The platform guides cover every step.
The Dashboard only shows a setup checklist #
You have no meetings, webinars or bookings yet. Create one, and the figures appear.
Frequently asked questions #
Does the Dashboard update on its own? #
Yes. Up next and the live card refresh every minute while the tab is open. The figures update when you change the date range or reload the page.
Why does Events held not match the number in All Events? #
Events held counts only events that took place in the chosen period, and leaves out cancelled bookings and requests never approved. All Events lists everything, including future and cancelled events.
Can hosts who are not administrators see the Dashboard? #
No. The Dashboard is for administrators. Other hosts open MeetingHub on All Events.
Which timezone does the Dashboard use? #
Your WordPress site timezone, set in Settings > General.
You’re ready to run your day from the Dashboard #
You can now read the period at a glance, join the next call, clear what needs you and share a booking page in seconds. Next, create more events or tune how they run.
- What is MeetingHub? A WordPress meeting and booking plugin
- How to create your first online meeting in WordPress with MeetingHub
- How to create a booking page in WordPress with MeetingHub
- How to manage booked appointments: approve, reschedule or cancel
- How to set your booking availability and hours with MeetingHub


