- Before you begin
- Step 1: Open the Instructors screen
- Step 2: Turn on applications to teach
- Step 3: Choose the roles that count as instructors
- Step 4: See how a new visitor applies
- Step 5: See how an existing student applies
- Step 6: Approve an application
- Step 7: Decline an application
- Step 8: Remove an instructor
- What an approved instructor gets
- Benefits of managing instructors with GoodMeet
- Troubleshooting
- Frequently asked questions
- Security best practices
- You're ready to manage instructors
When more people want to teach live classes on your site, you need a way to let them in without handing out wp-admin access. GoodMeet gives each instructor a teaching dashboard on the front end. There they schedule meetings, see their students and track attendance.
You will choose which roles count as instructors and let people apply to teach. Then you approve, decline or remove each person on the Instructors screen. This guide is for site administrators.
By the end of this guide, you will have:
- Applications to teach turned on, with you reviewing each one
- The roles that count as instructors chosen
- A clear picture of how visitors and students apply
- An application approved, and a new instructor on their dashboard
- A way to decline an application or remove an instructor later
Estimated setup time: 5 minutes. You can change every setting later, and removing an instructor never deletes their account.
Note: Requires GoodMeet Pro. Instructors, sign-up and the teaching dashboard are part of GoodMeet Pro.
Before you begin #
Make sure you have:
- GoodMeet and GoodMeet Pro installed and activated
- An administrator account
- An instructor dashboard page picked under GoodMeet > Settings > Page setup. See How to let instructors create meetings from the front end with GoodMeet.
- A student dashboard page, if you want students to apply from their account
Step 1: Open the Instructors screen #
The Instructors screen is where every application lands, so it is worth knowing your way around it first.
- In the WordPress admin menu, go to GoodMeet > Instructors. A number next to Instructors in the menu shows how many applications are waiting.
- Use the views All, Pending, Approved and Declined to filter the list. A Removed view also appears once you have removed someone.
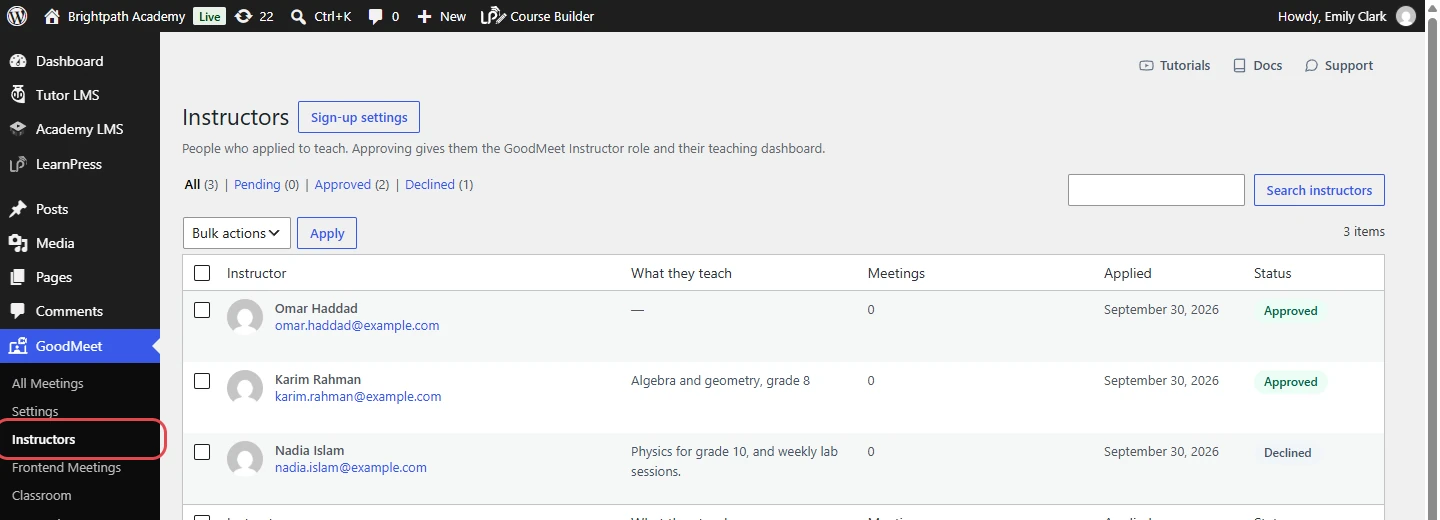
Tip: The line under the title tells you how sign-up works right now. Applying to teach is off, you review each application, or instructors are approved automatically.
Step 2: Turn on applications to teach #
People can only apply while Let people apply to teach is on. It works with or without public sign-up: existing students always apply from their dashboard, and sign-up adds a second place to apply.
- Click Sign-up settings at the top of the Instructors screen. It opens Settings > Page setup.
- In Sign-up, turn on Allow sign-up if visitors may create an account. This adds a Create account tab to the login box. New accounts are students.
- Turn on Let people apply to teach. Its hint changes with sign-up. With Allow sign-up on, it says that sign-up and the student dashboard offer “Teach”. With it off, only the student dashboard offers “Teach” to people with an account.
- Leave Approve instructors automatically off to review each application yourself.
- Click Save changes in the bar that appears at the bottom.
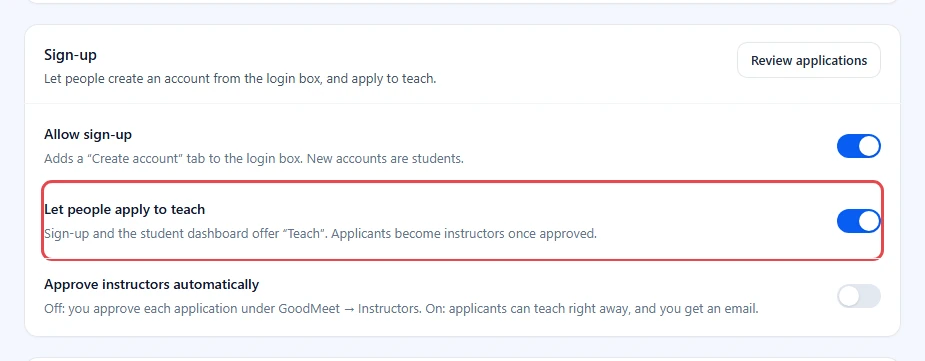
Important: With Approve instructors automatically on, anyone who applies can teach at once. You still get an email for each new instructor.
Step 3: Choose the roles that count as instructors #
GoodMeet shows the teaching dashboard only to roles you tick here, so this decides who teaches.
- Scroll down to Instructors on the same page.
- Under Roles that count as instructors, tick every role that should get the instructor dashboard.
- Keep GoodMeet Instructor ticked. Approved applicants get this role.
- Tick roles from your other plugins too, such as Tutor Instructor or Vendor, if those people should teach live classes.
- Click Save changes.
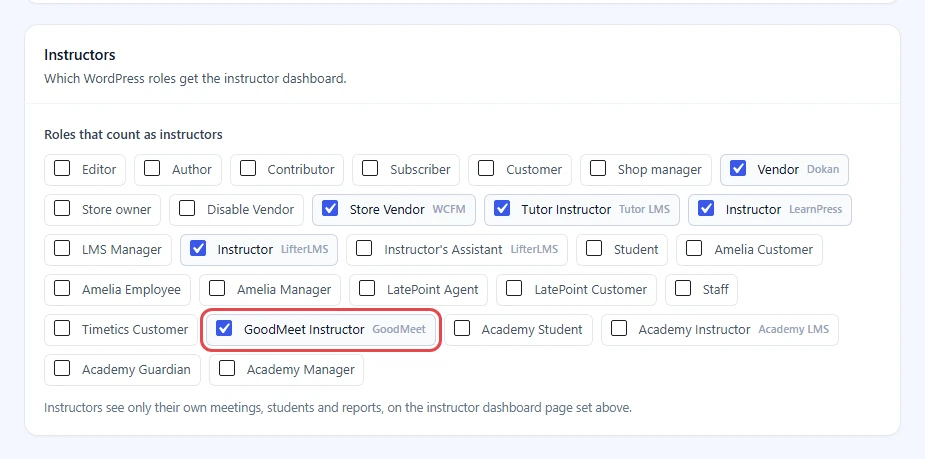
Note: Instructors see only their own meetings, students and reports. Users with a ticked role can create meetings even if their role cannot write posts.
Step 4: See how a new visitor applies #
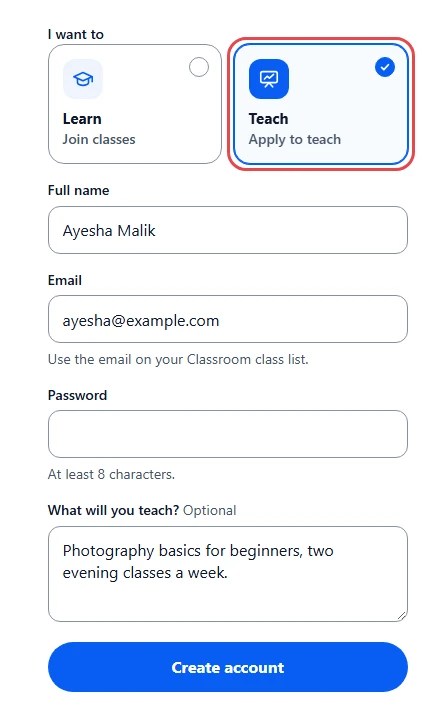
Turn on both Allow sign-up and Let people apply to teach. The login box on your dashboard pages then has a Create account tab with a Teach option. Here is what a visitor does.
- Under I want to, the visitor picks Teach. The hint reads Apply to teach.
- They fill in Full name, Email and Password.
- They add What will you teach? if they like. It is optional, and the text shows on your Instructors screen.
- They click Create account.
Step 5: See how an existing student applies #
Students who already have an account apply from the site, even when sign-up is off.
- On the student dashboard, the student opens the Account section and finds the Want to teach? card. On the instructor dashboard page, a student sees Teach on this site instead of the dashboard.
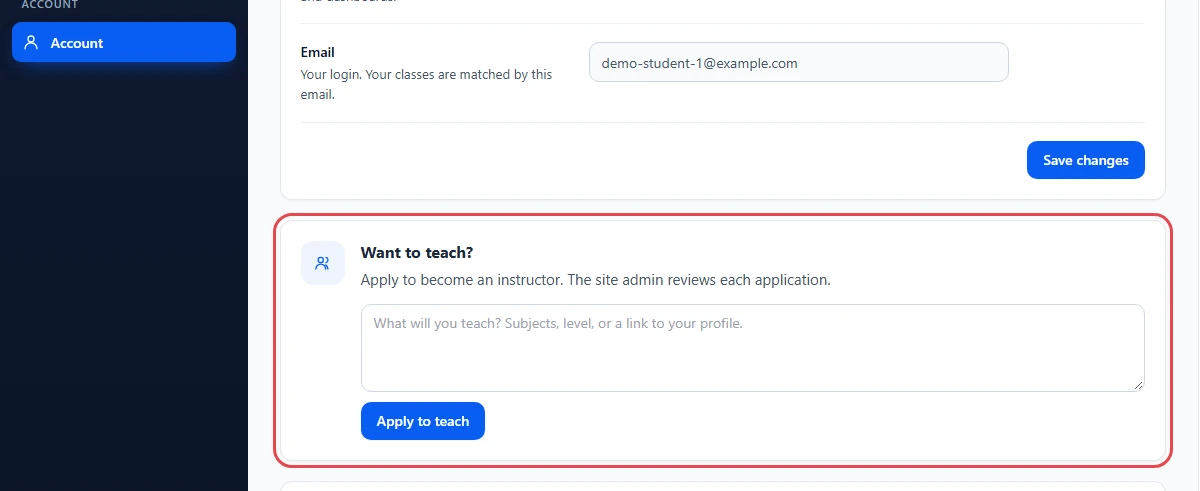
- The student types what they will teach, then clicks Apply to teach.
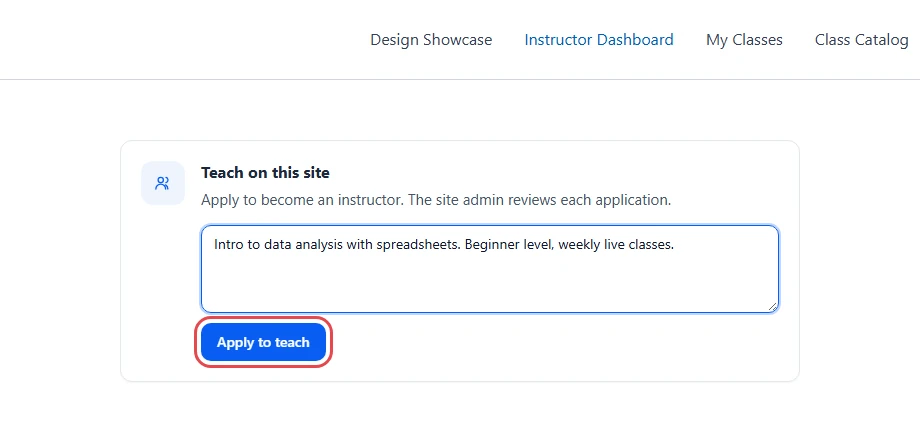
A confirmation appears: Thanks! Your instructor application was sent. You will get an email once it is reviewed. Until you decide, the card reads Your instructor application is being reviewed.

Step 6: Approve an application #
Approving gives the person the GoodMeet Instructor role and their teaching dashboard straight away.
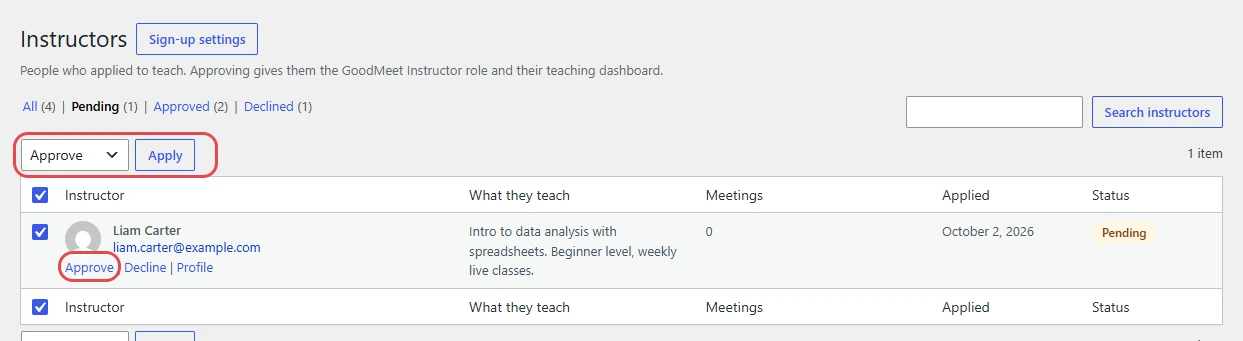
- On GoodMeet > Instructors, click Pending.
- Read the What they teach column.
- Hover over the person’s row and click Approve.
To approve several people at once, tick their rows, choose Approve in Bulk actions, and click Apply.
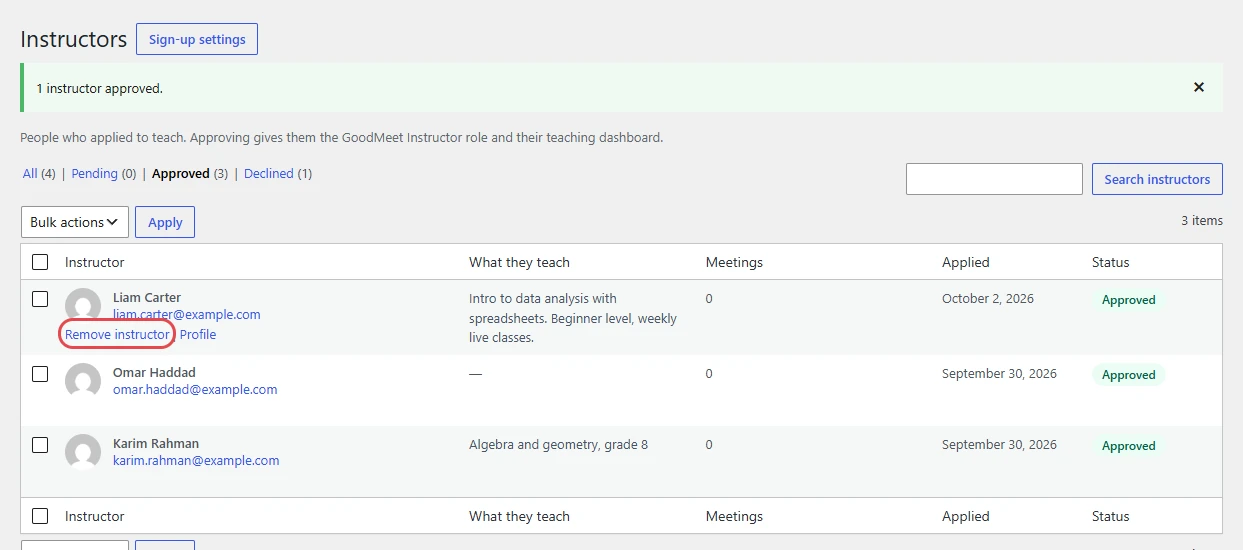
A message confirms 1 instructor approved. The person moves to Approved.
Note: If GoodMeet Instructor was not ticked in Roles that count as instructors, approving ticks it for you.
Step 7: Decline an application #
Declining keeps the person’s student account and lets them apply again later.
- In the Pending view, hover over the row and click Decline. Or tick the rows and choose Decline in Bulk actions.
- Check the message, for example 1 application declined. The person moves to Declined.
The person gets an email titled About your instructor application, saying it was not approved this time. Their card then reads Your last application was not approved. You can apply again.
Tip: Changed your mind? Hover over a declined row and click Approve. Approve shows on every row that is not approved yet.
Step 8: Remove an instructor #
Removing takes teaching rights away from an approved instructor. It is not the same as declining, so it gets its own status and its own email.
- In the Approved view, hover over the row and click Remove instructor.
- Check the message, for example 1 instructor removed. The person moves to the Removed view.
The person gets an email titled You are no longer an instructor on Brightpath Academy. It tells them their account stays and they can still join classes as a student. If applications are on, they can apply again from their dashboard.
Important: Remove instructor removes only the GoodMeet Instructor role. If the person also has another ticked role, such as Tutor Instructor, they can still teach. Change that role in Users as well.
Profile on any row opens the person’s WordPress user profile.
What an approved instructor gets #
The next time the person opens the instructor dashboard page, they see their own teaching space.
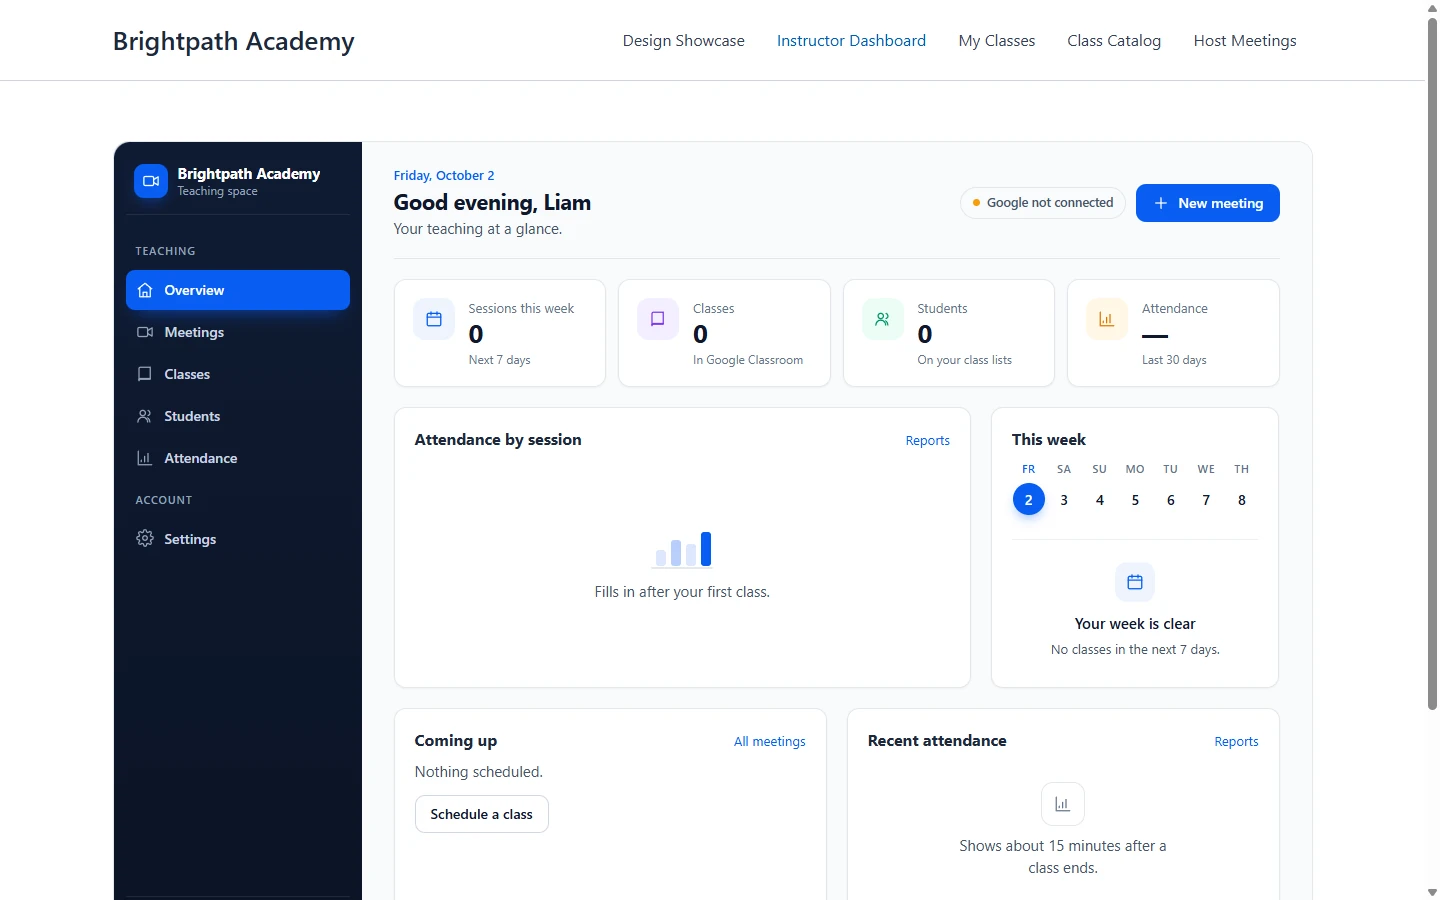
- Meetings: create, edit and start their own Google Meet meetings.
- Classes, Students and Attendance: show when Google Classroom is turned on.
- Settings: their photo, bio and default values for new meetings.
- An email titled You can now teach live classes, with a link to the dashboard.
Benefits of managing instructors with GoodMeet #
- Applications in one queue: people apply from your site, and the menu count shows how many are waiting. No request gets lost in your inbox.
- Nobody teaches by accident: new accounts start as students, and teaching rights come only from your approval.
- Applicants hear back: GoodMeet emails each person when you approve, decline or remove them.
- wp-admin stays closed: instructors work from the front-end dashboard.
Troubleshooting #
Students do not see “Want to teach?” or the Teach option #
The Want to teach? card needs Let people apply to teach. The Teach option on Create account also needs Allow sign-up.
- Go to Settings > Page setup > Sign-up.
- Turn on Let people apply to teach, and Allow sign-up if visitors should apply while creating an account.
- Click Save changes.
The Instructors screen says “Applying to teach is off” #
Let people apply to teach is off, so no new applications arrive. Click Sign-up settings and turn it on.
An approved instructor still sees “This page is for instructors” #
GoodMeet does not treat the person as an instructor yet.
Check that:
- GoodMeet Instructor is ticked under Page setup > Instructors, and you clicked Save changes.
- The person’s status on the Instructors screen is Approved, not Removed.
The student sees “You cannot change that.” #
The person already applied and is waiting, already teaches, or applications are off. Check their row under Pending or Approved, and turn on Let people apply to teach if needed.
Frequently asked questions #
Does the Instructors screen list everyone who teaches? #
No. It lists people who applied to teach. Users you gave an instructor role by hand, in Users, do not appear here but still get the dashboard.
Can I approve instructors automatically? #
Yes. Turn on Approve instructors automatically under Sign-up. Applicants can teach right away and you get an email for each one.
Can a declined or removed person apply again? #
Yes. While Let people apply to teach is on, their dashboard offers the application card again.
Does removing an instructor delete their meetings? #
No. Their account and meetings stay. They lose access to the instructor dashboard.
Do instructors need wp-admin access? #
No. Everything happens on the instructor dashboard page on your site.
Security best practices #
- Review before you approve. Keep Approve instructors automatically off unless you trust everyone who can create an account.
- Tick only the roles that should teach. Every ticked role can create Google Meet meetings on your account.
- Remove access promptly. When someone stops teaching, click Remove instructor and check their other roles in Users.
- Turn off applications you do not need. If you add instructors by hand, switch off Let people apply to teach.
- Check the Instructors screen often. The menu count shows waiting applications, so nothing sits unreviewed.
You’re ready to manage instructors #
Applications to teach now land on the Instructors screen for you to review. Each approved instructor sees only their own meetings and students. Next, set up the dashboards and connect your course plugin.


