- Before you begin
- Step 1: Open the Webex setup in MeetingHub
- Step 2: Copy the redirect URL from MeetingHub
- Step 3: Create an integration on the Webex developer portal
- Step 4: Give the integration the meeting scopes
- Step 5: Copy the Client ID and Client Secret
- Step 6: Paste the keys into MeetingHub and save them
- Step 7: Authorise MeetingHub to connect Webex to WordPress
- Step 8: Confirm Webex is connected to WordPress
- What attendees see
- Troubleshooting
- Webex shows an error about the redirect URI
- "Sign-in did not finish. Check that the Client ID, Client Secret and Redirect URI in your app match the ones shown here, then try again."
- "Authorisation did not complete. Try again."
- "This sign-in link has expired. Please start the Webex connection again."
- "Sign-in needs https" or "Sign-in will fail with Plain permalinks"
- The sign-in still fails
- Frequently asked questions
- Security best practices
- You're ready to create Webex meetings
To connect Webex to WordPress, create an integration on the Webex developer portal with your MeetingHub redirect URL and the two meeting scopes, then paste its Client ID and Client secret into the Webex card in MeetingHub > Integrations > Video platforms and click Authorise with Webex. After you approve access once, MeetingHub schedules Webex meetings on your account for the events you create and for every booking made on a Webex booking page.
The integration lives in your own Webex account, and nobody else sits between your site and Webex. You can remove it at any time.
By the end of this guide, you will have:
- A Webex integration with your MeetingHub redirect URL
- The
meeting:schedules_readandmeeting:schedules_writescopes on it - Its Client ID and Client secret saved in MeetingHub
- Your Webex account authorised, with a green Connected badge in MeetingHub
- A clear picture of what attendees see on a Webex meeting page
Estimated setup time: about 4 minutes. Creating a Webex integration is free.
Before you begin #
Make sure you have:
- A Webex account that can schedule meetings. Meetings are created on this account.
- An administrator account on your WordPress site
- MeetingHub installed and active. See How to install MeetingHub and finish the Get Started setup.
- A site served over HTTPS, so the redirect URL starts with
https://. - Pretty permalinks (anything other than Plain in Settings > Permalinks). Webex sends you back to an address that needs them.
Let’s get started.
Step 1: Open the Webex setup in MeetingHub #
Everything MeetingHub needs from Webex goes into one panel. Keep it open in its own browser tab while you work on the Webex developer portal.
- In the WordPress admin menu, go to MeetingHub > Integrations.
- Click Video platforms in the category list on the left.
- On the Webex card, click Connect.

A panel titled Set up Webex opens on the right, with three steps at the top: App keys, Authorise and Ready.
- Under Which Webex integration?, click Where do I get these IDs? to open a five-step checklist of this guide, with your site’s redirect URL.

Tip: You can open the same panel from MeetingHub > Meeting setup > Platforms: click Webex, then Connect Webex. Once it is connected, the same button reads Connection settings.
Now comes the main part: creating the Webex integration.
Step 2: Copy the redirect URL from MeetingHub #
After you approve access, Webex sends you back to this address. Webex only accepts addresses you register on the integration, so it must match the one MeetingHub uses, character for character.
- In the checklist, under Add the redirect URL below to it, click Copy. The button reads Copied for a moment.

The URL looks like this:
https://brightpath.example.com/mhub-webex-oauth/
Your actual URL may look different. Always copy it from your own MeetingHub settings.
Step 3: Create an integration on the Webex developer portal #
Steps 3 to 5 happen on the Webex developer portal. Webex changes these screens from time to time, so if a label differs from what you see, look for the closest match.
- In the checklist, click Open next to Open the Webex developer portal, or go to
https://developer.webex.com/and sign in with the Webex account your meetings belong to. - Open the menu under your avatar and select My Webex Apps. You will see the apps you already have, if any.
- Select Create a New App. You will see a choice of app types.
- Select Create an Integration, not Create a Bot. The New Integration form opens.
- Under Will this integration use a mobile SDK?, select No. MeetingHub connects from your web server.
- In Integration name, type
MeetingHub. People see this name in Webex when they approve access. - Under Icon, add an icon. Webex asks for one on every integration.
- In App Hub Description, type a short description, such as
Schedules Webex meetings from our WordPress site. - In Redirect URI(s), paste the URL you copied in Step 2.
Important: Never type this URL by hand. Webex needs an exact match, including https, www and the trailing slash.
Step 4: Give the integration the meeting scopes #
Scopes are the permissions MeetingHub asks for. MeetingHub needs two: one to read your meeting schedules and one to create and change them.
- On the same form, scroll to Scopes.
- Tick
meeting:schedules_read. Webex describes it as “Retrieve your Webex meeting lists and details”. - Tick
meeting:schedules_write. Webex describes it as “Create, manage, or cancel your scheduled Webex meetings”. - Leave every other scope unticked.
- Select Add Integration at the bottom of the form.
Note: Webex adds spark:kms to every integration’s scopes by itself. That is normal; leave it.
Step 5: Copy the Client ID and Client Secret #
Webex shows both keys right after it creates the integration. You will see Congratulations! and “Your integration has been created”, followed by Client ID, Client Secret and OAuth Authorization URL.
- Copy the Client ID.
- Copy the Client Secret and keep it somewhere safe for the next step.
You do not need the OAuth Authorization URL. MeetingHub builds its own sign-in link.
Important: Copy the secret before you leave that page. Webex shows it only when the integration is created. If you lose it, select Regenerate the client secret on the integration’s page; this revokes the old secret, so paste the new one into MeetingHub.
Step 6: Paste the keys into MeetingHub and save them #
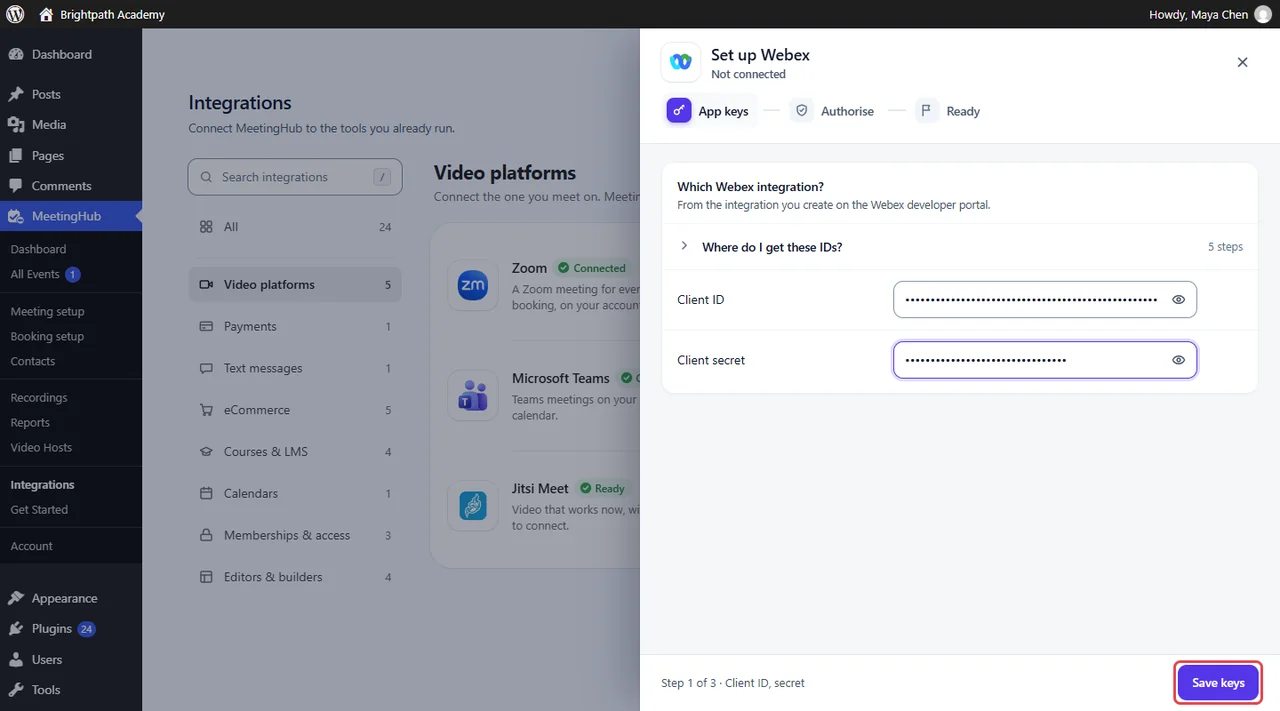
- In the MeetingHub tab, paste the Webex Client ID into Client ID.
- Paste the Client Secret into Client secret.
- Click Save keys at the bottom of the panel. MeetingHub shows Keys saved. and moves to Authorise.
Step 7: Authorise MeetingHub to connect Webex to WordPress #
The keys tell MeetingHub which integration to use. Now your Webex account has to say yes, once, so MeetingHub can schedule meetings on it.
- On Authorise (Allow MeetingHub on your account), click Authorise with Webex.

- Sign in to Webex with the account your meetings belong to.
- Read the permission screen. You will see the integration name from Step 3 and the access it asks for: reading your meeting lists, and creating and changing your meetings.
- Approve the request.
Webex sends you back to MeetingHub > Integrations, and the panel opens again on Ready.
Important: Only accept when the integration name and account are the ones you set up.
Step 8: Confirm Webex is connected to WordPress #
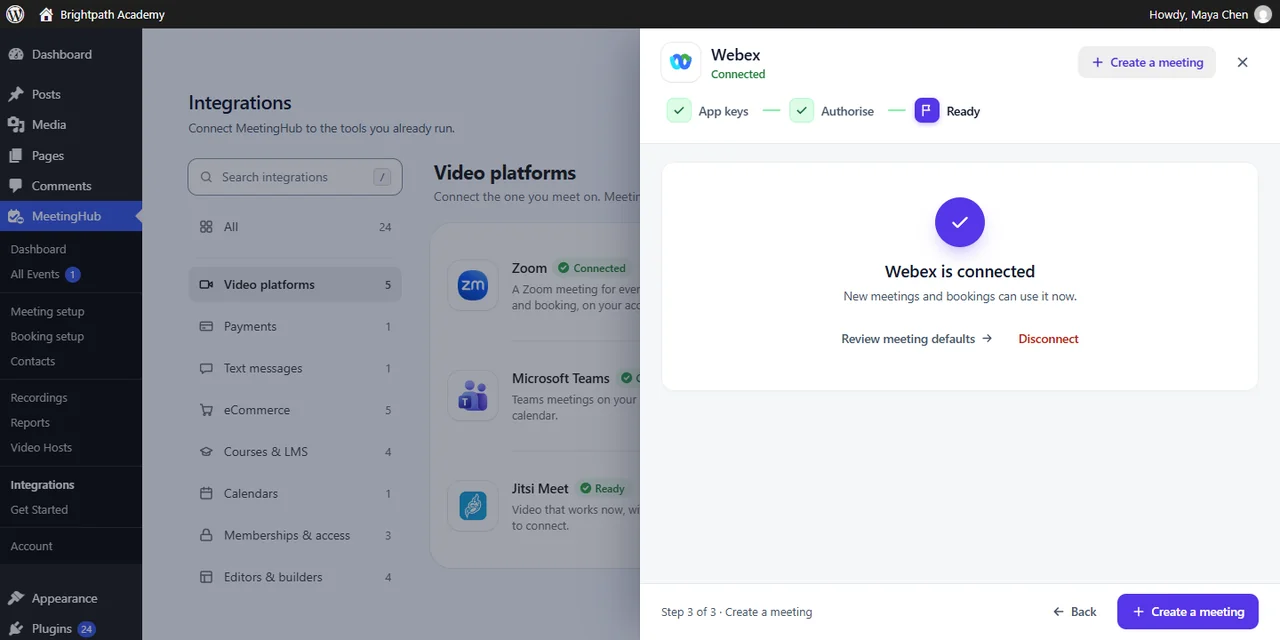
- If the panel is not on Ready already, click Ready at the top.
- Check that it reads Webex is connected and New meetings and bookings can use it now.
From here you can:
- Click Create a meeting to schedule your first Webex meeting or webinar.
- Click Review meeting defaults to set the timezone, Join before host, Record automatically, Breakout sessions and Lock automatically for every new Webex meeting.
- Click Disconnect to stop MeetingHub using your Webex account. MeetingHub shows Webex disconnected. and keeps your keys saved.
The Webex card in Integrations now shows Connected.
Note: The Require registration default requires MeetingHub Pro.
What attendees see #
On a Webex meeting page, attendees see the meeting details and Join now, which opens Webex. When a webinar needs registration, they see Register now first.
Troubleshooting #
Webex shows an error about the redirect URI #
The redirect URI on your integration does not exactly match the one MeetingHub sent.
Check that:
- You copied the URL with Copy in MeetingHub, not by hand.
- You pasted it into Redirect URI(s) on the same integration whose Client ID is in MeetingHub.
https,wwwand the trailing slash match your site address exactly.
Save the integration, then click Authorise with Webex again.
“Sign-in did not finish. Check that the Client ID, Client Secret and Redirect URI in your app match the ones shown here, then try again.” #
Webex accepted your sign-in, but your site could not swap it for a token. The usual cause is a wrong or regenerated Client secret.
Check that:
- Client ID and Client secret come from the same integration.
- The secret was not regenerated after you pasted it.
Paste the right values, click Save keys, then Authorise with Webex again. To send the details to support, click Copy details for support.
“Authorisation did not complete. Try again.” #
Webex returned an error, shown after The provider said:.
access_denied: someone declined access, or the account is not allowed to use integrations. Try again and accept.invalid_scope: the integration is missing a scope. Tickmeeting:schedules_readandmeeting:schedules_writeon the integration and save it.connection_failed: your site could not reach Webex. Try again in a minute; if it keeps happening, ask your host whether outgoing connections are blocked.authentication_failed: Webex refused the keys. Check the Client ID and Client secret.
“This sign-in link has expired. Please start the Webex connection again.” #
The sign-in took too long, or the page was opened from an old link. Go back to the Webex card in MeetingHub > Integrations and click Authorise with Webex again.
“Sign-in needs https” or “Sign-in will fail with Plain permalinks” #
MeetingHub shows these warnings before you authorise. The return address needs https and pretty permalinks. Turn on HTTPS, or click Open Permalinks and pick any option other than Plain, then connect again.
The sign-in still fails #
Open Tools > Site Health. MeetingHub checks your permalinks, https, server clock and whether your server can reach Webex, and Recent platform errors on the Info tab shows what Webex said. See How to check your MeetingHub setup with WordPress Site Health.
Frequently asked questions #
Do I need a paid Webex plan? #
No, not to connect. Some features have their own Webex requirements; webinars, for example, need a Webex Webinars licence.
Is a Webex integration the same as a bot? #
No. MeetingHub needs an Integration, which acts on behalf of the Webex user who authorises it. A bot cannot schedule meetings for you.
Which Webex account do meetings use? #
The account you authorise in Step 7. Meetings are scheduled on that account.
What happens to my meetings if I disconnect? #
They stay in Webex and their join links keep working. You cannot create or change Webex meetings from MeetingHub until you reconnect.
Can booking pages use Webex? #
Yes. Choose Webex on a booking page, and MeetingHub schedules a Webex meeting for every booking on your account.
Security best practices #
- Keep the Client secret private. Never share it in screenshots, support tickets, email or code repositories.
- Give WordPress administrator access only to people you trust. Only administrators can see and change these keys.
- Add only the two meeting scopes MeetingHub uses.
- If the secret leaks, select Regenerate the client secret on the integration’s page, paste the new secret into MeetingHub, click Save keys and authorise again.
- Delete the integration on the Webex developer portal if you stop using MeetingHub.
You’re ready to create Webex meetings #
Your site now talks to Webex through your own integration, and the keys and scopes stay in your own Webex account. Next, set your Webex defaults and create your first meeting or webinar.
- How to create your first online meeting in WordPress with MeetingHub
- How to run Zoom and Webex webinars from WordPress
- How to set default meeting settings for each platform
- How to create a booking page in WordPress with MeetingHub
- How to connect Microsoft Teams to WordPress with MeetingHub
- How to check your MeetingHub setup with WordPress Site Health


