- Step 1: Open the Performance Tab
- Step 2: Load Modules After the Page (optional)
- Step 3: Load Files in Batches
- Step 4: Choose the Loading Method
- Step 5: Set the Files per Load (optional)
- Step 6: Load Scripts on All Pages (only if needed)
- Step 7: Use Server Throttle on Budget Hosting (optional)
- Step 8: Save Your Changes
- Benefits of Tuning DriveHub's Performance
Do your Google Drive galleries take a while to appear, or do you have folders with hundreds of files? You can easily speed things up with DriveHub.
The Performance tab controls what loads and when, how many files load at once, and where DriveHub’s scripts are added. A few small changes here can make big folders feel quick.
Let’s get started!
Step 1: Open the Performance Tab #
- Go to DriveHub > Settings from your WP-Admin.
- Click on Performance in the settings menu.
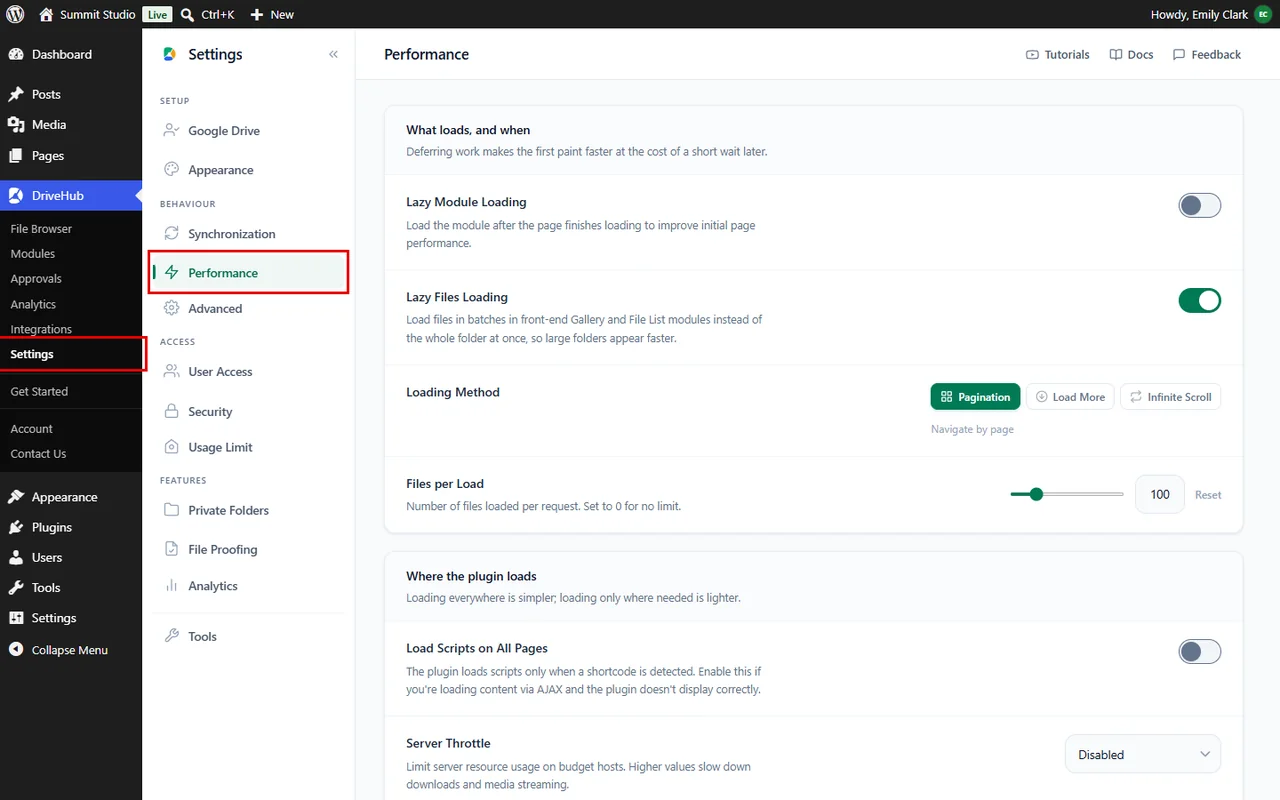
You will see two groups: What loads, and when and Where the plugin loads.
Step 2: Load Modules After the Page (optional) #
- Turn on Lazy Module Loading to let the rest of your page appear first. DriveHub then loads your galleries and file lists right after the page has finished loading.

This is handy on long pages where the DriveHub module sits further down.
Note: Lazy Module Loading needs DriveHub Pro.
Step 3: Load Files in Batches #
- Keep Lazy Files Loading switched on (it is on by default). DriveHub then loads a folder’s files a batch at a time instead of all at once, so even very large folders open quickly.

If you switch it off, every file in a folder loads in one go. That is fine for small folders, but slower for big ones.
Step 4: Choose the Loading Method #
When Lazy Files Loading is on, you can choose how the next batch of files appears:
- Pagination: people move between pages of files.
- Load More: a button at the bottom fetches the next batch.
- Infinite Scroll: more files load by themselves as people scroll down.

Pagination is great for document lists, while Infinite Scroll feels natural for photo galleries.
Step 5: Set the Files per Load (optional) #
- Use the slider or type a number in Files per Load to choose how many files load in each batch, from 0 to 500. Set it to 0 for no limit.
- Click Reset to go back to the default of 100.

A smaller number makes the first batch appear faster; a bigger number means fewer clicks or scrolls to reach the end of a folder.
Note: Files per Load needs DriveHub Pro.
Step 6: Load Scripts on All Pages (only if needed) #
DriveHub only adds its scripts to pages where it finds a DriveHub module, which keeps the rest of your site light:
- Leave Load Scripts on All Pages off in most cases.
- Turn it on if your theme or page builder loads content with AJAX (for example in popups, tabs or “load more posts” sections) and a DriveHub module shows up empty or unstyled there.

Step 7: Use Server Throttle on Budget Hosting (optional) #
- In Server Throttle, choose Low, Medium or High to limit how much server power DriveHub uses for downloads and media streaming. Keep it on Disabled if your hosting has no trouble.

Higher values protect a small hosting plan, but downloads and videos will be slower.
Note: Server Throttle needs DriveHub Pro.
Step 8: Save Your Changes #
- Click on Save changes in the bar at the bottom of the screen.

And that’s it! Open a page with a big Google Drive folder and you will see it load faster and more smoothly.
Benefits of Tuning DriveHub’s Performance #
- Faster pages: Your content appears first, and Google Drive files follow right after.
- Big folders made easy: Files load in batches instead of all at once.
- A browsing style that fits: Pages, a button, or endless scrolling.
- Lighter site: Scripts load only where they are needed.
With DriveHub, even large Google Drive libraries feel quick on your website.


