- Before you begin
- Step 1: Install and activate GoodMeet
- Step 2: Connect your Google account
- Step 3: Turn on Google Classroom
- Step 4: Allow Classroom access
- Step 5: Choose how students sign in (Classroom settings)
- Step 6: Choose what students see from Classroom
- Step 7: Set attendance rules and instructor accounts
- Step 8: Open the Classroom screen
- Step 9: Create a class
- Step 10: See who is in the class
- Step 11: Invite students
- Step 12: Link the class to a course (Courses and Sell seats)
- Step 13: Post a meeting to a class
- Step 14: Read attendance
- Step 15: Set up instructors
- What your students see
- Benefits of using GoodMeet with Google Classroom
- Troubleshooting
- "Needs one more permission" on Settings > Classroom
- "Allow Google Classroom access again: GoodMeet Pro needs a few more permissions."
- "Could not read your classes from Google Classroom"
- "No active classes yet"
- A class shows "Not accepted"
- "The class post did not go through"
- "Google Classroom access is not allowed yet" in the meeting form
- The Google Classroom card is missing from the meeting form
- "Only for students of this class"
- "There is no account for this Google address yet. Ask the school to add you."
- "This Google account is not in any class here yet."
- "Staff accounts cannot use Google sign-in."
- The "Sign in with Google" button does not appear
- Frequently asked questions
- Do I need GoodMeet Pro to use Google Classroom?
- Does turning Classroom off delete anything?
- Does GoodMeet change my connected Google account?
- What happens to the class post when I delete the meeting?
- Can one meeting go to several classes?
- Do students need a Google account to join?
- Which LMS plugins work with classes?
- Can students see grades?
- Will students ever see "Connect Google" messages?
- Security best practices
- You're ready to run live classes with Google Classroom
Many teachers keep their classes in Google Classroom and their schedule in WordPress. Connecting the two with GoodMeet lets you run both from one place.
You schedule a Google Meet class in WordPress, and GoodMeet posts it to the class stream with the time and join link. When you edit the meeting, the post updates. When you delete the meeting, the post goes away.
GoodMeet Pro adds more. You can create classes, invite students and link classes to Tutor LMS, LearnPress or Academy LMS courses. You can also sell seats with WooCommerce and read attendance from Google Meet. Students get a sign-in page and a “My classes” dashboard on your site.
By the end of this guide, you will have:
- Google Classroom turned on and allowed for your connected Google account
- Your classes listed in WordPress, with their students and invites
- A class linked to an LMS course, so enrolling sends the Classroom invite
- A meeting posted to a class stream with its join link
- Attendance read from Google Meet after each class
- Instructors and students using their own dashboards
Estimated setup time: 10 minutes. You turn Classroom on once; everything after that happens from the screens you already use.
Note: Posting meetings to a class stream is free. Creating classes, invites, course links, attendance, student sign-in and the dashboards require GoodMeet Pro. Each Pro step below says so.
Before you begin #
Make sure you have:
- An administrator account on your WordPress site
- A Google account that can teach in Google Classroom: a school Google Workspace account, or a personal account with Classroom
- A GoodMeet Pro license, for the Pro features in this guide
- Tutor LMS, LearnPress or Academy LMS active and switched on under GoodMeet > Integrations, if you want to link courses
- WooCommerce active, if you want to sell seats
Let’s get started.
Step 1: Install and activate GoodMeet #
GoodMeet creates the Google Meet links and talks to Google Classroom for you. Start with the free plugin from WordPress.org.
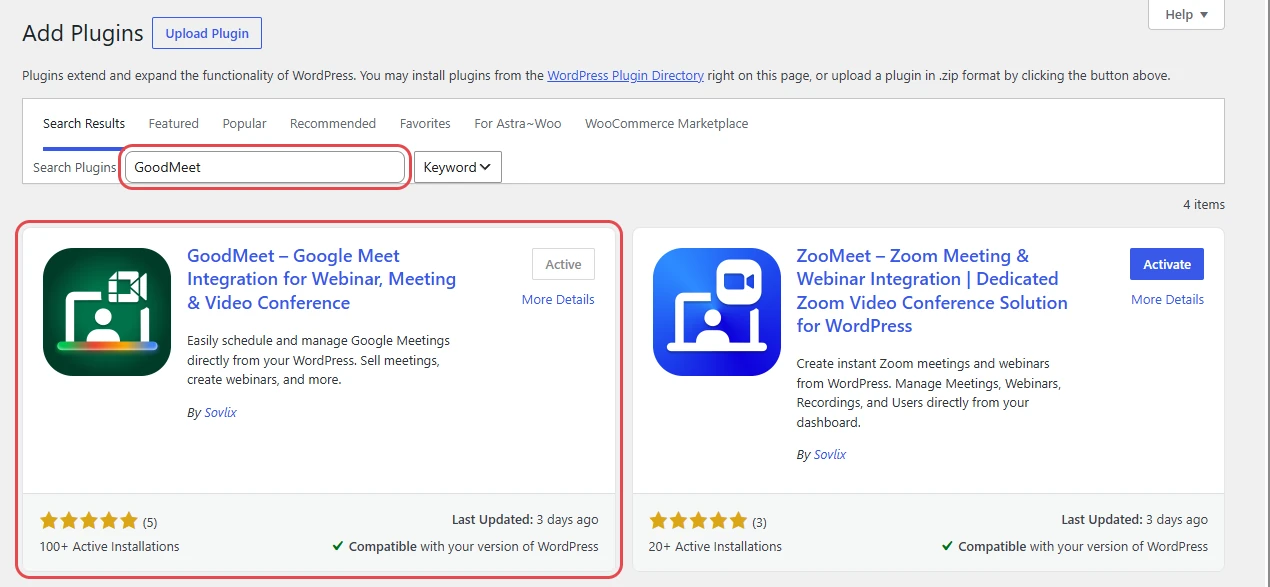
- In the WordPress admin menu, go to Plugins > Add New Plugin.
- Search for GoodMeet.
- Click Install Now, then Activate.
To use the Pro features in this guide, add GoodMeet Pro from inside GoodMeet. There is nothing to upload.
- In WordPress admin, open GoodMeet and click Upgrade, then complete the checkout.
- Go to GoodMeet > Account. Your license shows there, and GoodMeet offers to install GoodMeet Pro.
- Install GoodMeet Pro, then activate it. If GoodMeet shows Activate Pro, click it.
Note: If you already have a license, open GoodMeet > Account and install Pro from there. GoodMeet shows Download Pro when your license is active but Pro is not installed yet.
Step 2: Connect your Google account #
Classroom uses the same Google connection as Google Meet and Calendar, so connect your account first.
- Go to GoodMeet > Settings and click Connect.
- Upload the JSON file from your Google Cloud OAuth client on the Google Cloud Credentials card.
- Click Continue to Google.
- Sign in with the Google account you teach with, and approve access.
Read our step-by-step Google setup guide for the full walkthrough.
Classroom also needs its own API turned on in the same Google Cloud project.
- In Google Cloud, go to APIs & Services > Library.
- Search for Google Classroom API, open it and click Enable.
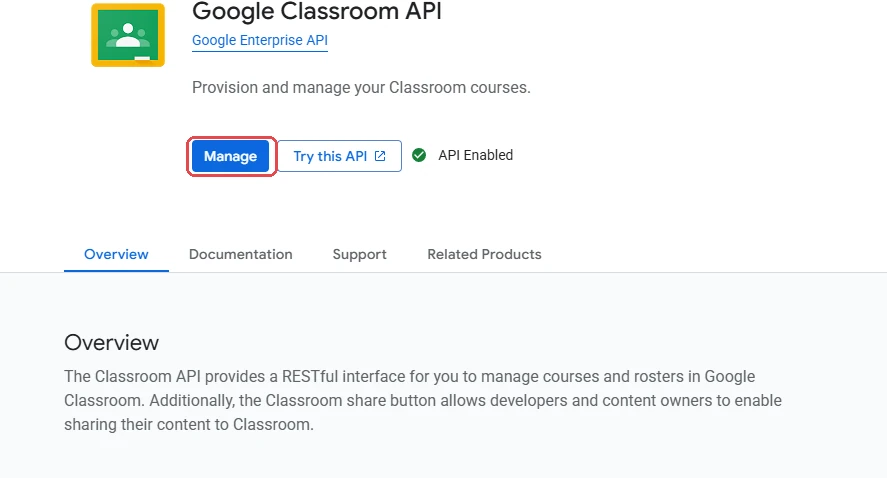
Important: Without the Google Classroom API, GoodMeet cannot create classes or invite students, even when your account is connected.
Step 3: Turn on Google Classroom #
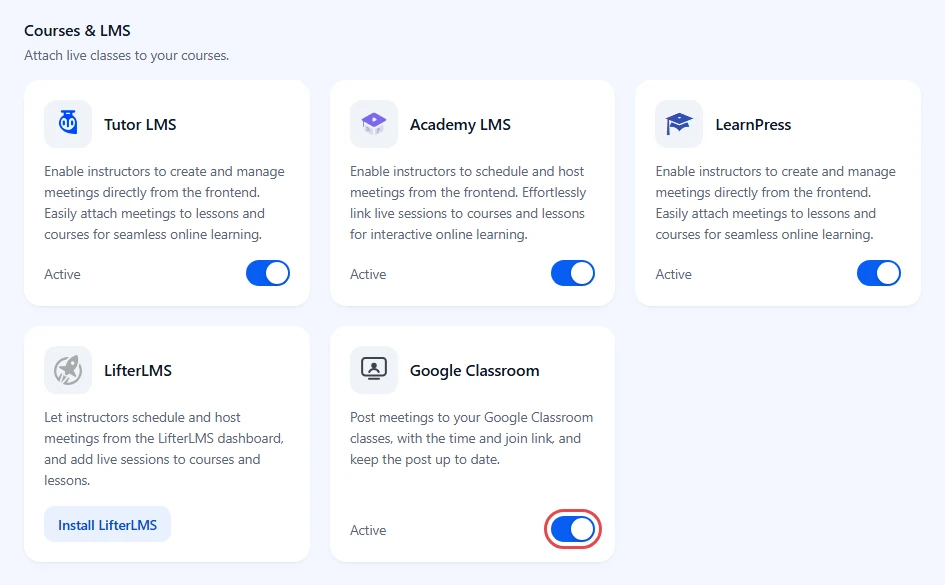
Classroom is off until you turn it on. Turning it on only adds Classroom to what GoodMeet asks Google for, so sites that leave it off never see the extra permission. You can switch it on from two places; both use the same switch.
- Go to GoodMeet > Integrations.
- Find the Google Classroom card under Courses & LMS.
- Turn the switch on. The card shows Active.
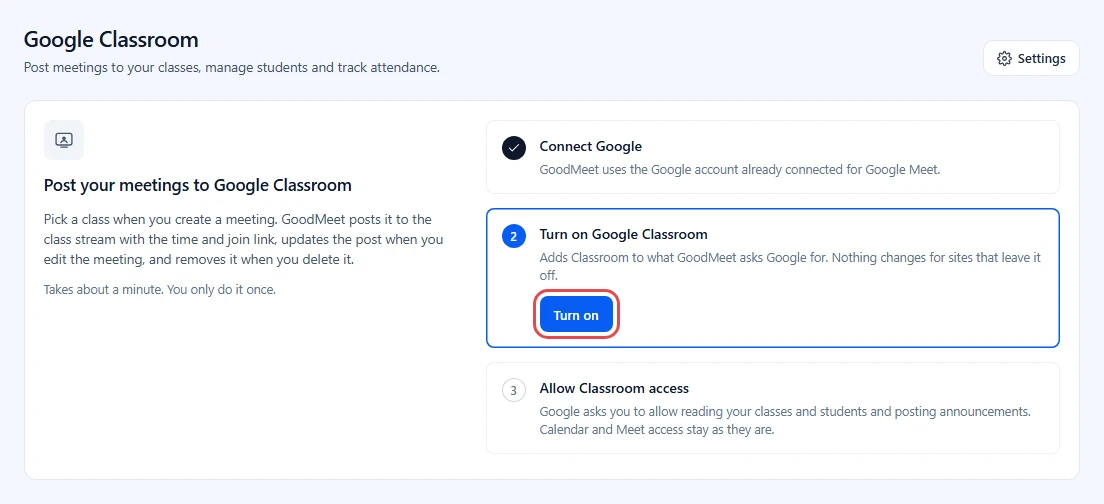
Or use the setup card on the Classroom screen:
- Go to GoodMeet > Classroom. Until Classroom is ready, the screen shows three steps. Connect Google is already ticked when Google Meet is connected.
- Under Turn on Google Classroom, click Turn on.
Step 4: Allow Classroom access #
Google has to allow Classroom access once, on top of your existing Meet and Calendar permission. Your connected account does not change.
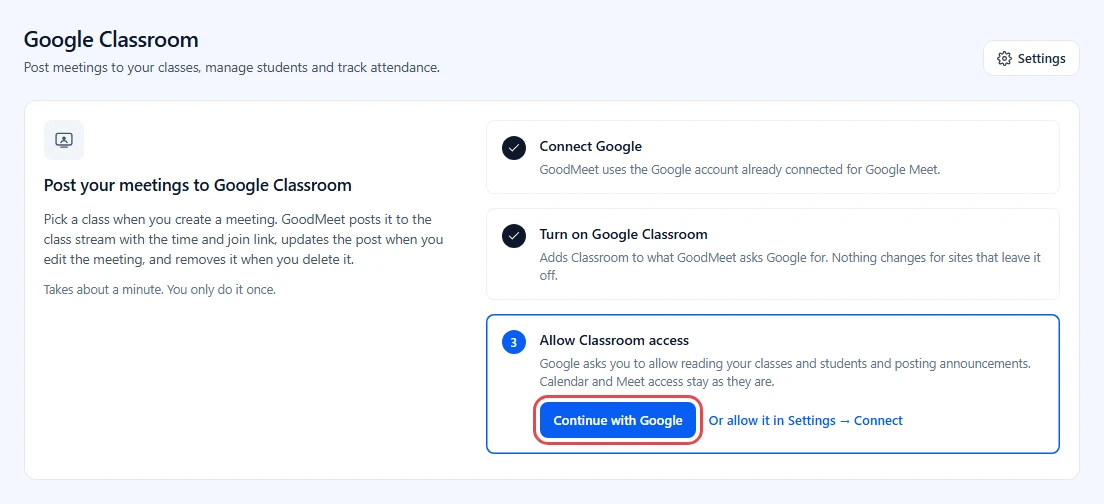
- On the setup card, click Continue with Google. You can also click Or allow it in Settings → Connect.
- On Google’s consent screen, sign in with the same account that is connected to GoodMeet.
- Allow reading your classes and students and posting announcements. Calendar and Meet access stay as they are.
To check the result:
- Go to GoodMeet > Settings > Connect.
- Under Google services, check that the Google Classroom row shows Allowed.
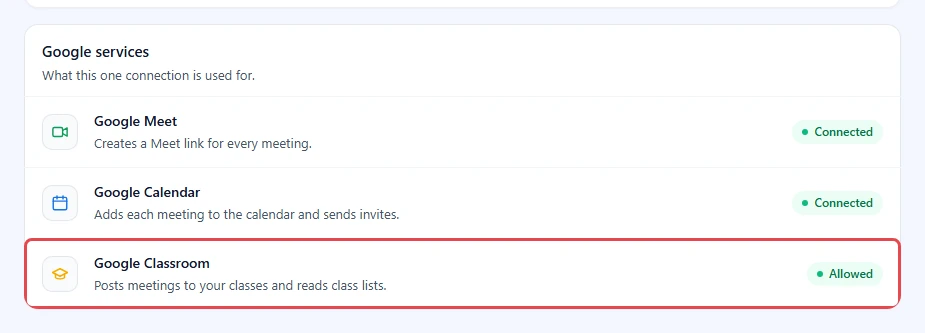
Important: If the row shows Needs permission, click Allow access in that row. GoodMeet Pro asks for a few more Classroom permissions than the free plugin, so this also appears once after you activate Pro.
Step 5: Choose how students sign in (Classroom settings) #
Once Classroom is on, Settings gets a Classroom tab under Google Classroom. The top card says Google Classroom is on with Access allowed, and holds Turn Classroom off.
- Go to GoodMeet > Settings and click Classroom.
- Under Students, choose whether to Show “Sign in with Google” and whether to Create WordPress accounts for Classroom students.
- Copy the [goodmeet_login] shortcode if you want a sign-in page.
- For the Google button, add the site address shown here under “Authorized JavaScript origins” of your OAuth client in Google Cloud.
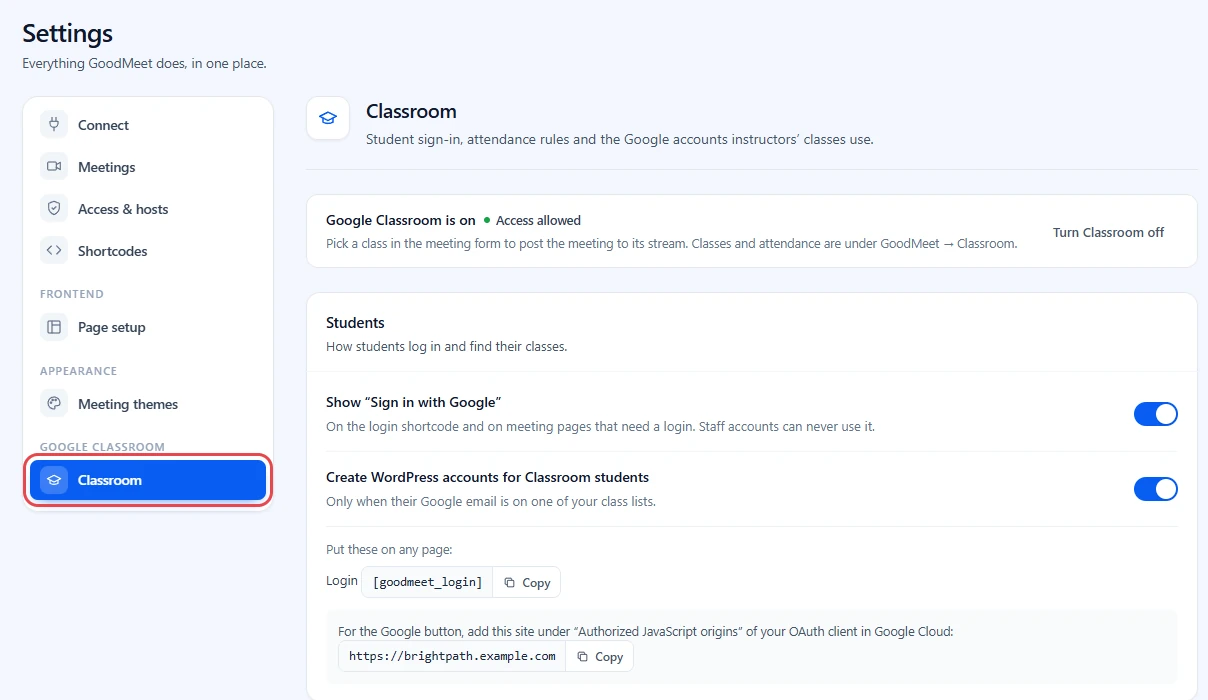
The address to add looks like this:
https://brightpath.example.com
Your actual URL may look different. Always copy it from your own GoodMeet settings.
Note: Everything under the top card requires GoodMeet Pro. Without Pro, the tab explains what Pro adds.
Step 6: Choose what students see from Classroom #
The next two groups decide how much of Google Classroom shows on your site.
- Under Class page, choose Show the class stream, Show files and links and Show assignments and grades.
- Under LMS course pages, choose from these options:
– Show live sessions on the course page
– Add a “Go to class” button
– Add a “Live class” tab
– Post Tutor LMS announcements to Classroom (Tutor LMS only)
– Remove students from the class when their enrollment ends
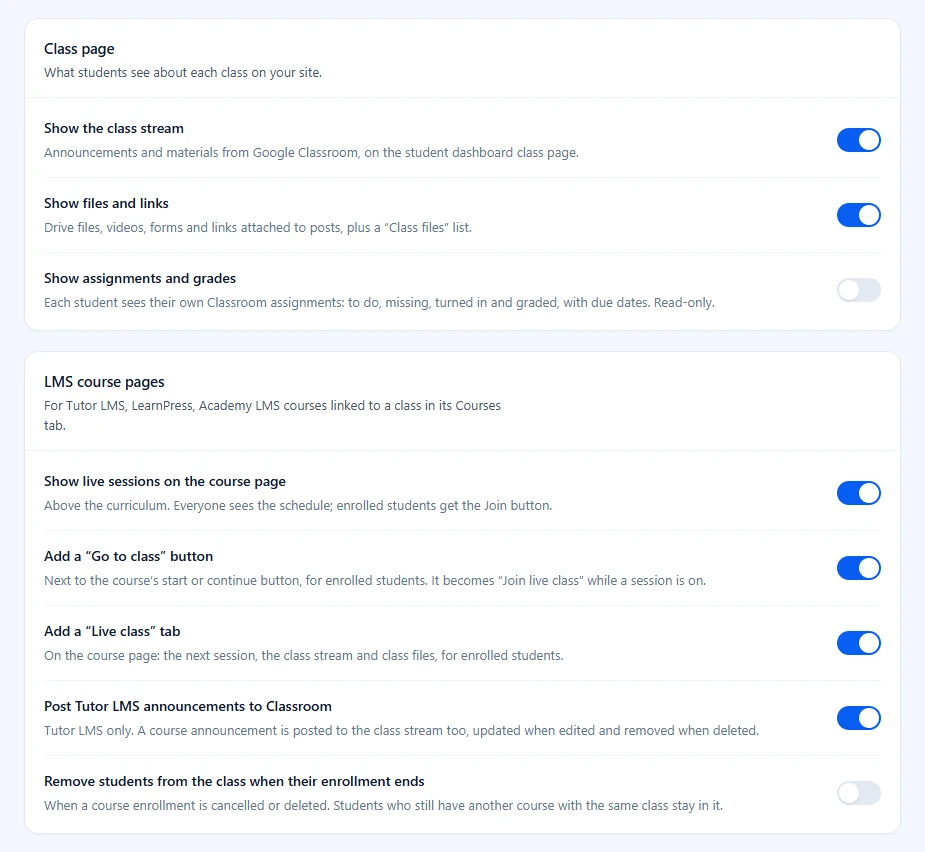
The LMS course pages settings apply to courses linked to a class in its Courses tab (Step 12).
Tip: When you turn on Show assignments and grades, save first. Google then asks for one more read-only permission; click Allow access in the yellow box.
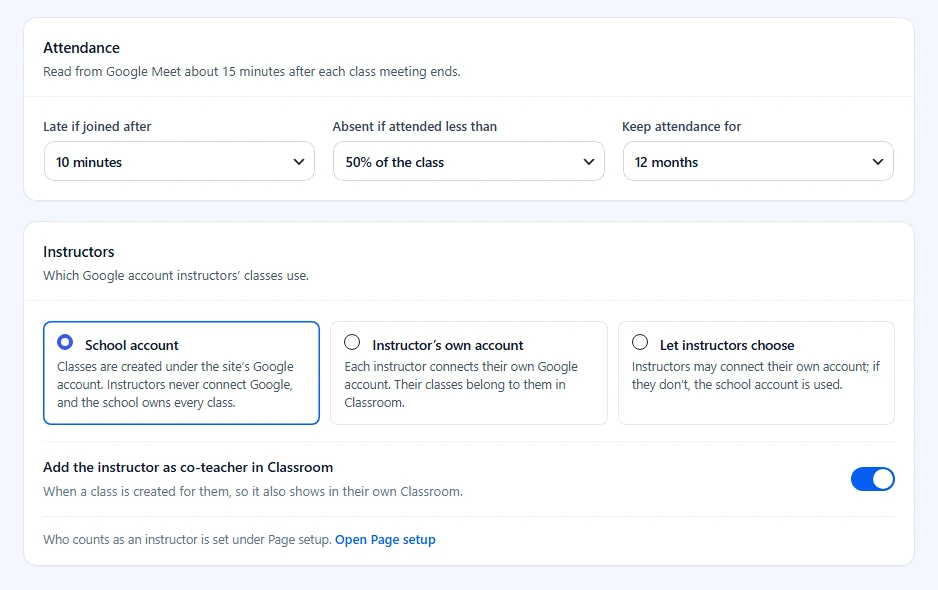
Step 7: Set attendance rules and instructor accounts #
Attendance rules decide when a student counts as late or absent. The instructor option decides whose Google account owns the classes instructors run.
- Under Attendance, set Late if joined after, Absent if attended less than and Keep attendance for.
- Under Instructors, pick School account, Instructor’s own account or Let instructors choose.
- Click Save changes in the bar that appears at the bottom.
Step 8: Open the Classroom screen #
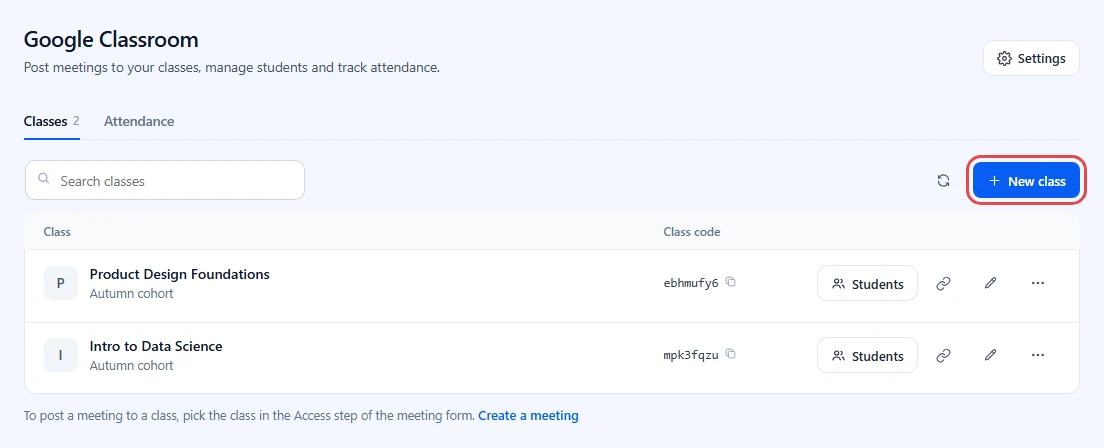
The Classroom screen is your home for classes, students and attendance.
- Go to GoodMeet > Classroom.
- On the Classes tab, find your active classes from Google Classroom, with the section and Class code.
From here you can:
- Click a class code to copy it, or the link icon to copy the class invite link.
- Use the search box to filter classes.
- Click the refresh icon to read the list from Google again.
Step 9: Create a class #
Note: Requires GoodMeet Pro. With the free plugin, create the class in Google Classroom and click refresh.
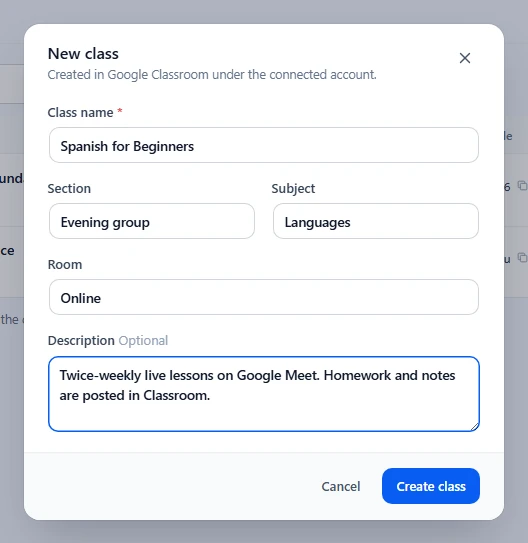
- Click New class.
- Enter a Class name, for example “Algebra Foundations”. Add a Section, Subject, Room and Description if you like.
- Click Create class. The class is created in Google Classroom under the connected account.
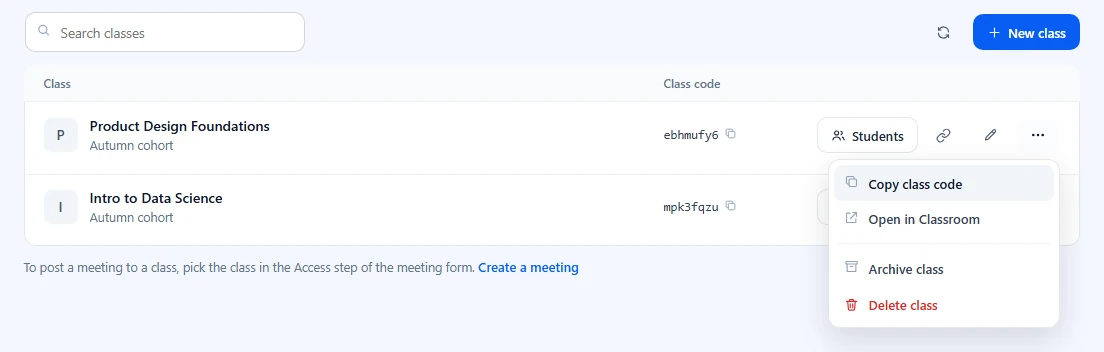
To change a class later, click the pencil icon. Changes save to Google Classroom. For everything else, open the ⋯ menu on the class row.
- Click ⋯ on the class.
- Pick Copy class code, Open in Classroom, Archive class or Delete class.
Note: A class created for another Google account may show Not accepted. The owner has to click Accept in Classroom before students can join.
Step 10: See who is in the class #
The side panel shows each student and where their invite came from, so you can spot who still needs to join.
- Click Students on a class row. A side panel opens on the Students tab.
- Check each student’s status: Joined, Invited or Invite gone.
- Click Resend to send an invite again.
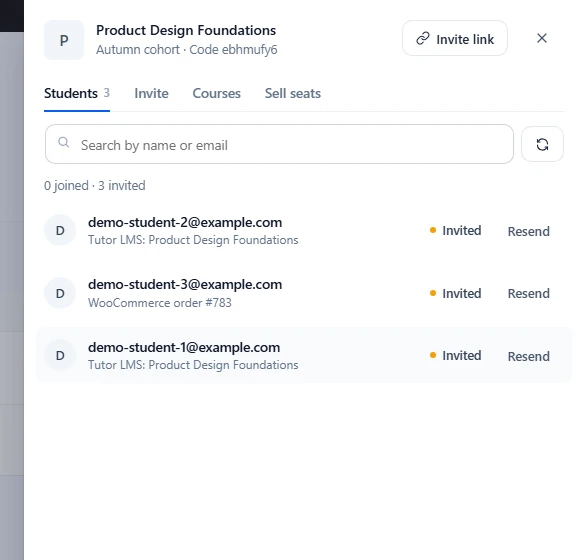
Note: Without Pro, this panel shows a read-only list of the students who joined. Status, sources and the other tabs require GoodMeet Pro.
Once students have joined, a Site accounts box appears under the list. Click Create site accounts to give joined students a WordPress login. You can email each new account a link to set a password, and enroll them in the linked LMS courses at the same time.
Step 11: Invite students #
Note: Requires GoodMeet Pro.
Google Classroom sends the invitation email, so students get the same invite they would get from Classroom itself.
- In the side panel, click Invite.
- Type the student emails under Student emails, one per line or comma separated.
- Click Send N invites, for example Send 2 invites.
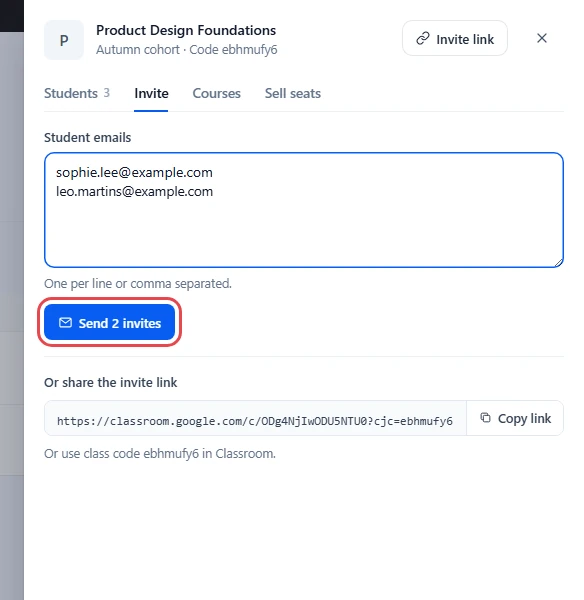
You can also copy the link under Or share the invite link, or share the class code.
Important: Invites go out from Google Classroom to real inboxes. Check the addresses before you send.
Step 12: Link the class to a course (Courses and Sell seats) #
Note: Requires GoodMeet Pro, plus Tutor LMS, LearnPress or Academy LMS for course links.
When a student enrolls in a linked course, GoodMeet sends them the Classroom invite. You no longer have to invite course students by hand.
- In the side panel, click Courses.
- Under Link a course, search your courses and click one to link it. Or click an LMS name next to New draft course: to create a draft course from this class.
- Open the arrow on a linked course to set Class stream and Files to Show, Hide or Default. Default follows Settings.
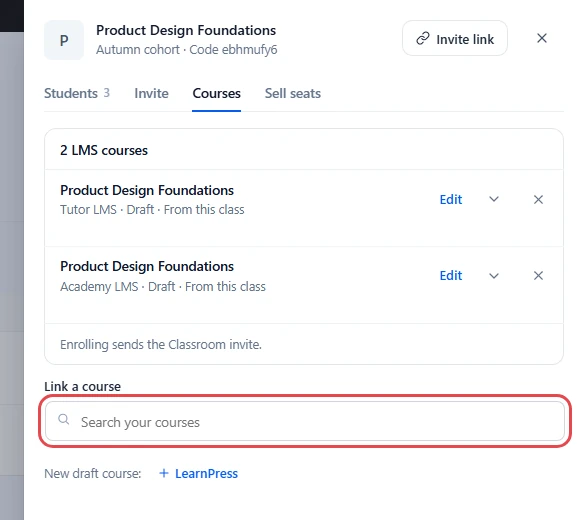
To unlink a course, click the × on it.
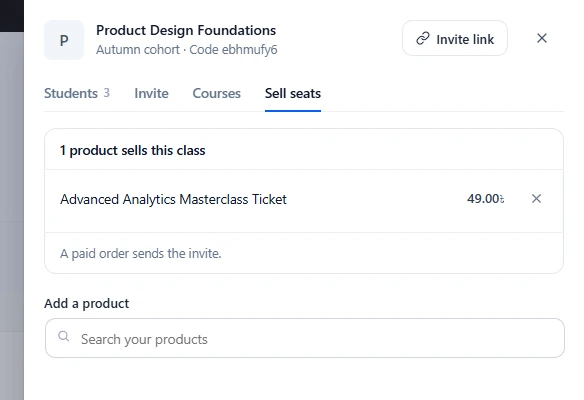
To sell seats without an LMS, use WooCommerce. A paid order sends the buyer the class invite.
- Click Sell seats.
- Under Add a product, search your WooCommerce products and click one.
Step 13: Post a meeting to a class #
This is the free core of the integration. Most meetings are not class meetings, so the card stays one switch until you turn it on.
- Go to GoodMeet > All Meetings and create or edit a meeting.
- Open the Access and controls step.
- In the Google Classroom card, turn on Post to Google Classroom.
- Pick the class under Class. With GoodMeet Pro, pick one or more under Classes, and choose a Topic to post under Classwork instead of the stream.
- With GoodMeet Pro, turn on Only class students can open the page to keep the meeting page for signed-in students on the class list.
- Save the meeting.
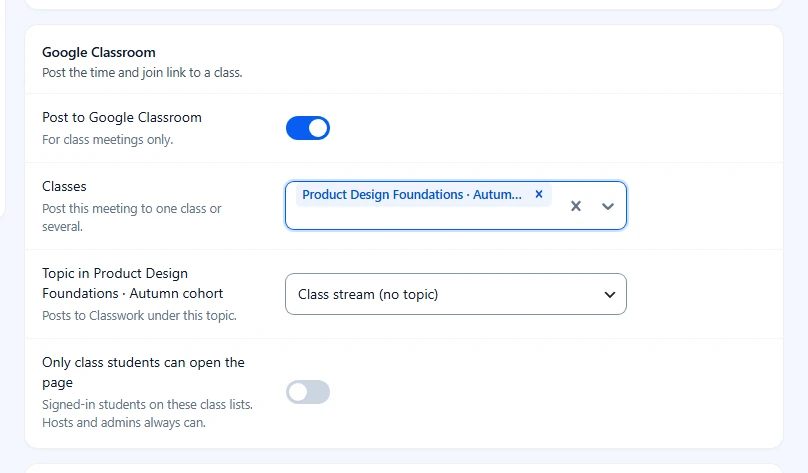
After saving, the card shows Posted to the class with a View in Classroom link. The post holds the meeting title, start time, summary and the join link.
Note: The Classroom connection belongs to the site, not to each host. Without Pro, only site admins see this card. With GoodMeet Pro, instructors see it too, with the classes they may post to.
Step 14: Read attendance #
Note: Requires GoodMeet Pro.
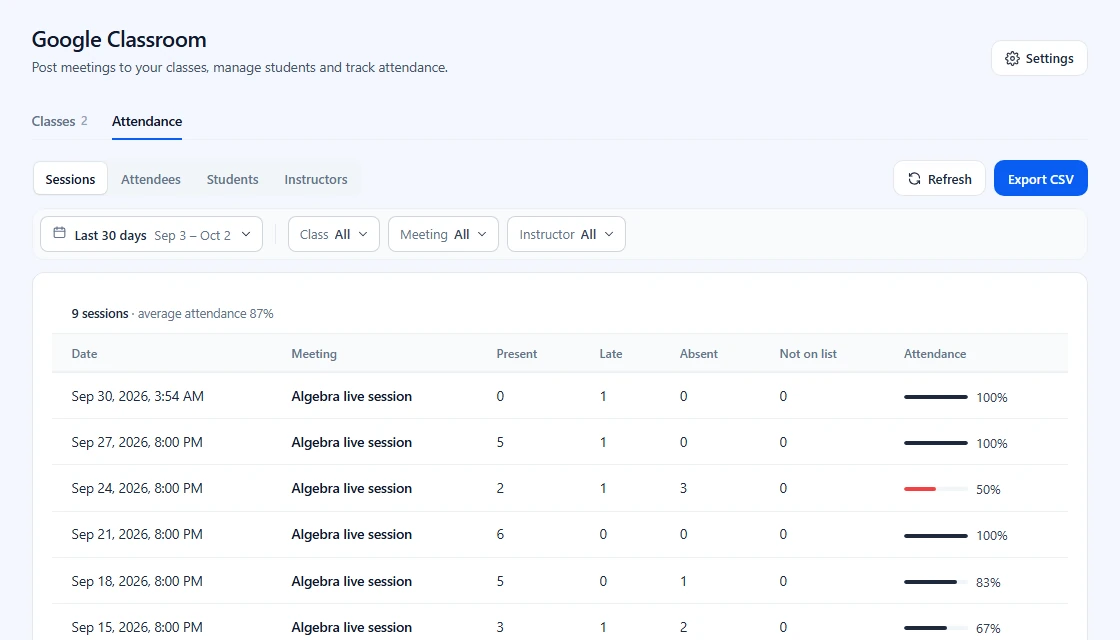
GoodMeet reads attendance from Google Meet about 15 minutes after each class meeting ends, and applies your rules from Step 7.
- On GoodMeet > Classroom, click Attendance.
- Switch between Sessions, Attendees, Students and Instructors.
- Filter by date, Class, Meeting and Instructor.
- Click Export CSV to download.
Step 15: Set up instructors #
Note: Requires GoodMeet Pro.
Instructors run their own classes without full admin access. On GoodMeet > Classroom, an instructor sees Live classes with only their own classes, students and attendance.
- Go to GoodMeet > Settings > Page setup.
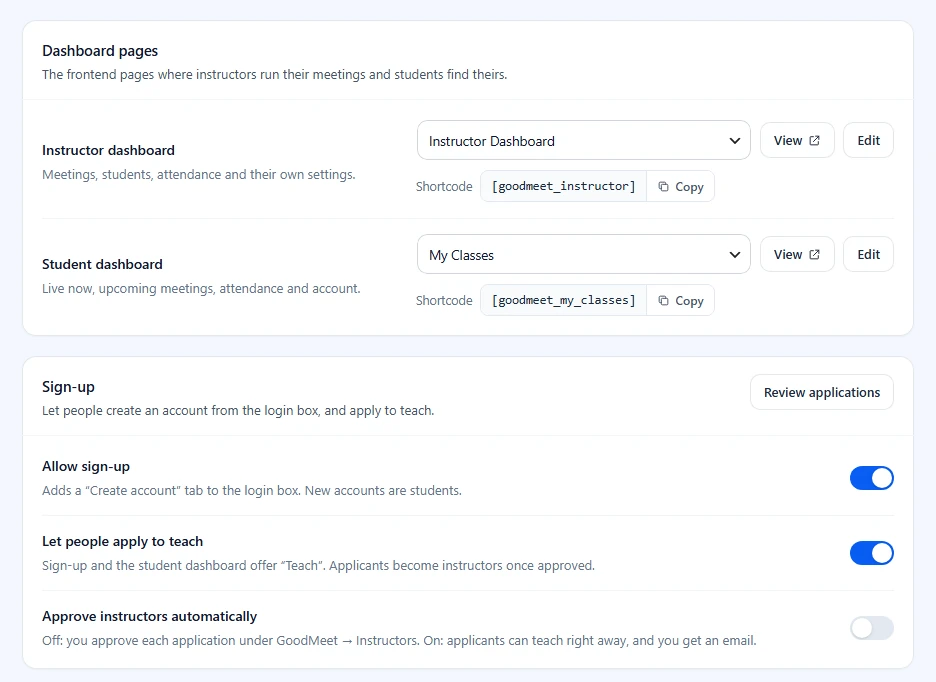
- Under Dashboard pages, pick or create the Instructor dashboard and Student dashboard pages. Each one shows its shortcode, [goodmeet_instructor] and [goodmeet_my_classes].
- Under Sign-up, choose Allow sign-up, Let people apply to teach and Approve instructors automatically.
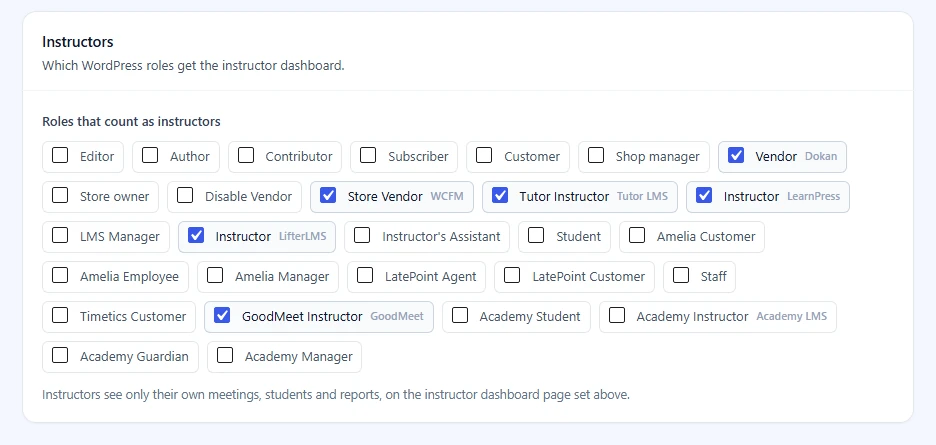
- Under Instructors, tick the Roles that count as instructors. Roles from other plugins show their source, like Tutor LMS or Dokan.
- Click Save changes.
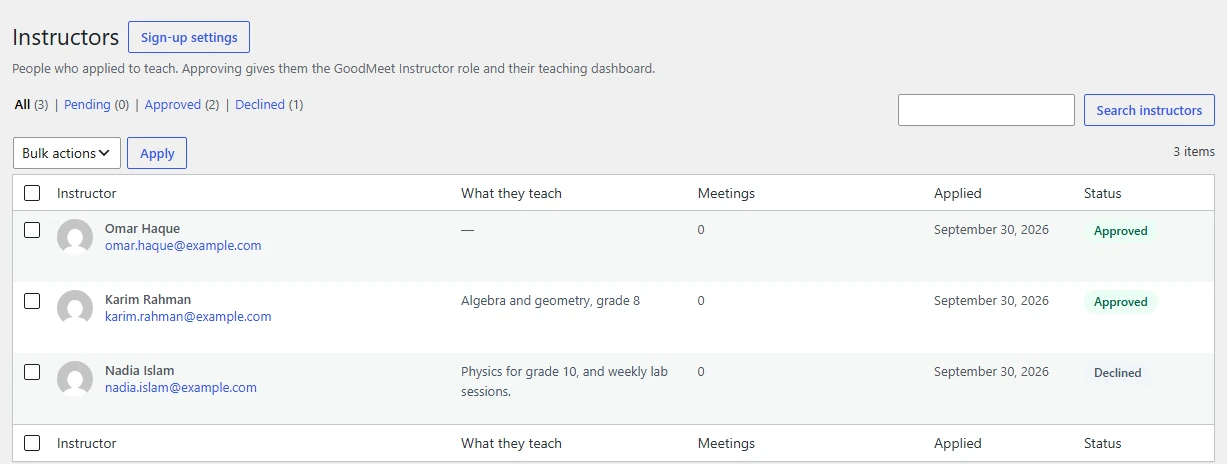
To review people who applied to teach:
- Go to GoodMeet > Instructors.
- Filter by Pending, Approved or Declined.
- Hover a row and click Approve or Decline, or use Bulk actions. Remove instructor takes the role away again.
Note: If instructors use their own Google account, add the redirect URI shown under Settings > Classroom > Instructors to your OAuth client. Until your Google app is verified, up to 100 people can connect to it.
What your students see #
Note: The student pages require GoodMeet Pro. Students never see Google setup or connection messages; only admins and instructors do.
The class sign-in page #
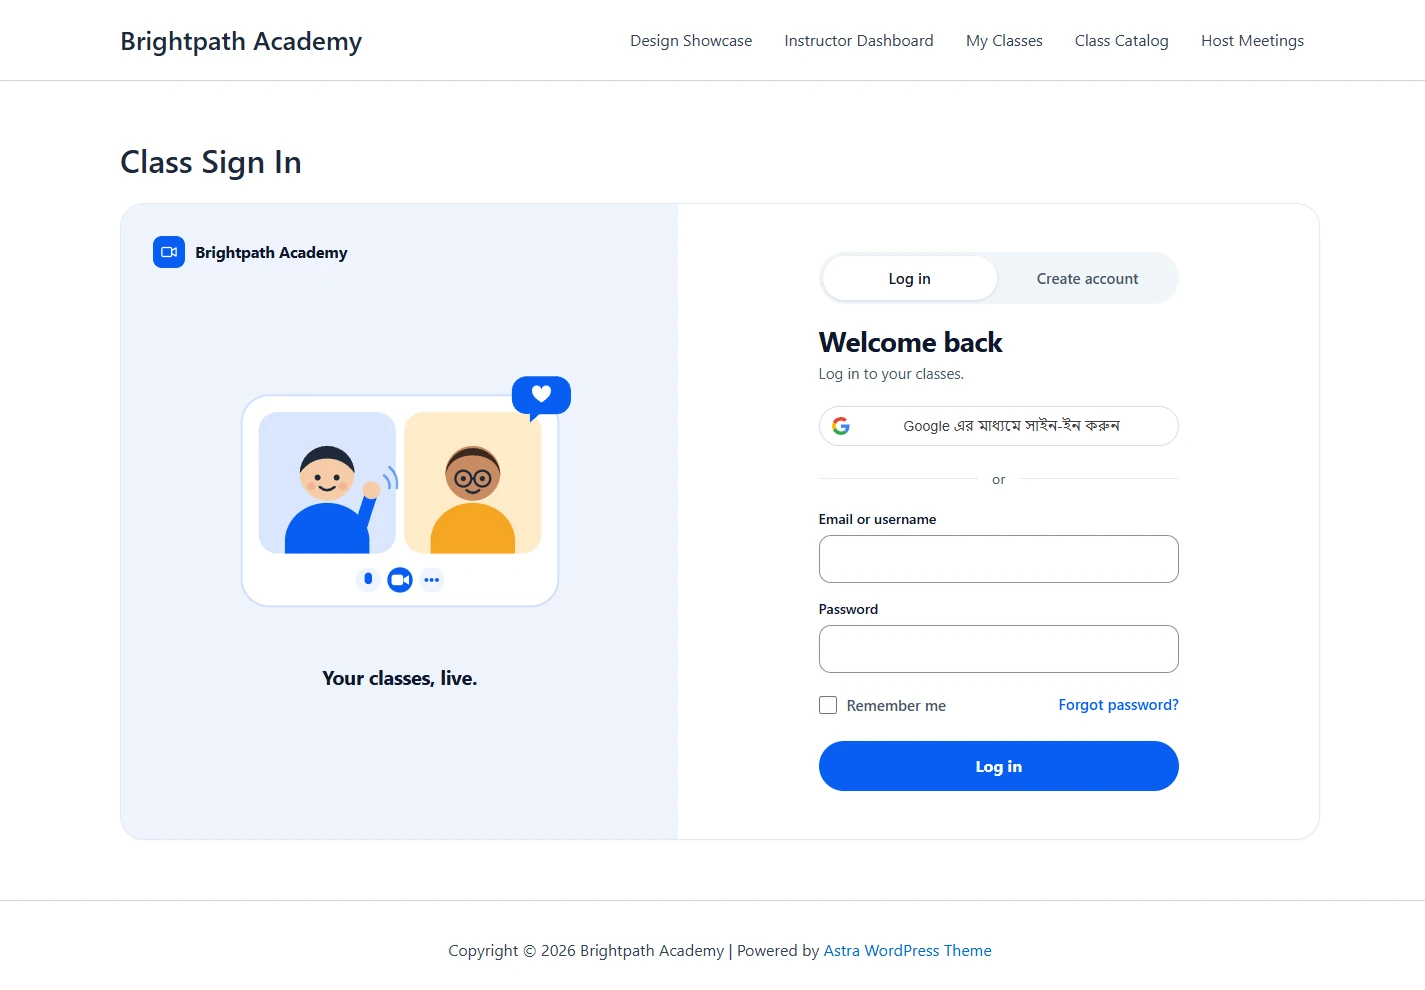
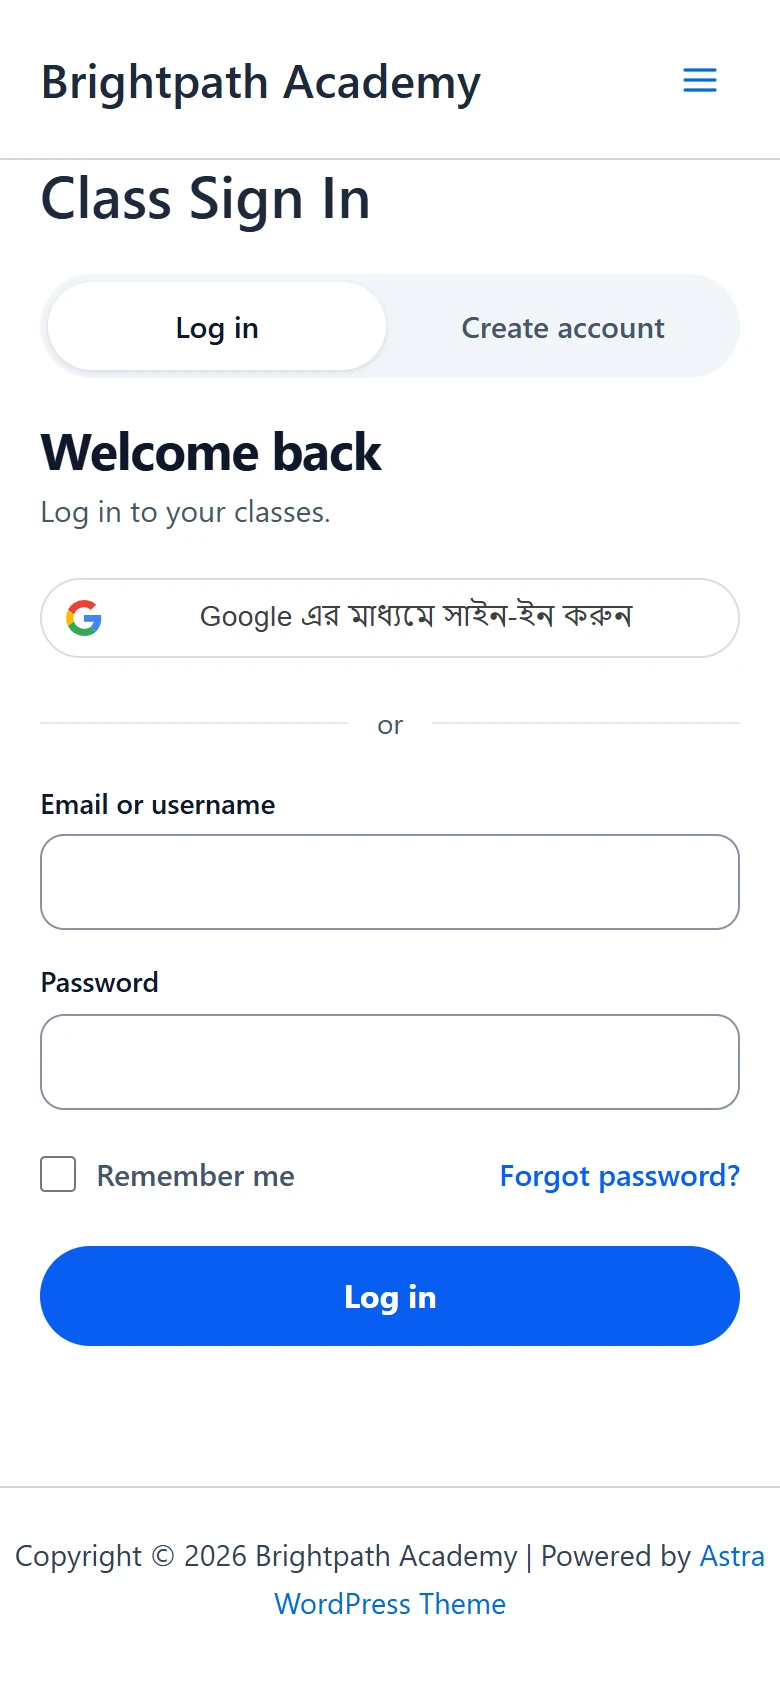
Put [goodmeet_login] on a page. Students log in with their email or username, or with Sign in with Google when you turned it on. After logging in, they land on the student dashboard.
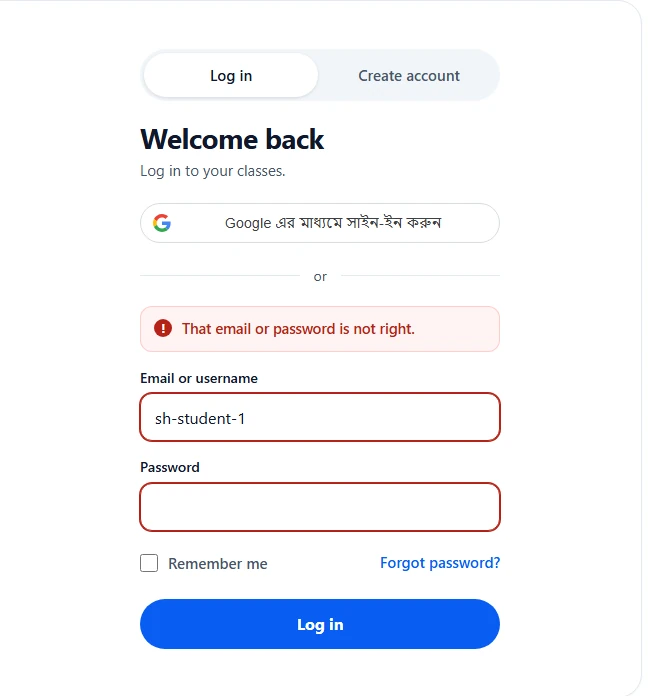
A wrong password brings the form back with That email or password is not right. The email or username stays filled in. The student only retypes the password.
The class catalog #
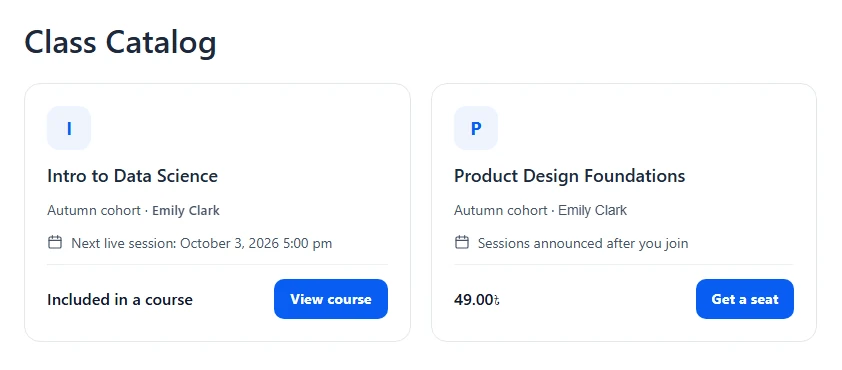
Put [goodmeet_classes] on a page to list your classes. Each card shows the next live session and one action:
- Go to class for students already in it
- Get a seat when a product sells it
- View course when it comes with a course
The student dashboard #
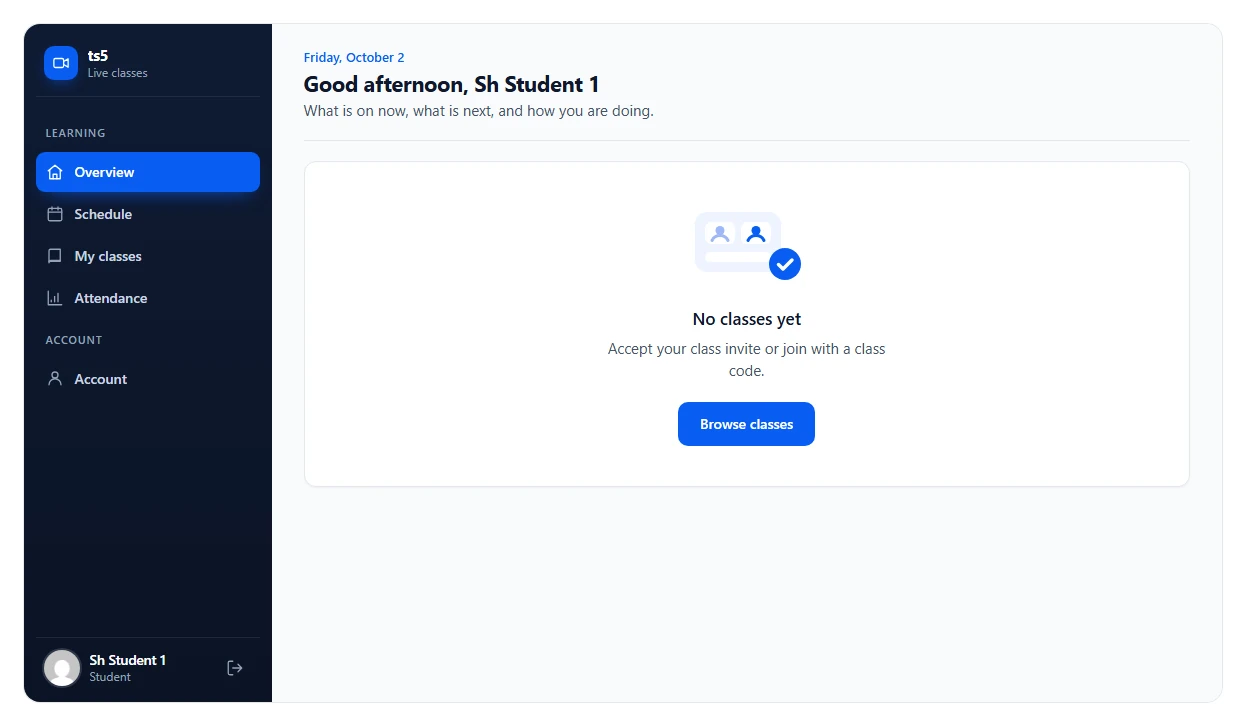
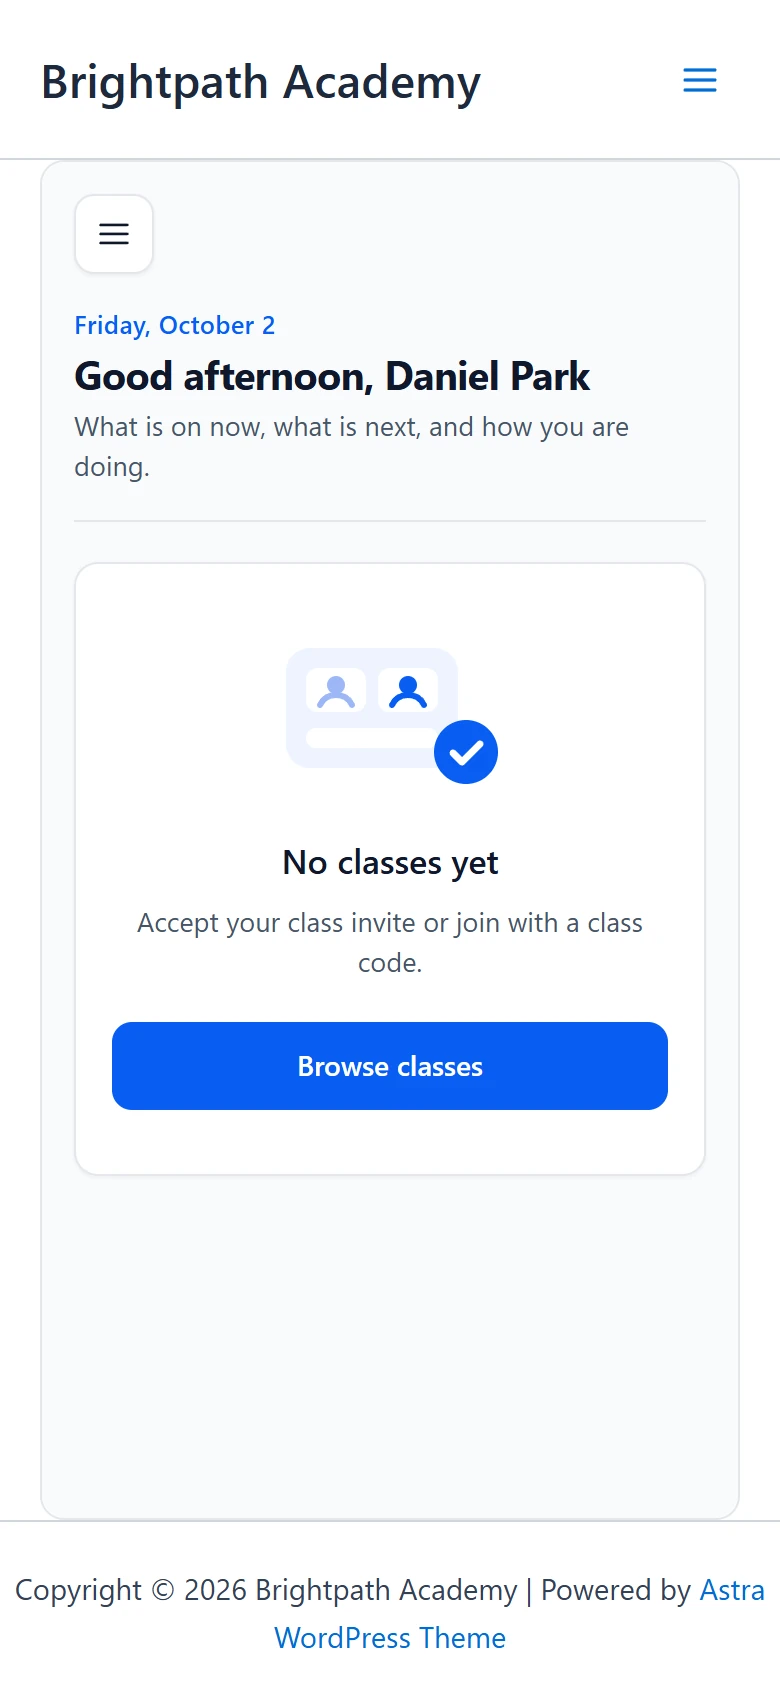
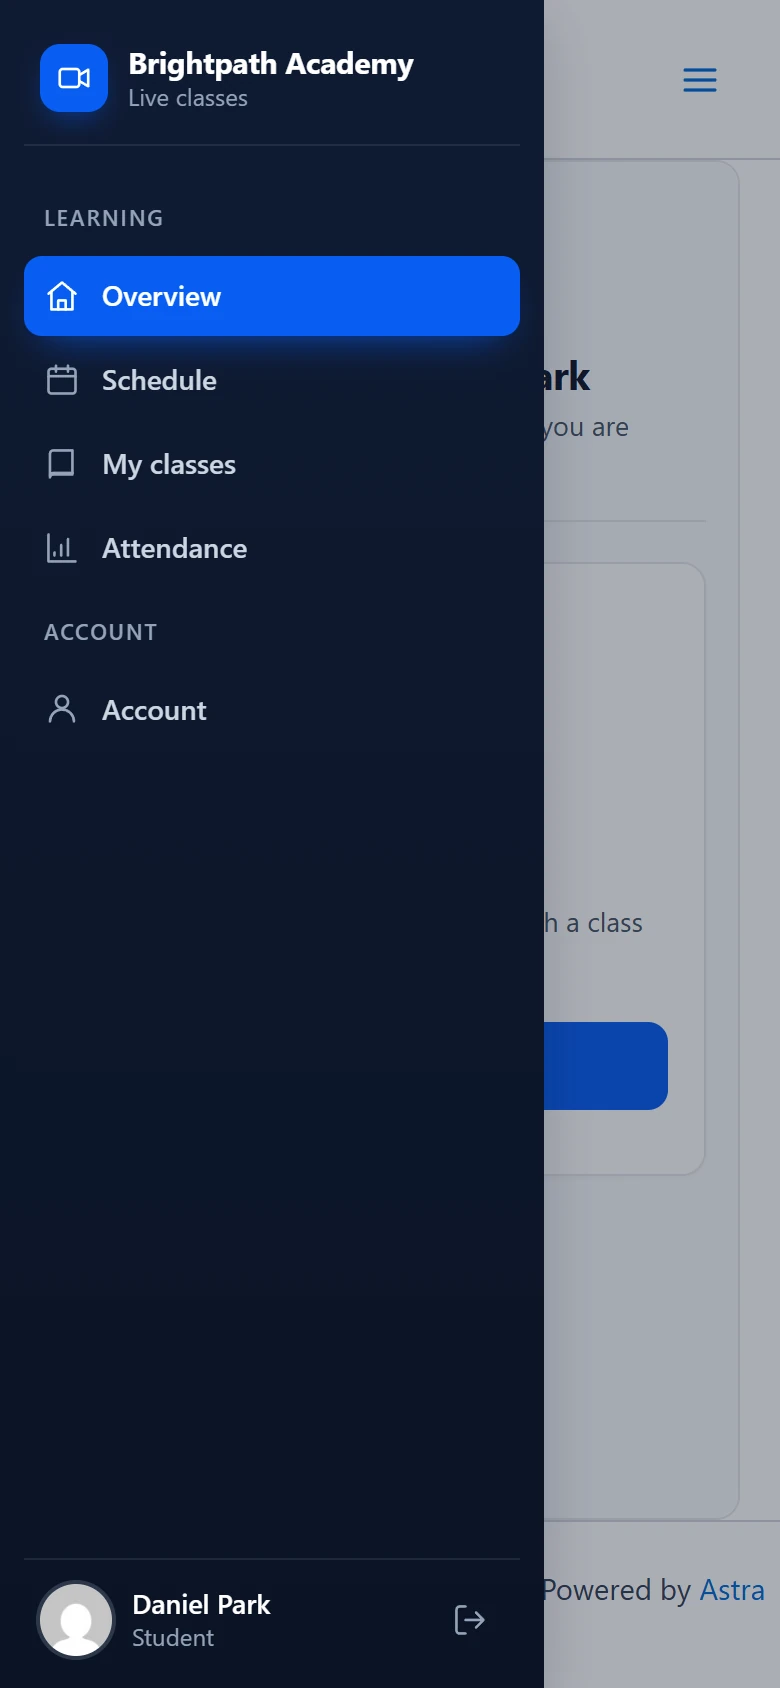
The student dashboard page ([goodmeet_my_classes]) has Overview, Schedule, My classes, Attendance and Account. Joined students see what is live now and what is next. A Join class button shows while a session is on, and each class has Open in Classroom.
Until the student accepts the Classroom invitation, the dashboard says No classes yet with a Browse classes button.
The course page #
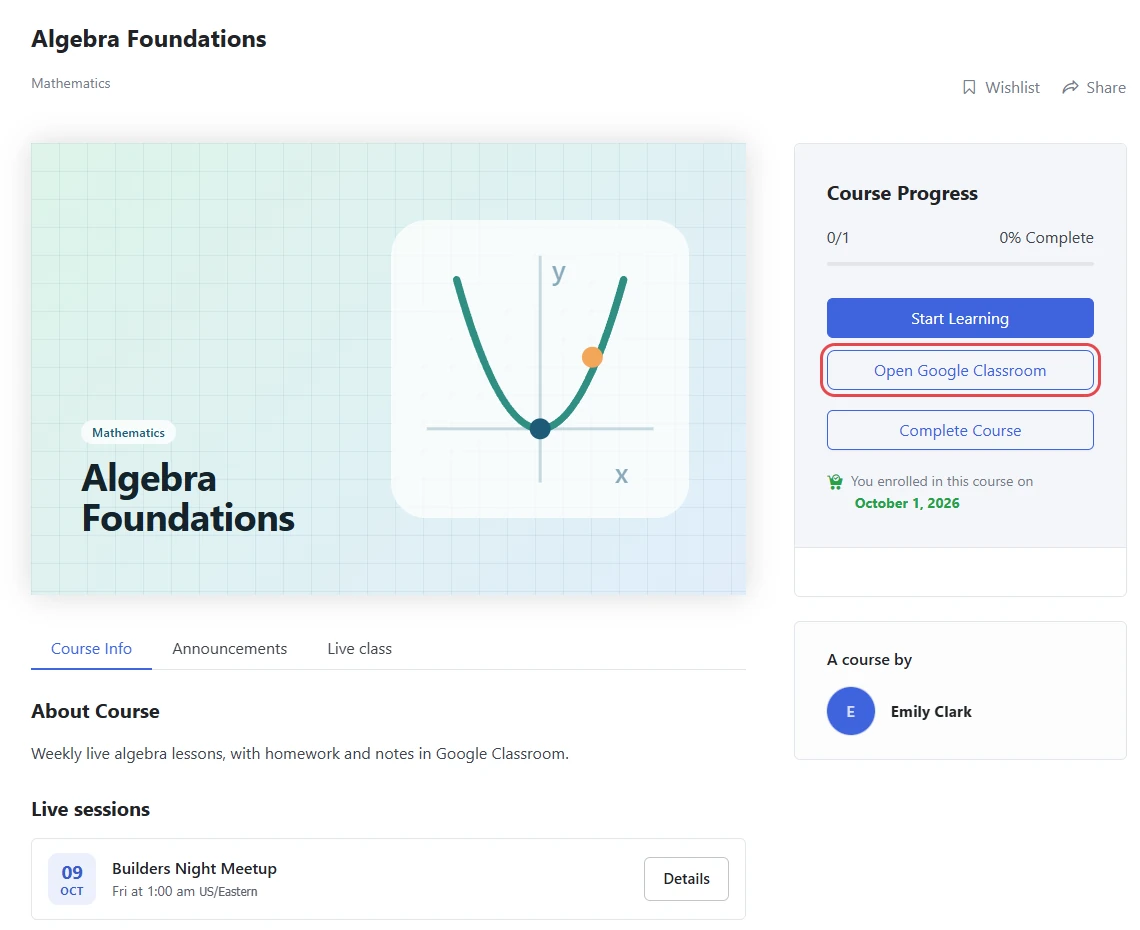
On a course linked to a class, such as Algebra Foundations, enrolled students get an extra button next to the course’s start button:
- Join live class while a session is on.
- Go to class at other times, which opens the class on the student dashboard.
- Open Google Classroom while the student has not accepted the class invite yet.
Session times show in the meeting’s own time zone, with a small zone label.
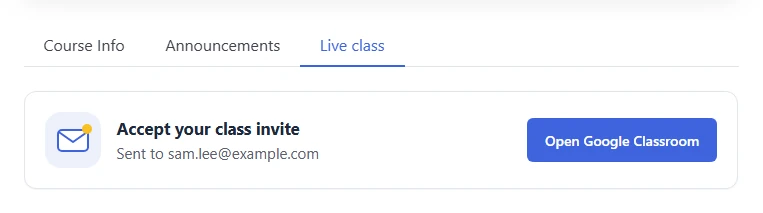
The Live class tab shows the next session with Join now or Details, plus the class stream and files. On LearnPress and Academy LMS it is a section instead of a tab. Before the student accepts the invite, it shows Accept your class invite with the address the invite went to.
On a phone #
The sign-in page and the dashboard fit small screens. On a phone, the dashboard menu opens from the menu button at the top left.
Benefits of using GoodMeet with Google Classroom #
- Class posts that follow the meeting: Editing or deleting a meeting updates or removes its Classroom post.
- Automatic Classroom invites: Course enrollments and WooCommerce orders send the Classroom invite for you.
- Attendance you do not take by hand: It comes from Google Meet, marked with your own late and absent rules.
- One dashboard per person: Instructors see their own classes and reports. Students get one dashboard for every class.
Troubleshooting #
“Needs one more permission” on Settings > Classroom #
Classroom is on, but Google has not allowed the Classroom permissions for the connected account yet.
- Click Allow it in Connect.
- Click Allow access in the Google Classroom row.
- Sign in with the account already connected to GoodMeet.
“Allow Google Classroom access again: GoodMeet Pro needs a few more permissions.” #
GoodMeet Pro creates classes, manages rosters and reads topics, which need more Classroom permissions than the free plugin. Go to Settings > Connect and click Allow access in the Google Classroom row once.
“Could not read your classes from Google Classroom” #
Google refused the request. On school Google Workspace accounts, the domain admin may block third-party apps. Ask your Workspace admin to allow your OAuth app, then click the refresh icon on GoodMeet > Classroom.
“No active classes yet” #
The connected account has no active classes. Archived classes do not show. Click New class (Pro), or create a class in Google Classroom and click refresh.
A class shows “Not accepted” #
The class was created for an account that has not accepted it in Google Classroom yet. Click Accept in Classroom. When you come back to the tab, GoodMeet checks again and the badge goes away.
“The class post did not go through” #
The meeting saved, but Google Classroom rejected the announcement. The error detail under the message says what Google answered.
- Open the meeting and go to Access and controls.
- Click Post again.
“Google Classroom access is not allowed yet” in the meeting form #
Classroom is on, but access was not allowed. Click Open Classroom setup and finish step 3 of the setup card.
The Google Classroom card is missing from the meeting form #
Check that:
- Classroom is on (Step 3).
- You are a site admin. Without Pro, only admins can link meetings to classes.
- With GoodMeet Pro, your role counts as an instructor under Settings > Page setup.
“Only for students of this class” #
The meeting has Only class students can open the page on, and the student’s site email is not on the class list. The student accepts the Classroom invitation, or joins with the class code. Their site email must match their Classroom email.
“There is no account for this Google address yet. Ask the school to add you.” #
Create WordPress accounts for Classroom students is off, and no site account uses that Google email. Turn the setting on, or click Create site accounts in the class’s Students tab.
“This Google account is not in any class here yet.” #
The student signed in with a Google account that is on none of your class lists. The student uses the account the school gave them, or you invite that address.
“Staff accounts cannot use Google sign-in.” #
Admins and other staff roles can never use Sign in with Google, for safety. Log in with the username and password.
The “Sign in with Google” button does not appear #
Check that:
- Show “Sign in with Google” is on.
- The address shown under Students is added to your OAuth client in Google Cloud as an authorized JavaScript origin.
Frequently asked questions #
Do I need GoodMeet Pro to use Google Classroom? #
No. The free plugin turns Classroom on, lists your classes and their students, and posts meetings to one class stream. Creating classes, invites, course links, attendance, student sign-in and dashboards require GoodMeet Pro.
Does turning Classroom off delete anything? #
No. Existing class posts stay in Classroom. GoodMeet stops posting and updating them.
Does GoodMeet change my connected Google account? #
No. Classroom uses the account already connected for Google Meet. Allowing Classroom adds permissions to the same account.
What happens to the class post when I delete the meeting? #
GoodMeet removes the announcement from the class stream. If you remove the class from the meeting, the old post comes down too.
Can one meeting go to several classes? #
Yes, with GoodMeet Pro. Pick several under Classes, and a Topic per class if you want it under Classwork.
Do students need a Google account to join? #
Yes, to join the class in Classroom. On your site, students can still log in with a username and password.
Which LMS plugins work with classes? #
Tutor LMS, LearnPress and Academy LMS. Each must be switched on under GoodMeet > Integrations. Posting course announcements to Classroom is Tutor LMS only.
Can students see grades? #
Yes, read-only, when you turn on Show assignments and grades and allow the extra permission. Each student sees only their own work.
Will students ever see “Connect Google” messages? #
No. Google setup messages are for admins and instructors only.
Security best practices #
- Protect student data. Rosters, emails and attendance are personal data. Give the administrator role only to trusted people, and set Keep attendance for to the shortest period you need.
- Check every invite. Invites go from Google Classroom to real inboxes. Check the addresses before you click Send N invites. Turn on Remove students from the class when their enrollment ends so access ends with the course.
- Keep Google sign-in for students. Staff accounts can never use Sign in with Google. Admins and instructors log in with a username and password.
- Keep class pages private. For class meetings, turn on Only class students can open the page. Then only signed-in students on the class list can open it.
- Review Google access. One Google connection covers Meet, Calendar and Classroom. Keep the OAuth JSON file private, and review connected apps in your Google Account security settings from time to time.
- Limit instructor accounts. If instructors connect their own Google account, only approve people you trust. Until your Google app is verified, up to 100 people can connect to it.
You’re ready to run live classes with Google Classroom #
You now schedule classes in WordPress, and Google Classroom gets the post. Students find the join button on your site. Linked courses send invites on their own, and attendance arrives about 15 minutes after each class. Next, link a class to your course pages, or set up the Google connection if you have not yet.
- How to connect your Google account
- How to add Google Meet live classes to Tutor LMS courses
- How to add Google Meet live classes to LearnPress courses
- How to add Google Meet live classes to Academy LMS courses
- How to add Google Meet live classes to LifterLMS courses
- How to let instructors create meetings from the front end


