- Before you begin
- Install and activate GoodMeet first
- Step 1: Open the Connect screen in GoodMeet
- Step 2: Open the built-in setup guide
- Step 3: Create a Google Cloud project
- Step 4: Enable the Google APIs
- Step 5: Set up the Google Auth Platform
- Step 6: Add the data access scopes
- Step 7: Add yourself as a test user
- Step 8: Copy the redirect URL from GoodMeet
- Step 9: Create a Web application OAuth client
- Step 10: Download the JSON file and upload it to GoodMeet
- Step 11: Approve access on Google
- Step 12: Confirm the connection
- Google hasn't verified this app
- Troubleshooting
- Error 400: redirect_uri_mismatch
- Error 403: access_denied
- Error 401: invalid_client
- "This file is not an OAuth client file. Download the JSON for a Web application client."
- "That is not a .json file. Pick the one Google Cloud downloaded."
- New meetings fail with "Could not create the meeting"
- Google shows the approval screen every time
- Frequently asked questions
- Security best practices
- You're ready to create meetings with Google Meet
GoodMeet creates Google Meet links and Google Calendar events through your own Google Cloud project. The app, the permissions and the secret all live in a Google account you own. No third party sits between your site and Google.
The setup takes a few screens in Google Cloud and one upload in GoodMeet. You create an OAuth client, download its JSON file, drop the file into GoodMeet and approve access once. One connection covers Google Meet, Google Calendar and, when you turn it on, Google Classroom.
By the end of this guide, you will have:
- A Google Cloud project for GoodMeet
- The Google Calendar API and Google Meet API enabled
- A configured Google Auth Platform (consent screen) with the right scopes
- A Web application OAuth client with your GoodMeet redirect URL
- The client’s JSON file uploaded to GoodMeet
- Your Google account connected, so every new meeting gets a Meet link and a calendar event
Estimated setup time: 10 to 15 minutes. You do not need a paid Google Cloud plan or a billing account for this setup.
Before you begin #
Make sure you have:
- An administrator account on your WordPress site
- The Google account your meetings should belong to. Meetings and invites are created on this account’s calendar.
- Permission to create a project in Google Cloud with that account
- A site served over HTTPS. Google accepts plain
http://redirect addresses only forlocalhost.
Let’s get started.
Install and activate GoodMeet first #
If GoodMeet is already active on your site, skip to Step 1.
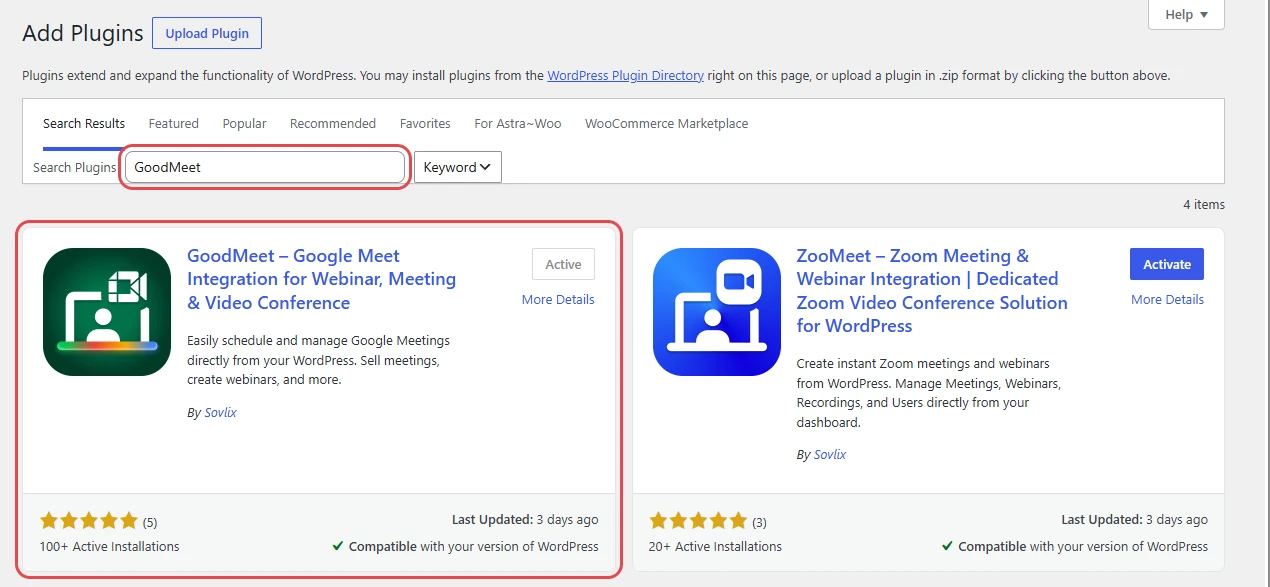
- In the WordPress admin menu, go to Plugins > Add New Plugin.
- Search for GoodMeet.
- Click Install Now, then Activate.
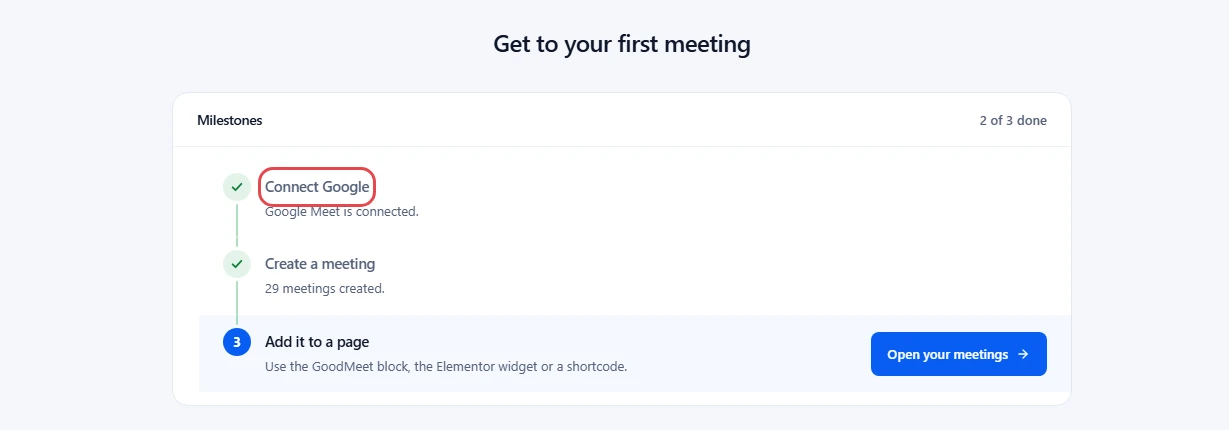
Tip: After activation, GoodMeet > Get Started lists your setup milestones. The Connect Google milestone opens the same screen as Step 1, and shows a tick once you finish this guide.
Now comes the main part: setting up Google Cloud and connecting it to GoodMeet.
Step 1: Open the Connect screen in GoodMeet #
Everything GoodMeet needs from Google goes into one card on this screen, so open it first and keep it open in its own tab.
- In the WordPress admin menu, go to GoodMeet > Settings.
- Click Connect at the top of the settings list.
- Find the Google Cloud Credentials card.
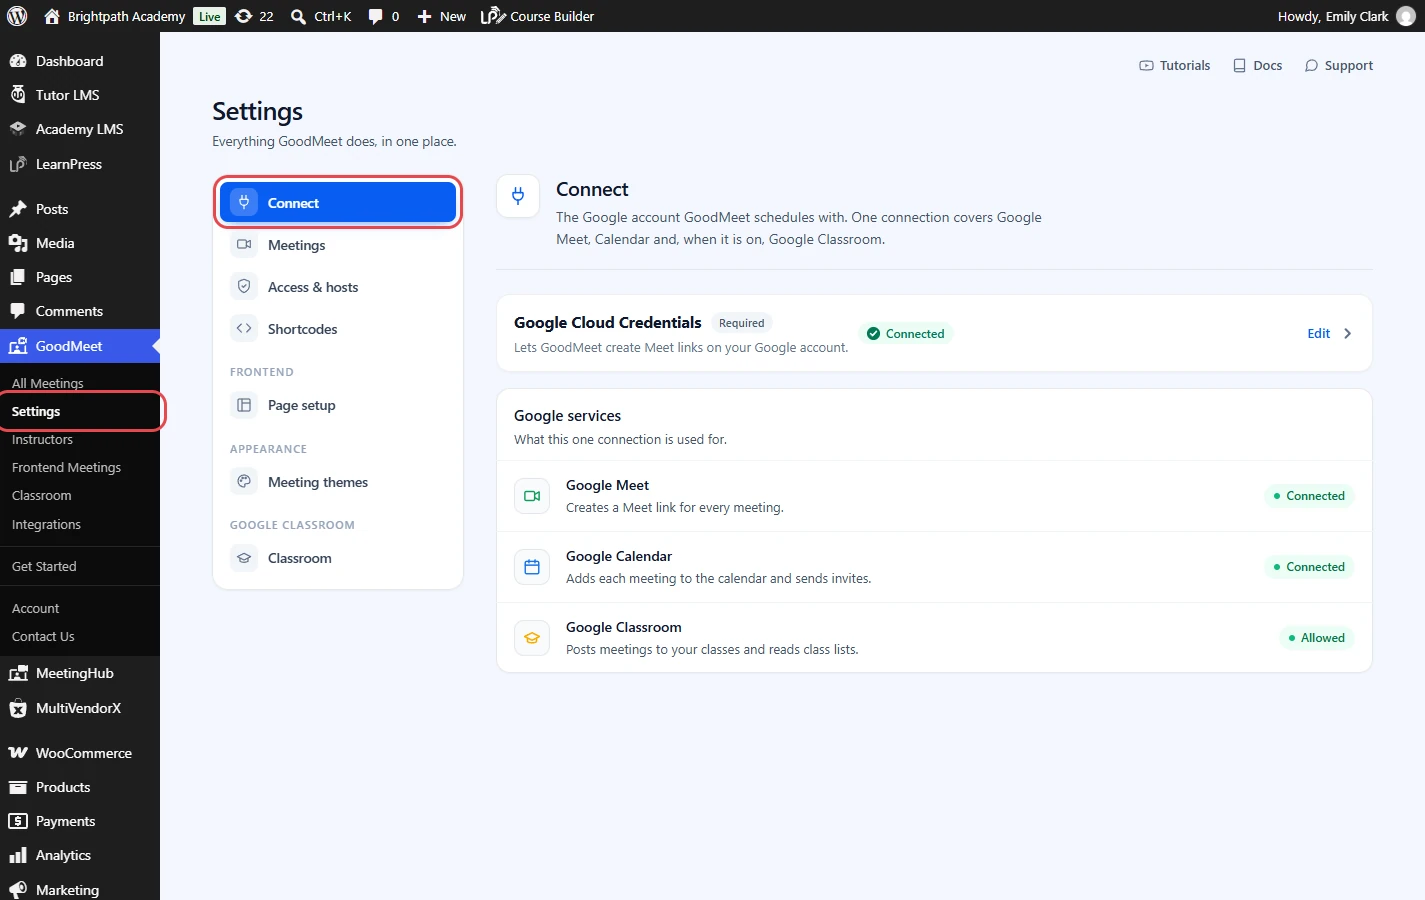
You come back to this tab twice: to copy the redirect URL, and to upload the JSON file.
Step 2: Open the built-in setup guide #
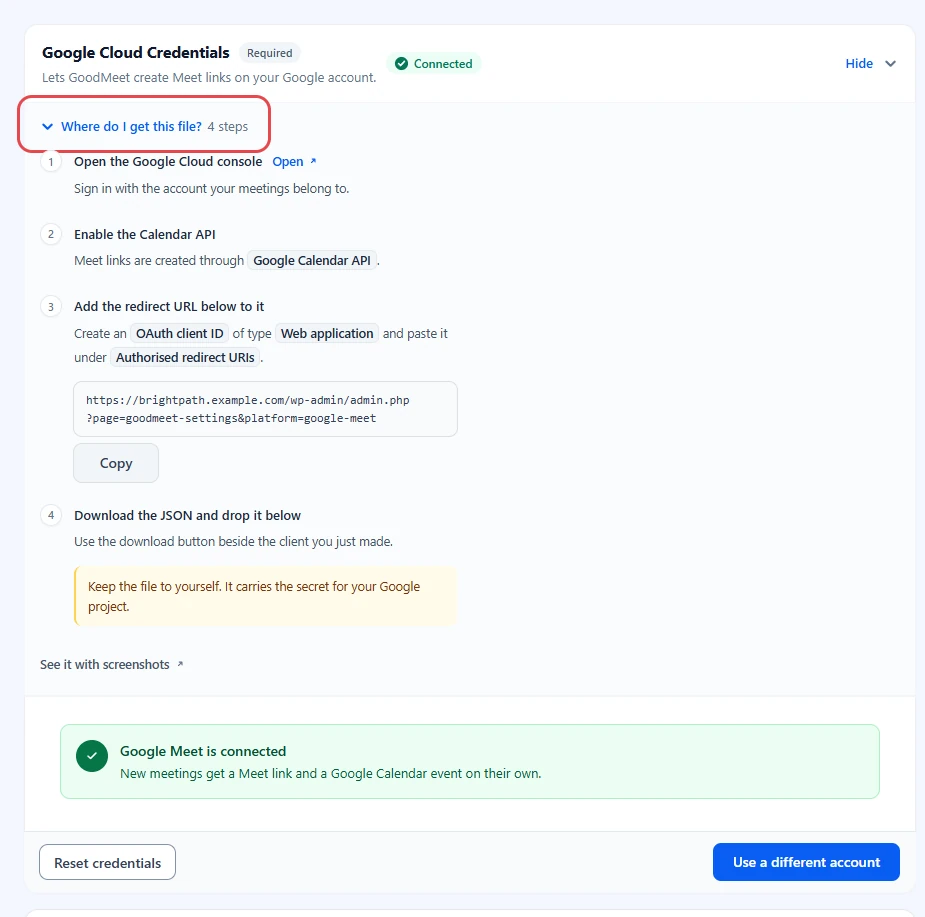
The card carries a short version of this guide and your site’s exact redirect URL. It makes a handy reference while you work in Google Cloud.
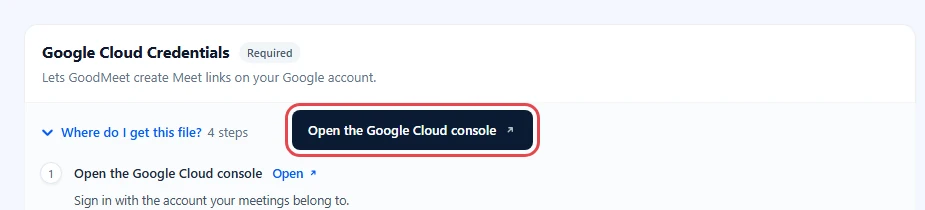
- On the Google Cloud Credentials card, click Where do I get this file?
- Check that the card now lists four steps, starting with Open the Google Cloud console.
Step 3: Create a Google Cloud project #
A project holds the APIs, the consent screen and the OAuth client for GoodMeet. Keeping them in a project of their own makes them easy to find and manage later.
- On the card, click Open the Google Cloud console. You can also go to
https://console.cloud.google.com/.
- Sign in with the Google account your meetings belong to.
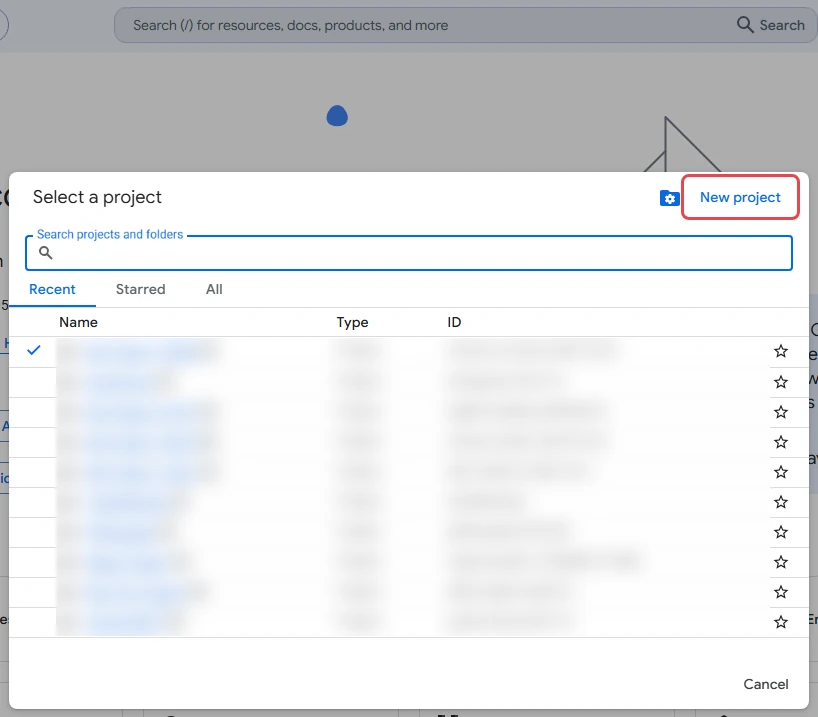
- Click the project selector in the top bar, then click New project.
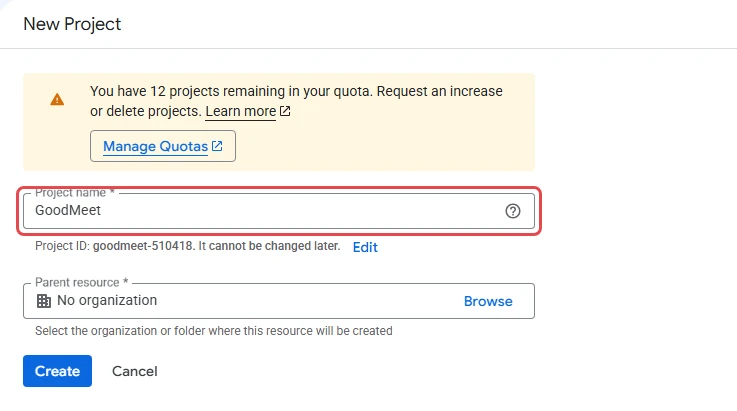
- Enter a clear Project name, for example
GoodMeet. - Choose your organization or location if Google asks, then click Create.
- Check that the new project is selected in the top bar before you continue.
Step 4: Enable the Google APIs #
GoodMeet creates every Meet link through the Google Calendar API, so nothing works until that API is on. The Google Meet API adds co-hosts and attendance in GoodMeet Pro.
- In Google Cloud, open the menu and go to APIs & Services > Library.
- Search for Google Calendar API, open it and click Enable.
- Search for Google Meet API, open it and click Enable.
- If you use Google Classroom with GoodMeet, also enable Google Classroom API.
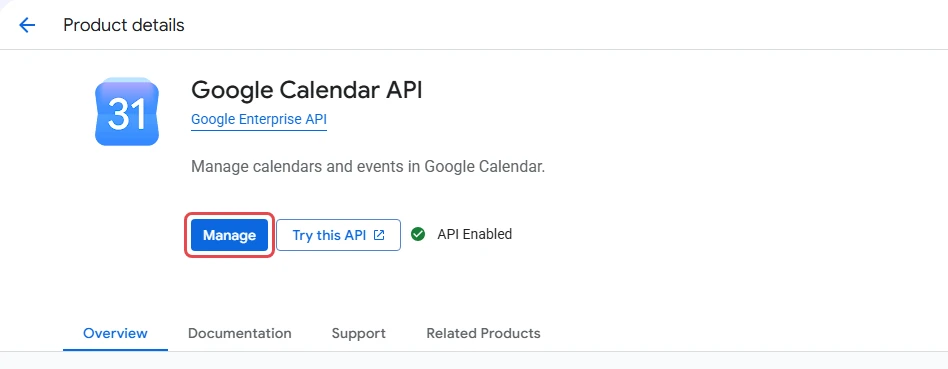
For Google Classroom, search for Google Classroom API and click Enable the same way.
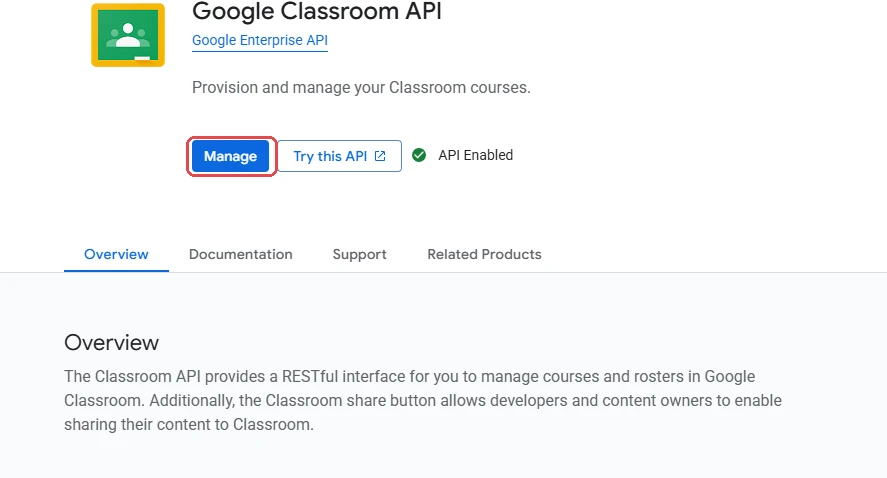
Important: Enable the APIs in the same project that holds your OAuth client. An API enabled in another project does not count.
Step 5: Set up the Google Auth Platform #
This is the screen people see when they approve access, so Google asks who the app belongs to. Google now calls it Google Auth Platform. Some accounts still show OAuth consent screen under APIs & Services.
- Go to Google Auth Platform > Overview and click Get started.
- Under App information, enter an App name, for example
GoodMeet, and pick a User support email. Click Next. - Under Audience, choose External for most sites. Choose Internal only if every user is in your own Google Workspace organization. Click Next.
- Under Contact information, enter an email address for Google’s notices. Click Next.
- Read the Google API Services: User Data Policy, tick the box to agree, click Continue, then Create.
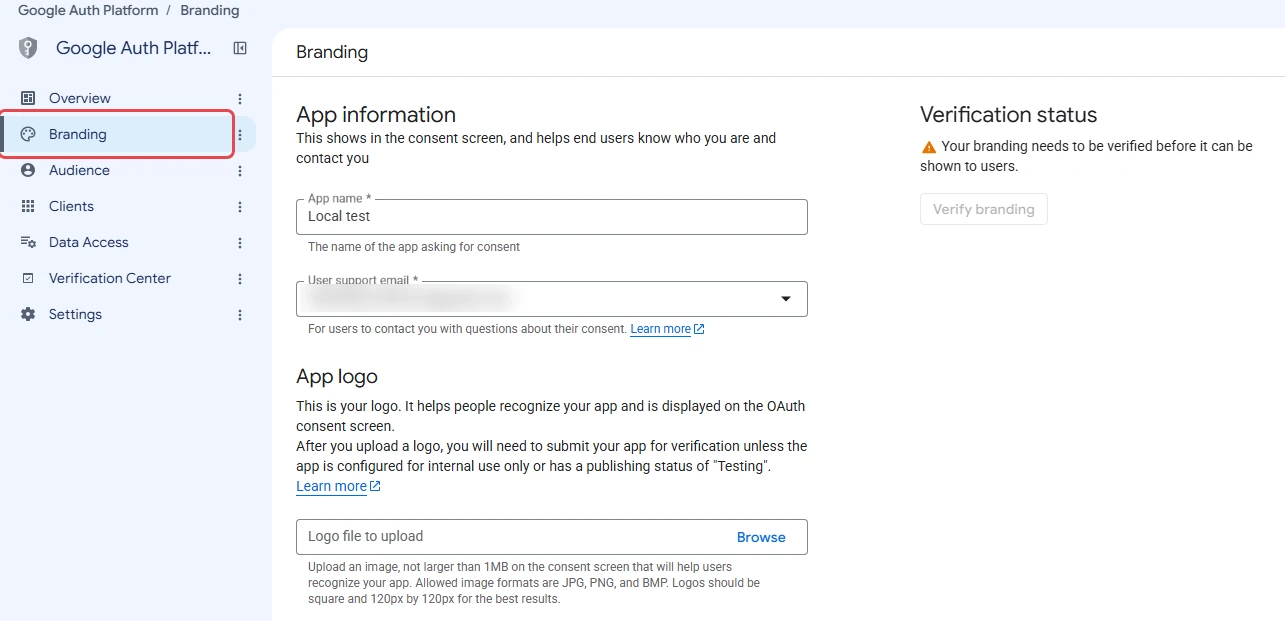
Note: The app name appears on Google’s approval screen in Step 11, so use a name you will recognize.
Step 6: Add the data access scopes #
Scopes are the permissions GoodMeet asks for. Listing them here keeps Google’s approval screen predictable, with no surprise requests later.
- Go to Google Auth Platform > Data Access and click Add or remove scopes.
- Add the scopes below. If you cannot find one in the list, paste it into Manually add scopes.
https://www.googleapis.com/auth/calendar
https://www.googleapis.com/auth/calendar.events
https://www.googleapis.com/auth/meetings.space.created
https://www.googleapis.com/auth/meetings.space.readonly
https://www.googleapis.com/auth/meetings.space.settings
https://www.googleapis.com/auth/userinfo.email
openid
Using Google Classroom? Add these four as well:
https://www.googleapis.com/auth/classroom.courses.readonly
https://www.googleapis.com/auth/classroom.rosters.readonly
https://www.googleapis.com/auth/classroom.profile.emails
https://www.googleapis.com/auth/classroom.announcements
- Click Update, then Save.
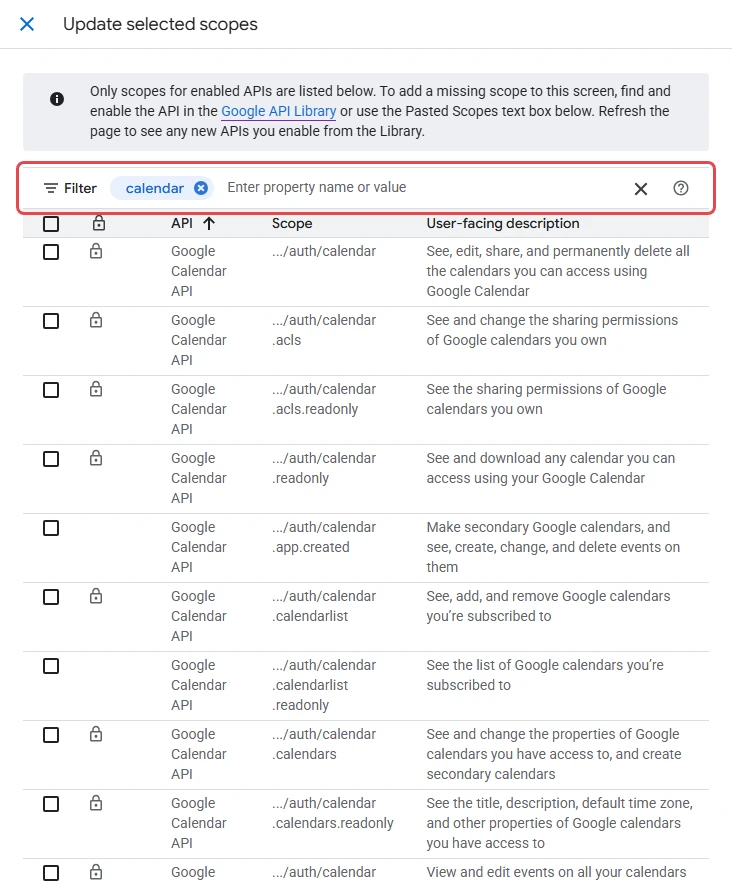
Note: These are the exact scopes GoodMeet requests. Google asks for any scope you skip here anyway, at approval time.
Step 7: Add yourself as a test user #
A new External app starts in testing mode, and only test users can approve it. Without this step, Google blocks your own approval in Step 11.
- Go to Google Auth Platform > Audience.
- Under Test users, click Add users.
- Enter the Google account email you will connect, then click Save.
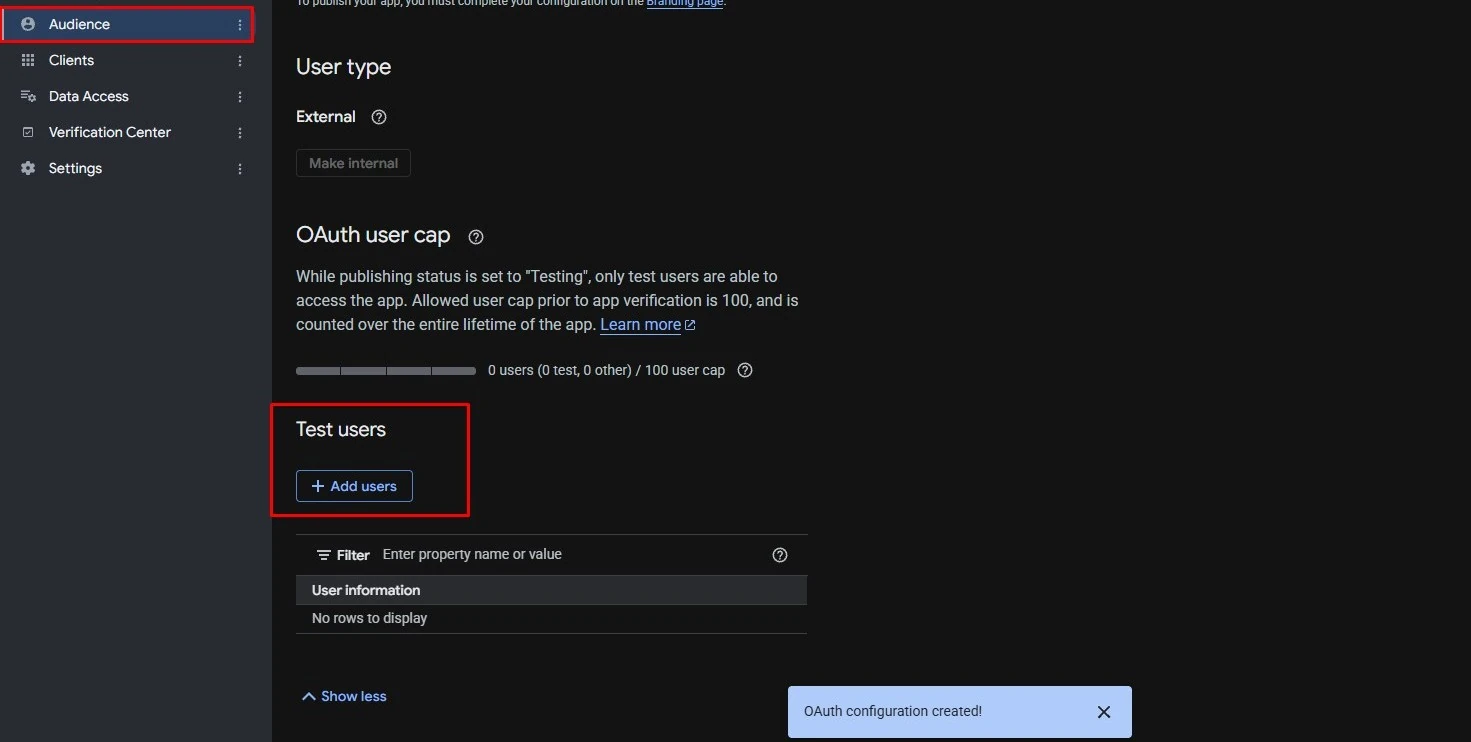
Important: Skip this and Google stops the approval with Error 403: access_denied.
Step 8: Copy the redirect URL from GoodMeet #
After you approve access, Google sends you back to this address. Google only accepts addresses you register in advance, so the URL in Google Cloud must match the one GoodMeet uses, character for character.
- Go back to the GoodMeet tab.
- In the setup guide, find step 3, Add the redirect URL below to it.
- Click Copy under the redirect URL.
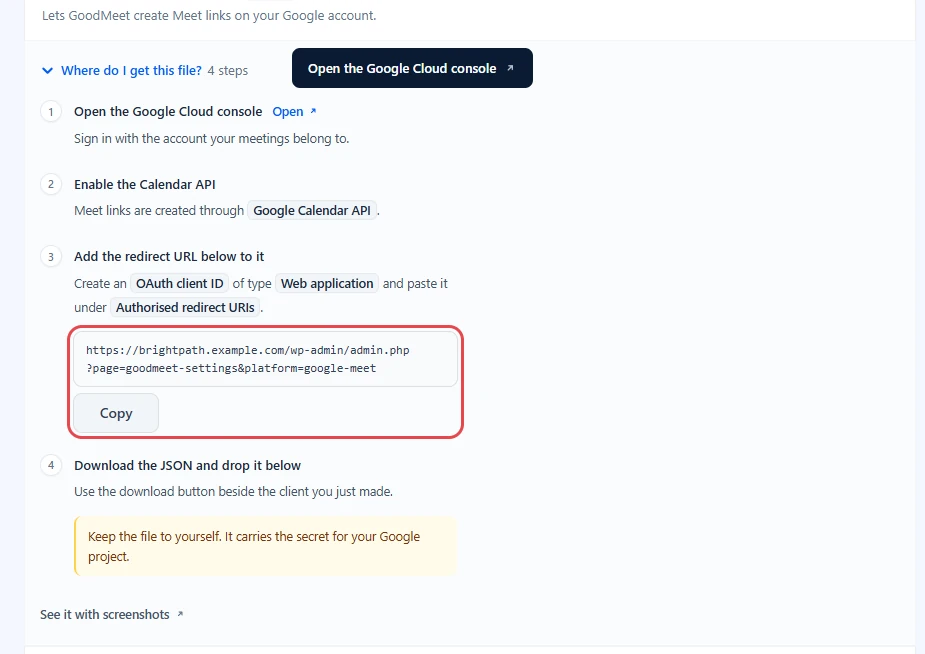
The URL looks like this:
https://brightpath.example.com/wp-admin/admin.php?page=goodmeet-settings&platform=google-meet
Your actual URL may look different. Always copy it from your own GoodMeet settings.
Important: Never type or edit this URL by hand. Google needs an exact match, including https, www, the path and both query parameters.
Step 9: Create a Web application OAuth client #
The OAuth client is what GoodMeet signs in with. It must be a Web application client, because only that type has a redirect URL for your site.
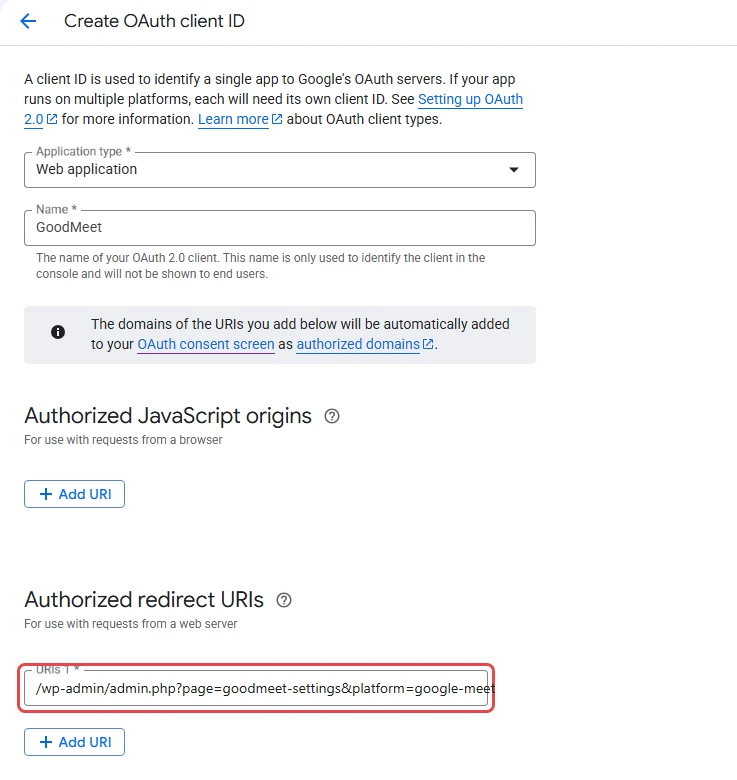
- In Google Cloud, go to Google Auth Platform > Clients and click Create client.
- Set Application type to Web application.
- Enter a Name, for example
GoodMeet web client. - Leave Authorized JavaScript origins empty.
- Under Authorized redirect URIs, click Add URI and paste the URL from Step 8.
- Click Create.
Step 10: Download the JSON file and upload it to GoodMeet #
The JSON file carries the client ID and client secret. GoodMeet reads both from the file, so there is nothing to copy and paste by hand.
- In the dialog that shows the new client, click Download JSON. Google names the file
client_secret_….json.
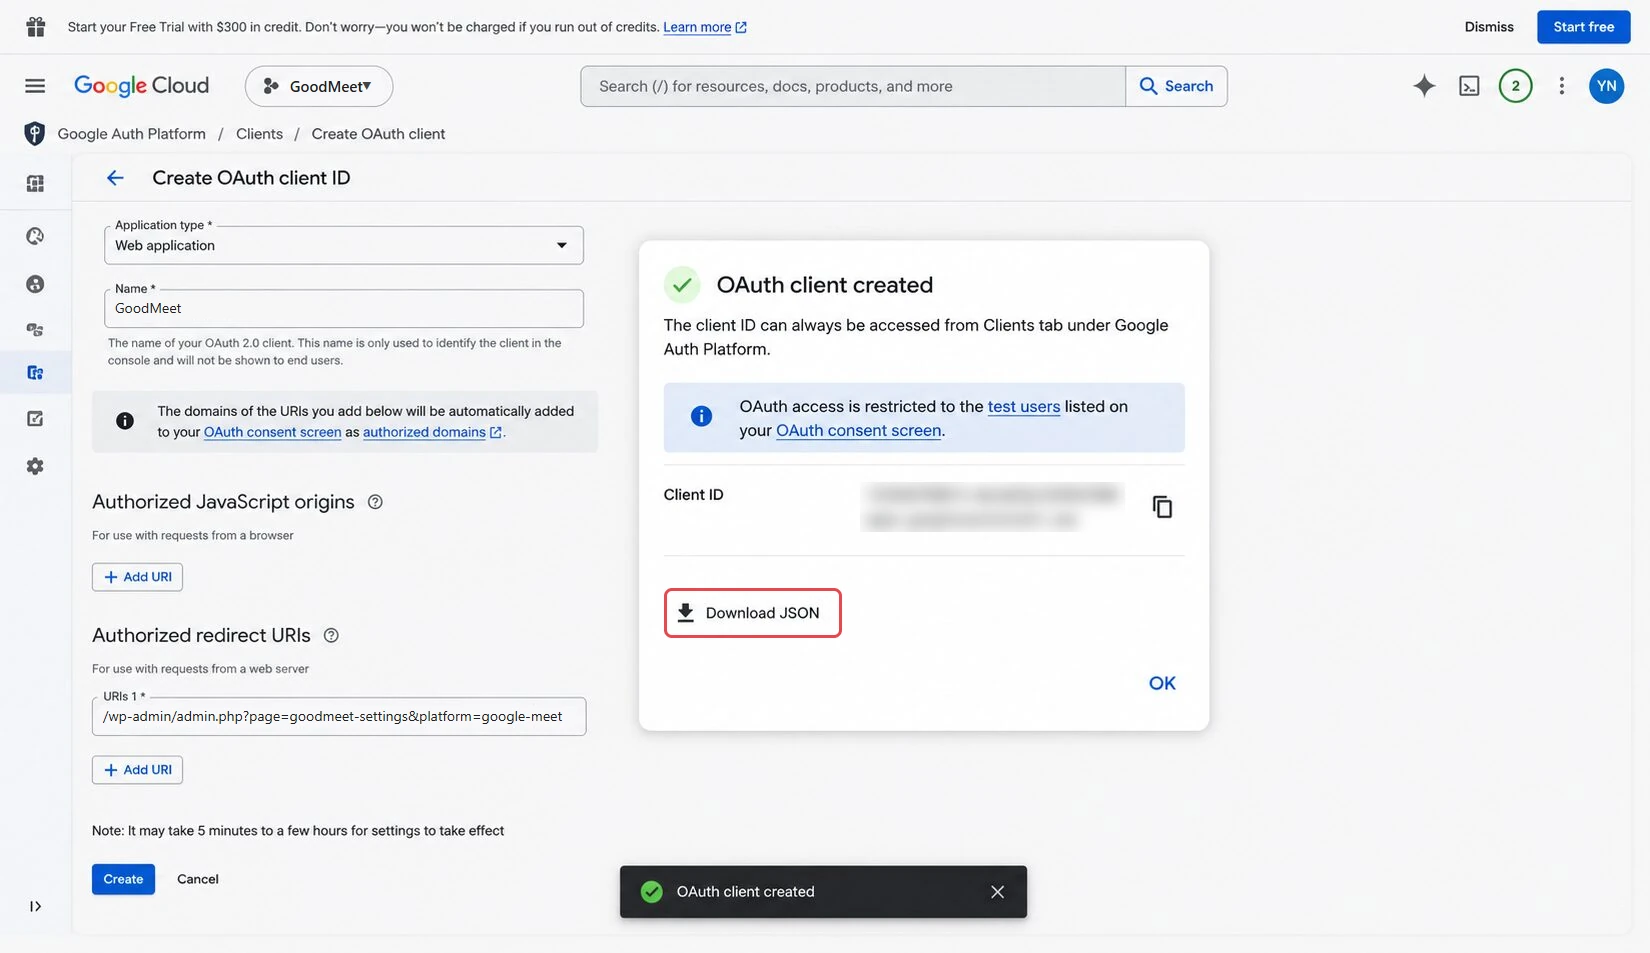
Important: Google may show the full client secret only once. Download the JSON before you close the dialog. If you lose it, add a new secret on the client’s page and download the file again.
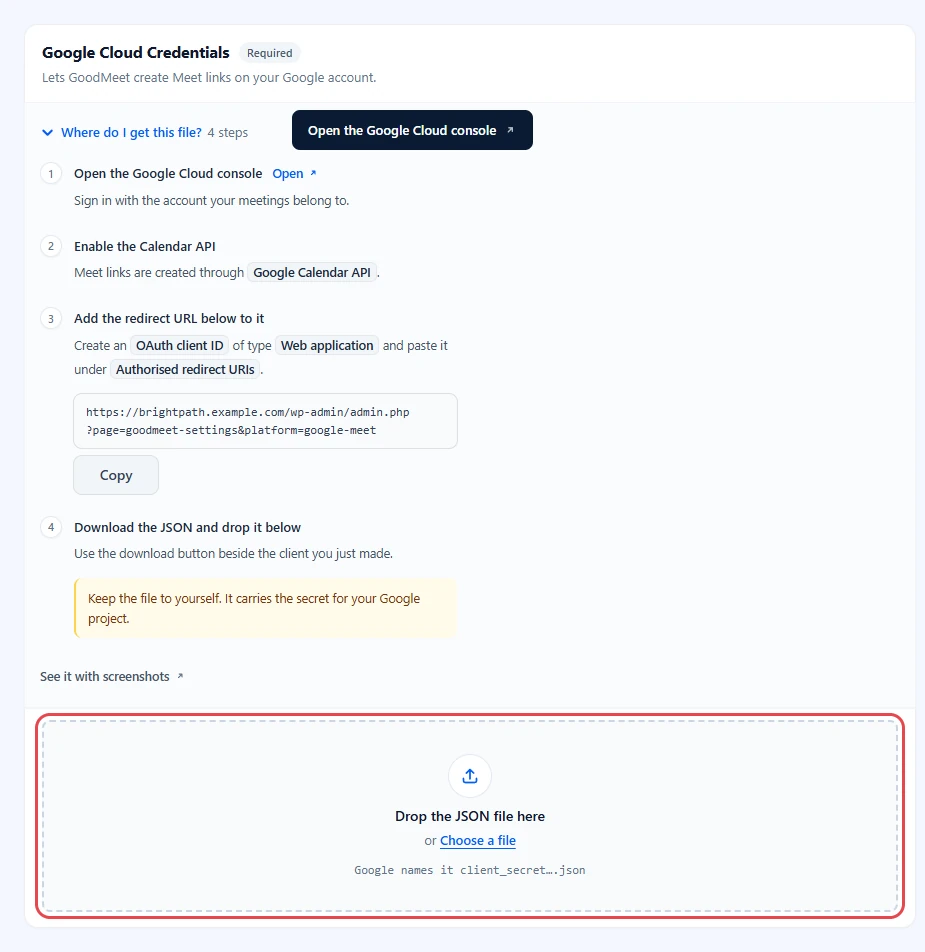
- In the GoodMeet tab, drag the file onto Drop the JSON file here, or click Choose a file and pick it.
- Wait for the message Credential Uploaded Successfully.
Security note: Keep the JSON file to yourself. It carries the secret for your Google project. Delete your local copy once GoodMeet shows it as uploaded.
Step 11: Approve access on Google #
The file tells GoodMeet which app to use. Now the Google account itself has to say yes, once, so GoodMeet can create events on its calendar.
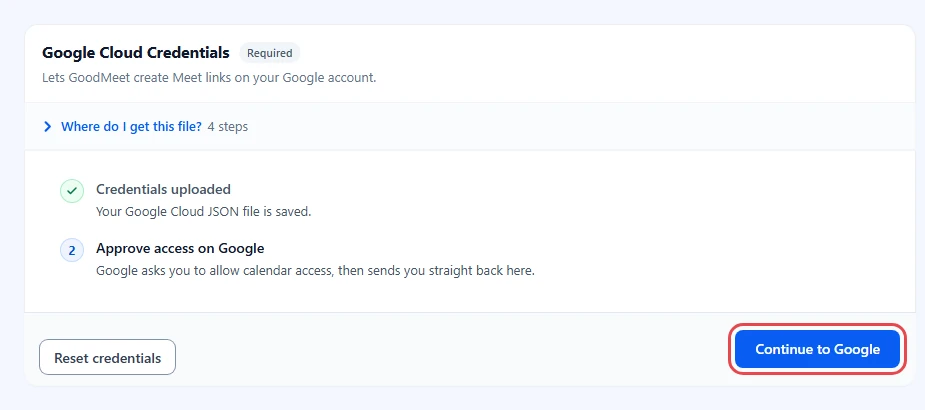
After the upload, the card shows Credentials uploaded and the next step, Approve access on Google.
- Click Continue to Google.
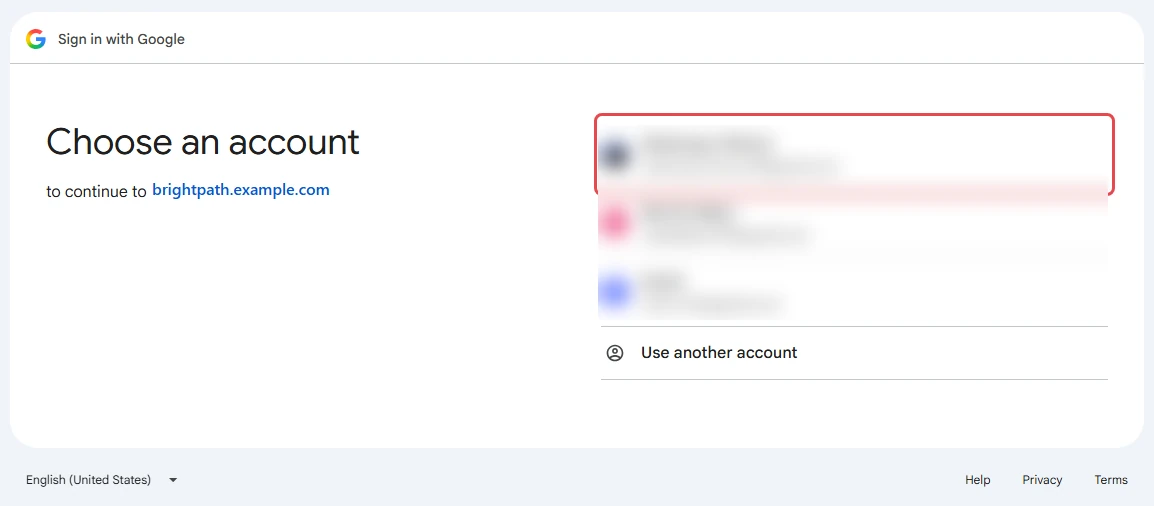
- Choose the Google account you added as a test user. Click Use another account if it is not listed.
- If Google warns that it has not verified the app, read the next section, then click Continue.
- Review the permissions. Check the app name and the account, then click Continue to allow access.
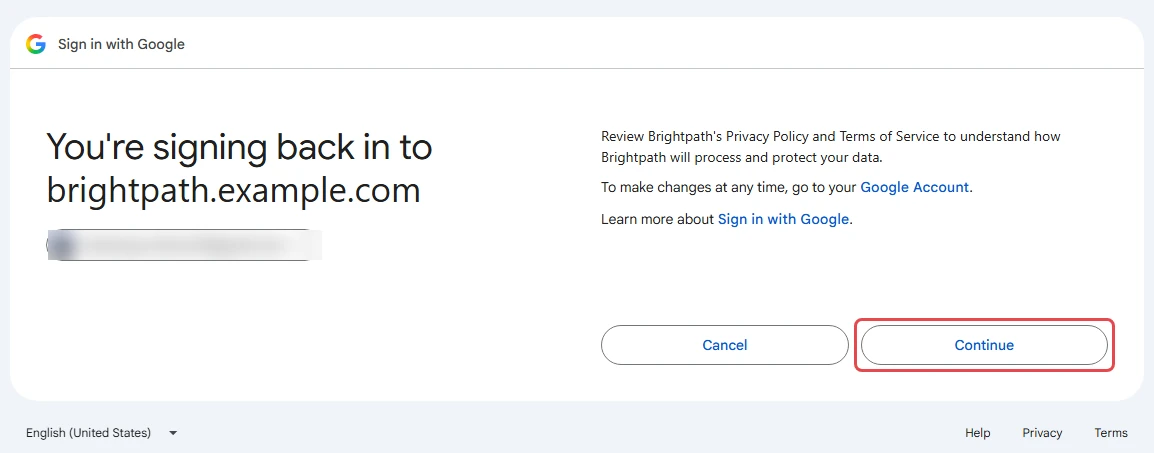
Important: Only approve when the app name, account and permissions are the ones you set up.
Step 12: Confirm the connection #
Google sends you back to GoodMeet > Settings, and the card shows the result straight away.
- Check that the Google Cloud Credentials card shows Connected.
- Check that Google services lists Google Meet and Google Calendar as Connected.
- Look at Google Classroom. It shows Allowed, Needs permission or Off, depending on your Classroom setup.
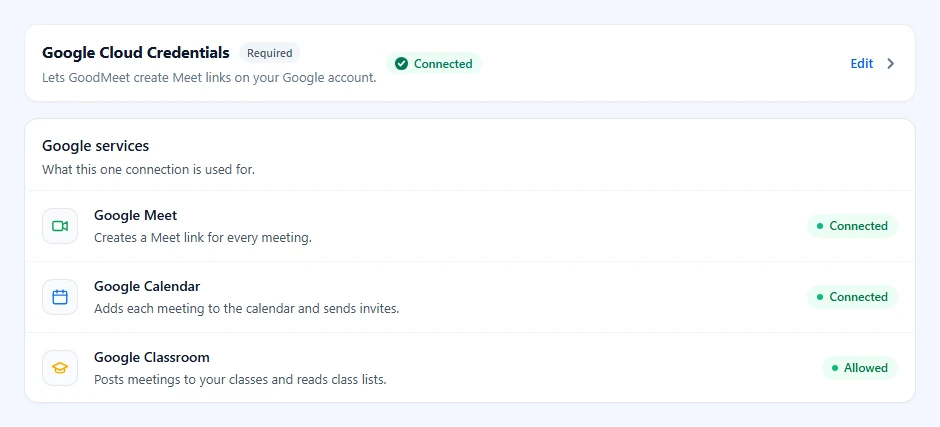
Tip: If Classroom shows Needs permission, click Allow access. Google asks once more, for the Classroom scopes only, on the same account. Meet and Calendar stay connected.
Google hasn’t verified this app #
A new External app shows a warning that Google has not verified it. This does not mean the app is unsafe. It means Google has not reviewed it for public use.
For your own site, you do not need verification. To get past the warning:
- Keep the app in testing mode, with every connecting account added as a test user.
- Continue only if you recognize the project and created the OAuth client yourself.
- Click Continue. If Google shows Advanced instead, click it, then click Go to followed by your app name.
Note: In testing mode, Google may expire the approval after seven days. If the connection drops, click Continue to Google on the card to approve again, or publish the app under Audience.
Publishing the app for production is a separate Google process. Google may ask for a verified domain, a home page, a privacy policy, terms of service, and a reason for each sensitive scope.
Troubleshooting #
Error 400: redirect_uri_mismatch #
The redirect URL saved in Google Cloud does not exactly match the one GoodMeet sends.
Check that:
- You copied the URL with Copy in GoodMeet, not by hand.
- You pasted it under Authorized redirect URIs, not Authorized JavaScript origins.
httpsandwwwmatch your site address exactly.- The client belongs to the same project you set up in this guide.
After you fix it, click Save in Google Cloud and wait a few minutes. Google can take a moment to pick up the change.
Error 403: access_denied #
The app is in testing mode and the account is not a test user, or someone clicked Cancel on Google’s screen.
Check that:
- The account is listed under Google Auth Platform > Audience > Test users.
- You pick that same account after clicking Continue to Google again.
Error 401: invalid_client #
The uploaded JSON belongs to a client that was deleted, or its secret was reset in Google Cloud.
- In GoodMeet, click Reset credentials.
- In Google Cloud, download a fresh JSON from your Web application client.
- Upload the new file and approve access again.
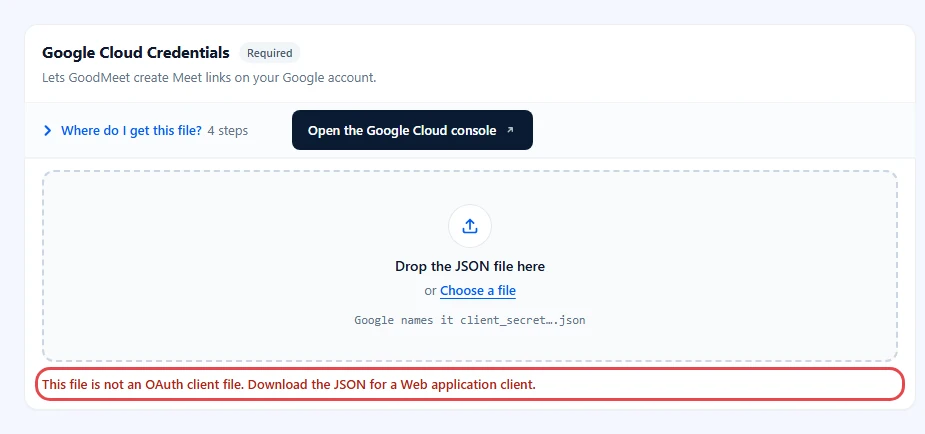
“This file is not an OAuth client file. Download the JSON for a Web application client.” #
GoodMeet rejected the file because it is not an OAuth client file. A service account key or a Desktop app client is the usual mix-up.
Check that:
- You downloaded the JSON from Google Auth Platform > Clients, for your Web application client.
- The file contains
client_id,client_secret,project_id,auth_uriandtoken_uri.
“That is not a .json file. Pick the one Google Cloud downloaded.” #
The file you dropped does not end in .json.
Check that:
- You upload the
client_secret_….jsonfile Google downloaded. - The file was not renamed, zipped or opened and saved in another program.
New meetings fail with “Could not create the meeting” #
GoodMeet shows this when Google refuses the request. The notice on the form names the reason, and Google’s own message sits underneath it.
Check that:
- The Google Calendar API is enabled in the project that holds your OAuth client. Go to APIs & Services > Library > Google Calendar API and click Enable if needed.
- The card in GoodMeet > Settings > Connect still shows Connected. If the notice offers Connect Google Meet or Reconnect Google Meet, click it and approve access again.
Google shows the approval screen every time #
This is expected. GoodMeet always asks Google for consent, so Google issues a long-lived refresh token. Review the screen and click Continue.
Frequently asked questions #
Do I need a paid Google Cloud account? #
No. Creating the project and the OAuth client, and enabling these APIs, does not need billing. Google’s usage limits still apply.
Can I paste a Client ID and Client Secret instead of a file? #
No. GoodMeet takes the JSON file Google downloads and reads the client ID and secret from it.
Which Google account do meetings use? #
The account you approve in Step 11. Meetings, Meet links and invites are created on that account’s Google Calendar.
How do I switch to a different Google account? #
Open the Google Cloud Credentials card with Edit and click Use a different account. Pick the new account in Google’s chooser and approve access. If the app is in testing mode, add the new account as a test user first.
Your uploaded JSON file stays as it is. Meetings created earlier stay on the old account’s calendar.
Do I need a second connection for Google Classroom? #
No. Classroom uses the same connection. Turn it on, then click Allow access in Google services to add its permissions.
What happens if I click Reset credentials? #
GoodMeet deletes the uploaded file and the Google token. New meetings cannot get Meet links until you upload a file and approve access again.
Security best practices #
- Never share the JSON file or client secret in screenshots, support tickets, email or code repositories.
- Give administrator access only to people you trust. Only administrators can upload or reset credentials.
- Remove test users and OAuth clients you no longer use.
- If the secret leaks, add a new secret in Google Cloud, delete the old one, and upload a fresh JSON file.
- Keep GoodMeet, WordPress and your other plugins up to date.
- Review connected apps from time to time at
https://myaccount.google.com/permissions.
You’re ready to create meetings with Google Meet #
Your site now talks to Google through your own Google Cloud project. Every new meeting gets a Google Meet link and a Google Calendar event. The client, the APIs, the test users and the secret stay in your own project. Next, create your first meeting, or connect your classes and courses.


