- Step 1: Open the User Access Tab
- Step 2: Choose Who Can Use the File Browser Page
- Step 3: Limit Them to Certain Folders (optional)
- Step 4: Give a Role or Person Their Own Folders (optional)
- Step 5: Choose Who Can Use the Modules Page
- Step 6: Choose Who Can Use the Members' Files Tab
- Step 7: Choose Who Can Change the Settings
- Step 8: Choose Who Can See the Analytics Page
- Step 9: Choose Who Can See the Get Started Page
- Step 10: Let Tutor LMS Instructors Use Their Own Drive (optional)
- Step 11: Save Your Changes
- Benefits of Sharing DriveHub Access
Do you want your editors, team members or a trusted client to browse Google Drive files or build modules without giving them full admin access? You can easily do this with DriveHub.
The User Access tab lets you choose, page by page, which user roles and which individual users can open each part of DriveHub in your WordPress dashboard. You can even give each role its own Google Drive folders. Administrators always keep full access.
Here is an easy, step-by-step guide to help you set it all up!
Step 1: Open the User Access Tab #
- Go to DriveHub > Settings from your WP-Admin.
- Click on User Access under Access in the settings menu.
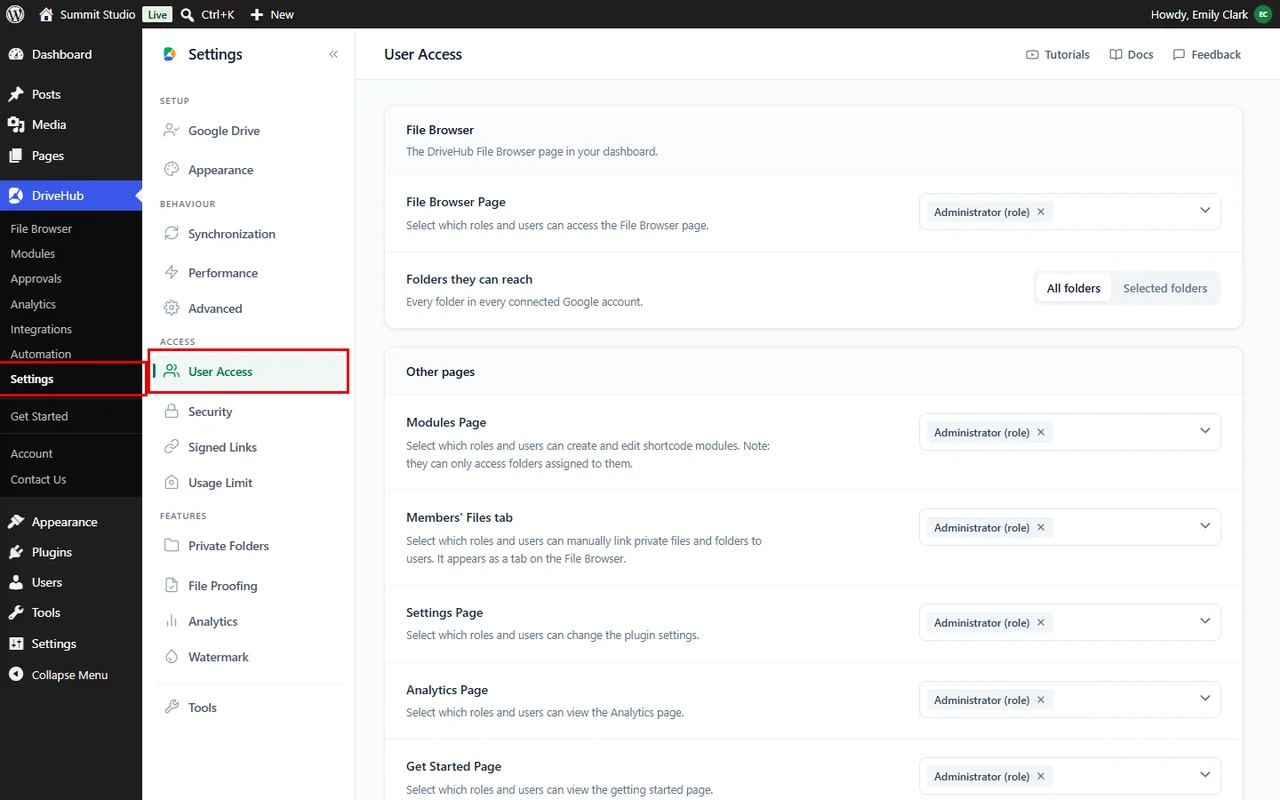
The tab is split into sections. File Browser and Other pages hold one row for each item in the DriveHub menu, so it is easy to see what you are giving access to.
Step 2: Choose Who Can Use the File Browser Page #
The File Browser is where people browse, upload and manage your Google Drive files from the dashboard. In the File Browser section:
- Click on the field next to File Browser Page.
- Pick the roles (for example Editor (role)) or the individual users who should have access. A tick shows they are selected.
- To take someone off the list, click the small × on their name.
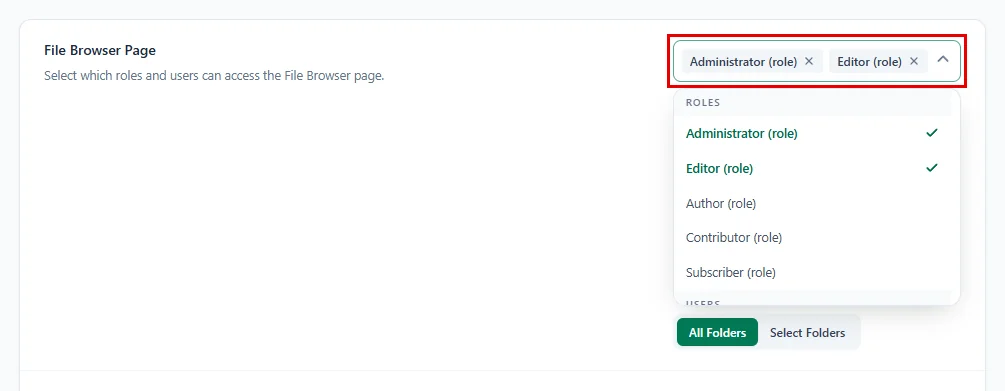
The list shows roles first, then users. If your site has many users, a Filter box appears at the top so you can find someone quickly.
Step 3: Limit Them to Certain Folders (optional) #
Right under it, Folders they can reach decides how much of your Google Drive these people see. By default it is set to All folders: every folder in every connected Google account. If you want them to see only a few folders, for example only Client Uploads:
- Next to Folders they can reach, click on Selected folders.
- Click on Add folders.
- Tick the folders in the Folders File Browser users can reach window and click Confirm Selection.
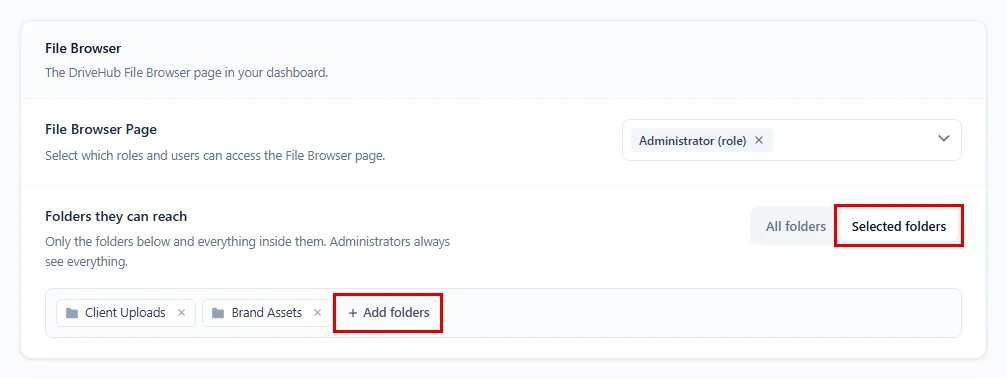
The chosen folders show as small tags. Click the × on a tag to remove it, or Add folders to add more. Until you add one, DriveHub warns No folders chosen yet, so the File Browser shows nothing.
From then on, the people you picked only see those folders (and everything inside them) when they open the File Browser. The rest of your Google Drive stays hidden from them. Administrators always see everything.
Note: Selected folders needs DriveHub Pro.
Step 4: Give a Role or Person Their Own Folders (optional) #
Do your editors need Brand Assets, while a client should only see Client Proposals? Once Selected folders is on, a Folders by role section appears below the File Browser section:
- Open the Add role or person menu at the top right of Folders by role.
- Pick a role under Roles, or one user under People.
- The folder window opens right away. Tick their folders and click Confirm Selection.
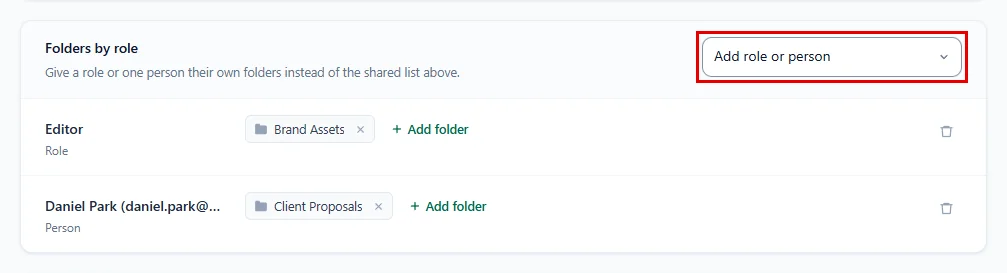
Each entry shows its name, whether it is a Role or a Person, and its folders:
- Click on Add folder to give them another folder.
- Click the × on a folder to take it away.
- Click the bin button at the end of the row to remove the whole entry.
People with an entry here see only their own folders instead of the shared list from Step 3. If someone matches both a role entry and a person entry, they see the folders of both. Everyone else with File Browser access keeps the shared list. While nobody has an entry, you see Nobody has their own folders yet, so everyone with access gets the folders chosen above.
Important: An entry with no folders reads Sees no folders until you add one. People in it see nothing in the File Browser, so add a folder or remove the entry.
Folders by role only decides which folders they see. They still need to be on the File Browser Page list from Step 2 to open the File Browser at all.
Note: Folders by role needs DriveHub Pro.
Step 5: Choose Who Can Use the Modules Page #
The rest of the pages are in the Other pages section. The Modules page is where galleries, file lists, uploaders and other shortcode modules are created and edited:
- Click on the field next to Modules Page.
- Pick the roles or users who should be able to build and edit modules.

People you add here can only use the Google Drive folders they are allowed to see in the File Browser, so your private folders stay private.
Step 6: Choose Who Can Use the Members’ Files Tab #
The Members’ Files tab on the File Browser is where you link private files and folders to individual users:
- Click on the field next to Members’ Files tab.
- Pick the roles or users who may link files to members.

The people you add here see an extra Members’ Files tab on the File Browser page, where they can link private files and folders to individual users.
Note: Members’ Files tab needs DriveHub Pro.
Step 7: Choose Who Can Change the Settings #
- Click on the field next to Settings Page.
- Pick only the people you trust to change how DriveHub works, because this page includes your Google connection and security options.

Step 8: Choose Who Can See the Analytics Page #
- Click on the field next to Analytics Page.
- Pick the roles or users who may see views, downloads and other activity on your files.

The people you add here see Analytics in their DriveHub menu and can open the full statistics for your files.
Note: Analytics Page needs DriveHub Pro.
Step 9: Choose Who Can See the Get Started Page #
- Click on the field next to Get Started Page.
- Pick the roles or users who should see DriveHub’s getting started page with its setup tips.

Step 10: Let Tutor LMS Instructors Use Their Own Drive (optional) #
Running courses with Tutor LMS? A Tutor LMS section appears at the bottom of the tab:
- Turn on Instructors use their own Google Drive.
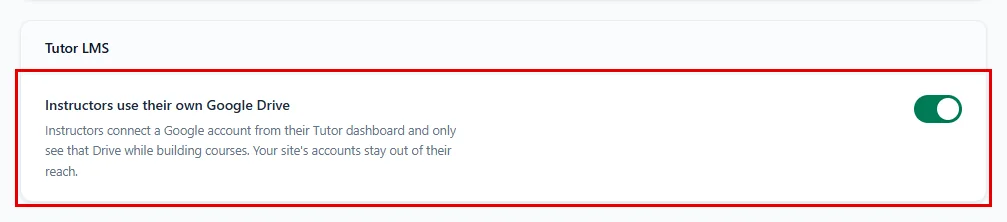
Instructors can then connect a Google account from their Tutor dashboard and only see that Drive while building courses. Your site’s own Google accounts stay out of their reach. Our guide on how to let Tutor LMS instructors use their own Google Drive walks through it.
Note: This needs DriveHub Pro, and the section only shows while Tutor LMS is active.
Step 11: Save Your Changes #
- Click on Save changes in the bar at the bottom of the screen.

Don’t forget to save; the new access only applies after you click Save changes.
And that’s it! The next time your chosen users log in, they will see the DriveHub pages you allowed in their dashboard menu, with only the folders you gave them, and nothing more.
Benefits of Sharing DriveHub Access #
- Teamwork without risk: Editors can manage files and modules without full admin rights.
- Page-by-page control: Give someone the File Browser but keep Settings to yourself.
- The right folders for each team: Give every role, or one person, their own folders.
- Roles or people: Allow a whole role, or just one named user.
- Admins stay in charge: Administrators always keep access to everything.
With DriveHub, your whole team can work with Google Drive files from WordPress, safely.


