- Before you begin
- Step 1: Install LearnPress
- Step 2: Install and activate ZooMeet
- Step 3: Connect your Zoom account
- Step 4: Turn on the LearnPress integration
- Step 5: Open the meeting form (Access and controls)
- Step 6: Pick the course
- Step 7: Choose where it shows
- Step 8: Add the meeting to the course
- Step 9: Choose who can join and save
- Step 10: Attach meetings in the course editor (optional)
- Step 11: Add a live session to a lesson
- Step 12: Or use the LearnPress Course Builder
- Step 13: Manage meetings from the instructor profile
- Step 14: Check your course page
- Benefits of using ZooMeet with LearnPress
- What your students see
- Troubleshooting
- Frequently asked questions
- Security best practices
- You're ready to run live classes in LearnPress
If you want your LearnPress students to join live Zoom classes from the course itself, you’re in the right place. This guide shows you how to put a ZooMeet meeting on a course page, in a lesson, or both, step by step.
Students see the date, a countdown when the class is close, and a join button while it is live. You can attach meetings from the ZooMeet meeting form, the classic course editor or the LearnPress Course Builder.
By the end of this guide, you will have:
- The LearnPress integration turned on in ZooMeet
- A Zoom meeting in the Live sessions list on your course page
- A live session card at the top of a lesson
- Only your course students able to open the meeting
- Instructors managing their meetings from their LearnPress profile
Estimated setup time: 10 minutes. Attaching a meeting never changes course progress, because the meeting is not a curriculum item.
Note: Requires ZooMeet Pro.
Before you begin #
Make sure you have:
- An administrator account on your WordPress site
- At least one LearnPress course with a lesson
- A Zoom account you can connect to ZooMeet
- A LearnPress instructor account, if you want to try the profile steps
Let’s get started.
Step 1: Install LearnPress #
First, make sure LearnPress is installed and activated. ZooMeet adds its live sessions to LearnPress’s own course and lesson pages.
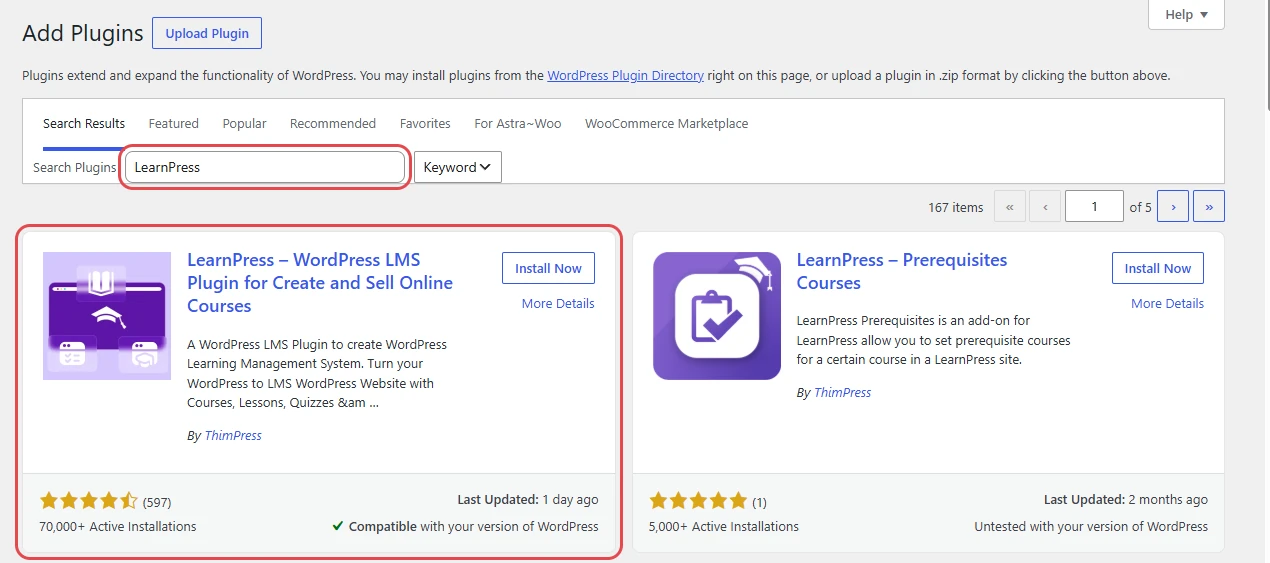
- In the WordPress admin menu, go to Plugins > Add New Plugin.
- Search for LearnPress.
- Click Install Now, then Activate.
Note: The Zoom live sessions tab in the front-end Course Builder needs LearnPress 4.3.8 or later. Older versions can still use the classic course editor.
Step 2: Install and activate ZooMeet #
ZooMeet installs from the plugin directory too. The LMS features live in ZooMeet Pro, so you add that next.
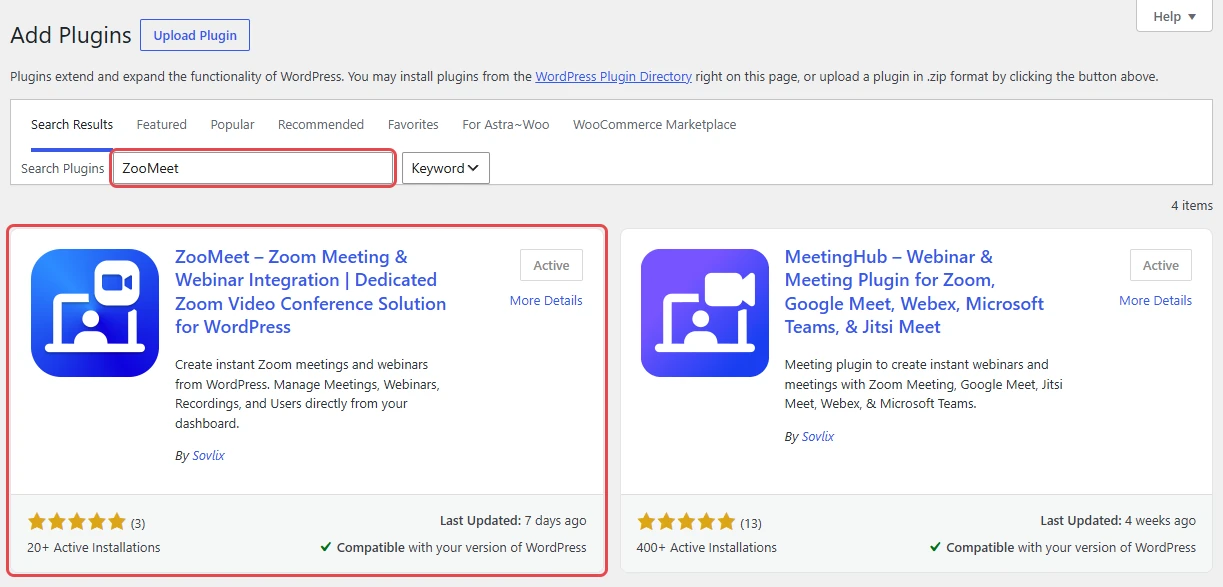
- Go to Plugins > Add New Plugin.
- Search for ZooMeet.
- Click Install Now, then Activate.
To use the Pro features in this guide, add ZooMeet Pro from inside ZooMeet. There is nothing to upload.
- In WordPress admin, open ZooMeet and click Upgrade, then complete the checkout.
- Go to ZooMeet > Account. Your license shows there, and ZooMeet offers to install ZooMeet Pro.
- Install ZooMeet Pro, then activate it.
Step 3: Connect your Zoom account #
ZooMeet cannot create Zoom meetings until it is connected to your Zoom account. If you already did this, skip to Step 4.
- Go to ZooMeet > Settings and click Connect.
- Paste the Account ID, Client ID and Client Secret from your Zoom Server-to-Server OAuth app.
- Save the settings and check that the connection succeeds.
Read our step-by-step Zoom setup guide for the full walkthrough, including how to create the Zoom app.
Step 4: Turn on the LearnPress integration #
The integration switch controls every LearnPress feature in this guide, from the course picker to the Live sessions list and the Zoom Events profile tab.
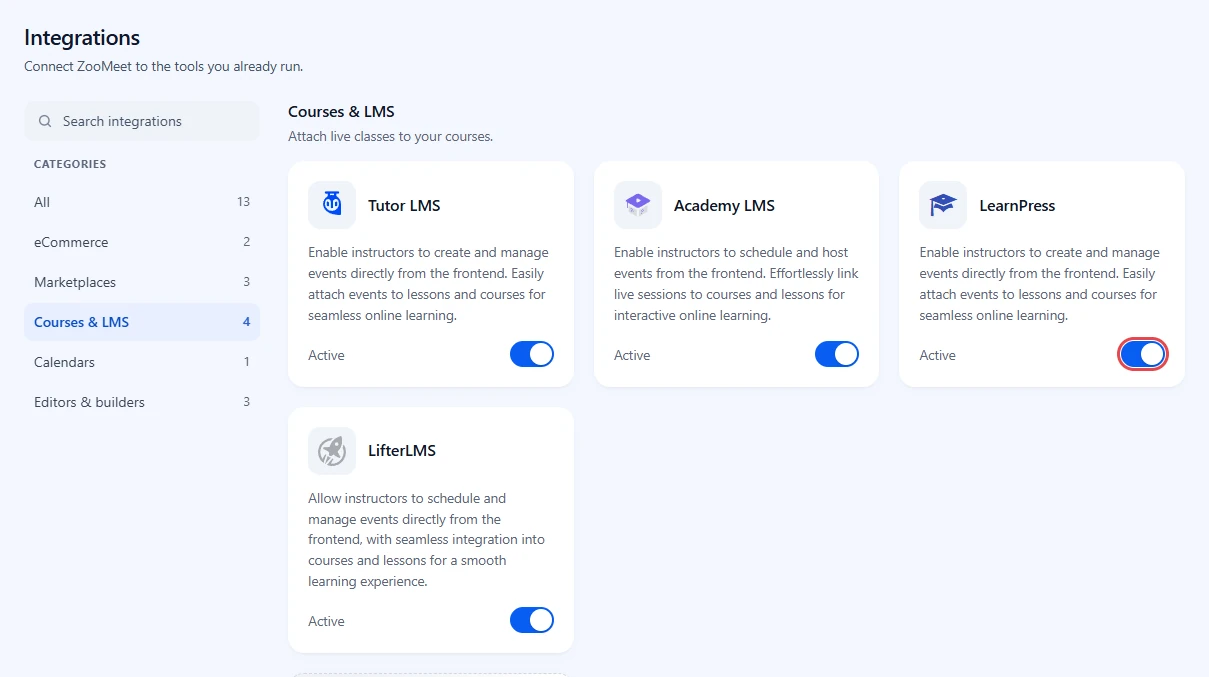
- In the WordPress admin menu, go to ZooMeet > Integrations.
- In Categories, click Courses & LMS.
- On the LearnPress card, switch the toggle on. The card reads Active.
Now comes the main part: adding a meeting to your course.
Step 5: Open the meeting form (Access and controls) #
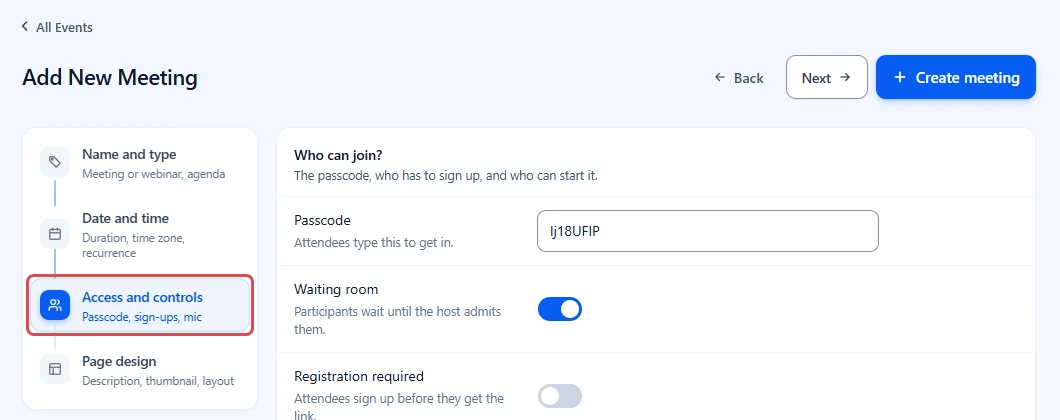
You can attach a new meeting or one you already have. The course options sit in the Access and controls step.
- Go to ZooMeet > Add New Event, or open an existing meeting from ZooMeet > All Events to edit it.
- Fill in the Meeting name, then the date and time, as usual.
- In the steps on the left, click Access and controls.
Step 6: Pick the course #
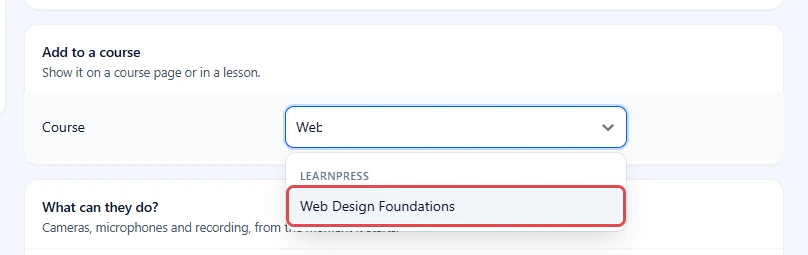
The Add to a course card reads “Show it on a course page or in a lesson.” It lists the courses you can edit.
- Scroll down to the Add to a course card.
- Click the Course field and type part of the course name.
- Choose your course from the LEARNPRESS group, for example Web Design Foundations.
Step 7: Choose where it shows #
Pick Course page to add the meeting to the course list, or a lesson to show a card inside that lesson.
- In Show it on, keep Course page, or pick a lesson. Lessons are grouped under their section names.
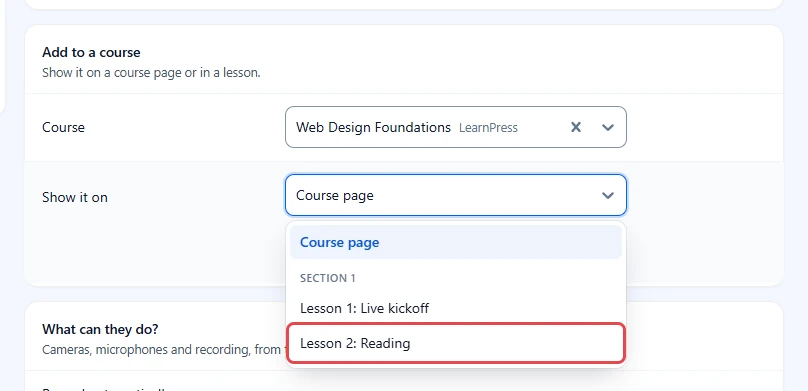
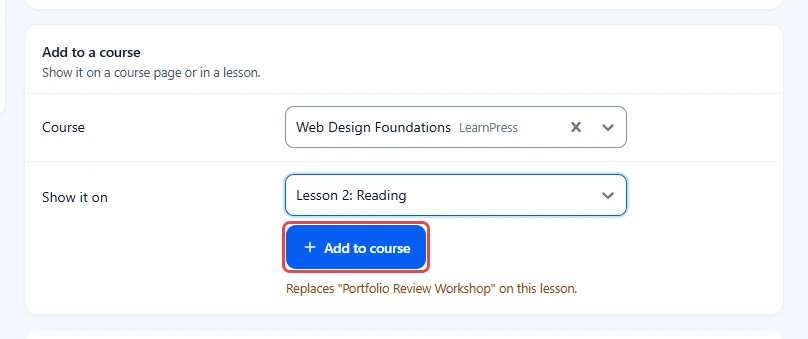
Important: A lesson holds one meeting. If the lesson already has one, the card warns you: Replaces “…” on this lesson.
Step 8: Add the meeting to the course #
- Click Add to course.
- To show the same meeting in more places, use the Add another field and repeat Steps 6 to 8.
Step 9: Choose who can join and save #
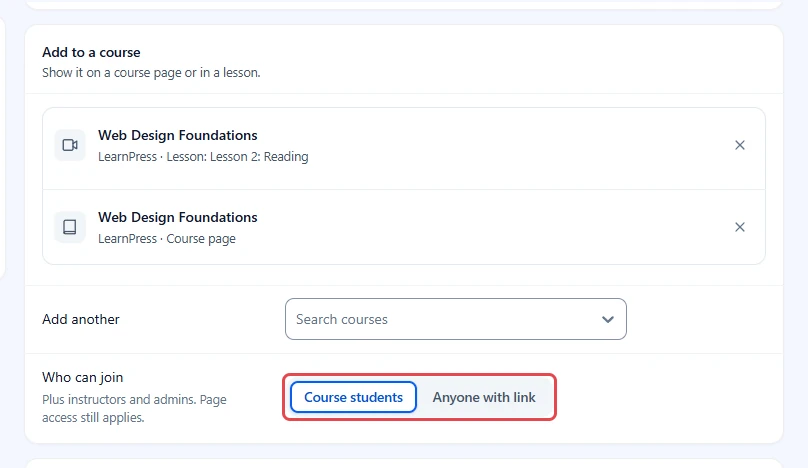
Every place you added appears as a row. Who can join decides whether the meeting stays with your students.
- Check the rows. Click the X on a row to remove it.
- Next to Who can join, click Change.
- Choose Course students (the default) or Anyone with link.
- Click Create meeting at the top of the form, or Update meeting when you edit.

Note: With Course students, enrolled students, the course’s instructors and administrators can open the meeting page. Everyone else sees For students of this course.
Step 10: Attach meetings in the course editor (optional) #
You can also attach meetings while you edit the course in WordPress admin. All the places in this guide save the same links.
- Go to LearnPress > Courses and edit the course.
- In the Course Settings box, click Zoom live sessions.
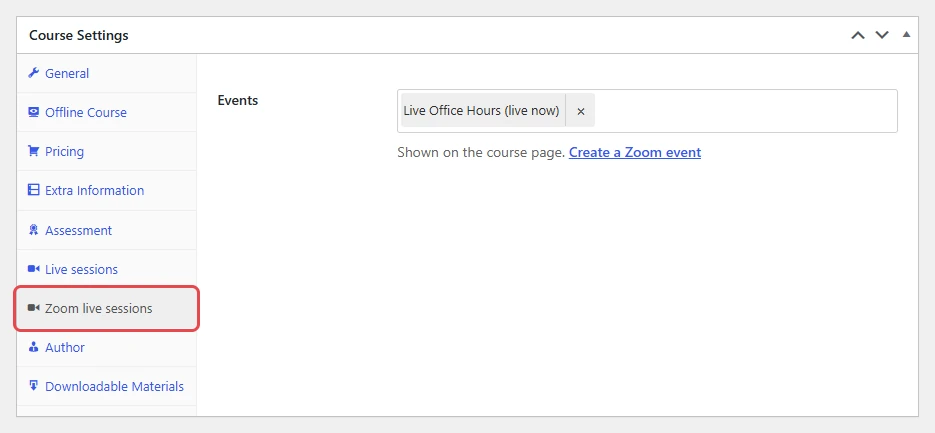
- Click the Events field and type part of an event name.
- Click the event to add it. Click × on an event to remove it.
- Click Update to save the course.
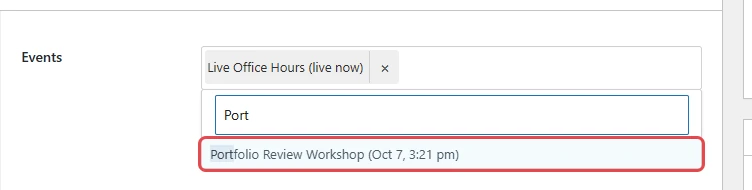
Tip: The LearnPress Live sessions tab next to it belongs to a different plugin. ZooMeet’s tab is always called Zoom live sessions.
Step 11: Add a live session to a lesson #
A lesson can show one meeting as a card at the top. It fits a class that belongs to one part of the course.
- Go to LearnPress > Lessons and edit the lesson.
- In the Lesson Settings box, pick a meeting in Zoom live session, or None to remove it.
- Click Update.

Step 12: Or use the LearnPress Course Builder #
If you build courses in LearnPress’s front-end Course Builder, the same tab is there.
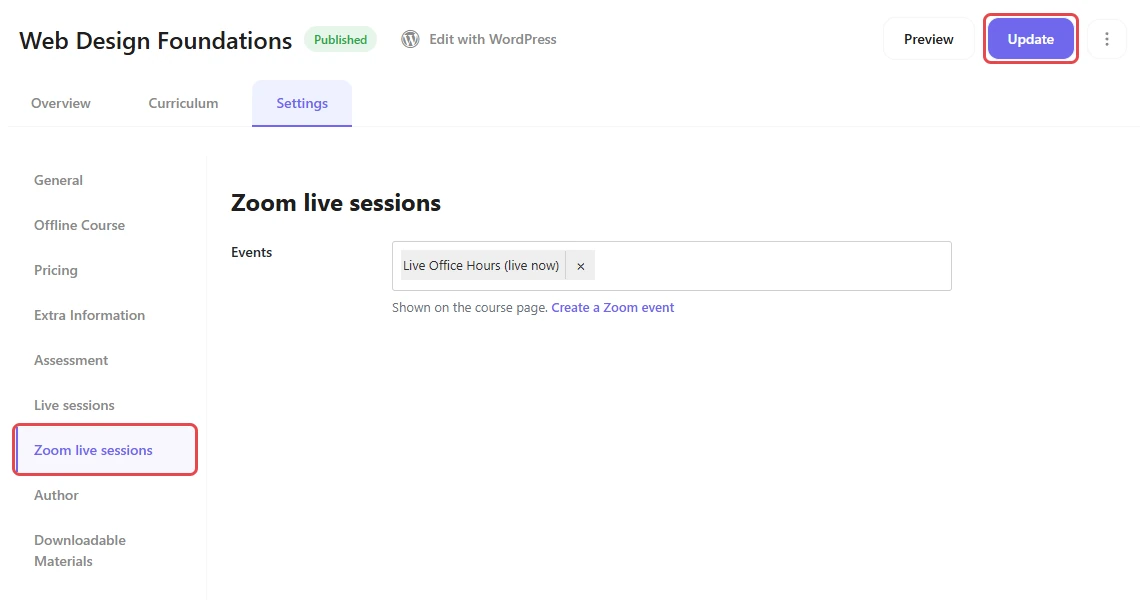
- Open the course in Course Builder and click the Settings tab.
- Click Zoom live sessions, then pick events in Events.
- Click Update.
Step 13: Manage meetings from the instructor profile #
Instructors who do not use WordPress admin create and attach meetings from their LearnPress profile.
- Open your LearnPress profile and click the Zoom Events tab.
- Click Add new event to create a meeting, or the pencil icon to edit one.
- In the meeting form, open Access and controls and use the Add to a course card as in Steps 6 to 9.
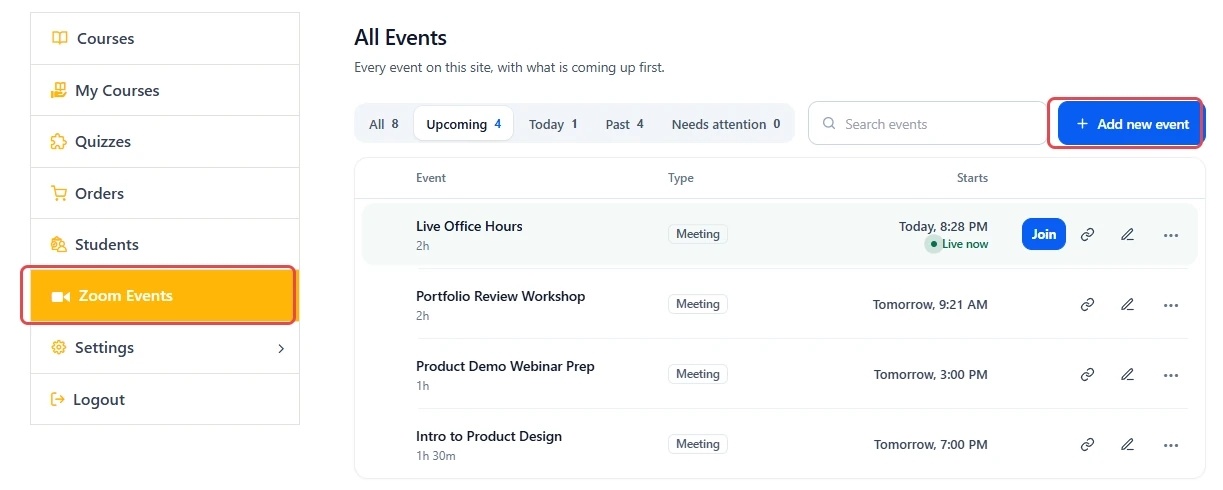
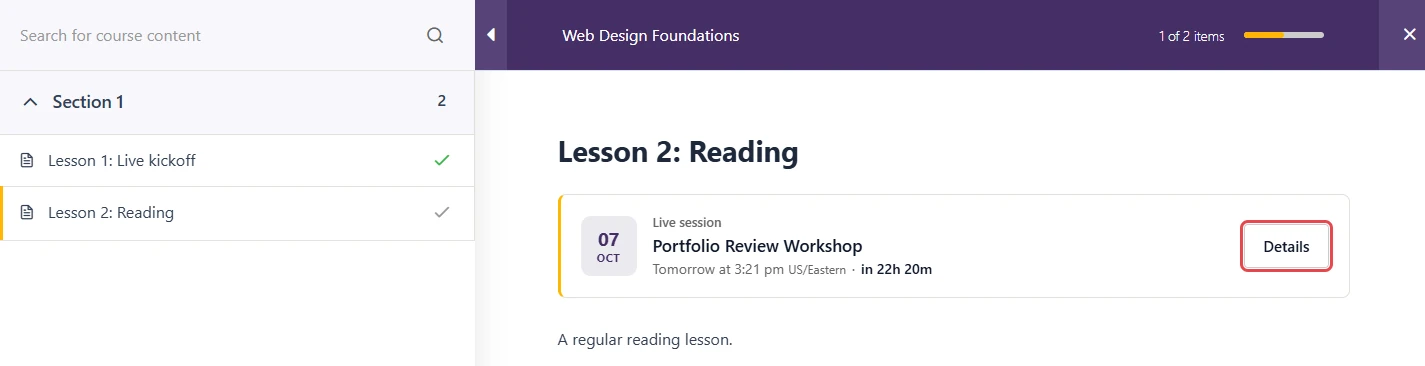
Each start time shows in the meeting’s own time zone. When that zone differs from your site’s, the zone name follows the time, for example Tomorrow, 3:21 PM US/Eastern.
Note: The Zoom Events tab shows for LearnPress instructors and administrators. Instructors see only the courses they created or co-teach in Add to a course.
Step 14: Check your course page #
Your meeting is saved and attached, so the course page already shows it. Check it the way a visitor does.
- Open a private browser window, so you are logged out.
- Go to your course page, for example Web Design Foundations.
- Scroll to Live sessions, above Curriculum.
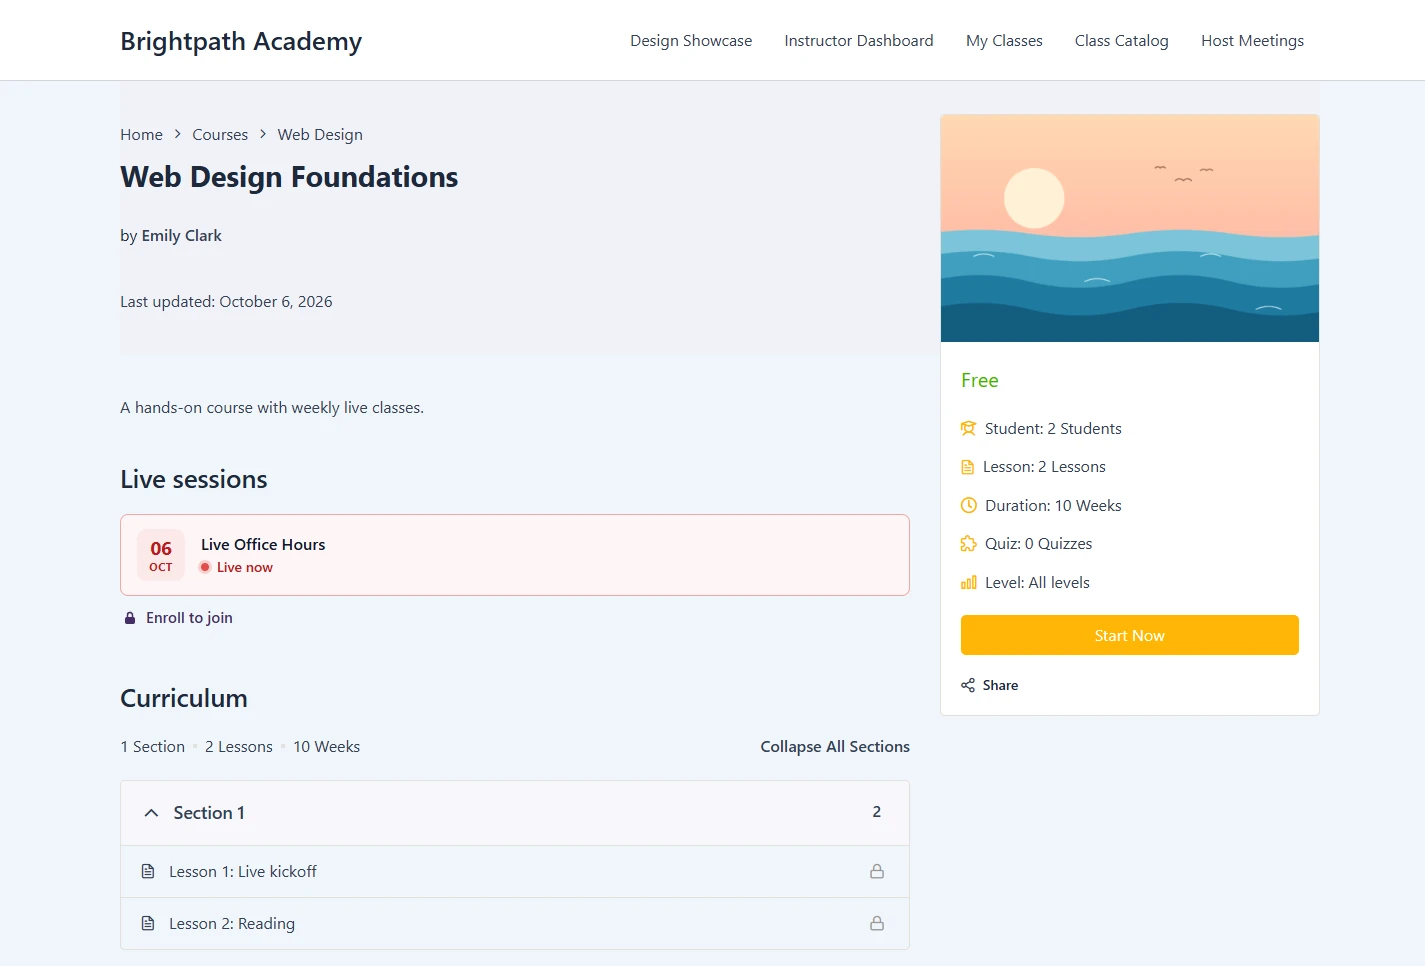
The list shows dates and titles with no join button, plus one Enroll to join link that jumps to the enroll button.
Benefits of using ZooMeet with LearnPress #
- Attach from anywhere: The ZooMeet form, the course editor and the Course Builder all save the same links.
- Classes for enrolled students only: With Course students, only enrolled students, course instructors and administrators get in.
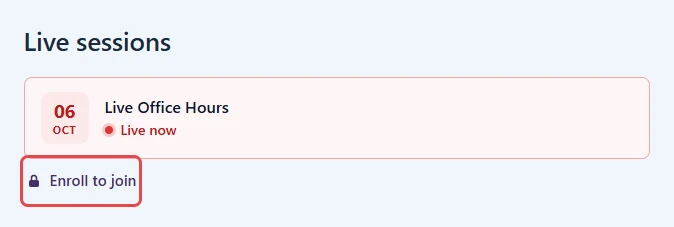
- A reason to enroll: Visitors see the live schedule and an Enroll to join link, never the Zoom link.
- Progress stays clean: A live session is never a curriculum item.
Your students learn and join class in the same place.
What your students see #
Logged-in users who are not enrolled #
They see the same list as visitors, with Enroll to join and no join button.
Enrolled students #
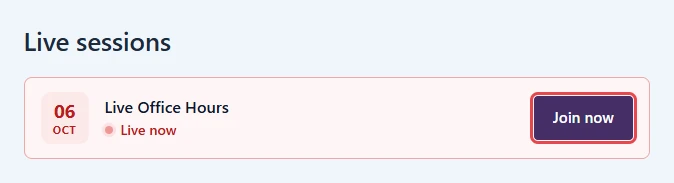
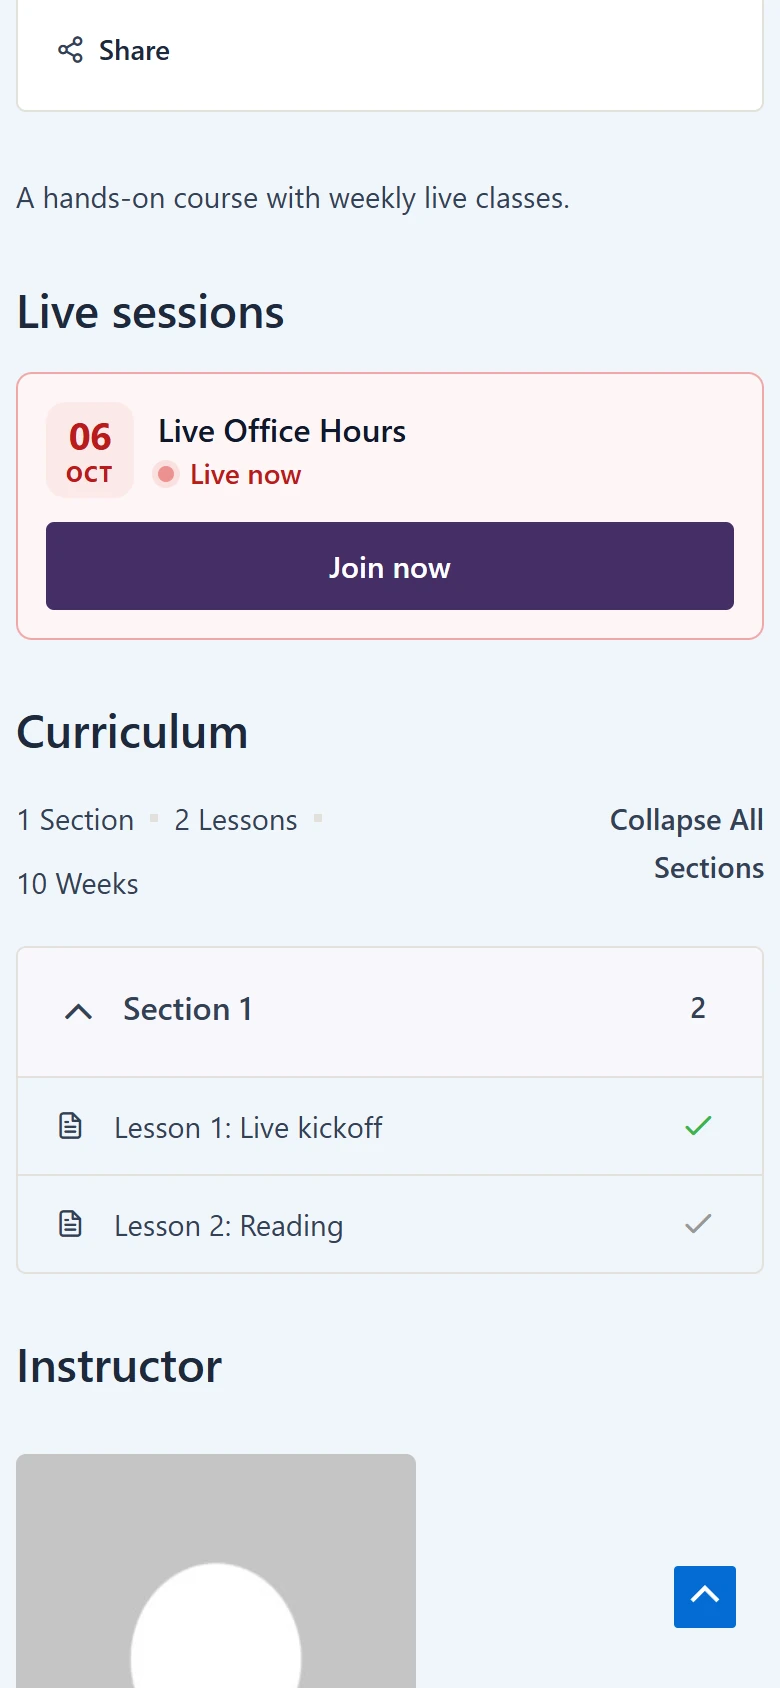
While a session is live, the row says Live now and shows Join now. Upcoming rows show Details and a countdown when the start is less than a day away.
Inside a lesson #
A lesson with a live session shows the meeting card under the lesson title.
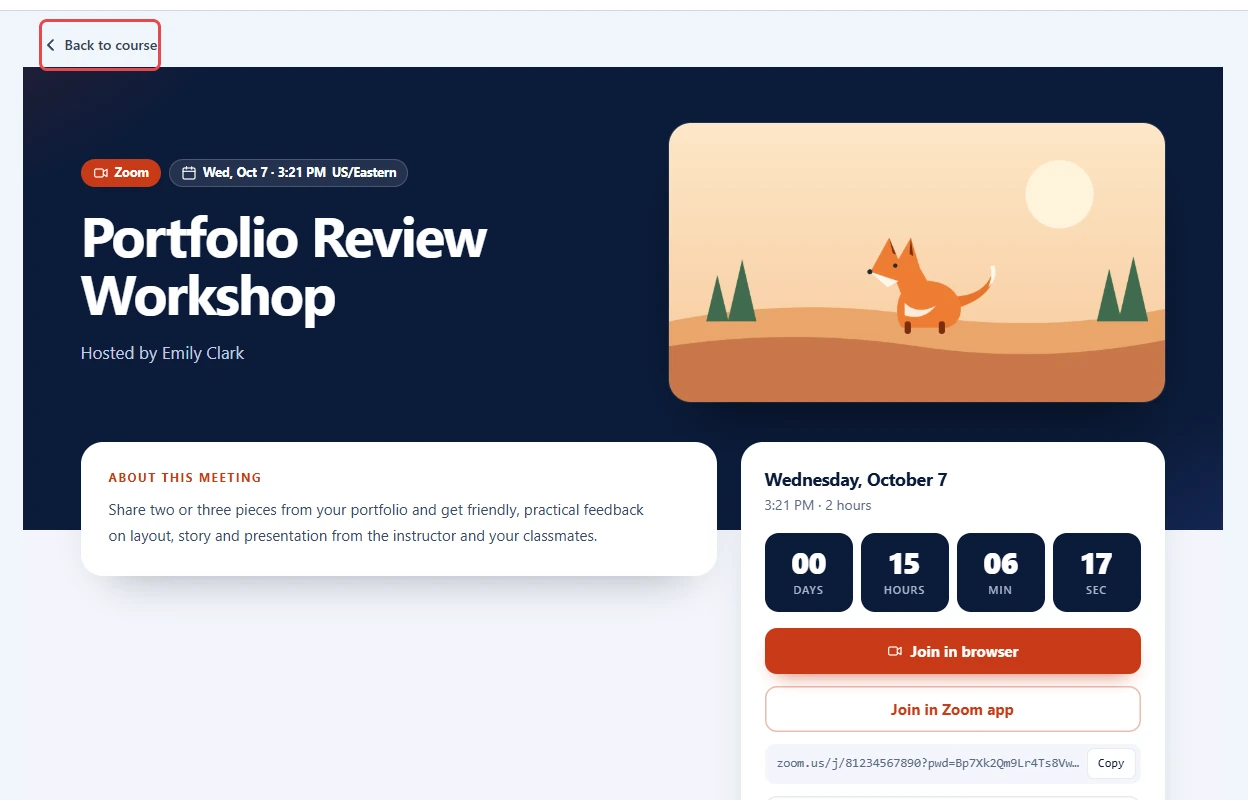
On the meeting page #
Students who open a meeting from a course get a Back to course link at the top.
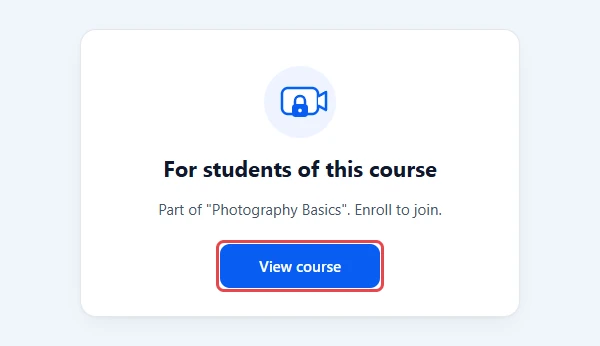
Someone who is not enrolled and opens the meeting link directly sees a locked card instead.
On a phone #
Troubleshooting #
The Add to a course card does not appear in the meeting form #
The card only loads when a supported LMS is active and switched on.
Check that:
- LearnPress is active under Plugins.
- LearnPress is switched on in ZooMeet > Integrations.
- You reloaded the meeting form after turning it on.
“No courses yet” #
The course picker lists the courses you can edit. Instructors see only courses they created or co-teach; administrators see every course.
Check that:
- The instructor is the course author or a co-instructor in LearnPress.
- Or create a course with Create a course in LearnPress, or ask an administrator to attach the meeting.
The Zoom live sessions tab is missing in Course Builder #
The Course Builder tab needs LearnPress 4.3.8 or later.
- Update LearnPress, or
- Use the Zoom live sessions tab in the course editor in WordPress admin.
The Zoom Events tab is missing from the LearnPress profile #
The tab shows only for LearnPress instructors and administrators, and only while the integration is on.
Check that:
- The user has the LearnPress instructor role.
- LearnPress is switched on in ZooMeet > Integrations.
Students see “For students of this course” #
The meeting is set to Course students, and this user is not enrolled in any of its courses.
- Enroll the student, or
- Set Who can join to Anyone with link and click Update meeting.
Students see Details but no Join now #
Join now shows only while the session is live. Before that, students see Details, which opens the meeting page with a countdown.
A lesson shows the wrong meeting #
A lesson holds one meeting, so adding another meeting to the same lesson replaces the first.
- Open the lesson’s Zoom live session field.
- Pick the meeting you want and click Update.
Frequently asked questions #
Does a live session count toward course progress? #
No. The meeting is shown inside a lesson or on the course page. It is never a curriculum item, so progress does not change.
Can one meeting be on several courses? #
Yes. Add one row per course or lesson in the Add to a course card.
Can a lesson hold more than one meeting? #
No. One meeting per lesson. A course page can list many.
What happens when I delete a meeting? #
ZooMeet removes it from every course and lesson it was attached to.
Do students see the Zoom link on the course page? #
No. Join now opens the ZooMeet meeting page, which checks access first.
Security best practices #
- Keep Who can join on Course students for paid or private classes.
- Share the course page, not the Zoom link. The meeting page checks access every time.
- Give the LearnPress instructor role only to people who should schedule classes.
You’re ready to run live classes in LearnPress #
Your LearnPress courses now list their live Zoom sessions, and a lesson can show its own class card. Only enrolled students can join, and instructors manage meetings from their profile. Next, set up the same flow for another LMS.


