- Before you begin
- Install and activate ZooMeet first
- Step 1: Open the Connect screen in ZooMeet
- Step 2: Open the built-in setup guide
- Step 3: Open the developer area of the Zoom App Marketplace
- Step 4: Build a Server to Server OAuth App
- Step 5: Find the app credentials
- Step 6: Fill in the app information
- Step 7: Add the scopes
- View account information
- View and manage account information
- View and manage sub accounts
- View all user meeting summaries
- View all user meetings
- View past meetings
- View and manage all user meetings
- View meeting tokens
- View meeting registrants
- View and manage sub-account meetings
- View all user recordings
- View and manage all user recordings
- View and manage sub-account recordings
- View archived files
- View report data
- View sub-account report data
- View all user information
- View user's ZAK token
- View users and manage users
- View and manage sub-account users
- Manage event speaker information
- View all events information
- View all user webinars
- View and manage all user webinars
- View and manage sub-account webinars
- Step 8: Activate the app
- Step 9: Paste the keys into ZooMeet and connect
- Step 10: Confirm the connection
- Next step
- Troubleshooting
- Frequently asked questions
- Security best practices
- You're ready to create Zoom meetings
This guide sets up the Server-to-Server OAuth card in ZooMeet > Settings > Connect, the connection every ZooMeet feature needs. It works through a small Server-to-Server OAuth app that you create in your own Zoom account. This app lets ZooMeet create and manage meetings, webinars, recordings, users and reports for you.
You build the app once in the Zoom App Marketplace, copy its three keys, and paste them into ZooMeet. Nobody else sits between your site and Zoom, and you can remove the app at any time.
By the end of this guide, you will have:
- A Server-to-Server OAuth app with every scope ZooMeet uses, activated on your Zoom account
- Your Account ID, Client ID and Client secret saved in ZooMeet
- A green Connected badge on the Server-to-Server OAuth card
Estimated setup time: 5 minutes.
Before you begin #
Make sure you have:
- A Zoom account where you are the owner or an admin, with permission to build apps in the Zoom App Marketplace
- An administrator account on your WordPress site
- ZooMeet installed and activated
Let’s get started.
Install and activate ZooMeet first #
If ZooMeet is already active on your site, skip to Step 1.
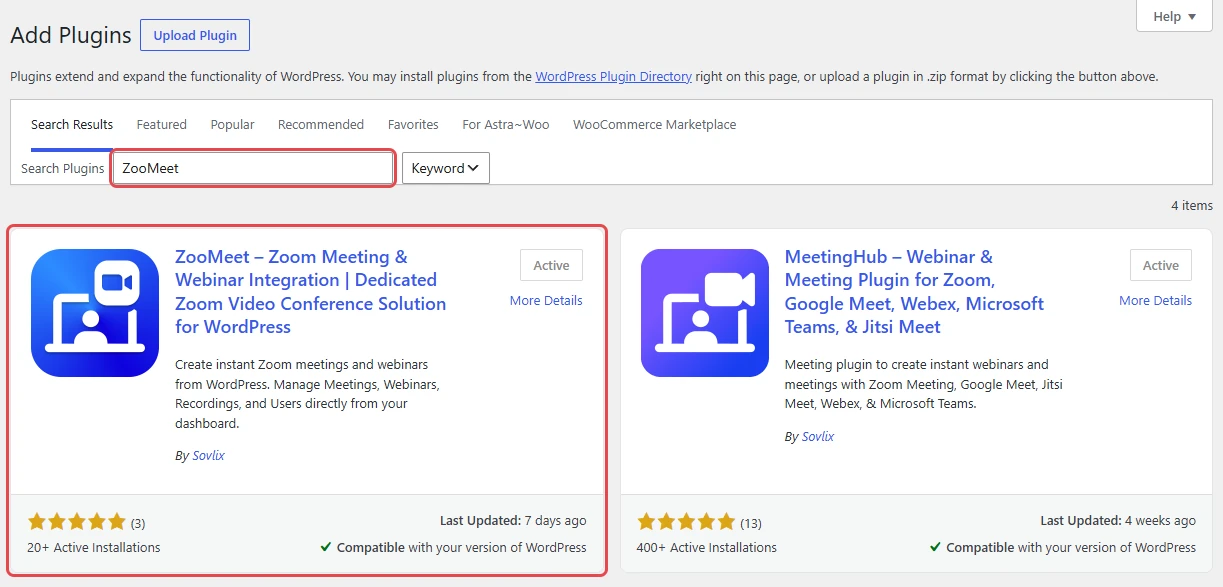
- In the WordPress admin menu, go to Plugins > Add New Plugin.
- Search for ZooMeet.
- Click Install Now, then Activate.
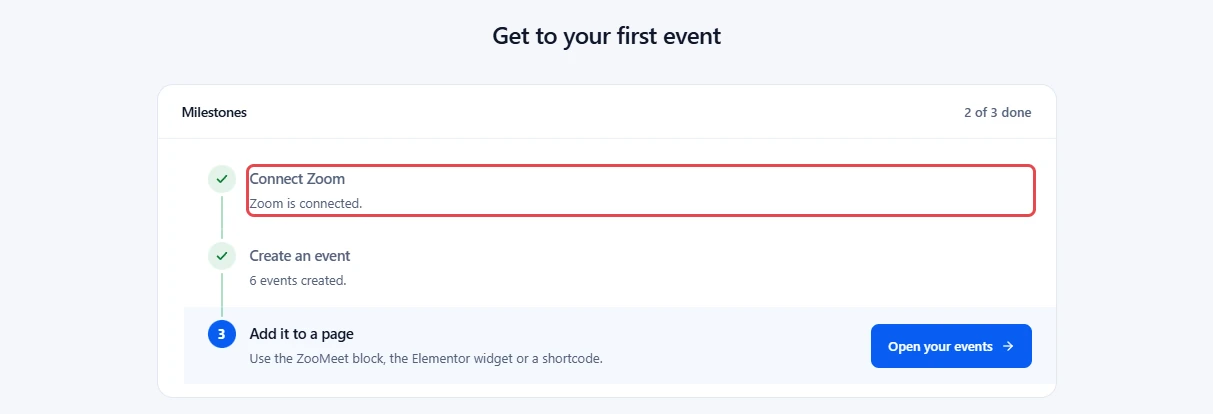
Tip: After activation, ZooMeet > Get Started lists your setup milestones. The Connect Zoom milestone opens the same screen as Step 1, and shows a tick once you finish this guide.
Now comes the main part: creating the Zoom app and connecting it to ZooMeet.
Step 1: Open the Connect screen in ZooMeet #
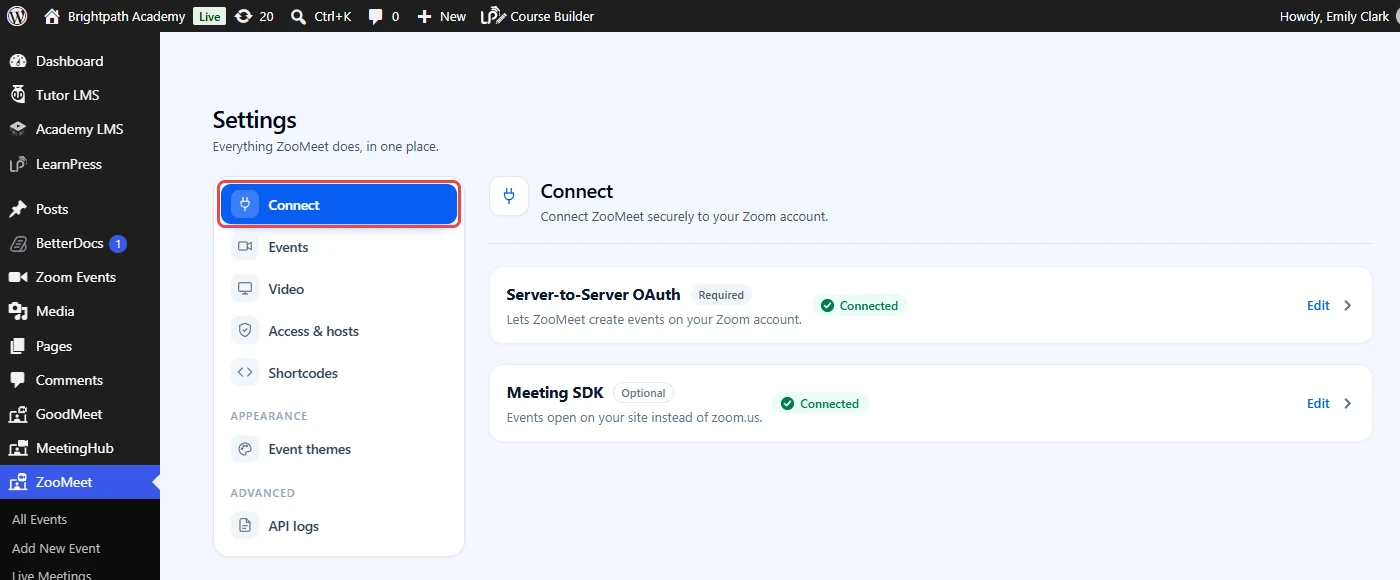
Everything ZooMeet needs from Zoom goes into the Connect section of the settings. Keep it open in its own tab while you work in Zoom.
- In the WordPress admin menu, go to ZooMeet > Settings.
- Click Connect at the top of the settings menu.
- Find the Server-to-Server OAuth card, marked Required. The Meeting SDK card below it, marked Optional, is for Join in browser and is not needed here.
Step 2: Open the built-in setup guide #
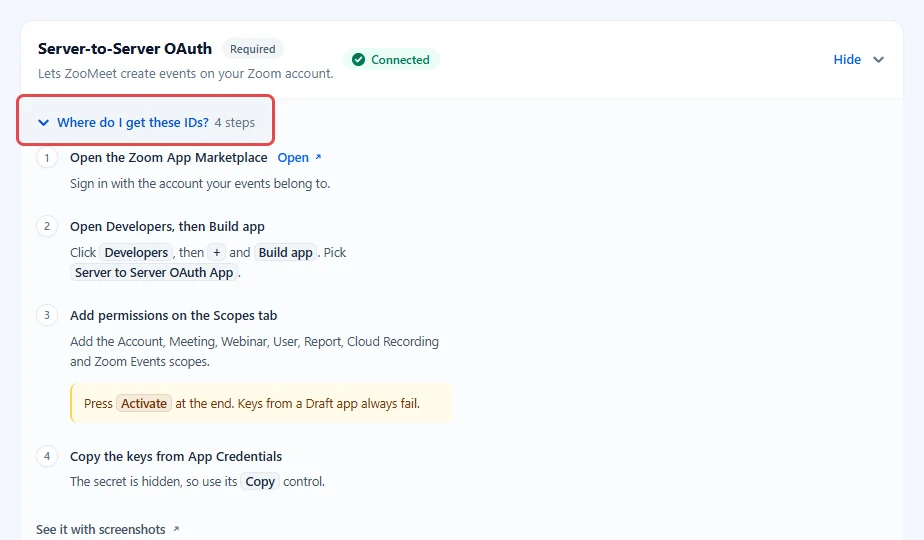
Each card carries a short checklist of this guide. It makes a handy reference while you click through Zoom.
- On the Server-to-Server OAuth card, click Edit (or the card itself if it is not connected yet).
- Click Where do I get these IDs?
- Check that the card lists four steps, starting with Open the Zoom App Marketplace.
This app is the connection itself. Every call ZooMeet makes to Zoom, from creating a meeting to listing recordings, is signed with the token these keys produce.
Step 3: Open the developer area of the Zoom App Marketplace #
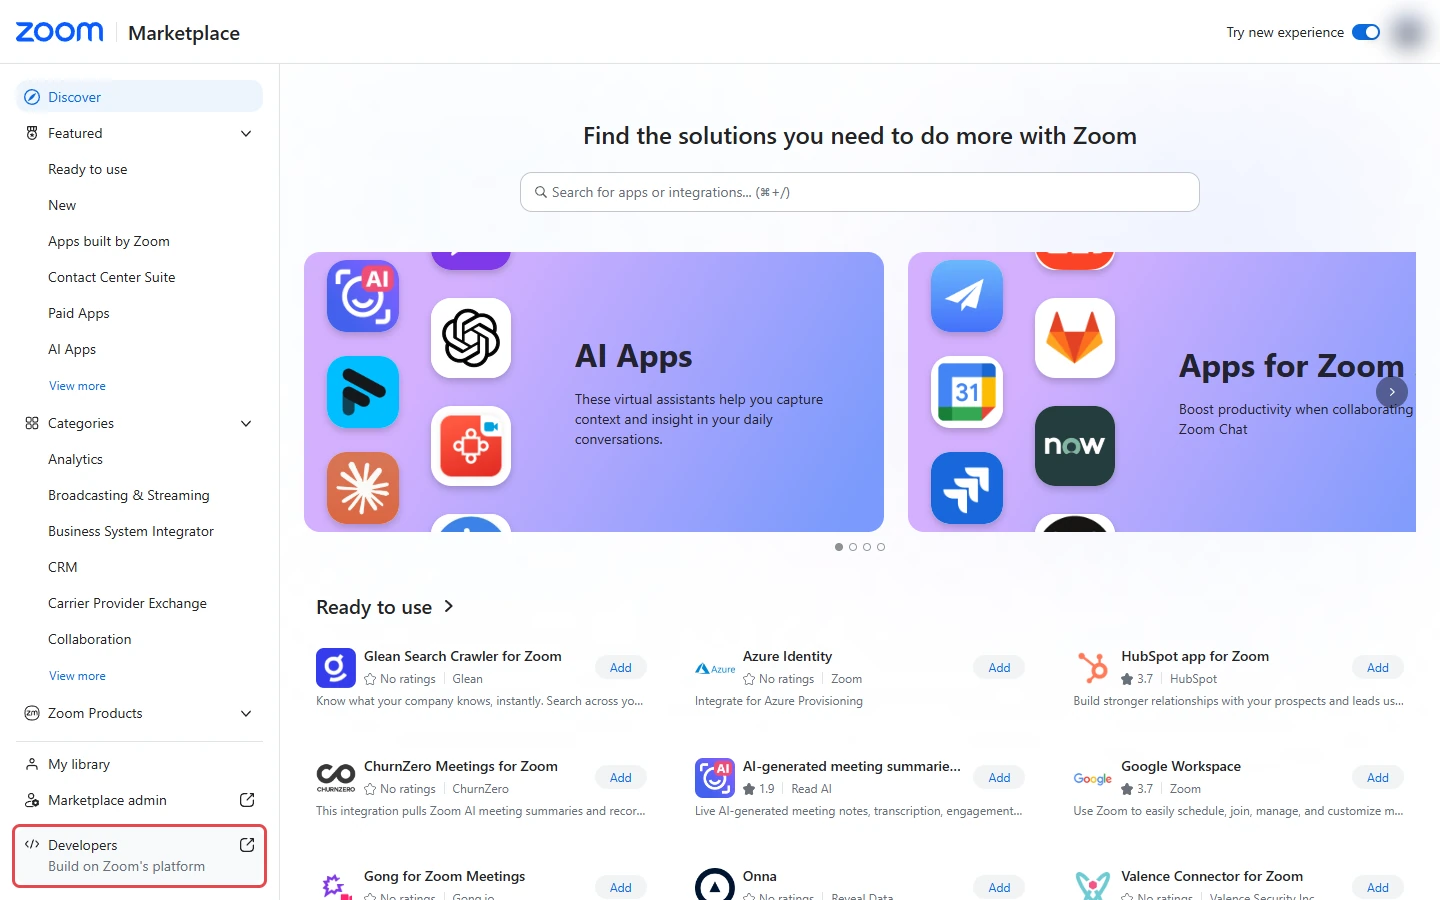
- Go to
https://marketplace.zoom.us/and sign in with the Zoom account your meetings belong to. - In the left menu, click Developers (Build on Zoom’s platform).
Step 4: Build a Server to Server OAuth App #
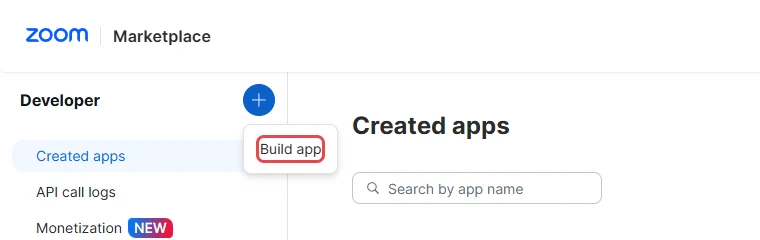
- Next to Developer, click the + button, then click Build app.
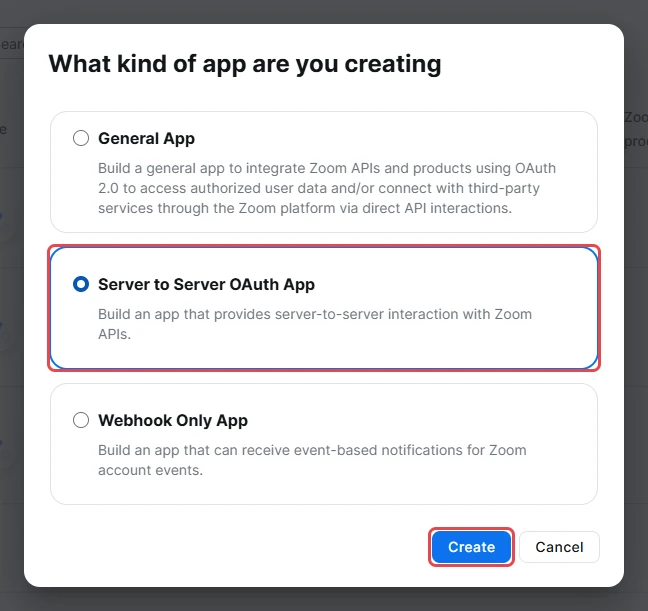
- In What kind of app are you creating, select Server to Server OAuth App.
- Click Create.
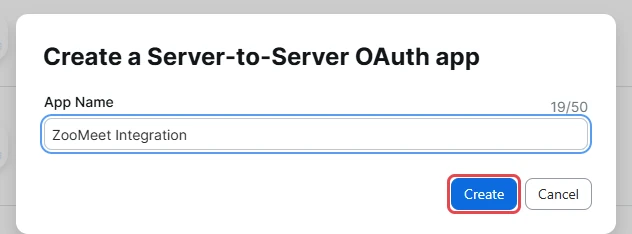
- In App Name, type
ZooMeet Integration. - Click Create.
Tip: When ZooMeet is not connected yet, the card also shows a Create a Server-to-Server OAuth app button that opens the right Zoom page for you.
Step 5: Find the app credentials #
Zoom opens the new app on App Credentials. This page holds the three keys ZooMeet needs. You copy them in Step 9, after the app is activated.
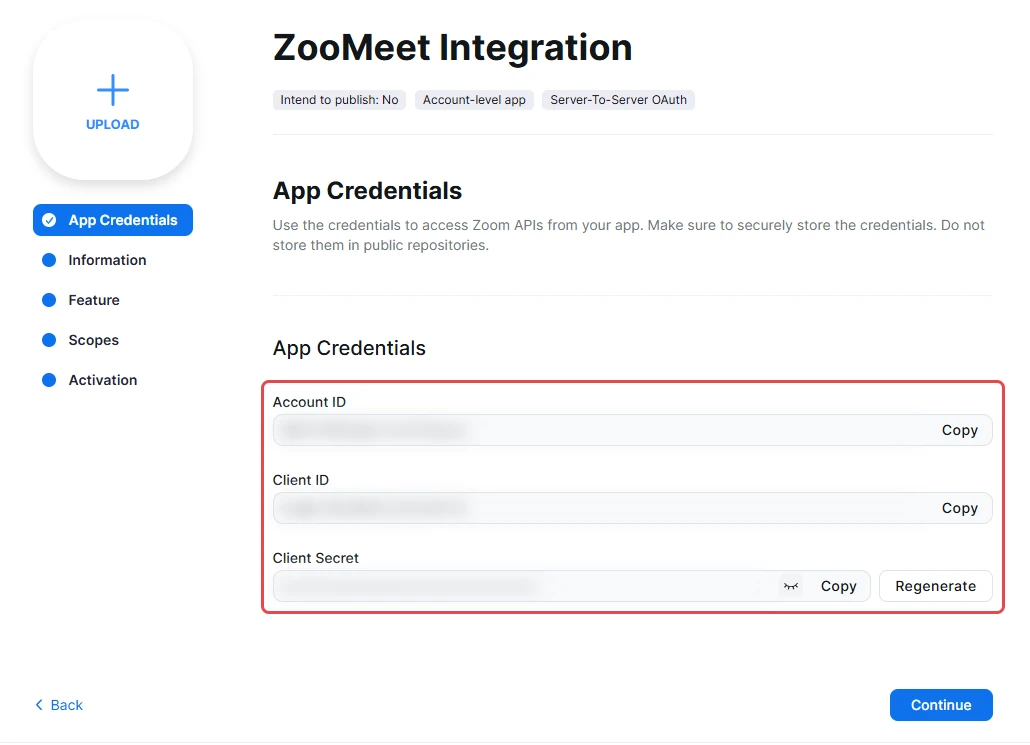
Security note: Treat these three values like a password. Anyone who has all three can create and delete meetings on your Zoom account.
- Click Continue.
Step 6: Fill in the app information #
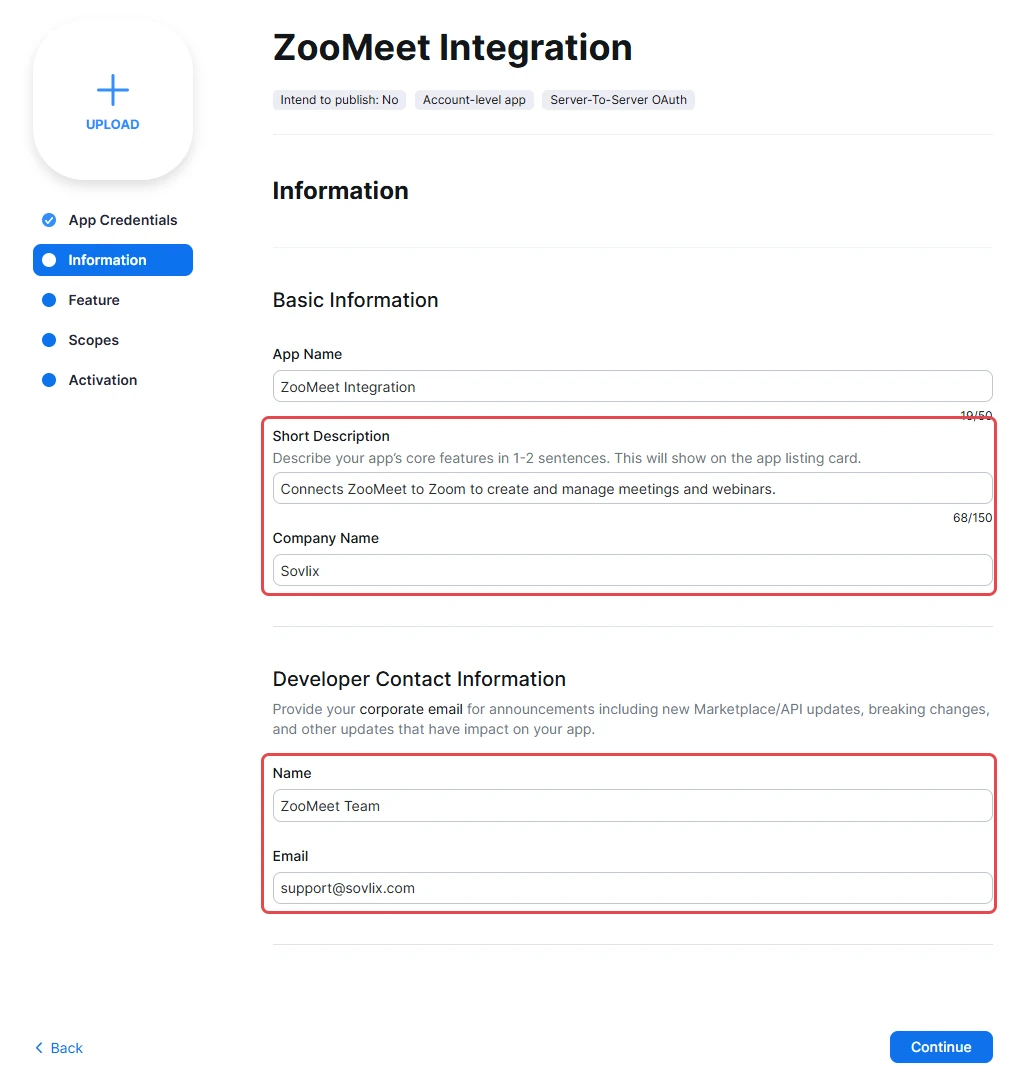
Zoom asks for a few details before it lets you activate the app.
- On Information, enter a Short Description, for example
Connects ZooMeet to Zoom to create and manage meetings and webinars. - Enter your Company Name.
- Under Developer Contact Information, enter a Name and an Email. Zoom sends app and API change notices to this address.
- Click Continue.
- On Feature, you do not need to change anything. Click Continue.
Step 7: Add the scopes #
Scopes are the permissions the app has on your Zoom account. ZooMeet creates and edits meetings and webinars, manages registrants, reads your Zoom users, shows reports and lists cloud recordings, so it needs scopes from each of those groups.
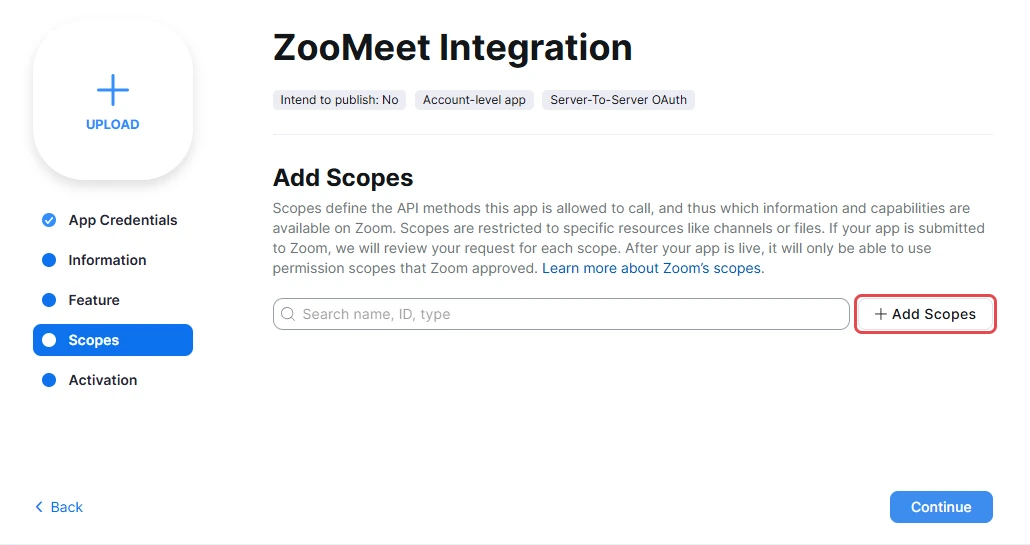
- On Scopes, click Add Scopes.
- In the Add Scopes dialog, paste a scope from the list below into Search scope.
- Tick the scope that appears.
- Repeat for every scope in the list. Your ticks are kept while you search.
- Click Done.
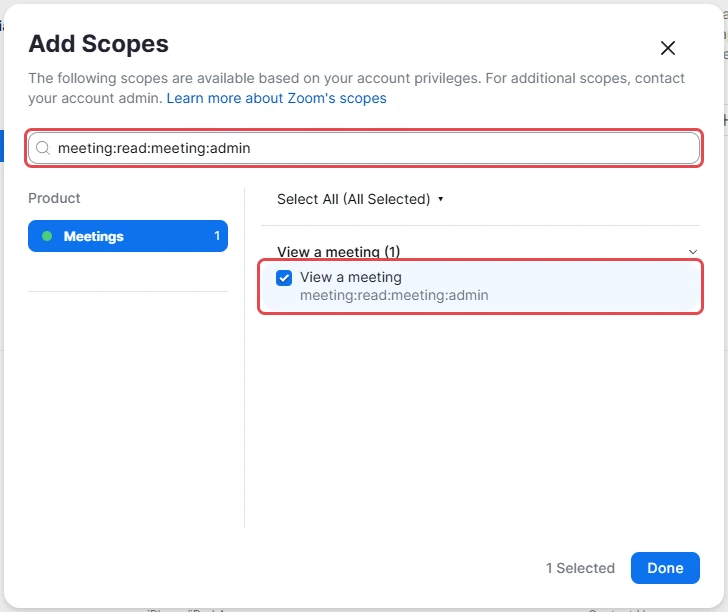
Back on Scopes, Zoom lists everything you added, grouped by product.
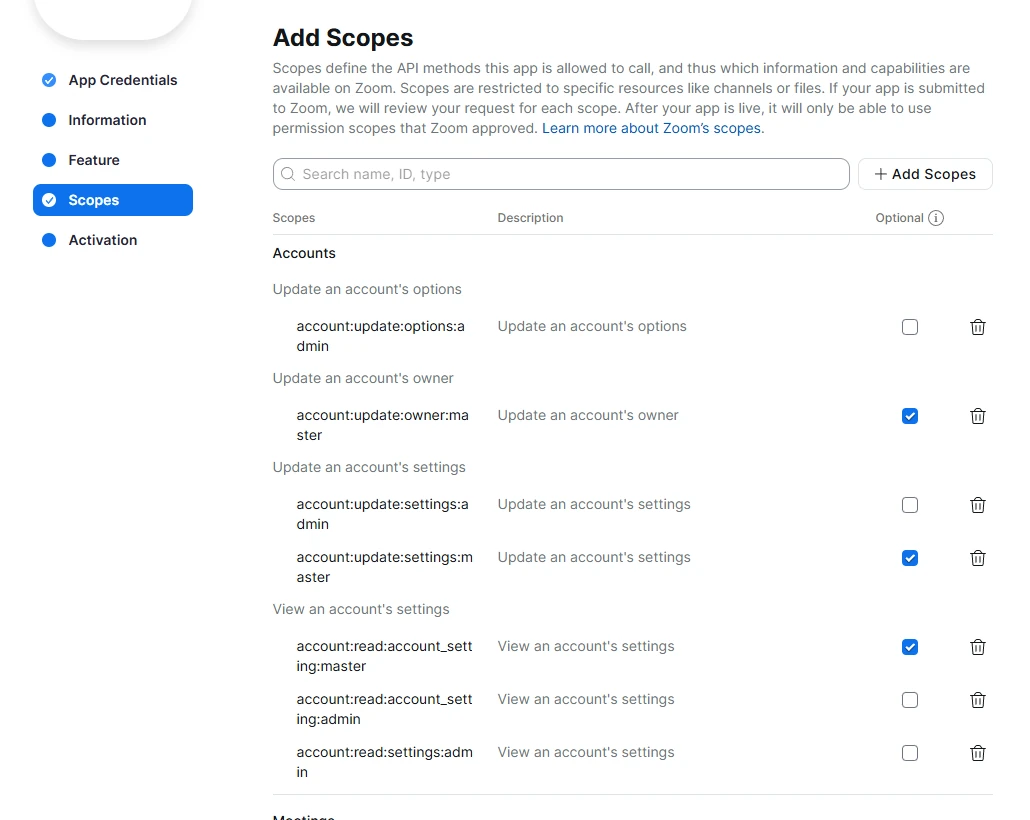
Below you can see all required scopes:
Important: ZooMeet needs these scopes to create and manage meetings, webinars, recordings, users, reports and other Zoom resources. A missing scope does not stop the connection, but the matching feature fails later with a permission error.
Note: Scopes ending in :master only appear on a master account that manages sub accounts. Add them if Zoom offers them; skip them if your account does not list them.
Account
View account information #
- View an account’s settings
account:read:account_setting:admin - View an account’s settings
account:read:account_setting:master - View an account’s settings
account:read:settings:admin
View and manage account information #
- Update an account’s settings
account:update:settings:admin
View and manage sub accounts #
- Update an account’s options
account:update:options:admin - Update an account’s owner
account:update:owner:master - Update an account’s settings
account:update:settings:master
Meetings
View all user meeting summaries #
- View a meeting’s summary
meeting:read:summary:admin
View all user meetings #
- View a meeting’s chat message
meeting:read:chat_message:admin - View a meeting’s invitation
meeting:read:invitation:admin - View a user’s meetings
meeting:read:list_meetings:admin - View a user’s upcoming meetings
meeting:read:list_upcoming_meetings:admin - View a meeting
meeting:read:meeting:admin
View past meetings #
- View a past meeting
meeting:read:past_meeting:admin - View a past meeting’s instances
meeting:read:list_past_instances:admin - View a past meeting’s participants
meeting:read:list_past_participants:admin
View and manage all user meetings #
- Delete a meeting
meeting:delete:meeting:admin - Remove a meeting’s registrant
meeting:delete:registrant:admin - Update a meeting
meeting:update:meeting:admin - Update a meeting registrant’s registration status
meeting:update:registrant_status:admin - Update a meeting’s status
meeting:update:status:admin - Create invite links for a meeting
meeting:write:invite_links:admin - Create a meeting for a user
meeting:write:meeting:admin - Add a registrant to a meeting
meeting:write:registrant:admin
Meeting Tokens
View meeting tokens #
- View a meeting live streaming join token
meeting:read:live_streaming_token:admin - View a meeting local archiving join token
meeting:read:local_archiving_token:admin
Meeting Registrants
View meeting registrants #
- View a meeting’s registrant
meeting:read:registrant:admin - View a meeting’s registrants
meeting:read:list_registrants:admin
View and manage sub-account meetings #
- Delete a meeting
meeting:delete:meeting:master - Remove a meeting’s registrant
meeting:delete:registrant:master - View a user’s meetings
meeting:read:list_meetings:master - View a meeting’s registrants
meeting:read:list_registrants:master - View a meeting
meeting:read:meeting:master - View a meeting’s registrant
meeting:read:registrant:master - Update a meeting
meeting:update:meeting:master - Update a meeting registrant’s registration status
meeting:update:registrant_status:master - Create a meeting for a user
meeting:write:meeting:master - Add a registrant to a meeting
meeting:write:registrant:master
Cloud Recordings
View all user recordings #
- View a recording
cloud_recording:read:recording:admin - Returns all of a meeting’s recordings
cloud_recording:read:list_recording_files:admin - List account recording
cloud_recording:read:list_account_recordings:admin - Lists all cloud recordings for a user
cloud_recording:read:list_user_recordings:admin
View and manage all user recordings #
- Recover meeting recordings
cloud_recording:update:recover_meeting_recordings:admin - Recover a single recording
cloud_recording:update:recover_single_recording:admin - Delete a specific recording file from a meeting
cloud_recording:delete:recording_file:admin - Delete all recording files of a meeting
cloud_recording:delete:meeting_recording:admin
View and manage sub-account recordings #
- Returns all of a meeting’s recordings
cloud_recording:read:list_recording_files:master - Lists all cloud recordings for a user
cloud_recording:read:list_user_recordings:master - Delete all recording files of a meeting
cloud_recording:delete:meeting_recording:master - Delete a specific recording file from a meeting
cloud_recording:delete:recording_file:master
Archived Recordings
View archived files #
- Return a specific meeting instance’s archived files
archiving:read:archived_files:admin
Reports
View report data #
- View daily usage reports
report:read:daily_usage:admin - View users usage reports
report:read:list_users:admin - View a user’s usage reports
report:read:user:admin - View meeting detail reports
report:read:meeting:admin - View meeting participant reports
report:read:list_meeting_participants:admin - View webinar detail reports
report:read:webinar:admin - View webinar participant reports
report:read:list_webinar_participants:admin
View sub-account report data #
- View webinar detail reports
report:read:webinar:master
Users
View all user information #
- Verify a user’s email
user:read:email:admin - View a user’s assistants
user:read:list_assistants:admin - View a user’s permissions
user:read:list_permissions:admin - View users
user:read:list_users:admin - View a user’s settings
user:read:settings:admin - View a user’s token
user:read:token:admin - View a user
user:read:user:admin
View user’s ZAK token #
- View a user’s Zoom Access Key
user:read:zak:admin
View users and manage users #
- Delete a user
user:delete:user:admin - Update a user
user:update:user:admin - Create a user
user:write:user:admin
View and manage sub-account users #
- Delete a user
user:delete:user:master - View users
user:read:list_users:master - View a user
user:read:user:master - Update a user
user:update:user:master - Create a user
user:write:user:master
Zoom Events
Manage event speaker information #
- Remove an event’s speaker
zoom_events:delete:speaker:admin - Update an event’s speaker
zoom_events:update:speaker:admin - Add a speaker to an event
zoom_events:write:speaker:admin
View all events information #
- View an event
zoom_events:read:event:admin - View events
zoom_events:read:list_events:admin - View Zoom event access links
zoom_events:read:list_access_links:admin
Webinars
View all user webinars #
- View a webinar’s alert
webinar:read:alert:admin - View a user’s webinars
webinar:read:list_webinars:admin - View a webinar’s registrants
webinar:read:list_registrants:admin - View a webinar’s participant
webinar:read:participant:admin - View a webinar’s registrant
webinar:read:registrant:admin - View a webinar
webinar:read:webinar:admin - View a past webinar’s instances
webinar:read:list_past_instances:admin - View a past webinar’s participants
webinar:read:list_past_participants:admin
View and manage all user webinars #
- Remove a webinar’s registrant
webinar:delete:registrant:admin - Delete a webinar
webinar:delete:webinar:admin - Update a webinar registrant’s registration status
webinar:update:registrant_status:admin - Update a webinar’s status
webinar:update:status:admin - Update a webinar
webinar:update:webinar:admin - Create invite links for webinars
webinar:write:invite_links:admin - Add a registrant to a webinar
webinar:write:registrant:admin - Create a webinar for a user
webinar:write:webinar:admin
View and manage sub-account webinars #
- Create a webinar for a user
webinar:write:webinar:master - Remove a webinar’s registrant
webinar:delete:registrant:master - View a webinar’s registrants
webinar:read:list_registrants:master - View a user’s webinars
webinar:read:list_webinars:master - View a webinar’s registrant
webinar:read:registrant:master - View a webinar
webinar:read:webinar:master - Update a webinar registrant’s registration status
webinar:update:registrant_status:master - Update a webinar
webinar:update:webinar:master - Create invite links for webinars
webinar:write:invite_links:master - Add a registrant to a webinar
webinar:write:registrant:master
Note: Older guides list the classic scope recording:read:admin. Zoom’s current scope picker no longer offers it. cloud_recording:read:recording:admin and cloud_recording:read:list_user_recordings:admin above replace it.
When you have ticked them all, click Done, then Continue.
Step 8: Activate the app #
An app that is not activated gives out keys that Zoom refuses, so do not skip this step.
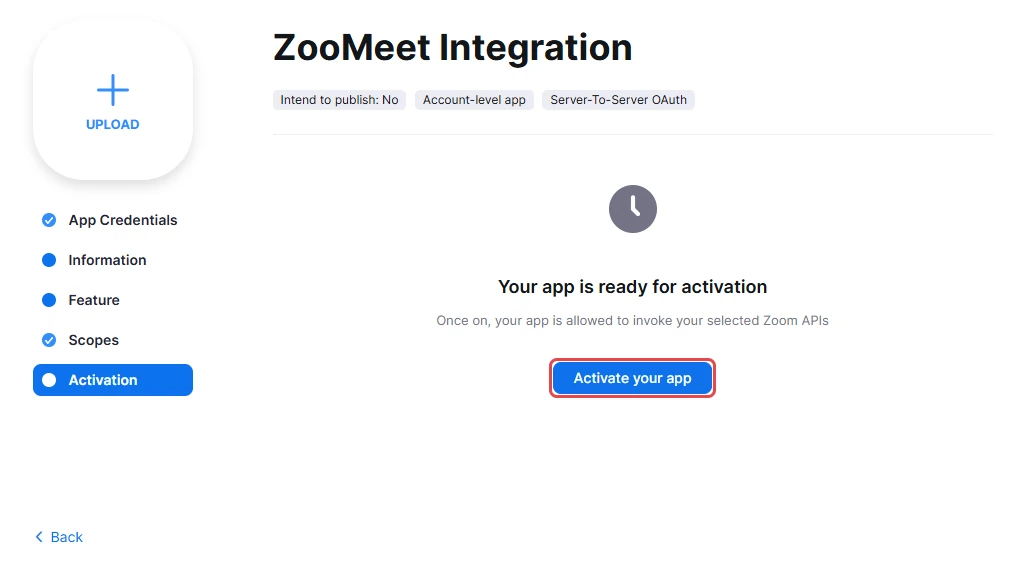
- On Activation, check that it says Your app is ready for activation.
- Click Activate your app.
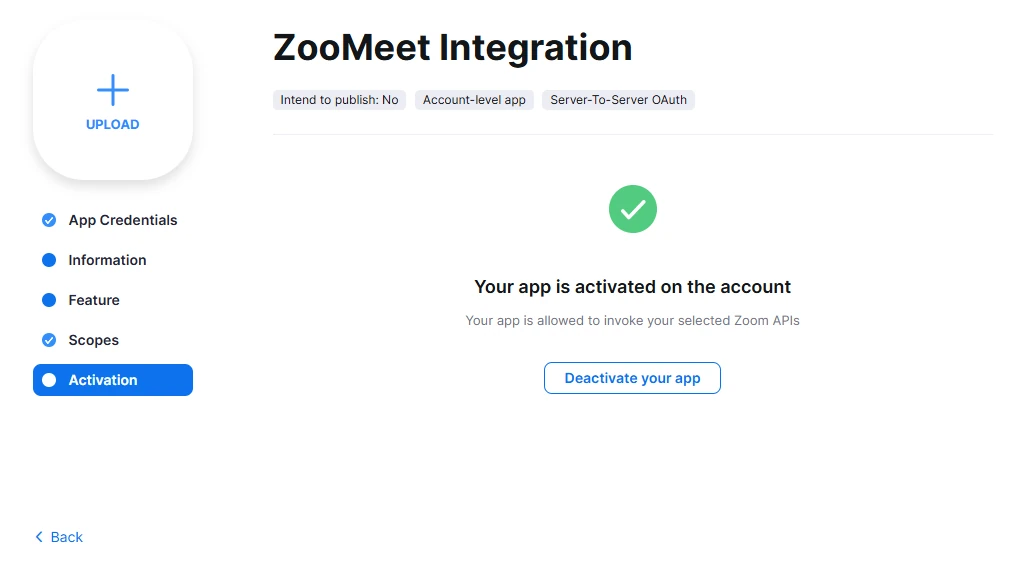
When it works, Zoom shows Your app is activated on the account.
Step 9: Paste the keys into ZooMeet and connect #
ZooMeet trades the three keys for a token as soon as you click the button, so you know at once whether Zoom accepts them.
- In Zoom, open App Credentials and click Copy next to Account ID.
- In the ZooMeet tab, paste it into Account ID on the Server-to-Server OAuth card.
- Do the same for Client ID and Client Secret. ZooMeet calls the last one Client secret.
- Click Connect. While ZooMeet talks to Zoom, the button reads Connecting…. On a card that is already connected, the button reads Reconnect.
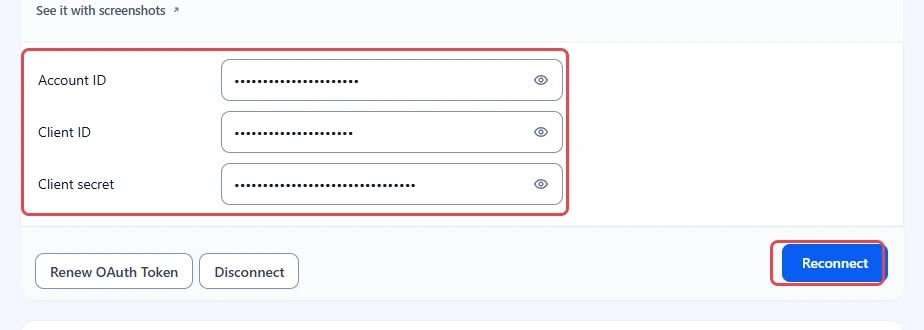
The Connect button stays greyed out until all three fields are filled.
Step 10: Confirm the connection #
When Zoom accepts the keys, the card shows a green Connected badge and folds itself away. Click Edit to open it again at any time.
The open card has two smaller buttons next to Reconnect:
- Renew OAuth Token asks Zoom for a fresh token with the same keys. Use it if meetings suddenly stop being created and the keys have not changed. You see Token renewed when it works.
- Disconnect stops ZooMeet acting on your Zoom account. Your keys stay in the fields, so reconnecting later is one click.
ZooMeet can now create meetings and webinars on your Zoom account.
Next step #
Want attendees to join inside your site? Set up Join in browser.
Troubleshooting #
“Zoom refused these credentials.” #
ZooMeet sent the Server-to-Server OAuth keys to Zoom and Zoom rejected them. Zoom’s own reason follows the message on the card.
Check that:
- The app shows Your app is activated on the account on Activation.
- You copied all three keys from the same Server-to-Server OAuth app.
- There are no spaces at the start or end of a field.
Fix the field, then click Connect again.
“Zoom rejected those keys. Check them and try again.” #
ZooMeet shows this when Zoom gave no clearer reason. Treat it the same way as the message above.
“Renew failed. Please check your credentials.” #
Renew OAuth Token could not get a new token with the saved keys. The secret may have been regenerated in Zoom, or the app deactivated. Copy fresh keys from App Credentials, paste them in, and click Reconnect.
Meetings or reports fail with a permission error #
The app is connected but is missing a scope. Open ZooMeet Integration in the Zoom App Marketplace, go to Scopes, add the missing ones from Step 7, and save. You do not need to change anything in ZooMeet.
Tip: Not sure what Zoom refused? Turn on API logs in ZooMeet > Settings and repeat the action. The log shows Zoom’s own message and error code. See How to find Zoom connection problems with API logs in ZooMeet.
The other settings sections say “Connect Zoom to change these settings.” #
ZooMeet is not connected, so Events, Video and the other sections are locked. Finish Steps 3 to 10 of this guide.
Frequently asked questions #
Do I need a paid Zoom plan? #
No, not to connect. Some features have their own Zoom requirements: webinars need a Zoom Webinars licence, cloud recording needs a paid plan, and meetings on a free Zoom account end after 40 minutes.
Zoom does not list the master scopes. Is that a problem? #
No. Scopes ending in :master only exist on master accounts that manage sub accounts. Skip them if Zoom does not offer them.
Can I use a JWT app instead? #
No. Zoom retired JWT apps. ZooMeet uses Server-to-Server OAuth for the connection.
What happens to my meetings if I disconnect? #
They stay in Zoom and on your site, and their join links keep working. You cannot create or change meetings from ZooMeet until you reconnect.
Security best practices #
- Keep the Client secret private. Never share it in screenshots, tickets, email or code repositories.
- Give WordPress administrator access only to people you trust. Only administrators can see and change these keys.
- If a secret leaks, click Regenerate next to it in Zoom, paste the new one into ZooMeet and save again.
- Add the scopes ZooMeet uses and no others.
- Deactivate or delete the Zoom app if you stop using ZooMeet.
You’re ready to create Zoom meetings #
Your site now talks to Zoom through your own Server-to-Server OAuth app. The app, its scopes and its secret stay in your own Zoom account. Next, create your first meeting, or set up Join in browser so attendees can join inside your site.


