- Before you begin
- Step 1: Install LifterLMS
- Step 2: Install MeetingHub and MeetingHub Pro
- Step 3: Connect a video platform
- Step 4: Turn on the LifterLMS integration
- Step 5: Open the event form (Access and controls)
- Step 6: Pick the course and where it shows
- Step 7: Choose who can join and save
- Step 8: Or attach events in the course editor
- Step 9: Add a live event to a lesson
- Step 10: Add office hours to the course (optional)
- Step 11: Manage events from the LifterLMS dashboard
- Step 12: See it on your course page
- Benefits of using MeetingHub with LifterLMS
- What students see
- Troubleshooting
- Frequently asked questions
- Security best practices
- You're ready to run LifterLMS live classes
To add LifterLMS live classes in WordPress, turn on the LifterLMS integration in MeetingHub > Integrations, then attach a MeetingHub event to the course page or to a lesson. Enrolled students join from the course with one click; everyone else sees the schedule and a way to enroll.
You can attach events from the MeetingHub event form or right inside the LifterLMS course and lesson editors. This guide shows you both, step by step, plus how to offer office hours.
By the end of this guide, you will have:
- The LifterLMS integration turned on in MeetingHub
- Live classes on your course page and a live event card in a lesson
- Events managed from the event form or the LifterLMS editors
- Weekly office hours on the course, plus a way for students to book one-to-one time
- Classes that only your course students can open
Estimated setup time: 10 minutes. No shortcodes needed for the course page.
Note: Requires MeetingHub Pro.
Before you begin #
Make sure you have:
- An administrator account on your WordPress site
- At least one LifterLMS course, with a lesson if you want a lesson card
- A video platform you can use with MeetingHub (Jitsi Meet works without any account)
Let’s get started.
Step 1: Install LifterLMS #
- In the WordPress admin menu, go to Plugins > Add Plugin.
- Search for LifterLMS.
- Click Install Now, then Activate.
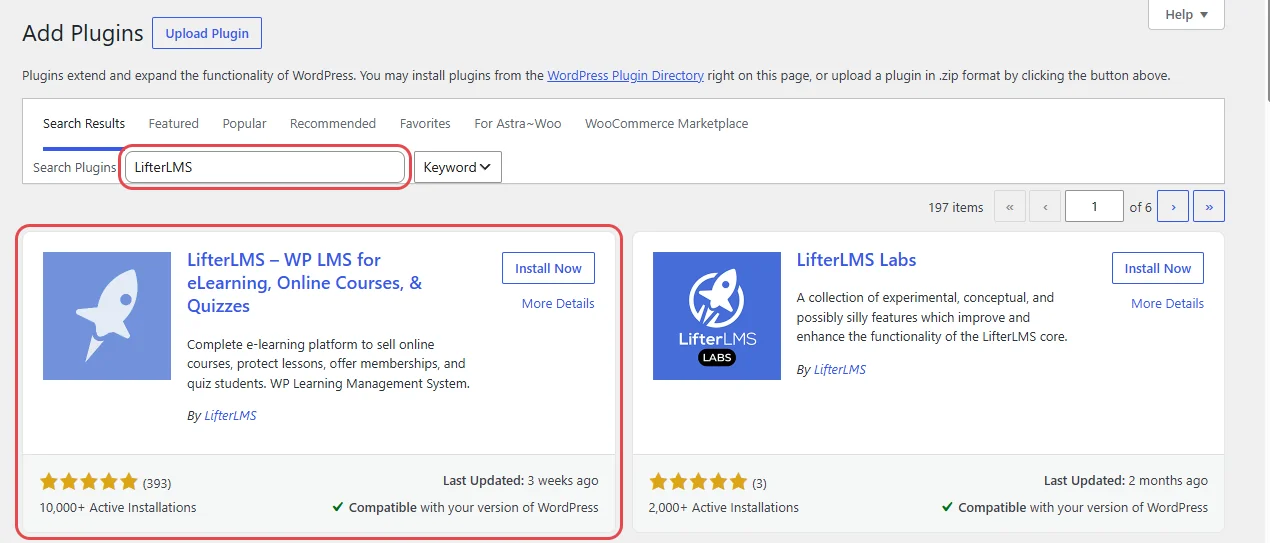
Note: Run one LMS per site. LifterLMS and Tutor LMS share the lesson type, and LifterLMS and Academy LMS both use /course/ addresses, so their pages can take over each other’s.
Step 2: Install MeetingHub and MeetingHub Pro #
MeetingHub comes from the WordPress plugin directory. The course features live in MeetingHub Pro, a second plugin that runs next to it.
- Go to Plugins > Add Plugin.
- Search for MeetingHub.
- Click Install Now, then Activate.
- Open MeetingHub, click Upgrade and complete the checkout.
- Download MeetingHub Pro from your account.
- Go to Plugins > Add Plugin and click Upload Plugin.
- Choose the MeetingHub Pro
.zipfile, click Install Now, then Activate Plugin.
The guide How to install MeetingHub and finish the Get Started setup shows each of these screens.
Step 3: Connect a video platform #
Your classes run on a video platform. Jitsi Meet is ready straight away, with no account. Zoom, Google Meet, Microsoft Teams and Webex need their own connection first.
- In the WordPress admin menu, go to MeetingHub > Integrations.
- In the categories on the left, click Video platforms.
- On the platform you want, click Connect and follow its steps.
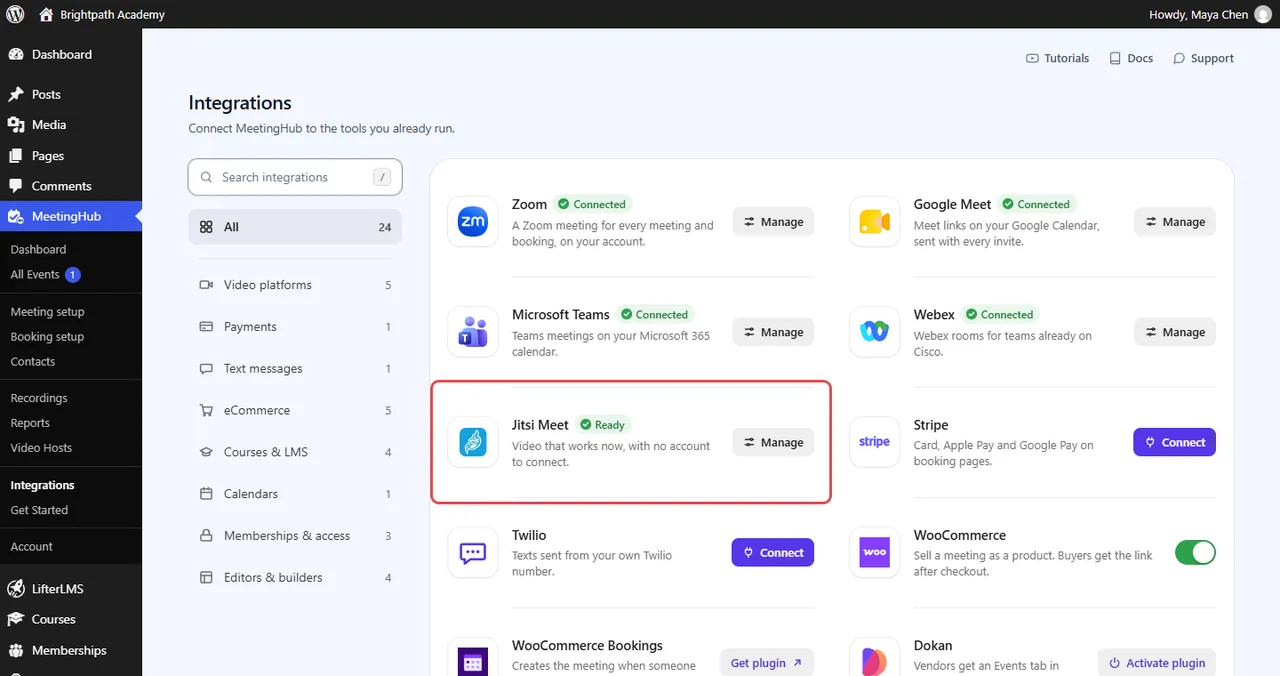
A connected platform shows Connected and a Manage button. Jitsi Meet always shows Ready. For each platform’s setup, see How to set up Jitsi Meet in WordPress with MeetingHub, How to connect Zoom to WordPress with MeetingHub, How to connect Google Meet to WordPress with MeetingHub, How to connect Microsoft Teams to WordPress with MeetingHub or How to connect Webex to WordPress with MeetingHub.
Step 4: Turn on the LifterLMS integration #
- Go to MeetingHub > Integrations.
- In the categories on the left, click Courses & LMS.
- On the LifterLMS card, switch the toggle on. MeetingHub confirms with LifterLMS is on.
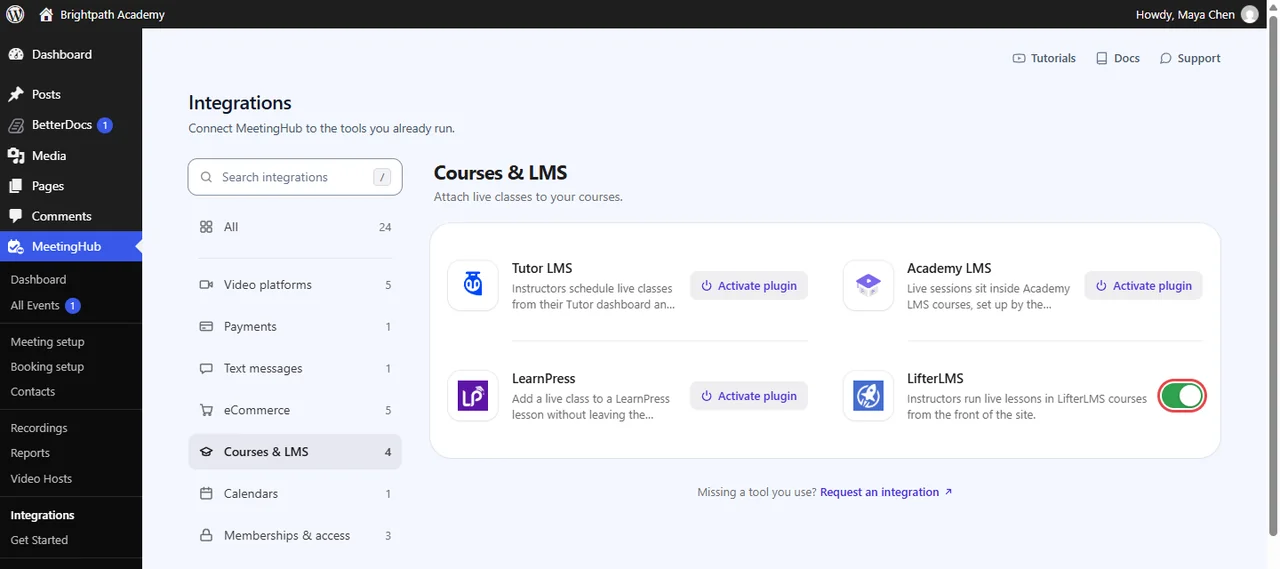
The toggle saves on its own. You can now attach events from the MeetingHub event form (Steps 5 to 7), or in the LifterLMS editors (Steps 8 and 9). Both save the same links.
Step 5: Open the event form (Access and controls) #
- Go to MeetingHub > All Events and click Create event.
- On Name and platform, enter the Meeting name and pick the Platform.
- On Date and time, set when the class starts.
- In the steps on the left, click Access and controls.
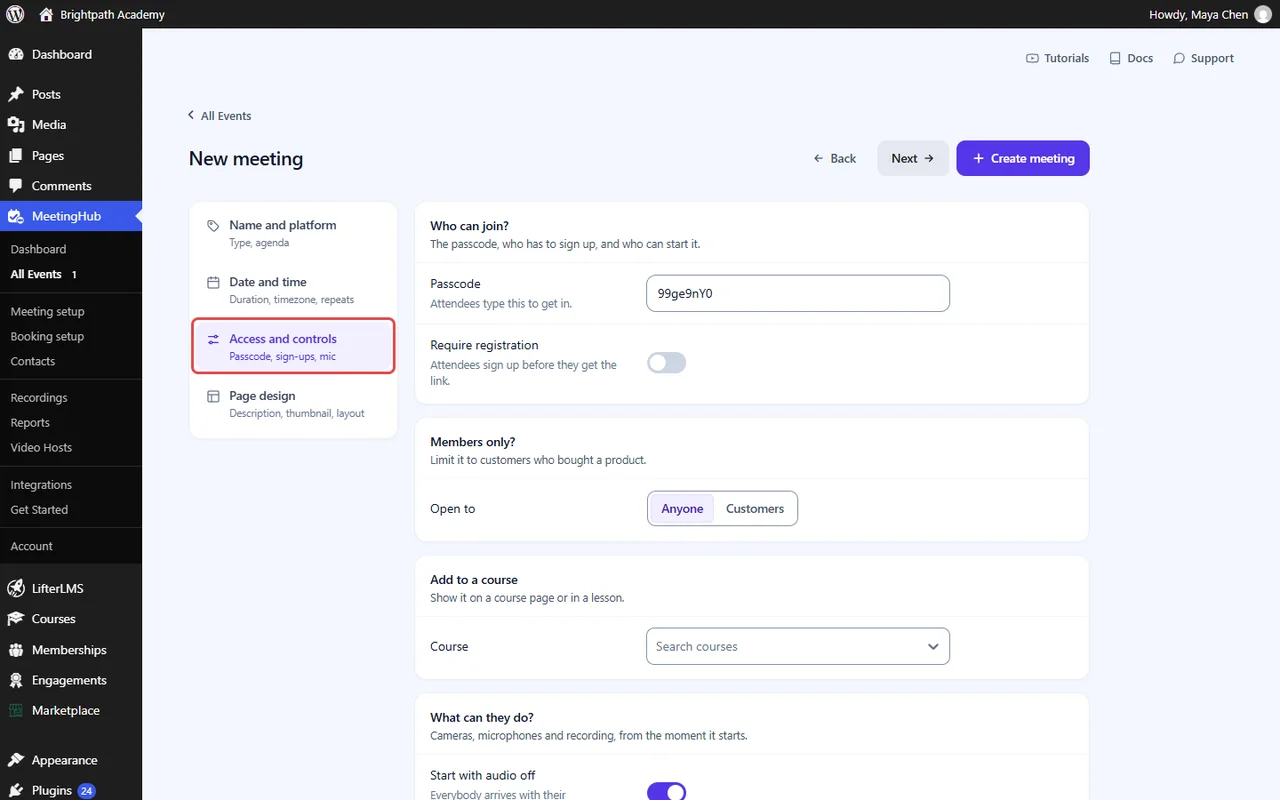
Editing an event you already have? Open it from All Events and scroll down to the Add to a course card; the edit form shows every setting on one page.
Step 6: Pick the course and where it shows #
- In the Add to a course card, click Course and type part of the course name.
- Pick it, for example Confident Public Speaking.

- In Show it on, keep Course page or pick a lesson. Lessons are grouped by section.

- Click Add to course.
A lesson holds one event; a course page can hold many.
Step 7: Choose who can join and save #
- Next to Course access, click Change and choose Course students or Anyone with link.

- Click Create meeting, or Update meeting when you edit.
MeetingHub saves the event, then its course links.
Step 8: Or attach events in the course editor #
- Open the course in Courses > Courses.
- Scroll to the Live events box. It reads “Shown on the course page.”
- Click the events field and pick the events to show. Click the × on an event to remove it.
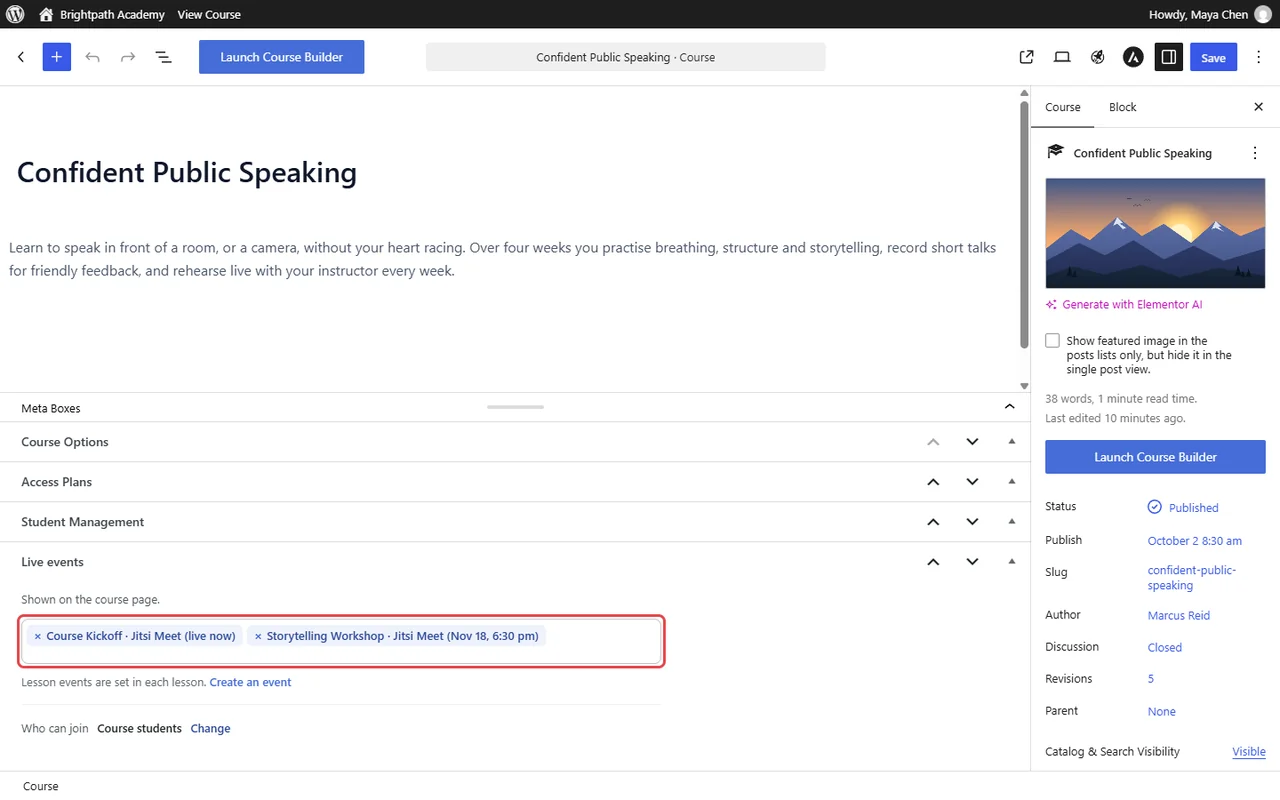
- Click Change next to Who can join to switch between Course students and Anyone with the link.
- Click Update to save the course.
No event yet? Click Create an event in the box. A New event dialog opens:
- Fill in the Name, Date, Time and Length, and pick the Platform.
- Click Create and add.

The new event is added to the field, with “Event created and added. Save to keep it here.” under the link. Click Update to attach it to the course.
Step 9: Add a live event to a lesson #
- Open the lesson in the lesson editor.
- In the Live event box on the side, pick an event, or None to remove it. Create an event in the box opens the same dialog and selects the new event.
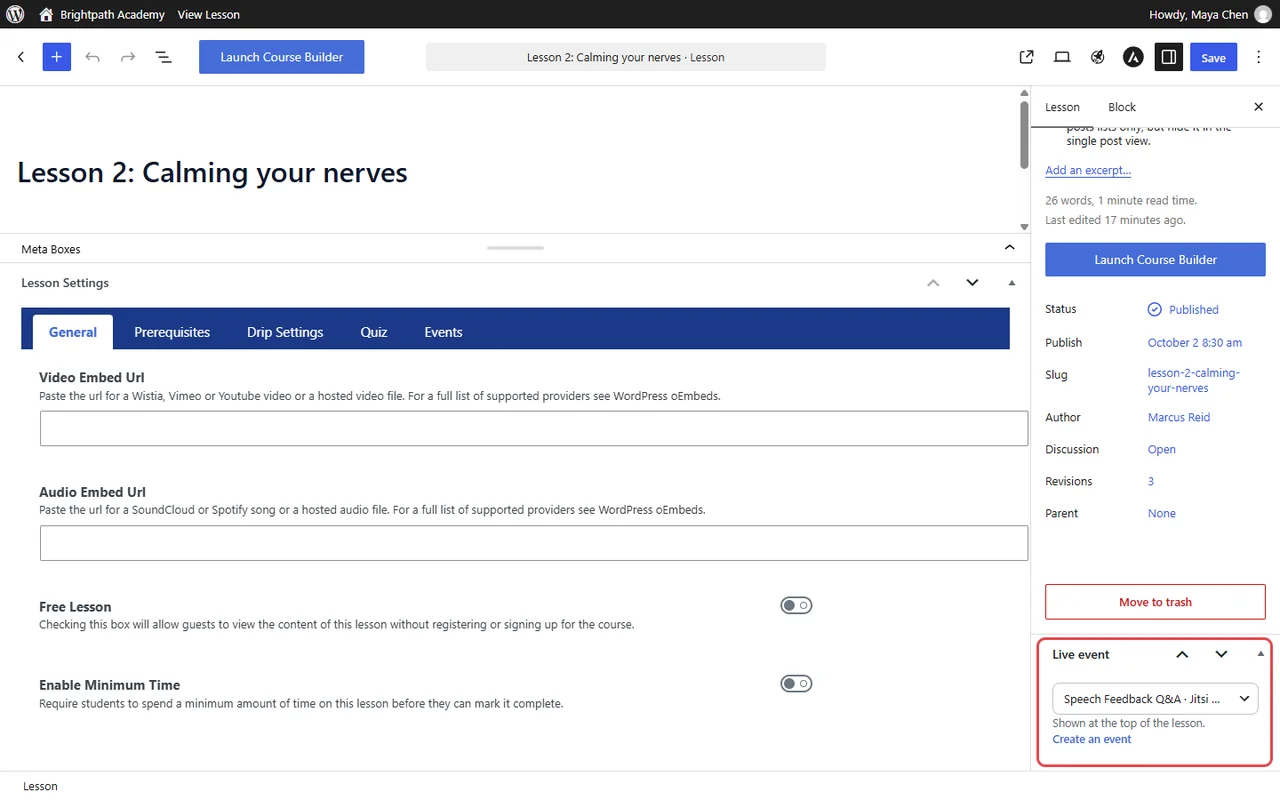
- Click Update to save the lesson.
Tip: In the LifterLMS Course Builder, each lesson’s settings have the same Live event choice.
Step 10: Add office hours to the course (optional) #
Office hours come in two shapes, and MeetingHub handles both.
Weekly group office hours. Create one event that repeats, such as Weekly Office Hours every Wednesday, and attach it to the Course page. Repeating events need MeetingHub Pro; see How to set up recurring meetings in WordPress.
One-to-one office hours. Create a booking page (see How to create a booking page in WordPress with MeetingHub), then paste its shortcode into a lesson or the course description:
[meetinghub_booking link="free-15-minute-intro-call" display="button" label="Book office hours"]
Your actual shortcode may look different. Always copy it from your own MeetingHub settings; see How to share or embed your booking page anywhere.
Note: A booking page does not check course enrollment. Anyone who has its link can book. To limit who can book, see How to control who can book your WordPress booking page.
Step 11: Manage events from the LifterLMS dashboard #
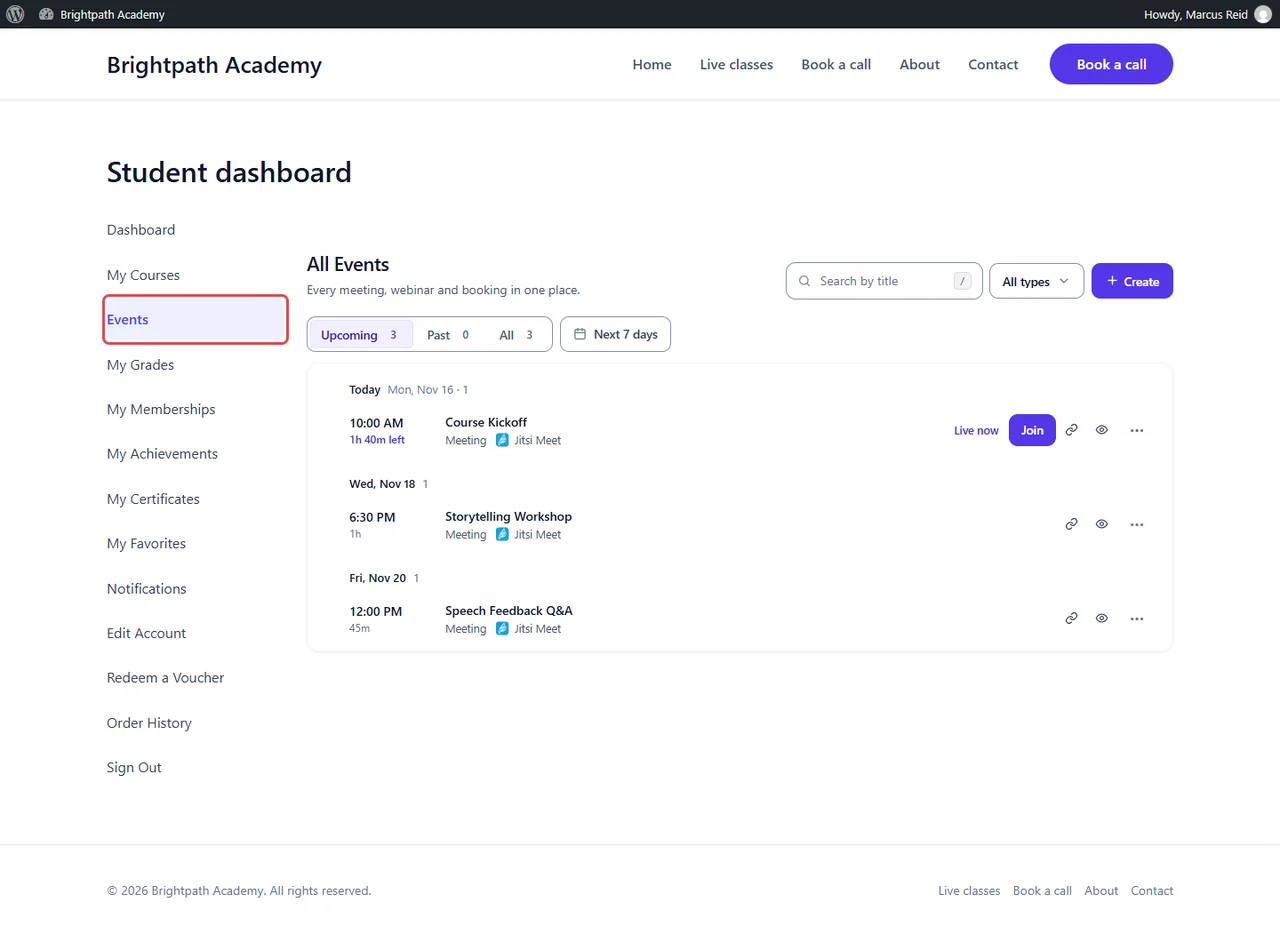
People who can host events, such as LifterLMS instructors, get an Events tab in the LifterLMS student dashboard. It opens the event list and form, so they can click Create event and attach it with Add to a course. Students without hosting rights do not see the tab.
Step 12: See it on your course page #
- Open a private browser window.
- Go to your course, for example Confident Public Speaking.

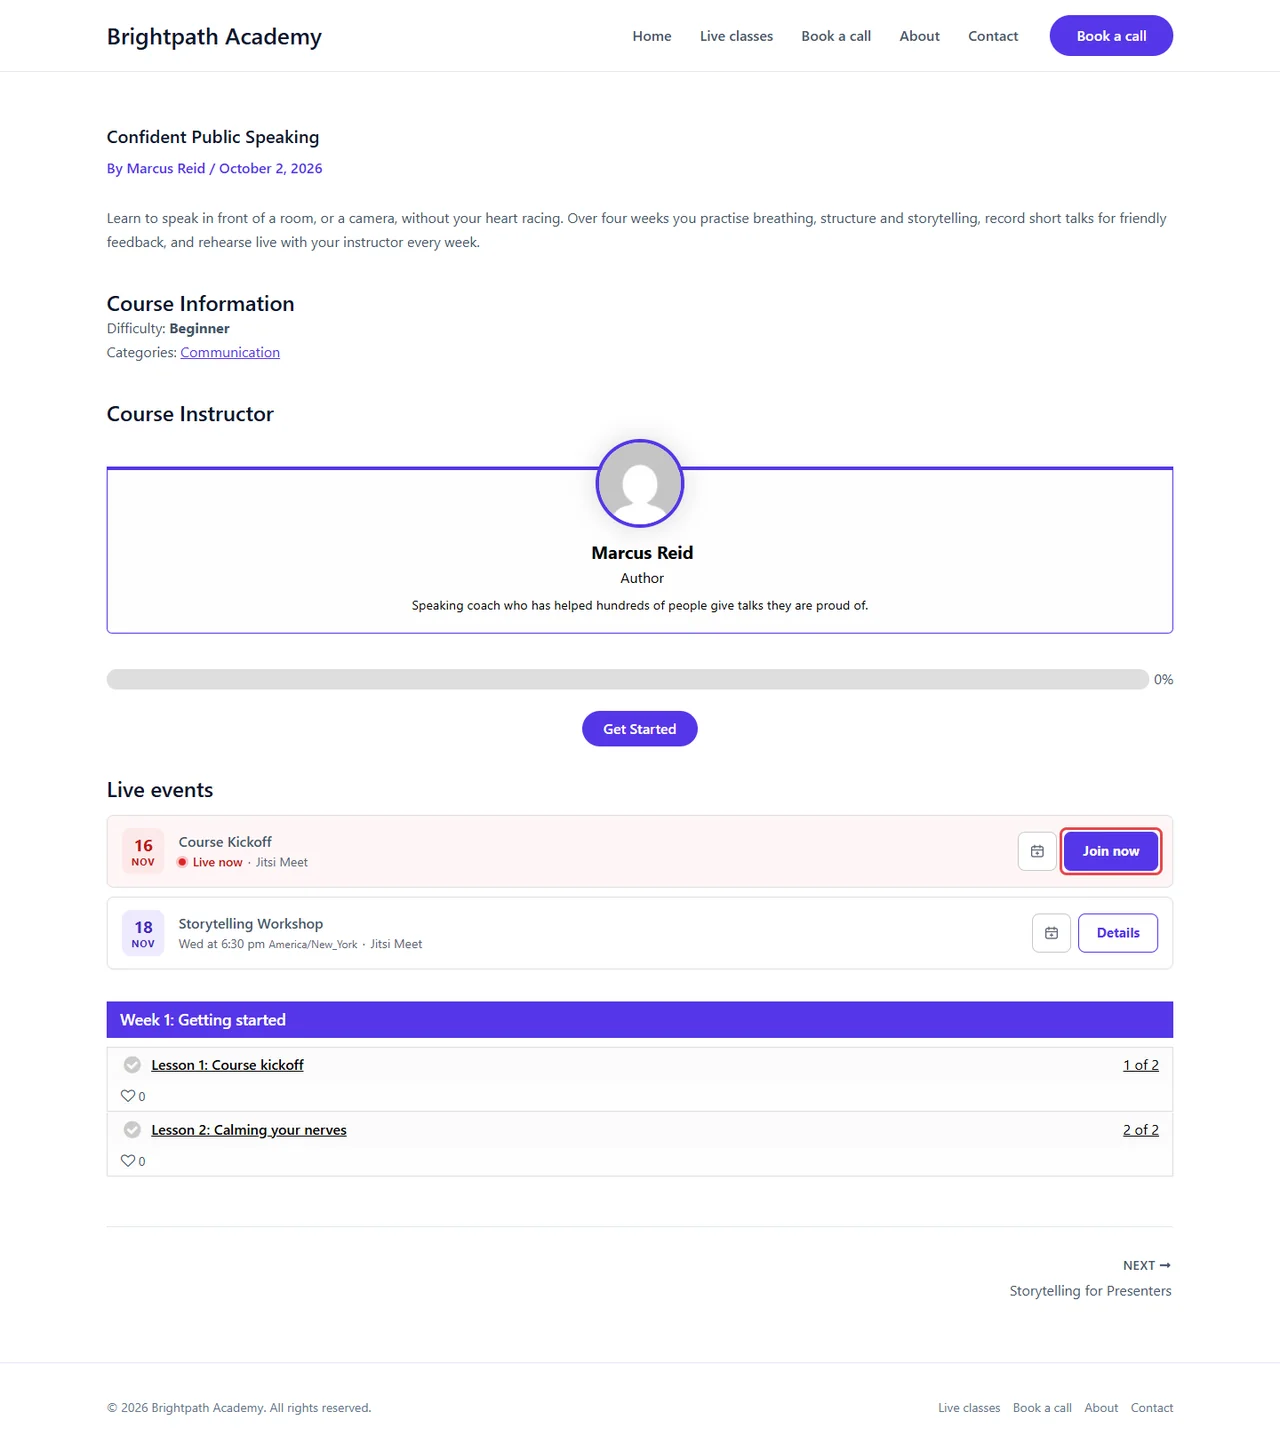
Visitors see the schedule and Enroll to join, never a join button. If your course page is built with a page builder, place [mhub-course-events course="123"] where the list should appear, using your course ID.
Benefits of using MeetingHub with LifterLMS #
- Works in the editors you know: A Live events box on courses and a Live event box on lessons.
- Every platform: Zoom, Google Meet, Microsoft Teams, Webex and Jitsi Meet.
- Students only, by default: Enrolled students, course instructors and administrators can open the event.
- No raw links: Join now opens the MeetingHub event page, which checks access first.
Your LifterLMS students join class from the course they are taking.
What students see #
Enrolled students #
Join now while an event is live, Details before. The calendar button adds the event to the student’s calendar.
Inside a lesson #
The lesson shows a Live event card at the top. While the class is live, it shows Join now; before it starts, it shows the day and time, with a countdown in the last 24 hours.

People outside the course #
Someone who opens the event link without being enrolled sees For students of this course with a View course button.

Troubleshooting #
The Add to a course card does not appear in the event form #
Check that MeetingHub Pro is active and LifterLMS is switched on in MeetingHub > Integrations.
The Live events box or Live event box is missing #
Both need the LifterLMS integration. Turn it on, then reload the editor. You may also need to tick the box in Screen Options at the top of the editor.
The Events tab is missing #
The tab shows only to people who can host events, and only while the integration is on.
The Events tab opens a “not found” page #
Go to Settings > Permalinks and click Save Changes once, so WordPress learns the new dashboard address.
Students see “For students of this course” #
The event is set to Course students and the person is not enrolled. Enroll them, or set Course access to Anyone with link.
Students see Details but no Join now #
Join now appears only while the event is live. Before the start time, students see Details.
Frequently asked questions #
Can I use LifterLMS and Tutor LMS or Academy LMS together? #
We don’t recommend it. LifterLMS and Tutor LMS share the lesson type, and LifterLMS and Academy LMS both use /course/ addresses, so their pages can take over each other’s.
Does a live event count toward course progress? #
No. Students complete lessons as usual.
Can one event be on several courses? #
Yes. Use Add another in the event form, or pick it in each course’s Live events box.
Can a lesson hold more than one event? #
No. One per lesson; the course page can hold many.
What happens when I delete an event? #
MeetingHub removes it from every course and lesson.
Security best practices #
- Keep Course access on Course students for paid courses.
- Share the course page, not the platform link.
You’re ready to run LifterLMS live classes #
Your LifterLMS courses now show their live classes, lessons can hold a live event card, and only enrolled students can join.


