- Before you begin
- Step 1: Install WooCommerce
- Step 2: Install and activate ZooMeet
- Step 3: Connect your Zoom account
- Step 4: Turn on the WooCommerce integration
- Step 5: Ask visitors to sign in (Access and controls)
- Step 6: Give the meeting the Admit design (Page design, optional)
- Step 7: Link a WooCommerce product (Zoom Event tab)
- Step 8: Check the product page and cart
- Step 9: Complete the order
- Step 10: See it on your meeting page
- Benefits of using ZooMeet with WooCommerce
- What buyers get
- Sell appointments with WooCommerce Bookings
- Troubleshooting
- Buyers paid but cannot sign in on the meeting page
- The sign-in box says "Invalid email or password"
- A visitor sees "Please buy a ticket to register for this event."
- I do not see Buy now or Buy ticket on the meeting page
- The Zoom Event tab is missing on the product
- The event I want is not in the Choose event list
- Frequently asked questions
- Security best practices
- You're ready to sell meetings
If you want people to pay before they join your Zoom masterclass, workshop or webinar, you’re in the right place. This guide shows you how to link a WooCommerce product to a ZooMeet meeting and sell seats through your own shop, step by step.
Buyers pay at checkout like for any other product. When you complete their order, ZooMeet adds them to the meeting, emails them their sign-in details and lists the meeting in their My Account page.
By the end of this guide, you will have:
- The WooCommerce integration turned on in ZooMeet
- A Zoom meeting that asks visitors to sign in before they get the join buttons
- A WooCommerce product that sells one seat in that meeting
- A ticket-style meeting page with the price and a buy button
- Buyers who get their meeting details by email and in My Account
Estimated setup time: 10 minutes. Nothing changes for your shop until you link a product to a meeting.
Note: Requires ZooMeet Pro and WooCommerce.
Before you begin #
Make sure you have:
- An administrator account on your WordPress site
- A Zoom account you can connect to ZooMeet
- A WooCommerce payment method set up
- A meeting to sell, or permission to create one
Let’s get started.
Step 1: Install WooCommerce #
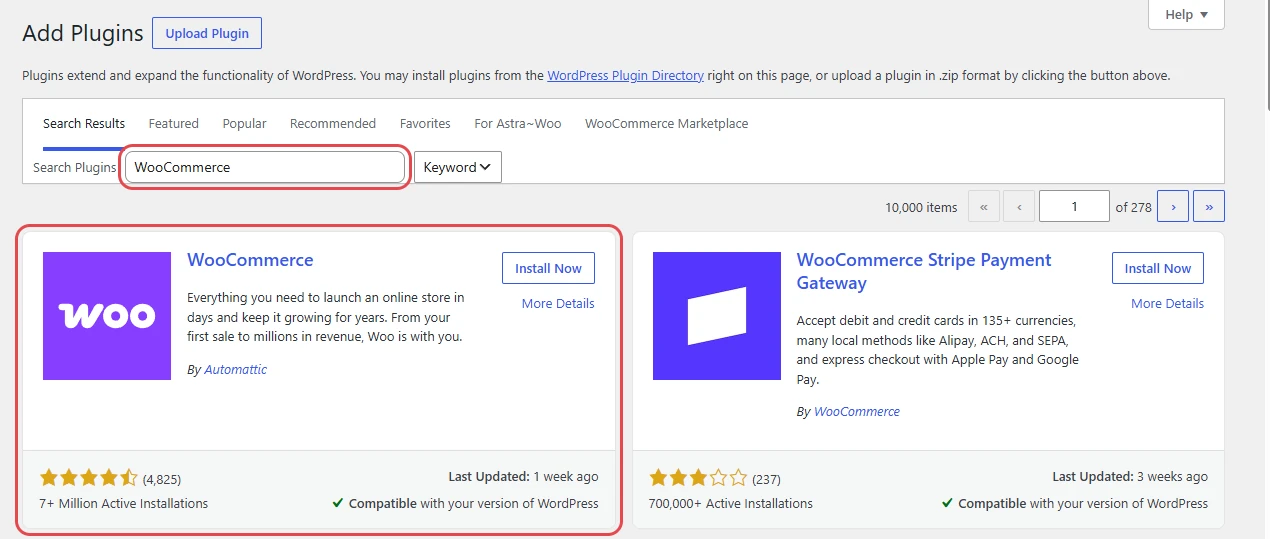
First, make sure WooCommerce is installed and activated. ZooMeet uses WooCommerce products, the cart and orders to sell meetings.
- In the WordPress admin menu, go to Plugins > Add New Plugin.
- Search for WooCommerce.
- Click Install Now, then Activate.
Step 2: Install and activate ZooMeet #
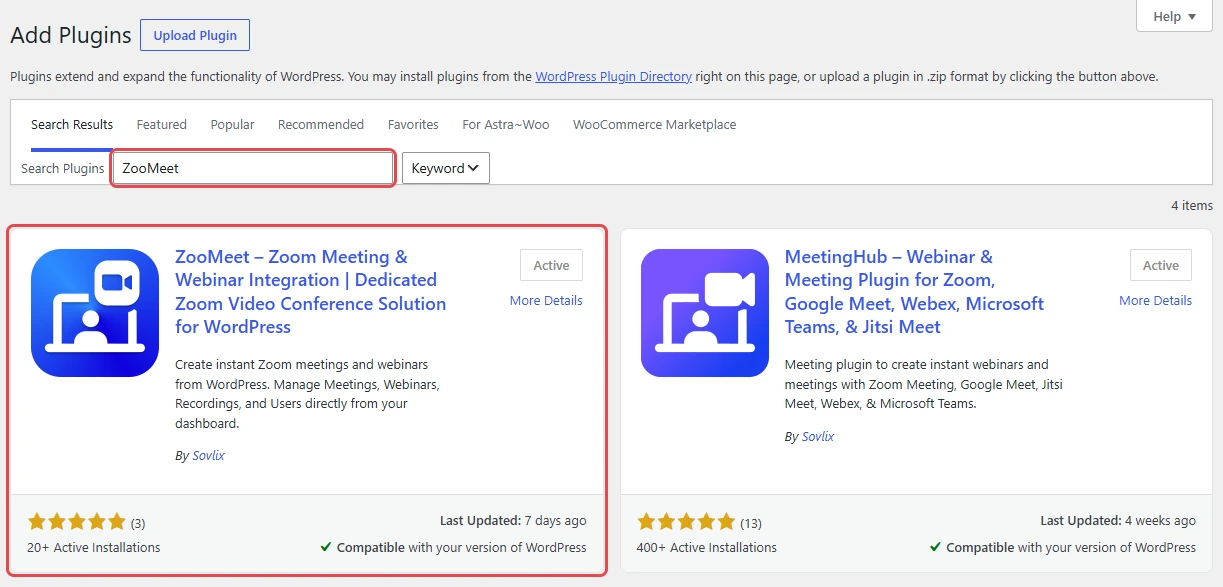
ZooMeet installs from the plugin directory too. Selling meetings lives in ZooMeet Pro, so you add that next.
- Go to Plugins > Add New Plugin.
- Search for ZooMeet.
- Click Install Now, then Activate.
To use the Pro features in this guide, add ZooMeet Pro from inside ZooMeet. There is nothing to upload.
- In WordPress admin, open ZooMeet and click Upgrade, then complete the checkout.
- Go to ZooMeet > Account. Your license shows there, and ZooMeet offers to install ZooMeet Pro.
- Install ZooMeet Pro, then activate it.
Step 3: Connect your Zoom account #
ZooMeet cannot create the Zoom meeting you are about to sell until it is connected to Zoom. If you already did this, skip to Step 4.
- Go to ZooMeet > Settings and click Connect.
- Paste the Account ID, Client ID and Client Secret from your Zoom Server-to-Server OAuth app.
- Save the settings and check that the connection succeeds.
Read our step-by-step Zoom setup guide for the full walkthrough.
Step 4: Turn on the WooCommerce integration #
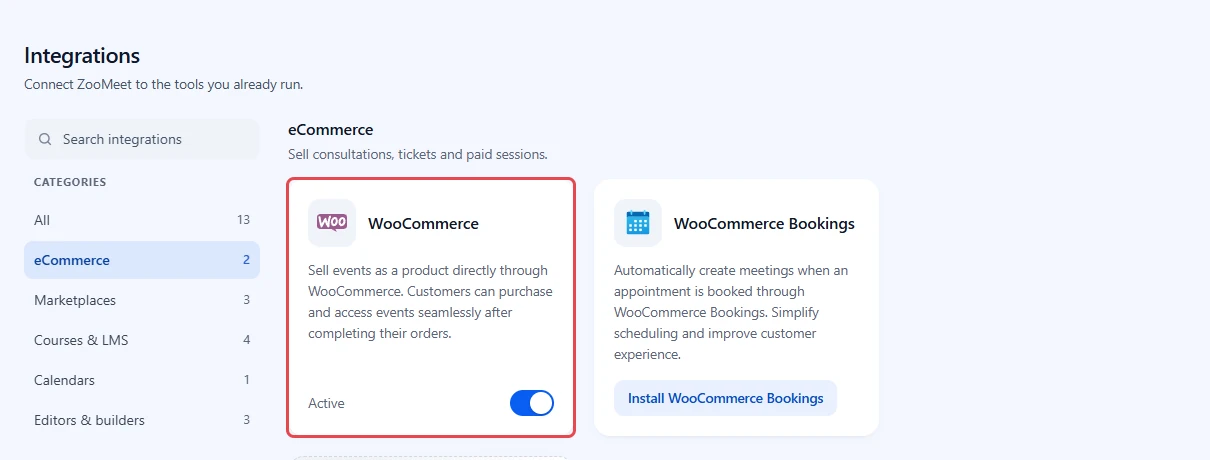
This switch controls every selling feature in this guide. While it is off, products have no Zoom Event tab and buyers get no event details.
- In the WordPress admin menu, go to ZooMeet > Integrations.
- In Categories, click eCommerce.
- On the WooCommerce card, switch the toggle on. The card shows Active.
Now comes the main part: preparing the meeting, then linking a product to it.
Step 5: Ask visitors to sign in (Access and controls) #
A paid meeting should not show its join buttons to everyone. With registration on, the meeting page asks for an email and password first, and only buyers have both.
- Go to ZooMeet > All Events and open your meeting, or click Add new event to create one.
- In the steps on the left, click Access and controls. The section is called Who can join?
- Check the Passcode. Buyers receive it as their meeting password and type it to sign in.
- Turn on Registration required.
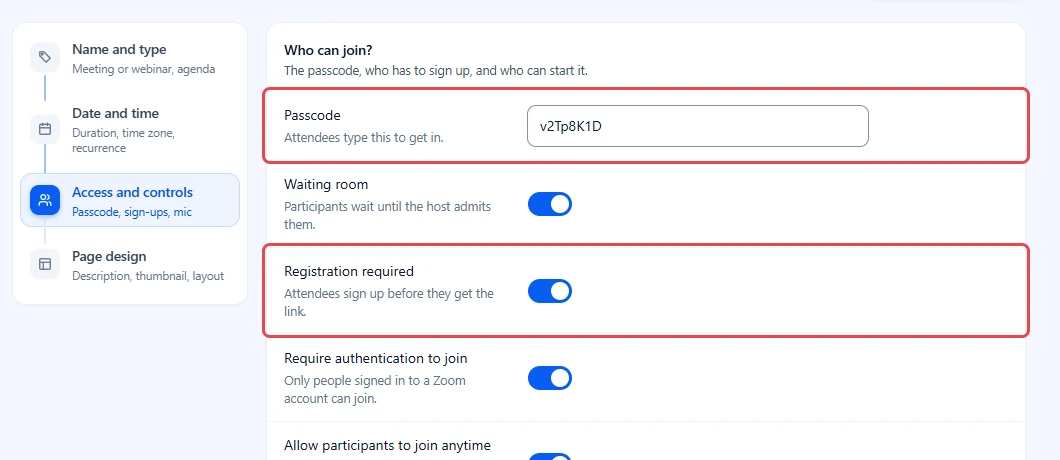
Note: Once a product sells the meeting, ZooMeet keeps the join details for buyers, signed-in attendees, the meeting’s host and administrators, even with Registration required off. Turning it on gives buyers the sign-in box on the meeting page.
Note: Registration required needs ZooMeet Pro. See How to require registration for a meeting with ZooMeet for the details.
Step 6: Give the meeting the Admit design (Page design, optional) #
Admit is a meeting page design built for paid meetings. It looks like an admission ticket, with the price on the stub and a buy bar that stays at the bottom of the screen.
- In the same meeting, click Page design.
- Click the Event theme field and choose Admit.
- Add a Description and a Thumbnail so the page looks complete.
- Click Create meeting, or Update meeting if you are editing.
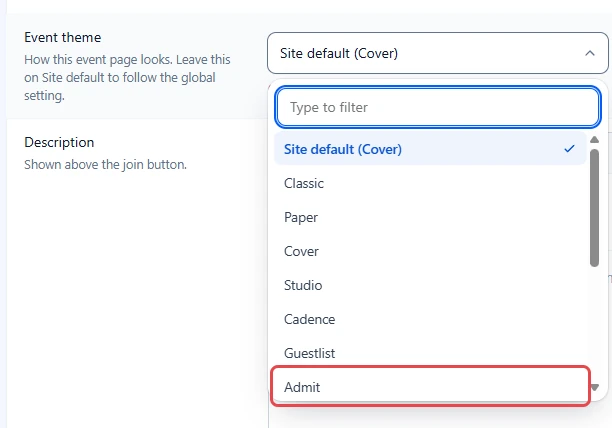
Note: Admit is a ZooMeet Pro design. Other designs still show a Buy now button on a paid meeting. Read more in How to choose a meeting page theme with ZooMeet.
Step 7: Link a WooCommerce product (Zoom Event tab) #
The product is what people buy. Linking it tells ZooMeet which meeting each order gives access to, and tells the meeting page its price.
- Go to Products > Add New, or open an existing product.
- Enter the product name, the Regular price in General and a product image.
- In Product data, keep Simple product and tick Virtual, since there is nothing to ship.
- Click the Zoom Event tab.
- Tick Sell a Zoom event with this product.
- Open Choose event. It starts on Select a meeting or webinar. Choose the meeting or webinar to sell, for example Portfolio Review Workshop. Webinars show (Webinar) after their name.
- Click Publish or Update.
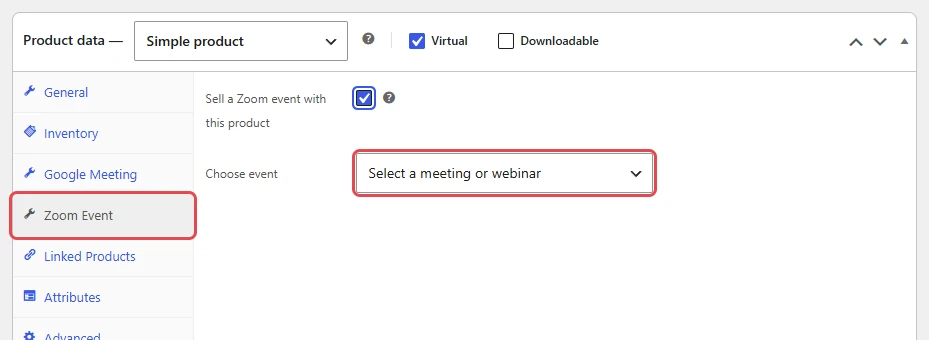
The Choose event list shows the meetings and webinars created by the product’s author. Administrators see every published event on the site.
Tip: Link one product to one meeting. ZooMeet saves the link on both the product and the meeting, and the meeting page then shows the product’s price. If you choose another meeting later, the old one is unlinked for you.
To stop selling a meeting, untick Sell a Zoom event with this product and click Update. ZooMeet unlinks the meeting, and its page no longer shows a price.
Step 8: Check the product page and cart #
Open the product in a private browser window, so you see what buyers see before they pay.
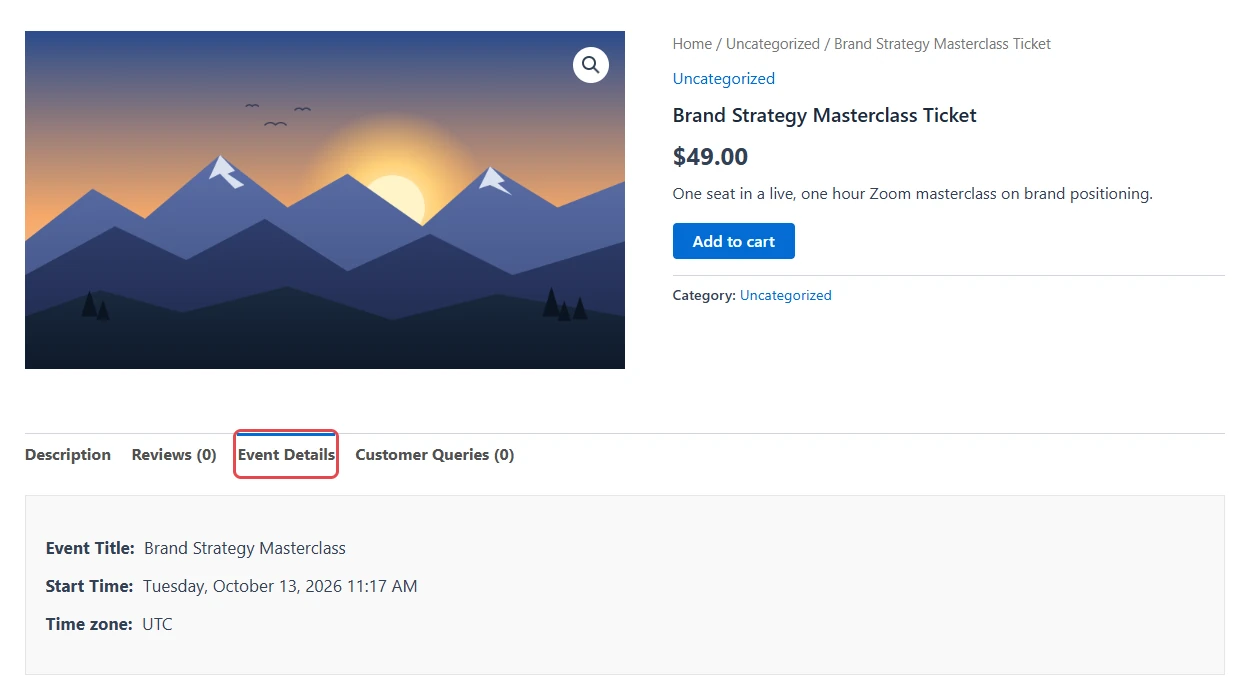
- Check the price and the Add to cart button.
- Click the Event Details tab. It lists Event Title, Start Time and Time zone, plus Recurrence for a repeating meeting.
- Click Add to cart and open the cart.
- Check the Start time under the product name. It shows in the meeting’s own time zone.
- Check that the quantity stays at 1. One order is one seat, so the plus and minus buttons are disabled.
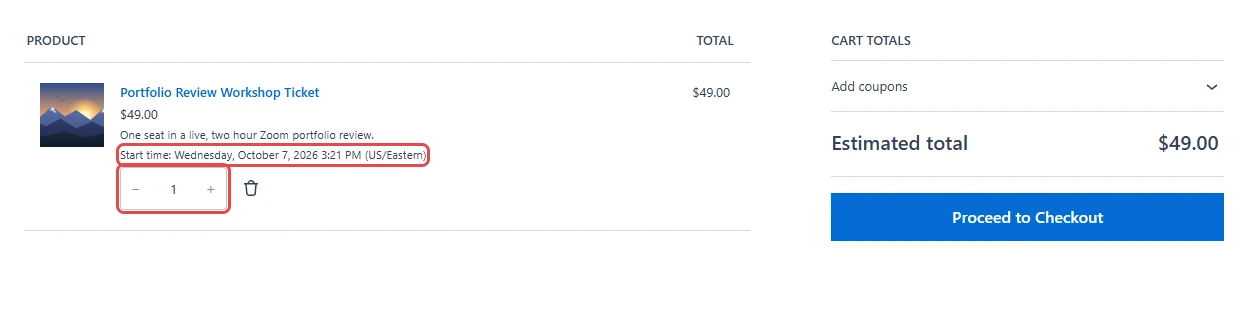
The checkout shows the start time too. On the classic cart and checkout pages, an Event Information block under the totals also lists the Start time and Time zone. If a buyer adds the same product twice, WooCommerce shows This product is already in your cart. You can only purchase one quantity because it’s an event product.
Step 9: Complete the order #
ZooMeet gives the buyer access when the order status changes to Completed. Orders for virtual products often stop at Processing, so check new orders.
- Go to WooCommerce > Orders and open the order.
- Set Status to Completed.
- Click Update.
When the order is completed, ZooMeet:
- adds the billing email to the meeting’s registered attendees, so the buyer can sign in on the meeting page;
- adds a Your Event Information table to WooCommerce’s completed order email;
- for a webinar, registers the buyer with Zoom and adds their personal Join Webinar link to that email.
Tip: To skip this manual step, use a payment method or extension that marks paid virtual orders as completed.
Step 10: See it on your meeting page #
Open the meeting page in a private browser window. Visitors see the ticket, the price and a sign-in box. There are two ways to buy: Buy now on the stub and Buy ticket in the bar at the bottom.
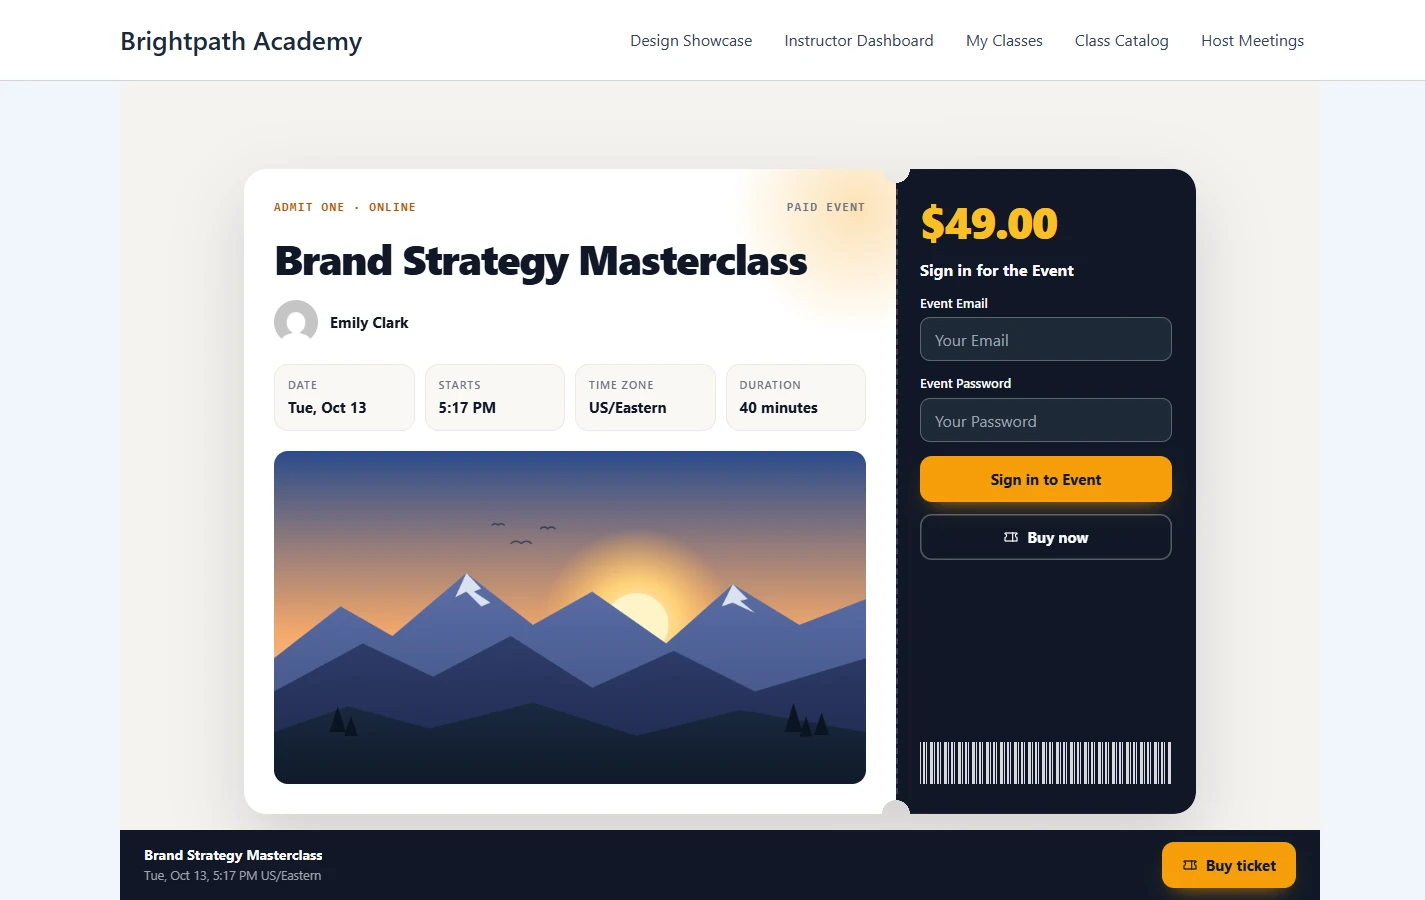
The sign-in box is titled Sign in for the Event. It has Event Email, Event Password and Sign in to Event. A paid meeting has no free registration form, so only buyers get in.
Buyers who are signed in to your site with the account they bought with see You have a ticket instead of the buy button.
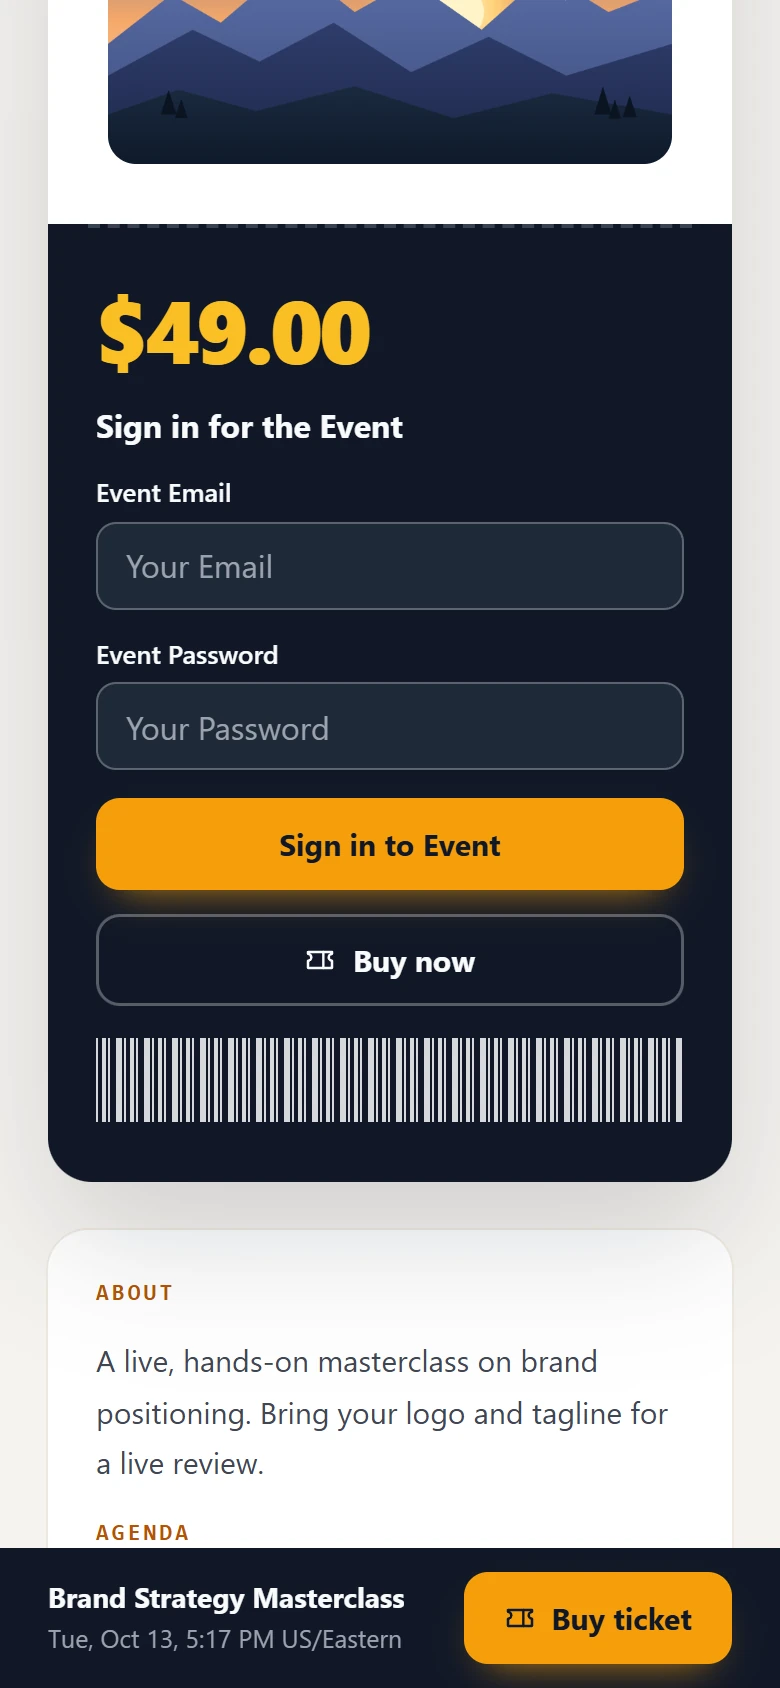
On a phone, the ticket stacks into one column and the Buy ticket bar stays at the bottom of the screen.
Benefits of using ZooMeet with WooCommerce #
- Your existing checkout: seats sell through the shop, payment methods and taxes you already run.
- No guest list to keep: completing an order adds the buyer to the meeting for you.
- Join buttons only for buyers: a meeting sold as a product opens only for buyers, signed-in attendees, its host and administrators.
- No accidental double seats: the cart locks a meeting product to a quantity of one.
- Webinars included: a webinar order registers the buyer with Zoom and emails their personal join link.
Your buyers pay in one place and find their seat in another, without you sending a single email by hand.
What buyers get #
The order email #
The completed order email includes a Your Event Information table with:
- Email and Password, the details for the sign-in box.
- Start time and Time Zone, plus Recurrence for a repeating meeting.
- Event URL, with a Join Event link to the event page.
For a webinar, the table is called Your Webinar Information and lists Topic, Registrant id, Email, Password, Start time, Time Zone and a Join Webinar link.
My Account #
Logged-in buyers get a Zoom Events tab in WooCommerce My Account.
- Go to My Account and click Zoom Events.
- Check the table: Title, Start time, Status, Email, Password and Actions. Status is the order status in plain words, such as Processing or Completed.
- Click Join to open the meeting page in a new tab.
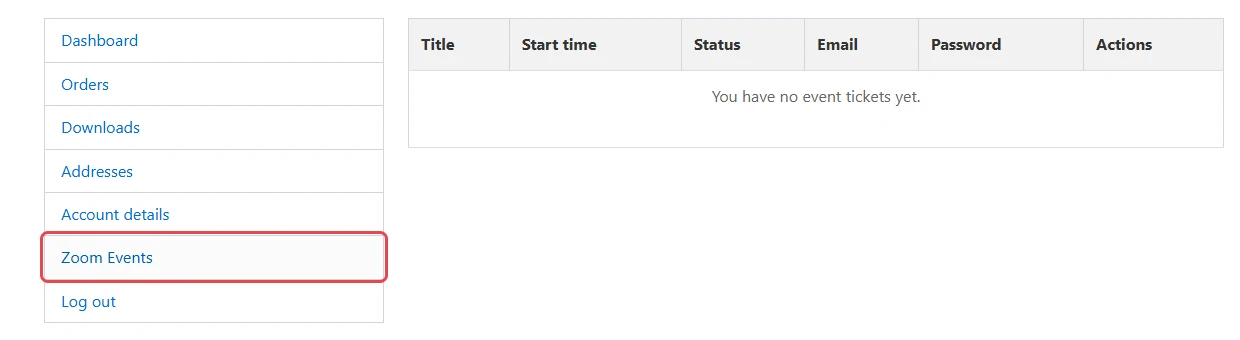
The Password column fills in once the order is Completed. A customer whose orders hold no event product sees You have no event tickets yet. A customer with no orders at all sees You have no scheduled events. Place an order now to schedule one.
Sell appointments with WooCommerce Bookings #
If you sell time slots, such as a one-to-one consultation, ZooMeet can create a fresh Zoom meeting for each booking.
Note: Requires ZooMeet Pro and the WooCommerce Bookings plugin. Until that plugin is active, the WooCommerce Bookings card on the Integrations screen shows Install WooCommerce Bookings.
- Go to ZooMeet > Integrations and turn on WooCommerce Bookings.
- Open a product with the Bookable product type and click its Zoom Meeting tab.
- Tick Zoom Meeting product?
- Choose the Default Host and set the Meeting Duration in hours and minutes.
- Optionally tick Allow participants to join anytime, Require authentication to join and Meeting Thumbnail?, and add a Meeting Description.
- Click Update.
When a booking is paid or confirmed, or its order moves to Processing or Completed, ZooMeet creates a Zoom meeting at the booked time, titled “Booking Session for” plus the product name and booking number. When a booking is cancelled or deleted, ZooMeet deletes that meeting, unless another booking still uses the same time slot.
Troubleshooting #
Buyers paid but cannot sign in on the meeting page #
The order is still Processing or On hold. Buyers are added to the meeting only when the order is Completed.
- Go to WooCommerce > Orders and open the order.
- Set Status to Completed and click Update.
The sign-in box says “Invalid email or password” #
The email typed is not on the meeting’s list of buyers, or the password does not match the meeting’s Passcode.
Check that:
- The buyer uses the exact billing email from their order, and the order is Completed.
- The buyer types the current passcode. If you changed the passcode after a sale, older emails show the old one. Send buyers the current passcode, or set the old one back.
A visitor sees “Please buy a ticket to register for this event.” #
The meeting is sold as a product, so free registration is closed. The visitor buys the product, or signs in to your site with the account they bought it with.
I do not see Buy now or Buy ticket on the meeting page #
The buy buttons are hidden in some cases.
Check that:
- You are not logged in as an administrator. Administrators never see the buy buttons, so open the page in a private window.
- The meeting has not ended.
- Sell a Zoom event with this product is ticked on the product and the event is chosen in Choose event.
The Zoom Event tab is missing on the product #
The WooCommerce integration is off, or the product type does not support it. Turn on WooCommerce under ZooMeet > Integrations, and set the product type to Simple product or Variable product.
The event I want is not in the Choose event list #
The list shows only the meetings and webinars created by the product’s author. Check that:
- The meeting is published.
- The product’s author created the meeting, or you are signed in as an administrator, who sees every meeting.
Frequently asked questions #
Can a buyer purchase more than one seat in one order? #
No. A meeting product is locked to a quantity of one. Each attendee buys their own seat.
Do buyers see the meeting time before they pay? #
Yes. The product’s Event Details tab shows the start time and time zone.
Can I sell a recurring meeting? #
Yes. The product page and the order email also show the meeting’s recurrence.
Can I sell a webinar? #
Yes. Link the product to a webinar. When the order is completed, ZooMeet registers the buyer with Zoom and emails their personal join link.
Can buyers join without an account on my site? #
Yes. Guests sign in on the meeting page with their order email and the meeting password. Only buyers with an account see the Zoom Events tab in My Account.
Do I need the Admit design to sell meetings? #
No. Other designs show a Buy now button on a paid meeting too. Admit adds the price and the sticky buy bar.
Security best practices #
- Turn on Registration required for paid meetings. Buyers who check out as guests then sign in on the meeting page with their order email and the meeting password.
- Treat the passcode like a ticket. It goes to every buyer, so change it if it leaks and send buyers the new one.
- Complete only paid orders. Completing an order gives access, so check the payment first.
- Limit who can edit products. Anyone who can edit a product can link it to a meeting.
You’re ready to sell meetings #
Your meeting now sells as a WooCommerce product. Each completed order adds the buyer to the meeting, and buyers find their sign-in details in the order email and in My Account. Next, let marketplace vendors sell their own meetings or fine-tune your meeting pages.


