- Before you begin
- How MeetingHub works out your free times
- Step 1: Open the Availability tab
- Step 2: Choose your time zone
- Step 3: Set your weekly hours
- Step 4: Add days off
- Step 5: Save weekly patterns as schedules (Pro)
- Step 6: Close every host on holidays (Pro)
- Step 7: Give one booking page its own hours
- Step 8: Set notice, booking window and gaps for a page
- Benefits of setting your booking availability in MeetingHub
- Troubleshooting
- Frequently asked questions
- You're ready to take bookings at the right times
To set your booking availability in MeetingHub, go to MeetingHub > Booking setup > Availability, choose your time zone, switch on the days you work with their start and end times, and click Save changes. Every booking page on your WordPress site then offers only those hours, minus any days off you add.
Your hours are the backbone of every booking page. Get them right once, and clients only ever see times you can really take.
By the end of this guide, you will have:
- Your weekly hours saved in the right time zone
- Days off and days with different hours added for holidays, trips or short days
- A clear idea of how one booking page can keep hours of its own
- Notice, booking window and gaps set so nobody books you at the last minute
- With MeetingHub Pro, saved schedules and holidays that close every host
Estimated setup time: 5 minutes. Nothing changes on your booking pages until you save.
Before you begin #
Make sure you have:
- MeetingHub installed and activated
- At least one booking page, or a plan to make one. See How to create a booking page in WordPress with MeetingHub.
- MeetingHub Pro, only for Saved schedules, Holidays and Booking limits
How MeetingHub works out your free times #
MeetingHub starts from your weekly hours, then takes away what you cannot do:
- Weekly hours: the days and times you work, in your time zone.
- Days off: dates you are closed, or open for different hours.
- Holidays (Pro): dates every host on the site is closed.
- Booking rules on each page: the shortest notice, how far ahead people can book, the spacing between start times and the gaps around each booking.
- Existing bookings: a time that is booked is never offered twice.
Clients see the result in their own time zone, so a client in London sees your 9:00 AM New York start as 2:00 PM.
Step 1: Open the Availability tab #
- In the WordPress admin menu, go to MeetingHub > Booking setup.
- Click the Availability tab.
The tab shows Weekly hours at the top, with a one-line summary such as Mon to Fri, 9:00 AM to 5:00 PM, then Days off.
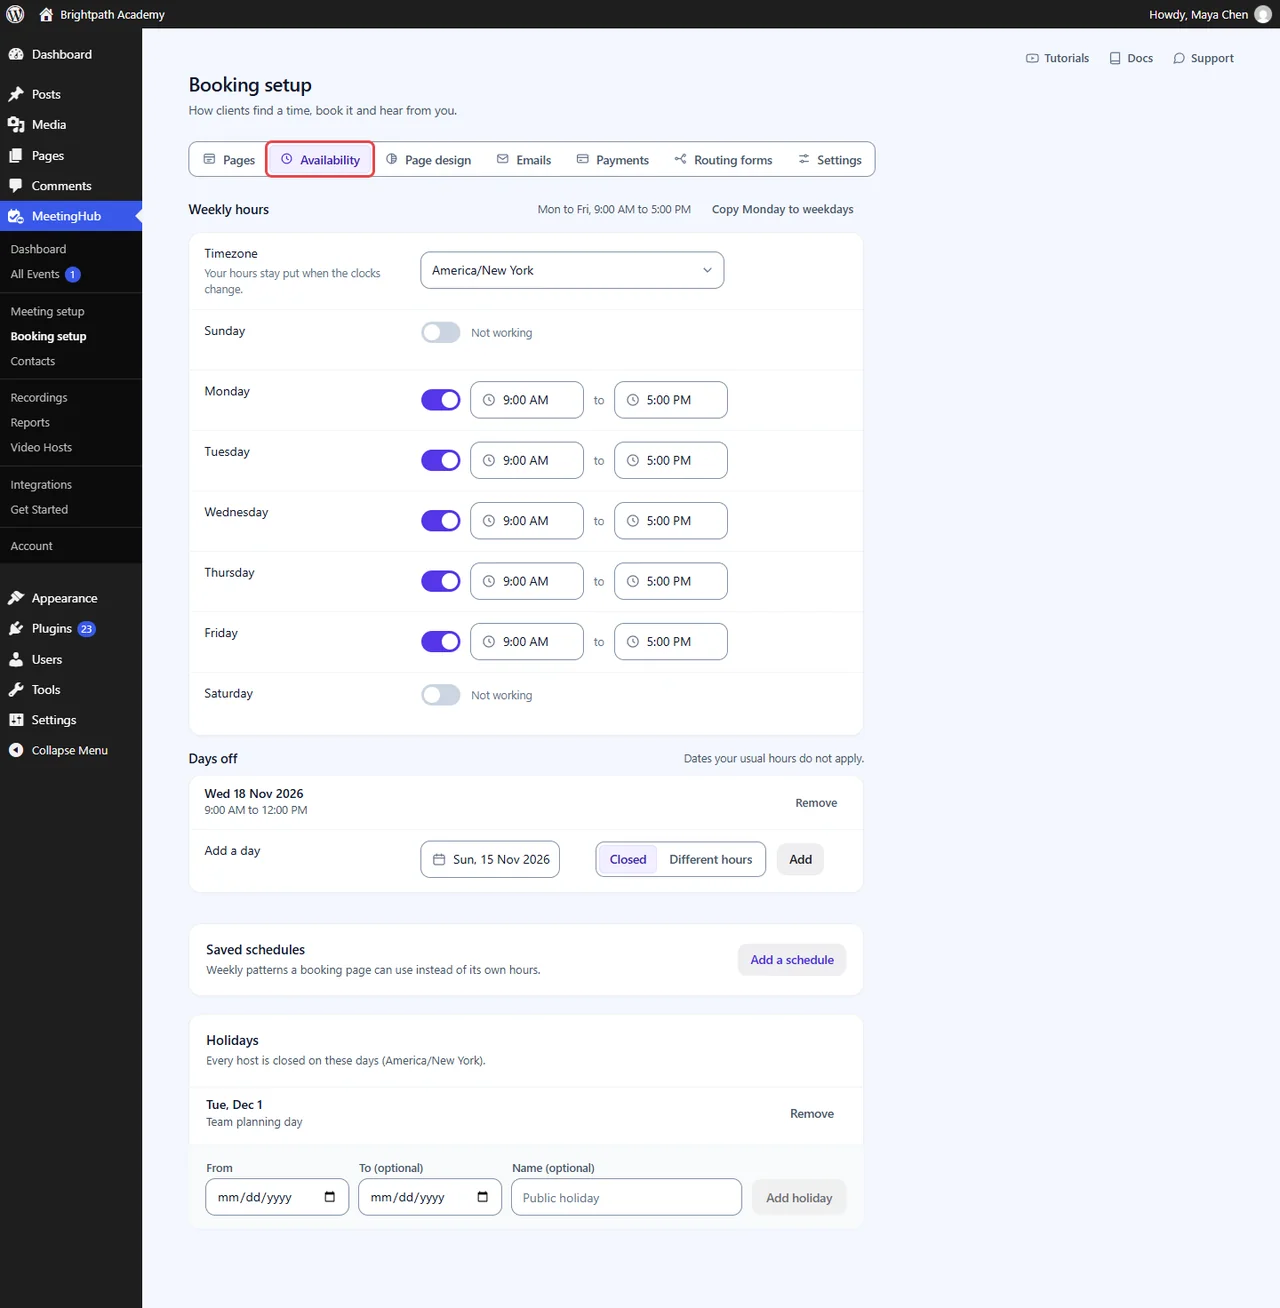
Note: These are your own hours. On a site with several hosts, each host who can manage their own bookings sets their own week on this tab.
Step 2: Choose your time zone #
Your hours are read on your clock, not the visitor’s. Pick the time zone you work in so that 9:00 AM stays 9:00 AM all year, even when the clocks change.
- In the Weekly hours card, open Timezone.
- Pick your city, for example America/New York.
Tip: If your hours use a different time zone from your WordPress site, a notice says so, for example “Your hours are kept in America/New_York, but this site runs on UTC.” Click the button that names the site’s zone, such as Use UTC, to match them, or close the notice if the difference is on purpose.
Step 3: Set your weekly hours #
Each day has a switch and two clocks.
- Switch on each day you take bookings. A day that is off reads Not working.
- For each day that is on, set the start time and the end time, for example 9:00 AM to 5:00 PM.
- To use Monday’s times for Tuesday to Friday, click Copy Monday to weekdays above the card.
- Click Save changes in the save bar at the bottom of the screen, or press Ctrl+S (Cmd+S on a Mac).

The save bar lists what you changed. Click Discard to put everything back to what was saved. A day you switch off keeps its times, so switching it on again brings them back.
Important: On a new site, a yellow notice says These hours are not saved yet. “Clients cannot book you until you save them.” Click Save these hours to keep the week shown, or change it first and then save.
Step 4: Add days off #
Days off are dates your usual hours do not apply: a holiday, a conference or a short Friday.
- Under Days off, in the Add a day row, click the date field and pick a date.
- Choose Closed to take no bookings that day, or Different hours to open for other times.
- For Different hours, set the start and end time. It starts at 9:00 AM to 1:00 PM.
- Click Add. MeetingHub says Day added. and the date appears in the list, for example Wed 18 Nov 2026, with Closed all day or the hours under it.
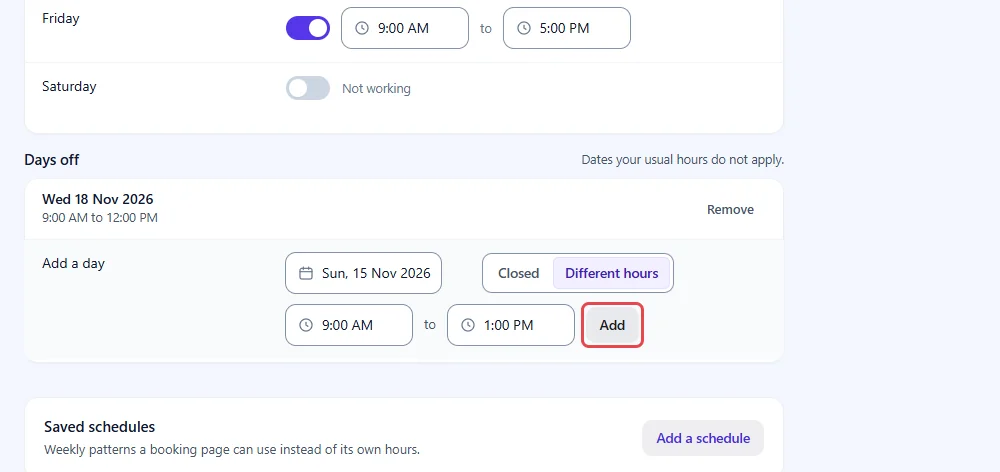
To bring a date back to your usual hours, click Remove on its row. Days off save straight away; they do not wait for the save bar.
Note: Days off apply to every booking page you host, including pages that keep hours of their own.
Step 5: Save weekly patterns as schedules (Pro) #
Saved schedules are named weeks, such as Weekdays or Weekend clinic, that a booking page can use instead of your default hours. Requires MeetingHub Pro.
- In the Saved schedules card, click Add a schedule.
- Type a Name, for example
Weekend clinic. - Set the days and times for this pattern.
- Click Save schedule. MeetingHub says Schedule saved.

Each saved schedule has Edit and Delete. Deleting one asks Delete this schedule? first; pages that used it keep its hours as their own.
Step 6: Close every host on holidays (Pro) #
Holidays close the calendar of every host on the site, which suits public holidays and team days off. Requires MeetingHub Pro.
- In the Holidays card, pick the From date.
- For a holiday longer than one day, pick To (optional).
- Type a Name (optional), for example
Team planning day. - Click Add holiday. MeetingHub says “Holiday added. No page offers times that day.”

Step 7: Give one booking page its own hours #
Most pages follow your default week. A page that runs at different times, such as an evening class, can keep a week of its own.
- On the Pages tab, click the booking page’s name to edit it.
- Click Availability on the left.
- Under When are you free?, click Set hours for this page.
- Switch the days on or off and set the times. The card now says Own hours: “Only this page uses these hours, on your clock”.
- Click Save changes at the top right.
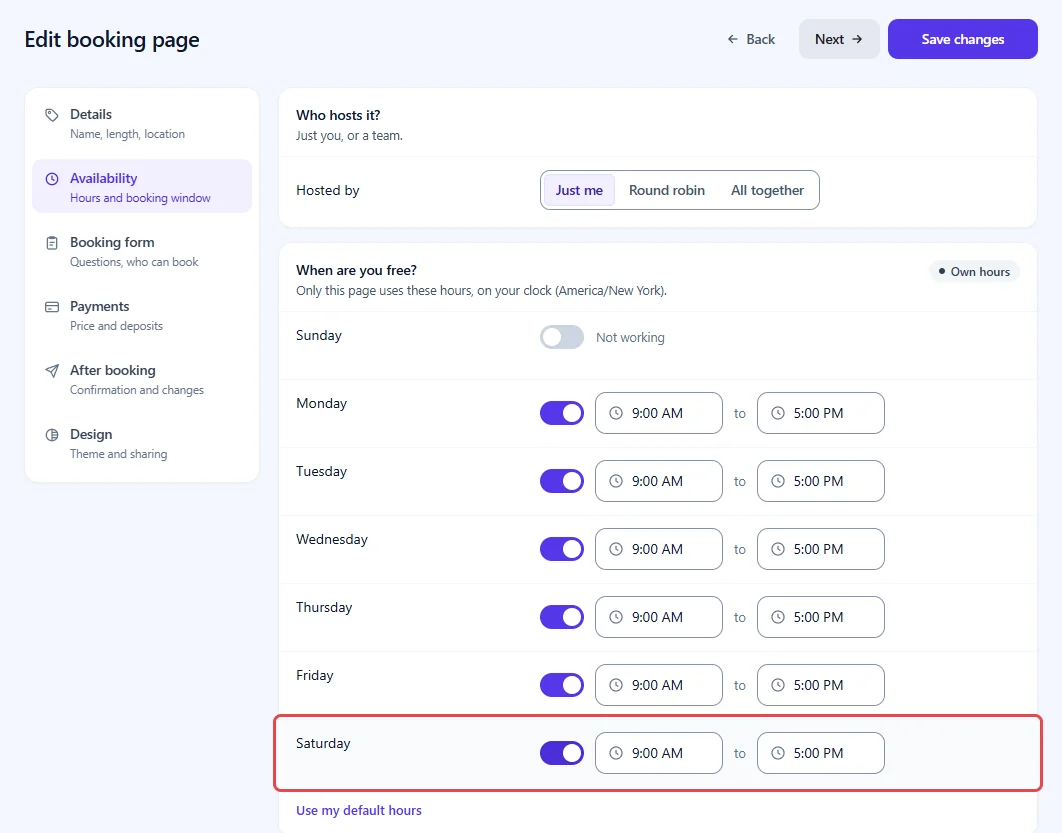
To put the page back on your default week, click Use my default hours at the bottom of the card. With MeetingHub Pro and at least one saved schedule, a Saved schedule card above it lets you pick a Schedule instead.
Step 8: Set notice, booking window and gaps for a page #
The When can people book? card on the same Availability step decides which of your open hours are offered.
- Shortest notice: nothing sooner than this is offered. Choose Any time, 1 hour, 4 hours, 1 day or 2 days.
- Bookable up to: how far ahead the calendar goes: 1 week, 1 month, 2 months, 3 months or 1 year.
- Offer a time every: the spacing between start times: 15 min, 30 min, 45 min, 1 hr or 1.5 hr. Shorter than the length gives overlapping starts.
- Gap before and Gap after: time kept clear around each booking: None, 5 min, 10 min, 15 min or 30 min.
- Click Save changes.

Each row starts on your site’s booking default and shows a Default tag while it follows it. The default’s own answer is marked, for example 4 hours (default). To change the defaults for every page at once, see How to change booking settings (calendar feed, reminders, data).
Booking limits caps how many bookings a page takes A day, A week or In all. Leave a box blank for no limit. Requires MeetingHub Pro.
Benefits of setting your booking availability in MeetingHub #
- One week, every page: change your hours once and every page that follows them updates.
- Daylight saving handled: your times are kept on your own clock, so they never drift when the clocks change.
- Time zones for clients: each client sees your free times in their own zone.
- No double bookings: a booked time is never offered again, and gaps keep breathing room around each call.
Clear hours mean fewer emails back and forth and fewer surprises in your calendar.
Troubleshooting #
Clients see no free times #
Check that:
- At least one day is switched on under Weekly hours, and you clicked Save changes.
- Your Days off and Holidays do not cover the dates the client looked at.
- The page’s Shortest notice is not longer than the time left in your week, and Bookable up to reaches far enough.
- The booking page is switched on in the Pages tab.
On the Pages tab, a page with no hours says “No hours, so nobody can book it.” Click Set hours to come straight here.
“Turn on at least one day, or use your default hours.” #
The page has hours of its own with every day off. Switch on at least one day, or click Use my default hours, then save again.
Times on the booking page look shifted #
The booking page shows times in the visitor’s time zone. Check Timezone in Weekly hours. Visitors can change their own zone with the time zone picker on the booking page.
“Your hours could not be saved. Please try again.” #
The save did not reach your site. Reload the page, check you are still logged in, and save again.
Frequently asked questions #
Do I need MeetingHub Pro to set my hours? #
No. Weekly hours, days off, per-page hours, notice, booking window and gaps are all in the free plugin. Saved schedules, holidays and booking limits need MeetingHub Pro.
Can I have different hours for different booking pages? #
Yes. Open the page, go to Availability, and click Set hours for this page. The rest of your pages keep your default week.
Can I take a half day off? #
Yes. Add the date under Days off, choose Different hours, and set the hours you are working that day.
Can I keep a break between bookings? #
Yes. Set Gap before or Gap after on the page. MeetingHub keeps that time clear around every booking.
Does MeetingHub check my Google Calendar? #
Yes, with MeetingHub Pro. Turn on Check Google Calendar under Booking setup > Settings, and busy times in Google Calendar stop being offered. See How to change booking settings (calendar feed, reminders, data).
You’re ready to take bookings at the right times #
Your weekly hours, days off and booking rules now decide exactly which times clients can pick, in their own time zone. Next, make your booking pages look like your brand, or check the emails clients receive.


