- Before you begin
- Which platforms can run a webinar?
- Step 1: Choose Webinar as the event type
- Step 2: Set the date and time
- Step 3: Decide who can join (Access and controls)
- Step 4: Set up webinar registration (optional)
- Step 5: Set the webinar controls (What can they do?)
- Step 6: Design the page and create the webinar
- What attendees see
- Manage your webinars
- Benefits of running Zoom and Webex webinars from WordPress
- Troubleshooting
- Frequently asked questions
- You're ready to run webinars
To create a webinar in WordPress with MeetingHub, click Create in All Events, set Event type to Webinar, pick Zoom or Webex, and fill in the same short form you use for meetings. MeetingHub creates the webinar on your Zoom or Webex account and gives it a page on your site, where attendees register and join.
A webinar suits talks, launches and classes where you present and everyone else watches. A meeting is for conversations where everybody can speak.
By the end of this guide, you will have:
- A Zoom or Webex webinar created from WordPress
- Registration set up so you know who is coming
- Panelist, recording and video options set for the session
- A webinar page on your site and a list of webinars to manage
Estimated setup time: 5 minutes. The form is the one you know from meetings, with a few webinar switches.
Before you begin #
Make sure you have:
- MeetingHub installed and activated, and Zoom or Webex connected. See How to connect Zoom to WordPress with MeetingHub or How to connect Webex to WordPress with MeetingHub.
- A webinar licence on that account: the Zoom Webinars add-on, or a Webex Webinars licence with host privileges.
- MeetingHub Pro, if you want Webex webinars, registration or a repeating webinar.
Note: Webex webinars require MeetingHub Pro. Zoom webinars work in every version.
Which platforms can run a webinar? #
| Platform | Webinar |
|---|---|
| Zoom | Yes |
| Webex | Yes, with MeetingHub Pro |
| Google Meet, Microsoft Teams, Jitsi Meet | No, meetings only |
Step 1: Choose Webinar as the event type #
- Go to MeetingHub > All Events and click Create.
- Under Event type, click Webinar. The hint changes to You present. Everyone else watches., the title reads New webinar, and Platform narrows to Zoom and Webex.
- Type a Webinar name, for example
Spring Cohort Kickoff Webinar. - Pick Zoom or Webex under Platform.
- Add an Agenda. It is sent to the platform with the invite.

Note: The event type cannot change after the webinar is created.
Step 2: Set the date and time #
- Click Date and time on the left.
- Set Starts, Timezone and Duration the same way as for a meeting.
- To run the webinar on a schedule, turn on Repeats. See How to set up recurring meetings in WordPress. Requires MeetingHub Pro.
Step 3: Decide who can join (Access and controls) #
- Click Access and controls on the left.
- Check the Passcode. Attendees type it to get in.
- On Zoom, check Host, the Zoom user the webinar is made on. That user needs the webinar licence. Click Refresh list if a new Zoom user is missing. Add an Alternative host if another licensed user may start it without you.
On Webex, the same step has webinar rows of its own:
- Panelist passcode: panelists type this instead of the attendee passcode.
- Webcast view: attendees watch a broadcast instead of joining the call.
- Invitees: type an email and press Enter for each person Webex should invite. Turn on Send invite emails so Webex emails them, and Send host email to get the joining details yourself.
- Join before host, Audio before the host and Lock automatically, as for a Webex meeting.

Step 4: Set up webinar registration (optional) #
- Turn on Require registration. Requires MeetingHub Pro.
- On Zoom, choose the Approval (Automatic, Manual or None), what Sign-up covers for a repeating webinar (Every session, One session each time or Sessions they pick), and whether to Email you when somebody signs up.
- On Webex, turn on Auto-approve registrations to accept sign-ups without reviewing them.

Visitors then register on the webinar page before they get in. See How to require meeting registration in WordPress with MeetingHub.
Step 5: Set the webinar controls (What can they do?) #
Scroll down to the What can they do? card.
On a Zoom webinar:
- Pick Record automatically: Off, Local (on the host computer) or Cloud.
- Turn on Host camera on if your camera should be on from the start.
- Turn on Panelist cameras on so panelists arrive on camera.
- Turn on Practice session to rehearse with panelists before attendees are let in.
- Turn on HD video for sharper video. It uses more bandwidth.
- Turn on Join from several devices if one person may join on a phone and a laptop at once.

On a Webex webinar, the card holds Record automatically, Breakout sessions, Host can unmute people, Attendees can unmute themselves, Mute everyone on entry, Live stream and Create in a Webex space.
Step 6: Design the page and create the webinar #
- Click Page design on the left. Add a Description and a Thumbnail, and set the page switches. See How to design your meeting pages in WordPress with MeetingHub.
- Click Create webinar at the top right.
MeetingHub creates the webinar on Zoom or Webex. You see Webinar created and land on All Events, where the row is marked Webinar.

What attendees see #
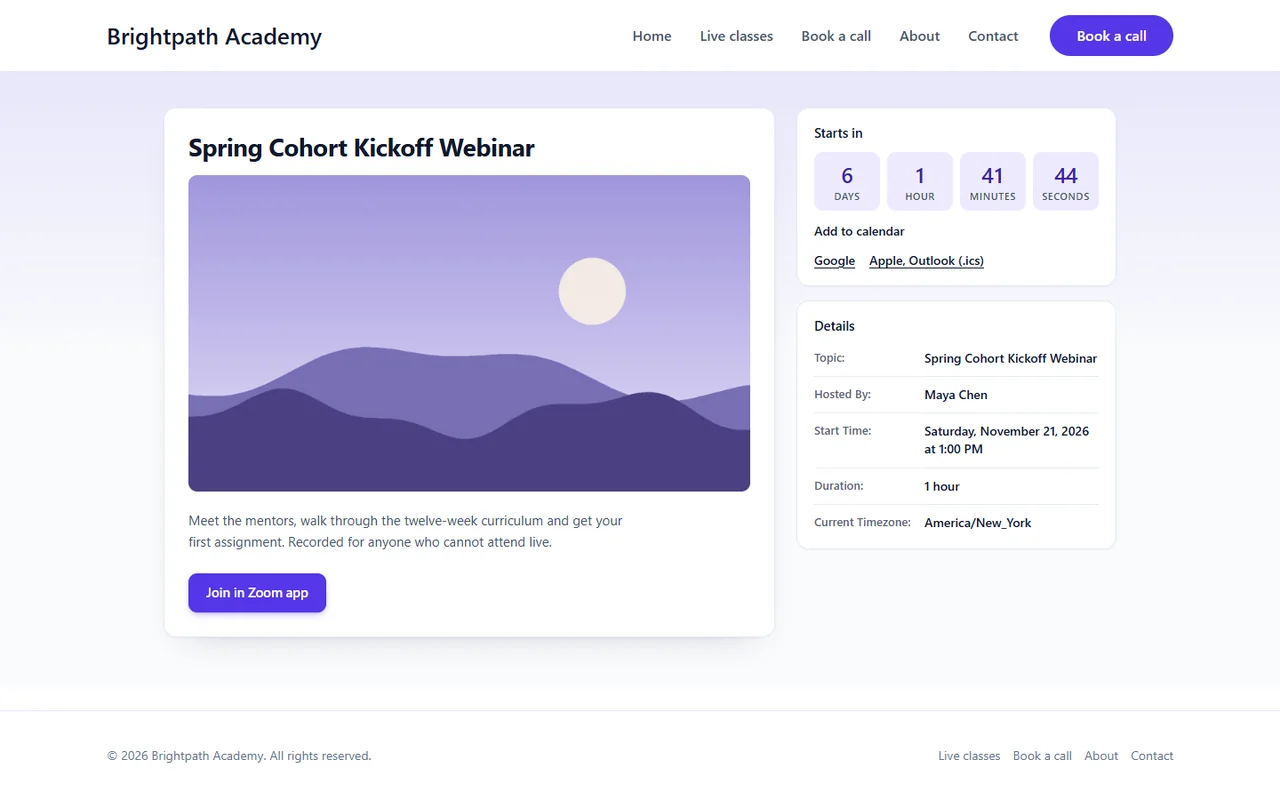
The webinar has its own page on your site, like a meeting: title, description, Starts in countdown, Add to calendar and Details. With registration on, visitors register there first. Attendees join with Join in Zoom app on the page; panelists join with the link and passcode the platform sends them.
Manage your webinars #
- Open All types in All Events and pick Webinars to see only webinars.
- Edit, copy the shortcode or delete a webinar from the row’s More actions (•••) menu, the same as a meeting.
- To list upcoming Zoom webinars on a page, use
[mhub-zoom-webinar-list available="true"]. See How to show meetings on any page with shortcodes, blocks and Elementor. - To set webinar defaults once for every new Zoom webinar, go to MeetingHub > Meeting setup > Platforms > Zoom and use the Webinars group: Panelist cameras on, Practice session, HD video and Join from several devices.
Benefits of running Zoom and Webex webinars from WordPress #
- One form for meetings and webinars: Switch Event type and the right fields appear.
- Your site, your audience: Attendees register and join on a page you control.
- Two platforms: Run webinars on Zoom or Webex from the same screen.
- Sensible defaults: Webinar switches start from your Meeting setup defaults.
Troubleshooting #
Google Meet, Microsoft Teams and Jitsi Meet disappear from the platform list #
That is expected. Only Zoom and Webex can run webinars, so the list narrows when you pick Webinar. Switch back to Meeting to see all five.
Webex shows a lock when I pick Webinar #
Webex webinars require MeetingHub Pro. Install and activate MeetingHub Pro, or run the webinar on Zoom.
“The meeting was not created” on a webinar #
Zoom or Webex refused the request, usually because the account has no webinar licence. Check that:
- The Host you picked on Zoom has the Webinars add-on.
- Your Webex site has Webex Webinars and the host has privileges for it.
- The platform still shows Connected in Meeting setup > Platforms.
I cannot find Waiting room or Join before host on a Zoom webinar #
Those are meeting settings in Zoom. A Zoom webinar has its own controls, such as Practice session and Panelist cameras on.
Frequently asked questions #
Do I need MeetingHub Pro to create a webinar? #
No, not for Zoom. Webex webinars, registration and repeating webinars require MeetingHub Pro.
Can I add panelists from WordPress? #
No. Add panelists in Zoom or Webex. MeetingHub sets how they arrive, for example Panelist cameras on and the Webex Panelist passcode.
Can I change a meeting into a webinar later? #
No. The event type is fixed once it exists. Create a new webinar and delete the meeting.
Can a webinar repeat every week? #
Yes. Turn on Repeats on the Date and time step. Requires MeetingHub Pro.
You’re ready to run webinars #
Your webinar exists on Zoom or Webex and has a page on your site where people register and join. Next, ask attendees to register, or put a list of upcoming webinars on a page.


