- Before you begin
- Step 1: Open Categories
- Step 2: Add a category
- Step 3: Nest categories under a parent (optional)
- Step 4: Read, edit and delete categories
- Step 5: Add categories to a meeting
- Step 6: Filter All Events by category
- Step 7: See categories on the meeting page
- Step 8: Show one category in a meeting list shortcode
- Benefits of categories in ZooMeet
- Troubleshooting
- Frequently asked questions
- You're ready to organize your meetings
As your list of meetings grows, it gets harder to find the right one. Categories let you group meetings and webinars by topic, team or course, for example Product Onboarding, Workshops or Town Halls.
You create categories once, tag each meeting with one or more, and then filter All Events by them. Visitors see the categories on each meeting page, can open a page listing every meeting in a category, and you can show one category’s meetings anywhere with a shortcode.
By the end of this guide, you will have:
- A set of categories, with child categories where they help
- Meetings tagged with categories from the meeting form
- All Events filtered by one category
- Category tags on your meeting pages that link to category pages
- A meeting list on any page that shows only the categories you choose
Estimated setup time: 5 minutes. Categories never change anything in Zoom. They only organize your site.
Before you begin #
Make sure you have:
- ZooMeet installed and activated
- An administrator account on your WordPress site
- A few meetings or webinars to tag. See How to create your first Zoom meeting with ZooMeet.
Categories are part of the free plugin.
Step 1: Open Categories #
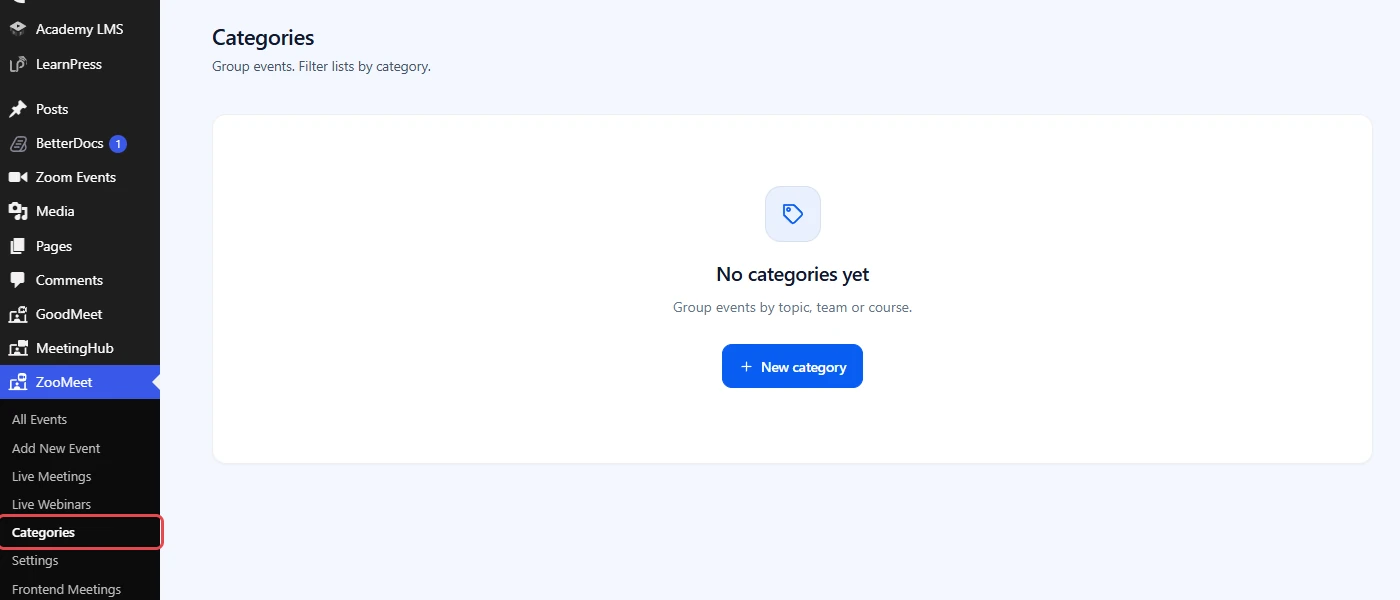
- In the WordPress admin menu, go to ZooMeet > Categories.
- Check the heading Categories and the line Group events. Filter lists by category.
Step 2: Add a category #
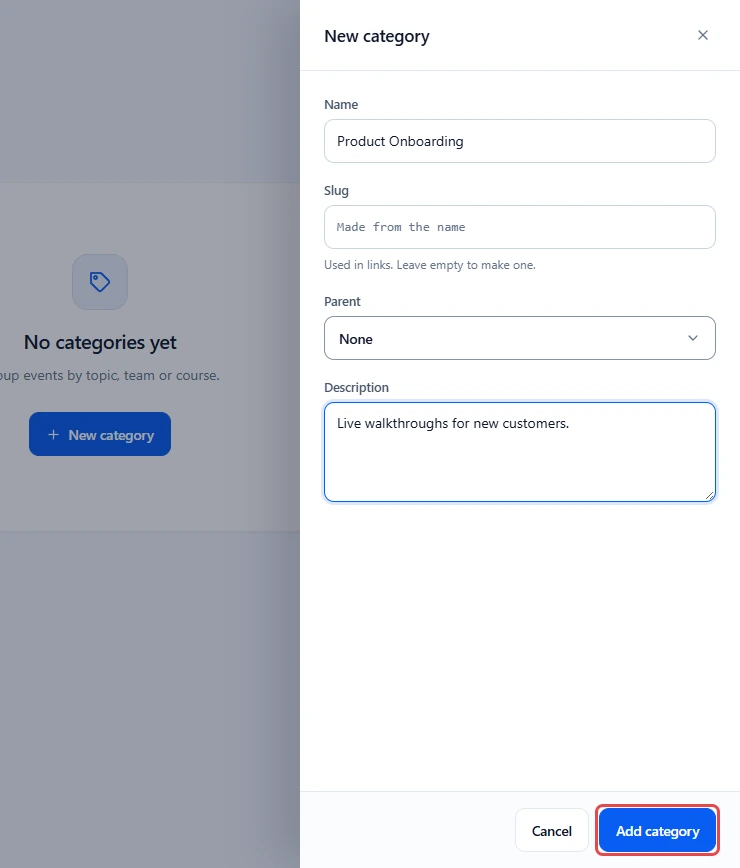
- Click New category. A panel opens on the right.
- In Name, type the category name, for example
Product Onboarding. - Leave Slug empty. ZooMeet makes one from the name. The slug is the short name used in links and shortcodes, for example
product-onboarding. - Leave Parent on None for a top-level category.
- Add a Description if you like. It is optional.
- Click Add category. You see Category added.
Repeat for each category you need.
Step 3: Nest categories under a parent (optional) #
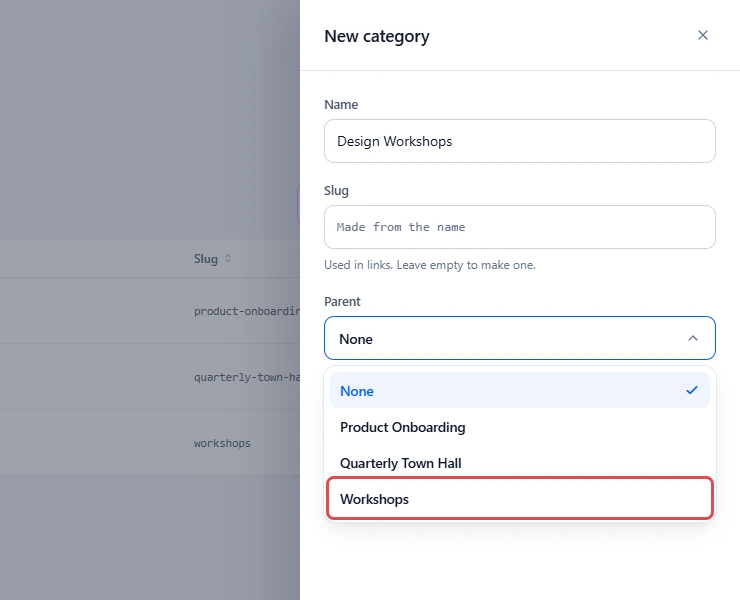
Child categories help when one topic has several parts, for example Workshops with Design Workshops and Writing Workshops under it.
- Click New category and type the name.
- Open Parent and pick the parent category.
- Click Add category.
Tip: Filtering by a parent also shows the meetings in its child categories, on the site and in shortcodes.
Step 4: Read, edit and delete categories #
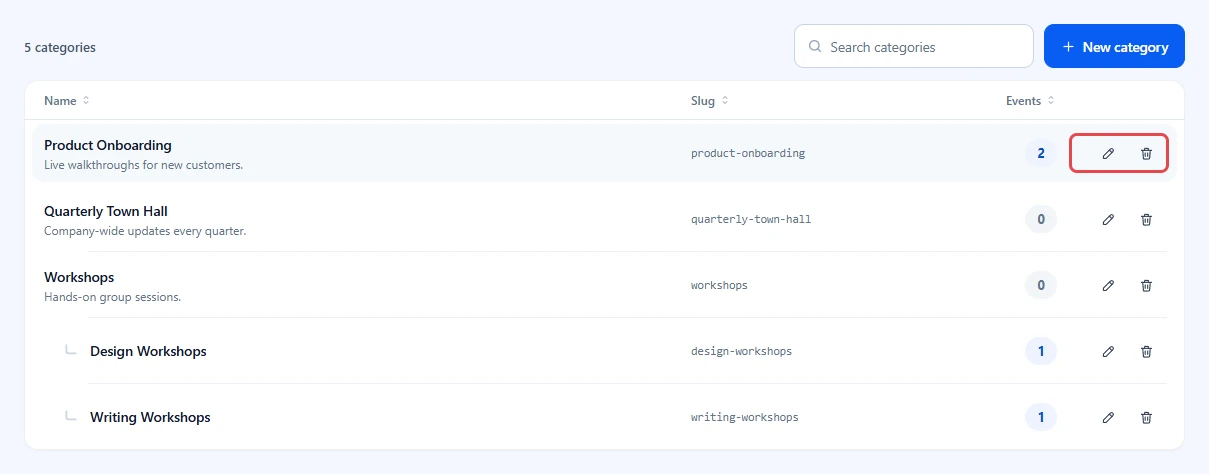
The list shows every category with its Name, Slug and the number of Events in it.
- Type in Search categories to find one.
- Click Name, Slug or Events to sort.
- Click the count under Events to open All Events filtered by that category. Its tooltip reads Show in All Events.
To change a category:
- Hover over the row and click the pencil icon.
- Change the Name, Slug, Parent or Description in Edit category.
- Click Save. You see Category saved.
To delete one:
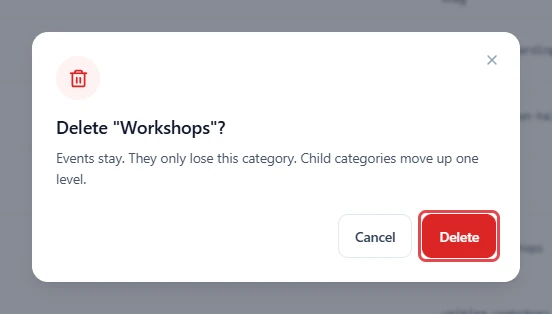
- Hover over the row and click the bin icon.
- Read Delete “…”? It says Events stay. They only lose this category. Child categories move up one level.
- Click Delete to confirm, or Cancel.
Important: Changing a slug changes the link to the category page and breaks shortcodes that use the old slug. Update those shortcodes after you change it.
Step 5: Add categories to a meeting #
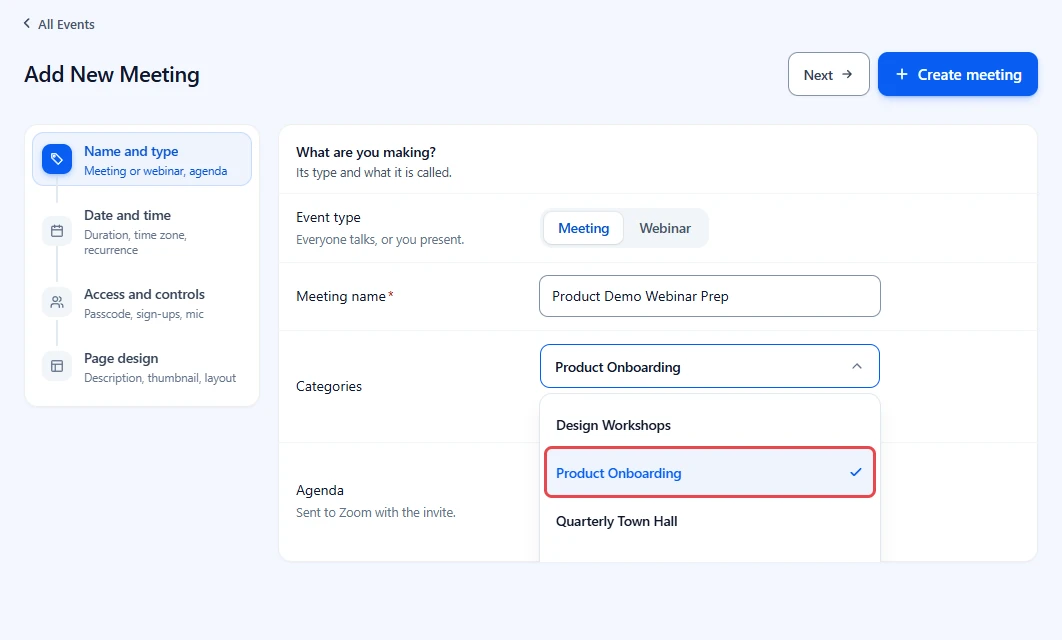
You choose categories on the first step of the meeting form, right under the name.
- Go to ZooMeet > Add New Event, or open an existing meeting from ZooMeet > All Events.
- On Name and type, find Categories below the meeting name.
- Open the list and pick one or more categories. It starts on No category. On a site with no categories yet, the list reads No categories yet; add one with New category below it.
- Click Create meeting, or Update meeting for an existing one.
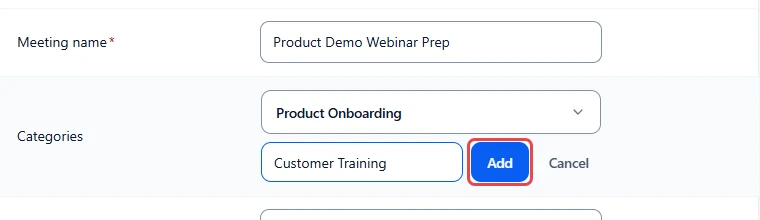
Need a category that does not exist yet? You do not have to leave the form.
- Click New category under the field.
- Type the Category name and click Add, or press Enter.
- The new category is added and picked for this meeting.
Note: Imported meetings can get categories as they come in. See How to import meetings and webinars from Zoom with ZooMeet.
Step 6: Filter All Events by category #
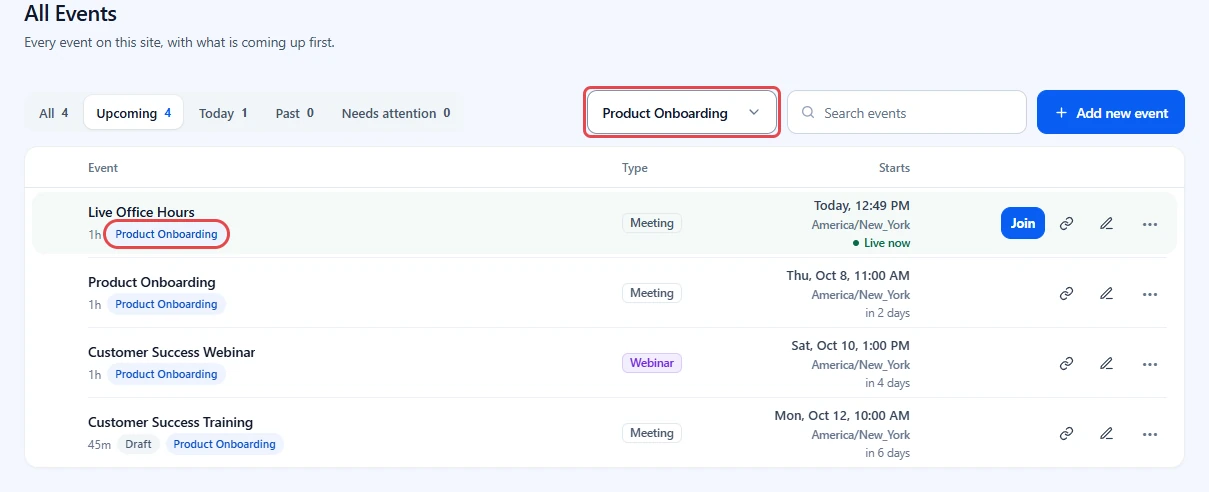
Once meetings carry categories, All Events shows them on each row and adds a category filter.
- Go to ZooMeet > All Events.
- Open Filter by category next to Search events and pick a category. Pick All categories to see every meeting again.
- Or click a category tag on any row to filter by it. Click it again to clear the filter.
Tip: The address in your browser keeps the filter, so you can bookmark a filtered list.
Step 7: See categories on the meeting page #
Each meeting page shows its categories as small tags under the title. Each tag links to that category’s page on your site.
- Open a meeting page that has categories. Hover over the row in All Events, click More actions (•••), then View event page.
- Find the category tags under the meeting title.
- Click a tag to open the category page. It lists the published meetings in that category.

The category page address looks like this:
https://brightpath.example.com/meeting-category/product-onboarding/
Your actual URL may look different. Always copy it from your own site.
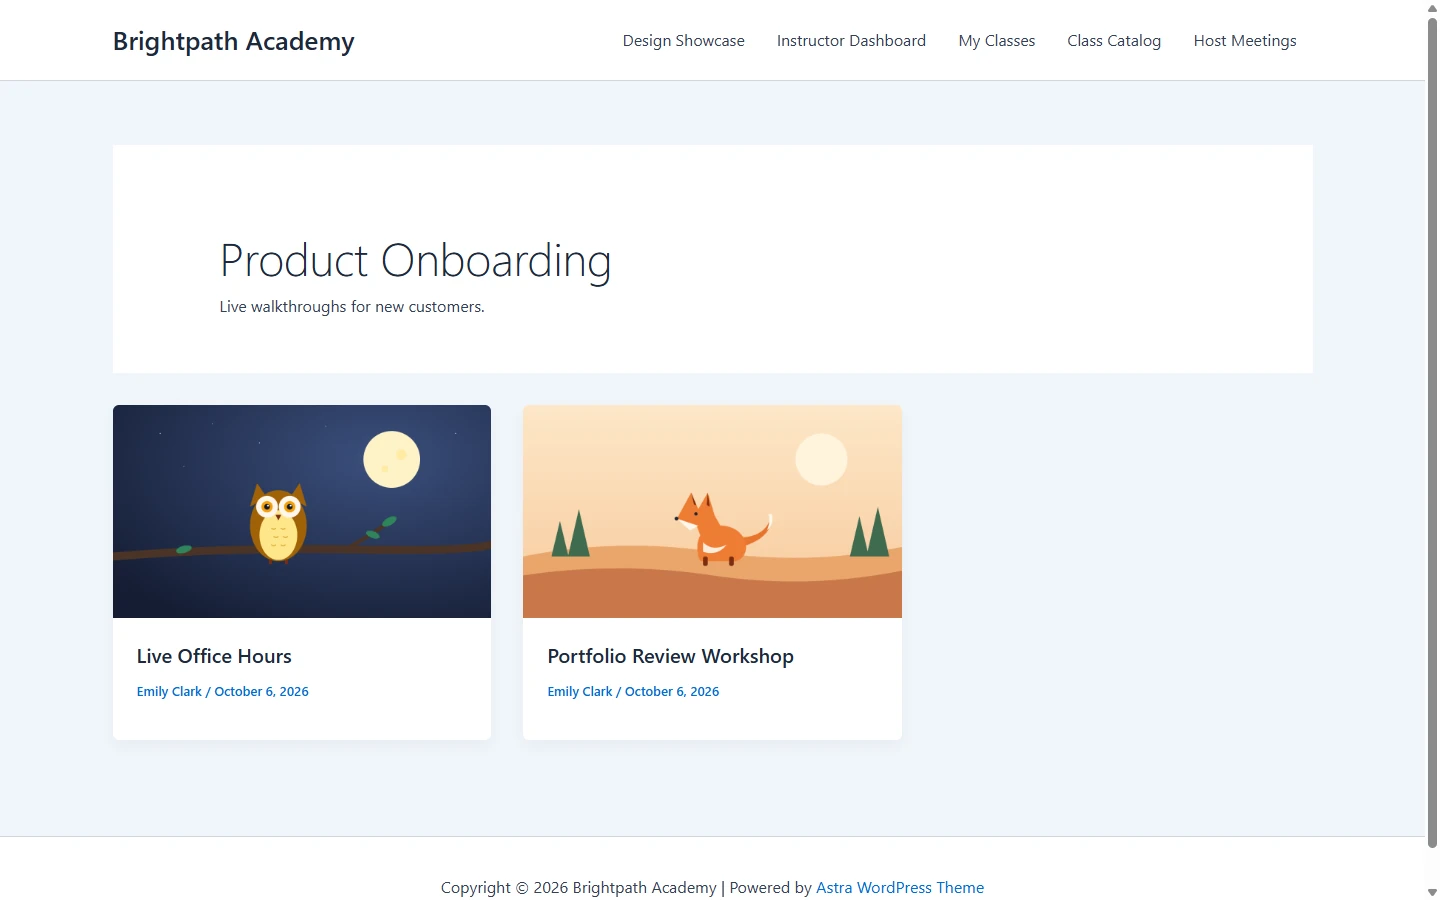
Note: The category page shows only published meetings the visitor is allowed to open. Meetings limited to a course or to logged-in members stay hidden from other visitors.
Step 8: Show one category in a meeting list shortcode #
The meeting and webinar list shortcodes take a category attribute. Use the category slug from the Slug column. Separate several slugs with commas.
- Go to Pages and edit the page, or click Add New Page.
- Add a Shortcode block and paste the shortcode with your slug.
- Click Publish or Save, then view the page.
[zmeet-zoom-meeting-list category="product-onboarding"]
[zmeet-zoom-webinar-list category="product-onboarding,quarterly-town-hall"]
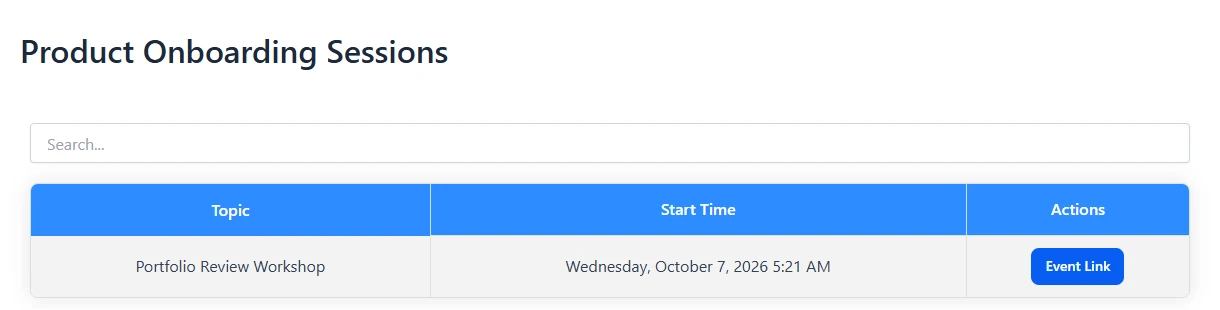
The list also shows meetings in child categories of the slugs you give. See How to show Zoom meetings on any page with ZooMeet shortcodes for every other attribute.
Benefits of categories in ZooMeet #
- Find meetings faster: Filter a long list down to one topic in a click.
- Pages that build themselves: Each category gets its own page on your site, and new meetings appear there as you tag them.
- Focused lists: Show only a team’s or a course’s meetings on the page where they belong.
- Safe to change: Renaming or deleting a category never touches the meetings or Zoom.
Troubleshooting #
There is no Filter by category on All Events #
The filter appears once at least one meeting has a category. Add a category to a meeting, then reload All Events.
The category page shows “Page not found” #
Your site’s links may need a refresh. Go to Settings > Permalinks and click Save Changes without changing anything, then open the category page again.
A meeting is missing from the category page #
Check that:
- The meeting is published, not a draft.
- The meeting is tagged with that category, or one of its child categories.
- The visitor may open the meeting. Meetings limited to a course or to logged-in members are hidden from others.
The shortcode shows “No meetings available.” #
The slug may be wrong, or the category has no upcoming meetings. Copy the slug from the Slug column on ZooMeet > Categories. To include ended meetings, add show_past="yes".
There is no New category link in the meeting form #
Only administrators can add categories. Other users who create meetings can pick existing categories only.
Frequently asked questions #
Do I need ZooMeet Pro for categories? #
No. Categories are part of the free plugin.
Can a meeting be in more than one category? #
Yes. Pick as many as you need in the Categories field.
Do categories show in Zoom? #
No. They exist only on your site.
Can webinars have categories? #
Yes. Meetings and webinars share the same categories.
What happens to meetings when I delete a category? #
They stay. They only lose that category. Child categories move up one level.
You’re ready to organize your meetings #
You can now group meetings and webinars into categories, filter All Events, send visitors to category pages and show one category’s meetings on any page. Next, bring existing Zoom meetings in with their categories, or build a page with the list shortcode.


