- Before you begin
- What you need from Zoom
- Step 1: Choose Webinar as the event type
- Step 2: Set the date and time
- Step 3: Decide who can join (Access and controls)
- Step 4: Set up webinar registration
- Step 5: Set the webinar controls (What can they do?)
- Step 6: Design the webinar page and create it
- Step 7: See the webinar page
- What attendees see
- Manage your webinars
- Benefits of running webinars with ZooMeet
- Troubleshooting
- Frequently asked questions
- You're ready to run Zoom webinars
A webinar is the right format when you present and everyone else watches: a product launch, a course open day or a guest lecture. Attendees join with their camera and microphone off, and only you and your panelists are on stage.
ZooMeet creates webinars from the same form as meetings. You switch Event type to Webinar, and the form swaps the meeting-only options for webinar ones, such as panelist video and a practice session. ZooMeet then creates the webinar in Zoom and builds its page on your site.
By the end of this guide, you will have:
- A Zoom webinar created from WordPress, with its own page on your site
- Registration with automatic or manual approval, if attendees should sign up first
- Panelist video, a practice session and HD video set the way you want
- A webinar page your attendees open to register and join
- A clear idea of what happens when the Zoom account has no Webinar plan
Estimated setup time: 5 minutes. The form is the one you already know from meetings, with a few webinar switches.
Before you begin #
Make sure you have:
- ZooMeet installed and activated, with Zoom connected. See How to connect Zoom with ZooMeet using Server-to-Server OAuth.
- An administrator account on your WordPress site
- A Zoom Webinar plan (the Zoom Webinars add-on) on the Zoom user who hosts the webinar. Zoom refuses webinars without it.
- ZooMeet Pro, if attendees should register before they get the link
Important: Zoom sells webinars as an add-on to a paid Zoom plan. ZooMeet cannot create a webinar on a host who does not have that add-on. If you are not sure, check the host’s plan in your Zoom account first.
What you need from Zoom #
Webinars are a Zoom product of their own, so the Zoom side matters as much as ZooMeet.
| You want to | Zoom needs |
|---|---|
| Create a webinar | A licensed user (Zoom Workplace Pro, Business or higher) with a Zoom Webinars licence assigned. Webinar licences are sold by audience size, starting at 500 attendees. |
| Let attendees register | Registration turned on for the webinar. ZooMeet sends this setting when Registration required is on. |
| Present with other people | Panelists, added to the webinar in your Zoom web portal. Panelists can share video, audio and their screen. Attendees watch, and take part through Q&A and chat. |
| Record to the cloud | Cloud recording on the host’s paid plan. See How to find and share Zoom cloud recordings with ZooMeet. |
Tip: Zoom notes that a regular meeting is usually enough for fewer than 500 people. Choose a webinar when you want a stage and an audience rather than a conversation.
Step 1: Choose Webinar as the event type #
Let’s get started. Webinars are created from All Events, like every other Zoom session.
- In the WordPress admin menu, go to ZooMeet > All Events.
- Click Add new event.
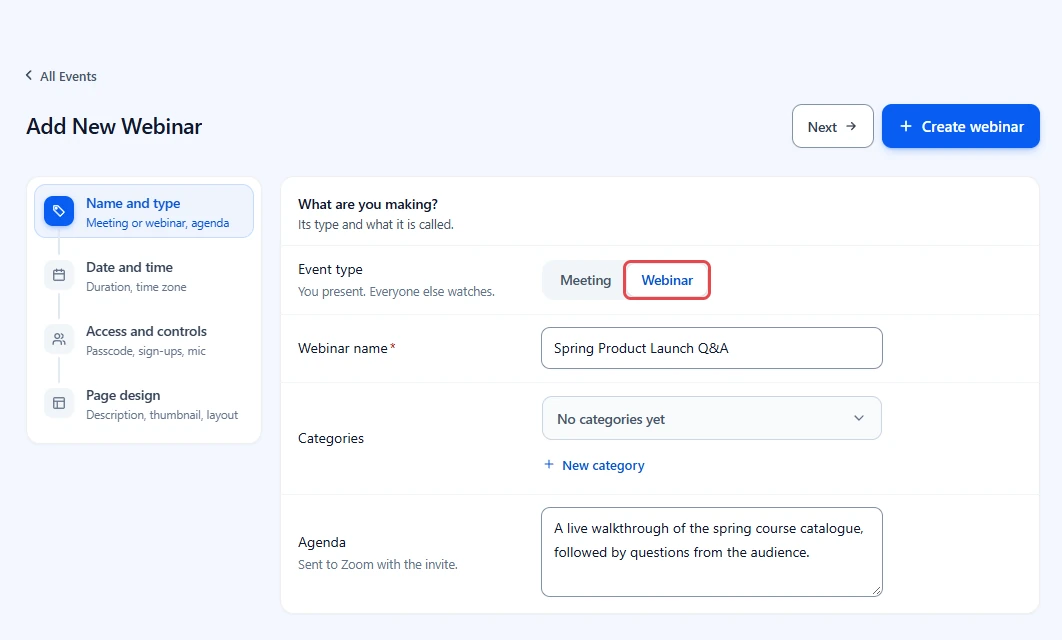
- Under Event type, click Webinar. The line under the label changes to You present. Everyone else watches. The page title changes to Add New Webinar and the main button to Create webinar.
- In Webinar name, type a clear title, for example
Spring Product Launch Q&A. - Add an Agenda. Zoom sends it with the invite.
Note: The event type is fixed once the webinar is created. To turn a webinar into a meeting, create a new meeting instead.
Step 2: Set the date and time #
- Click Next, or click Date and time on the left.
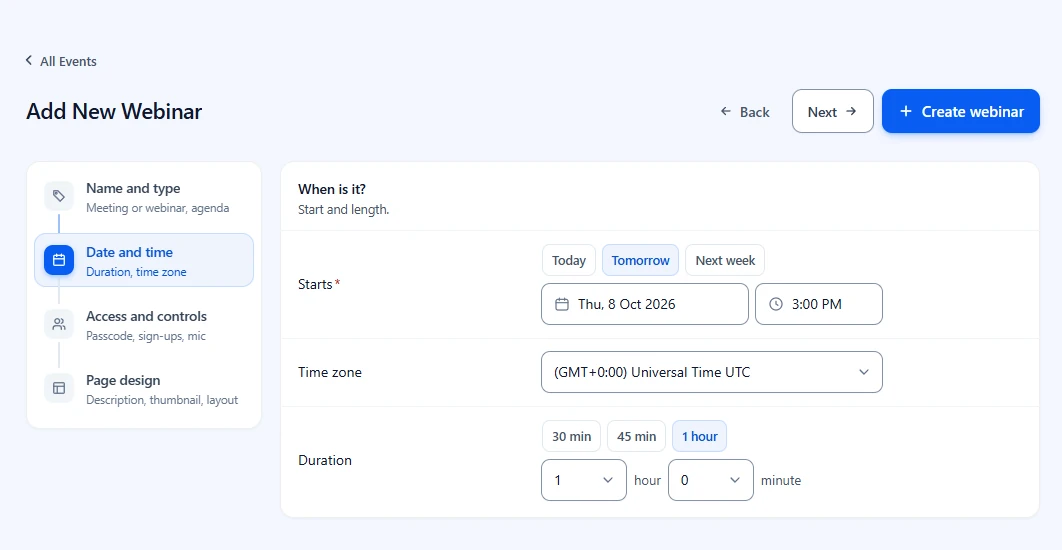
- Under Starts, click Today, Tomorrow or Next week, then pick the time.
- Check Time zone.
- Set Duration. Click 30 min, 45 min or 1 hour to fill the hour and minute dropdowns, or pick the values yourself.
Note: Webinars have no Recurring meeting switch. ZooMeet creates each webinar in Zoom as a single session.
Step 3: Decide who can join (Access and controls) #
A webinar step looks a little shorter than a meeting step. Waiting room, Require authentication to join and Allow participants to join anytime are meeting options, so they are hidden for webinars.
- Click Access and controls on the left.
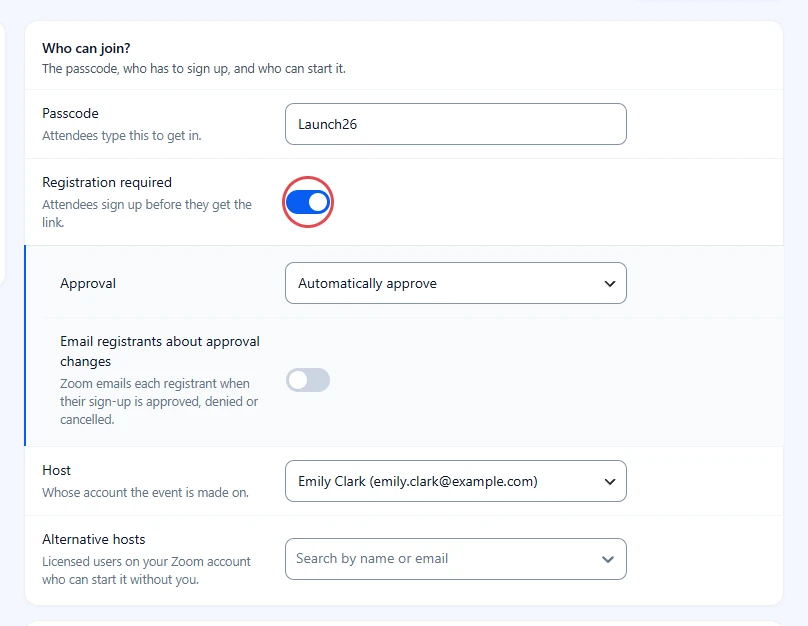
- Check the Passcode. ZooMeet fills in a random one. Attendees type it to get in.
- Turn on Registration required if attendees should sign up first. Step 4 covers the fields that open under it.
- Check Host. The webinar is created on this Zoom user, so pick the one with the Webinar plan.
- Add Alternative hosts if someone else may start the webinar. Pick licensed users on your Zoom account.
Note: ZooMeet has no field for panelists. Add them in your Zoom web portal after the webinar is created: open the webinar there and invite them as panelists. Zoom then emails each one their own join link.
Step 4: Set up webinar registration #
With registration on, Zoom asks every attendee for their name and email before it gives them the join details. You get a list of who is coming, and with manual approval you decide who gets in.
- On Access and controls, turn on Registration required. Two fields open under it.
- Pick an Approval from the dropdown:
– Automatically approve: Zoom approves everyone at once and sends them the join details. You can still deny someone later in Zoom.
– Manually approve: people register, then wait. They get the join details only after you approve them in your Zoom web portal, on the webinar’s registration list. - Turn on Email registrants about approval changes if Zoom should email each registrant when their sign-up is approved, denied or cancelled. These emails go to your registrants, not to you.
With Registration required off, ZooMeet tells Zoom the webinar needs no registration, and attendees get the join link straight away.
Note: Registration required needs ZooMeet Pro. Without Pro, the switch shows a lock icon. For meeting registration on your own site, see How to require registration for Zoom meetings with ZooMeet.
For webinars, the sign-up form itself is Zoom’s. ZooMeet sends your choices to Zoom, and the Join in Zoom app link on the webinar page leads attendees to Zoom’s registration page. Zoom then sends each approved attendee a personal join link by email.
To see who registered, open ZooMeet > Zoom Reports > Registrants, set Type to Webinar, and click Show. See How to see who registered for your Zoom meetings and webinars with ZooMeet.
Step 5: Set the webinar controls (What can they do?) #
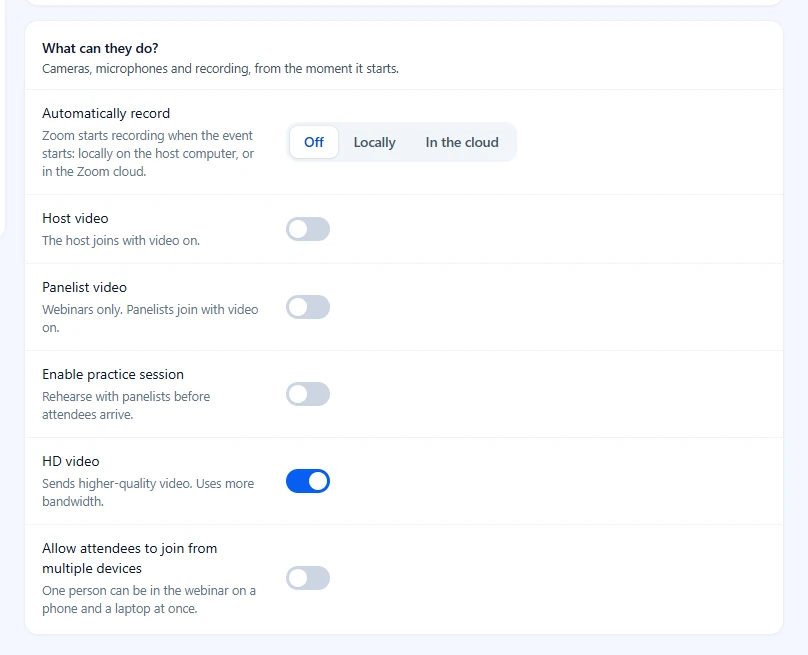
Further down the same step, the What can they do? card holds the webinar’s stage settings.
- Pick Automatically record: Off, Locally (on the host’s computer) or In the cloud.
- Turn on Host video if your camera should be on from the start.
- Turn on Panelist video so panelists appear on video as soon as they join.
- Turn on Enable practice session to rehearse with your panelists before attendees are let in.
- Leave HD video on for sharper slides and video. It uses more bandwidth.
- Turn on Allow attendees to join from multiple devices if one person may join from a phone and a laptop at once.
Tip: Set the usual values once in ZooMeet > Settings > Events and Video. Enable practice session, Panelist video and HD video are there too. See How to set default meeting settings with ZooMeet.
Step 6: Design the webinar page and create it #
The Page design step works the same as for a meeting: theme, description, thumbnail and layout. See Step 5 of How to create your first Zoom meeting with ZooMeet for the details.
- Click Page design on the left, write a Description in the editor and choose a thumbnail.
- Click Create webinar at the top right.
- Wait while ZooMeet sends the webinar to Zoom.
Note: Screens below use sample data. Your own list fills in once your Zoom plan includes this feature.
When Zoom accepts it, a green Webinar created message appears and you are back on All Events. The new webinar is in the list, marked Webinar so you can tell it apart from your meetings.

If the host has no Webinar plan, Zoom refuses the webinar and nothing is created, in Zoom or in WordPress. The form shows This Zoom account has no Webinar plan, with Zoom’s own message underneath, and keeps everything you entered.

Step 7: See the webinar page #
Every webinar gets a page on your site, built from the Page design step. Share its address in your emails and course pages.
- In All Events, hover over the webinar and click More actions (•••).
- Click View event page.
- Open the page in a private browser window to see it the way visitors do.
Note: Screens below use sample data. Your own list fills in once your Zoom plan includes this feature.
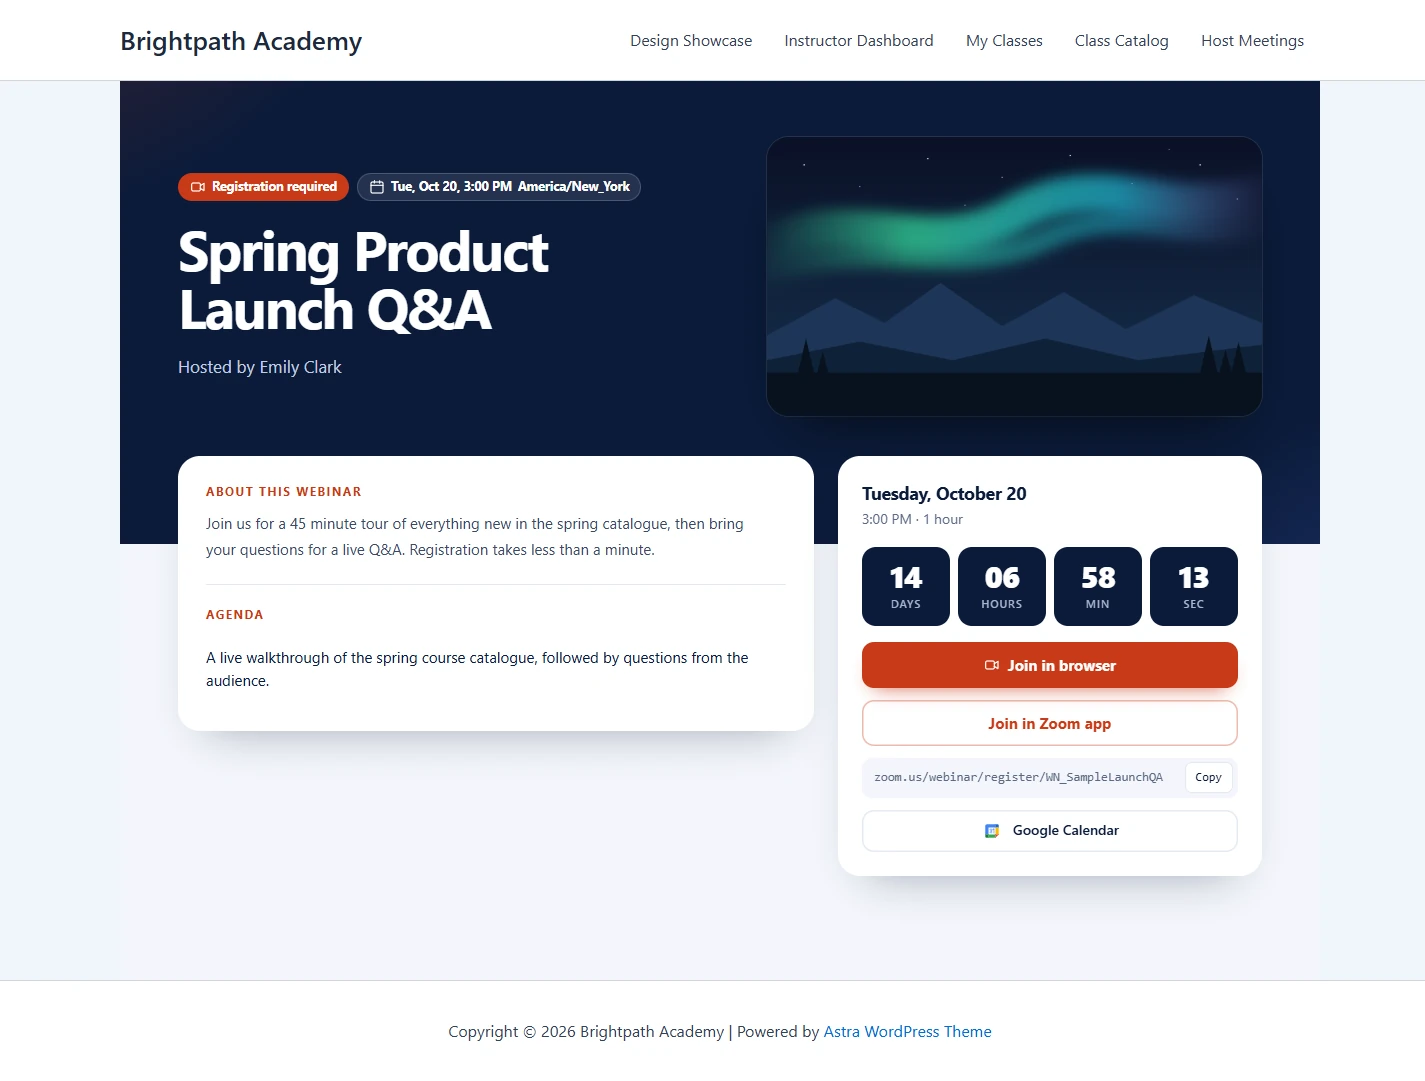
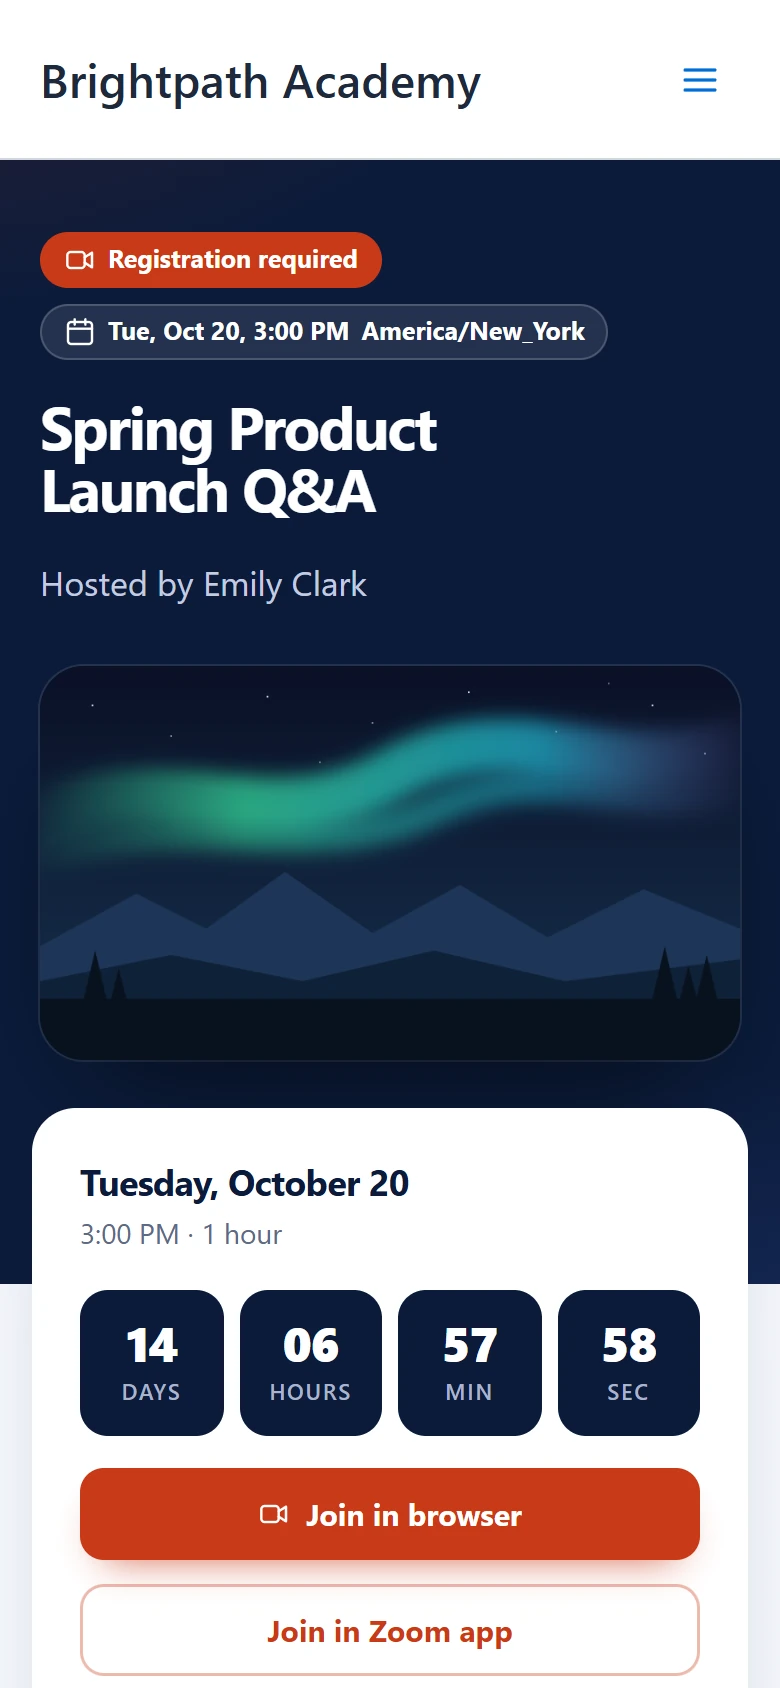
The page shows a Registration required badge when Registration required is on. The link under the buttons is the one Zoom gave the webinar. With registration on, it is Zoom’s registration page.
What attendees see #
Attendees join from the webinar page, on a computer or a phone.
- Open the webinar page before the start time. The countdown shows how long is left.
- Tap Join in Zoom app to register, if registration is on, and to open the webinar in the Zoom app.
- Or tap Join in browser to join without the Zoom app. This button needs the Meeting SDK keys. See How to set up the Zoom Meeting SDK for Join in browser in ZooMeet.
- Tap Google Calendar to save the date.
Inside the webinar, attendees see and hear you and your panelists. Their own camera and microphone stay off unless you let them talk. They take part through Q&A and chat.
Note: If you sell a webinar as a WooCommerce product, only ticket holders, signed-in registered attendees and site admins can join it. Everyone else sees the page but not the join details. See How to sell Zoom meetings with WooCommerce and ZooMeet.
Important: Do not share the Start link Zoom gives you as host. It lets whoever has it start the webinar as you. ZooMeet only shows Start webinar to the host.
Manage your webinars #
Webinars live in All Events next to your meetings, marked Webinar, and you manage them the same way.
- Type the webinar name in Search events to find it quickly.
- Click the name, or the pencil icon, to edit a webinar. The form opens with the webinar fields. Click Update webinar, and ZooMeet updates the webinar in Zoom too.
- Hover over the row and click More actions (•••) for View event page, Copy shortcode and Delete. Deleting removes the webinar from Zoom as well.
Benefits of running webinars with ZooMeet #
- One form for both formats: Meetings and webinars share the form, so there is nothing new to learn.
- Only the options that apply: Meeting-only switches step aside when you pick Webinar.
- A page people can find: Every webinar gets a page on your site with a countdown and join buttons.
- Sign-ups you control: With ZooMeet Pro, attendees register first and you choose how they are approved.
Troubleshooting #
“This Zoom account has no Webinar plan” #
Zoom refused the webinar because the host has no Webinar plan. Nothing was created.
Check that:
- The Zoom user picked in Host has the Zoom Webinars add-on, and webinars are enabled for that user in Zoom.
- You picked the right Host on Access and controls, if your account has more than one Zoom user.
Or switch Event type to Meeting and click Create meeting.
Registration required has a lock icon #
Registration is part of ZooMeet Pro, and Pro is not active. Activate ZooMeet Pro and reload the form.
Registered attendees say they have no join link #
With registration on, Zoom emails each attendee their own join link after they register.
Check that:
- Approval is not Manually approve with people still waiting. Approve them in your Zoom web portal.
- Attendees look in their spam folder for the email from Zoom.
- Attendees registered with the email address they are checking.
Visitors cannot join a webinar I sell as a product #
This is on purpose. A webinar linked to a WooCommerce product opens only for people who bought a ticket, signed-in registered attendees and site admins.
Check that:
- The visitor bought the product and is signed in with the same account.
- The product is linked to this webinar on its Zoom Event tab.
I cannot find Recurring meeting or Sign-up covers #
Webinars are created as single sessions, so the form hides Recurring meeting and Sign-up covers when Webinar is selected. Create one webinar per session.
I cannot find Waiting room or Allow participants to join anytime #
Zoom webinars do not use them, so the form hides them when Webinar is selected. Attendees wait in the webinar until it starts. Use Enable practice session if you and your panelists need time before attendees arrive.
Frequently asked questions #
Do I need ZooMeet Pro to create a webinar? #
No. Choosing Webinar works in the free plugin. Registration needs ZooMeet Pro. Zoom itself needs a Webinar plan on the host.
Can I add panelists from WordPress? #
No. Add panelists in your Zoom web portal, on the webinar ZooMeet created. Panelist video in ZooMeet only decides whether their video starts on.
Can I change a meeting into a webinar later? #
No. The event type is fixed once it is created. Create a new webinar instead.
Can a webinar repeat every week? #
No. ZooMeet creates each webinar as a single session. Create one webinar per session.
Do webinar attendees use the same join buttons as meeting attendees? #
Yes. Attendees join from the webinar’s page on your site, the same way they join a meeting.
You’re ready to run Zoom webinars #
You can now create a webinar from WordPress, let people register, and set up the stage for you and your panelists. Next, look at registration in more detail, or set the defaults every new webinar starts with.
- How to require registration for Zoom meetings with ZooMeet
- How to set default meeting settings with ZooMeet
- How to create your first Zoom meeting with ZooMeet
- How to manage Zoom users and hosts with ZooMeet
- How to use Zoom Reports in ZooMeet
- How to manage Zoom webinars from WordPress with Live Webinars in ZooMeet
Sources for the Zoom plan details in this guide: Zoom Support, Comparing meeting and webinar licenses, Getting started with Zoom Webinars, Customizing webinar registration and Roles in Zoom Webinars.


