- Before you begin
- Step 1: Check whether the SDK keys are missing
- Step 2: Open the Meeting SDK card
- Step 3: Build a General App
- Step 4: Make the app admin-managed
- Step 5: Add your site's redirect URL
- Step 6: Turn on the Meeting SDK
- Step 7: Add the ZAK scope
- Step 8: Add the app to your account
- Step 9: Copy the SDK keys and save them in ZooMeet
- Step 10: Confirm both cards are connected
- Step 11: Test the in-browser join
- Inside the meeting
- What visitors see
- Benefits of joining in the browser
- Troubleshooting
- There is no Join in browser button
- "Zoom SDK credentials are not configured."
- "You do not have access to this event."
- "Cannot detect your camera" or a warning sign on Video
- "An unknown error has occurred, please try to refresh this page to rejoin the meeting."
- Join in browser fails to start or the meeting never loads
- Zoom asks attendees to sign in
- Frequently asked questions
- Security best practices
- You're ready to let people join in the browser
This guide sets up the Meeting SDK card in ZooMeet > Settings > Connect. With the Meeting SDK keys in place, ZooMeet adds a Join in browser button to every meeting page. Attendees type their name and join the meeting inside your site, without installing the Zoom app.
This needs a second Zoom app, a General App with the Meeting SDK turned on, next to the Server-to-Server OAuth app you already connected. Keys from the Server-to-Server OAuth app do not work here. You set it up once.
By the end of this guide, you will have:
- A General App with the Meeting SDK turned on in the Zoom App Marketplace
- Your site’s redirect URL added to that app
- The Meeting SDK Client ID and Client secret saved in ZooMeet, with a Connected badge
- A Join in browser button on your meeting pages
- A clear picture of what attendees see when they join in the browser
Estimated setup time: 5 to 10 minutes. The Meeting SDK is optional. Without it, meeting pages keep working and people join through the Zoom app or zoom.us.
Before you begin #
Make sure you have:
- Zoom connected with Server-to-Server OAuth first. See How to connect Zoom with ZooMeet using Server-to-Server OAuth.
- A Zoom account where you are the owner or an admin, with permission to build apps in the Zoom App Marketplace
- An administrator account on your WordPress site
- A site served over HTTPS. Browsers only allow camera and microphone access on secure pages.
Let’s get started.
Step 1: Check whether the SDK keys are missing #
While the Meeting SDK keys are empty, ZooMeet shows a notice at the top of ZooMeet > Settings.

The clock icon hides the notice for a while, and the × dismisses it. Neither one adds the keys, so the in-browser join stays off until you finish this guide.
Step 2: Open the Meeting SDK card #
The card carries a short checklist of this guide and your site’s redirect URL. Keep it open in its own tab while you work in Zoom.
- Go to ZooMeet > Settings > Connect.
- On the Meeting SDK card, marked Optional, click Edit (or the card itself if it is not connected yet).
- Click Where do I get these keys? to open the built-in checklist.
Step 3: Build a General App #
Zoom now builds Meeting SDK apps as a General App with the Meeting SDK feature turned on.
- Go to
https://marketplace.zoom.us/and sign in with the same Zoom account. - In the left menu, click Developers, click + next to Developer, then Build app.
- Select General App and click Create.
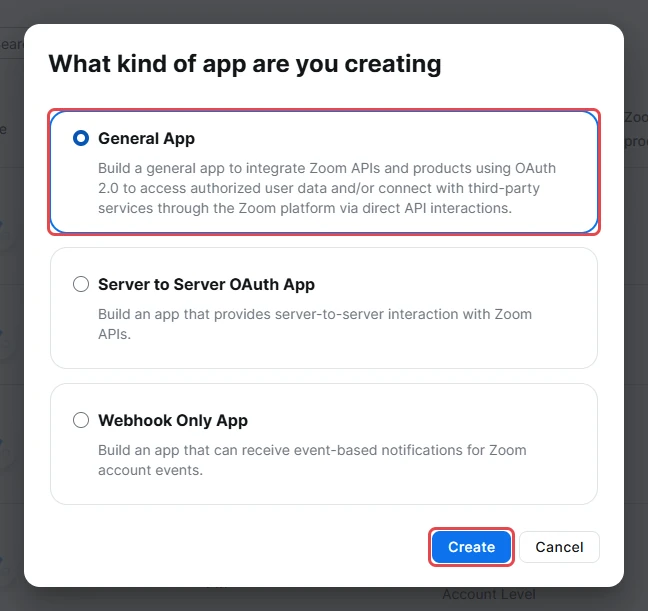
Zoom creates the app straight away with a default name such as General app 123.
- Click the pencil icon next to the app name.
- Type
ZooMeet SDKand press Enter.

Step 4: Make the app admin-managed #
- On Basic Information, under Select how the app is managed, choose Admin-managed.
- Click Save.
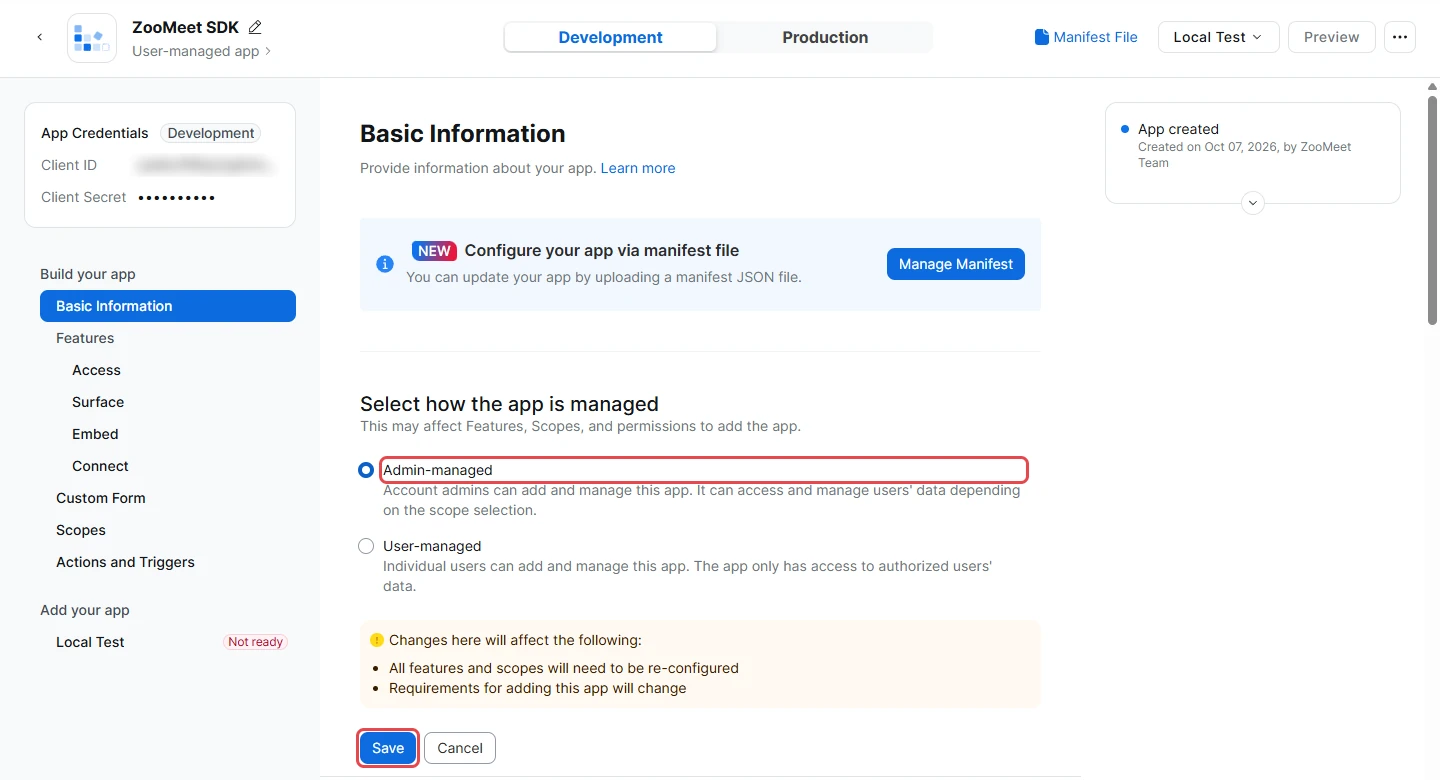
The subtitle under the app name changes to Admin-managed app.
Step 5: Add your site’s redirect URL #
Zoom only redirects to addresses you register in advance. ZooMeet shows your site’s exact address on the Meeting SDK card.
- In the ZooMeet tab, in step 3 of the checklist, click Copy next to the redirect URL. The button briefly reads Copied.
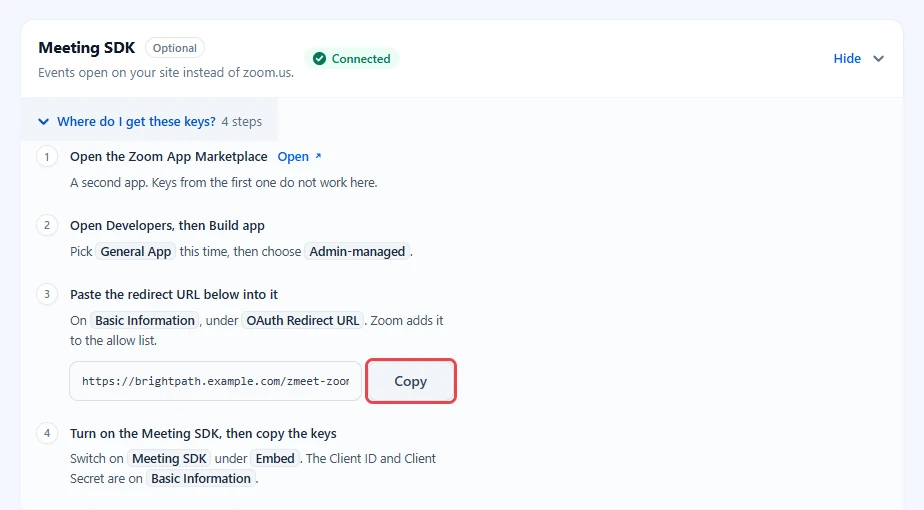
The URL looks like this:
https://brightpath.example.com/zmeet-zoom-oauth/
Your actual URL may look different. Always copy it from your own ZooMeet settings.
- Back in Zoom, on Basic Information, scroll to OAuth Information.
- Paste the URL into OAuth Redirect URL and click outside the field. Zoom saves it and adds the same URL under OAuth Allow Lists for you.
- If OAuth Allow Lists stays empty, click Add Allow List and paste the URL there too.
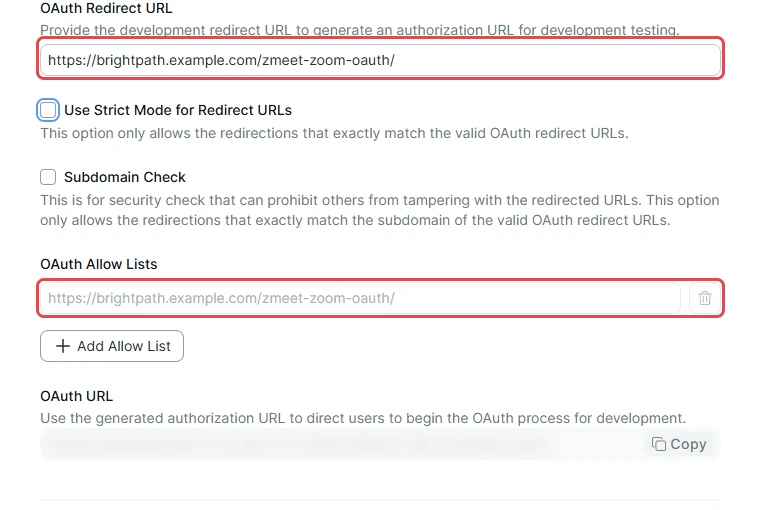
Important: Never type this URL by hand. Zoom needs an exact match, including https, www and the trailing slash.
Step 6: Turn on the Meeting SDK #
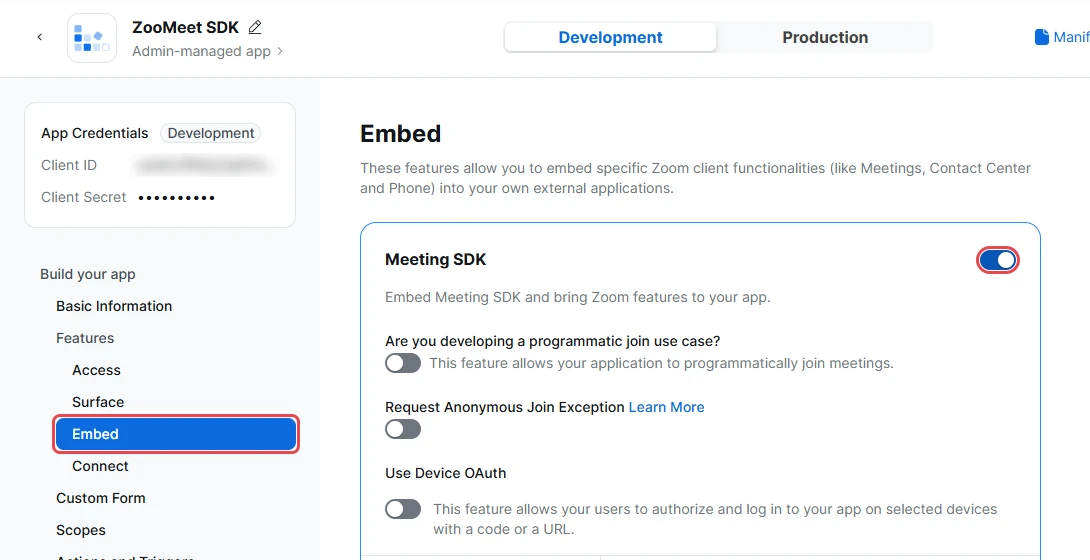
- In the left menu, under Features, click Embed.
- Switch on Meeting SDK. Zoom shows Saved next to the app name.
- Leave the other switches on this page off.
Step 7: Add the ZAK scope #
- In the left menu, click Scopes, then Add Scopes.
- Search for
user:read:zak:adminand tick View a user’s Zoom Access Key. - Click Done.
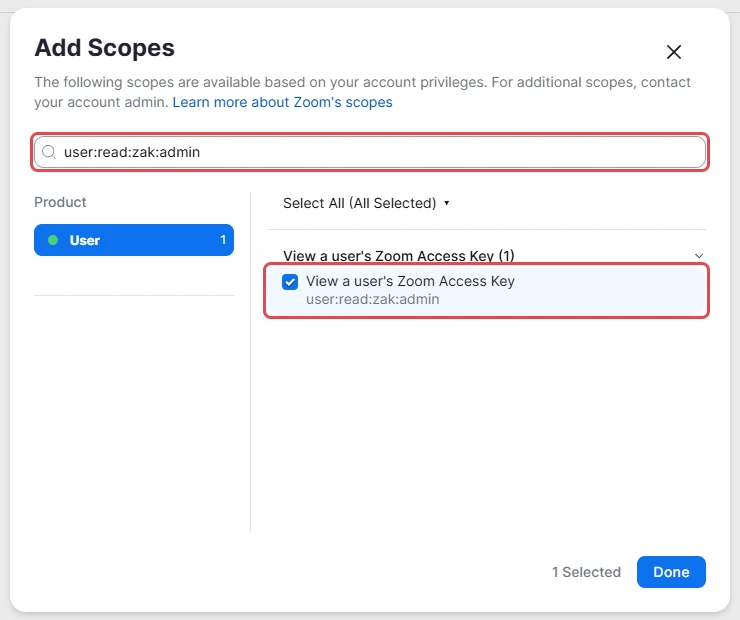
After this, the status box on the right reads Ready for local test.
Step 8: Add the app to your account #
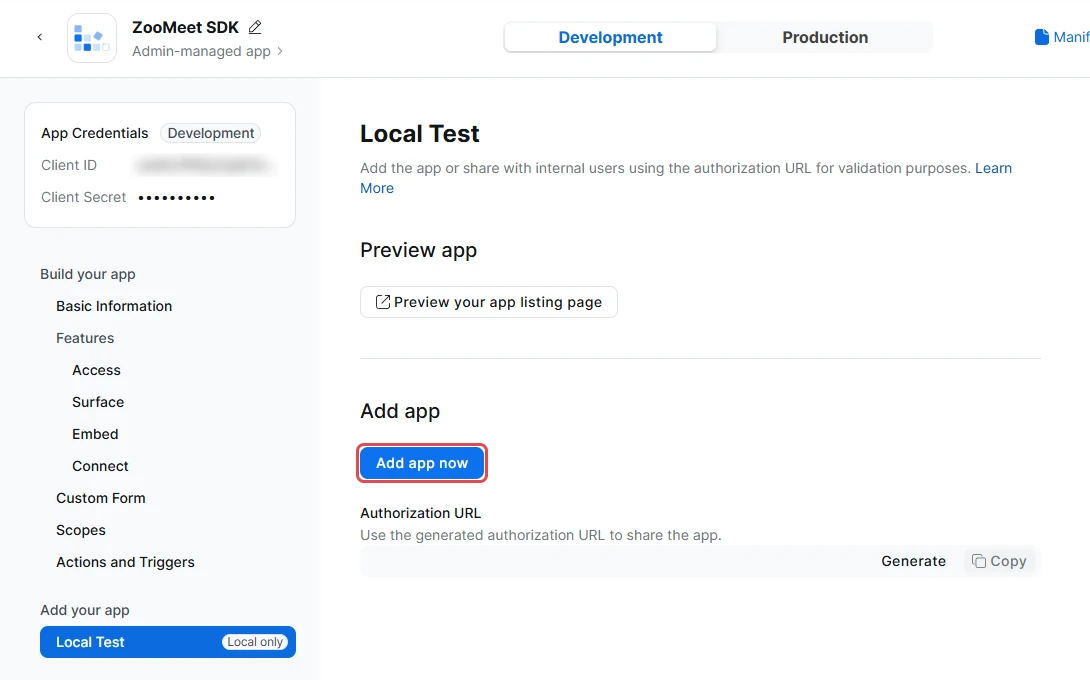
A General App only works on your account once you add it. Zoom calls this Local Test.
- In the left menu, under Add your app, click Local Test.
- Click Add app now.
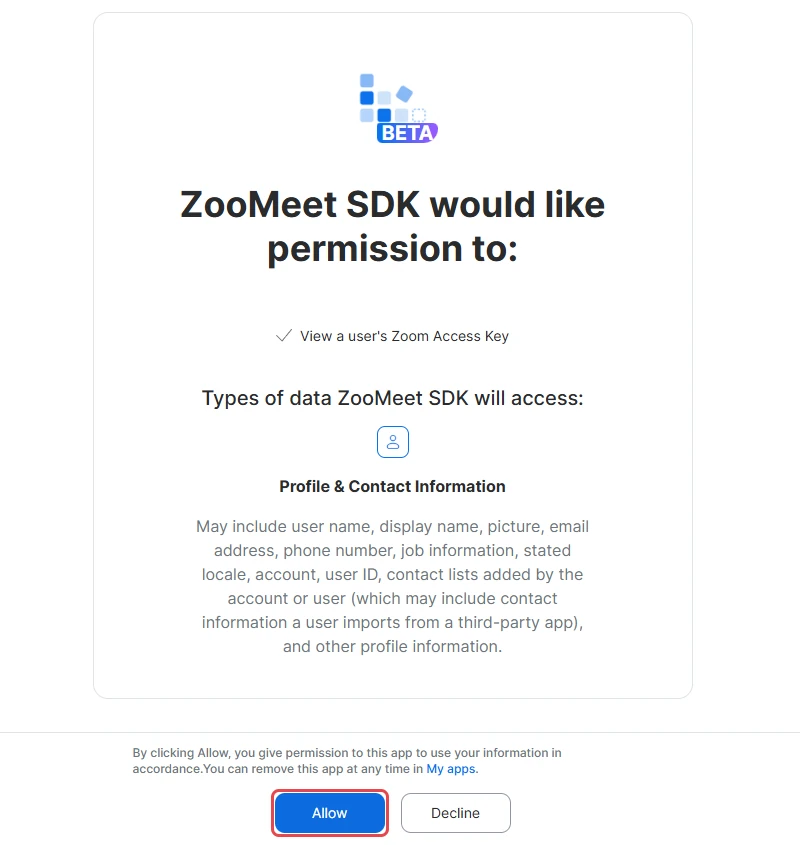
- Check that Zoom asks for View a user’s Zoom Access Key and nothing else.
- Click Allow.
Step 9: Copy the SDK keys and save them in ZooMeet #
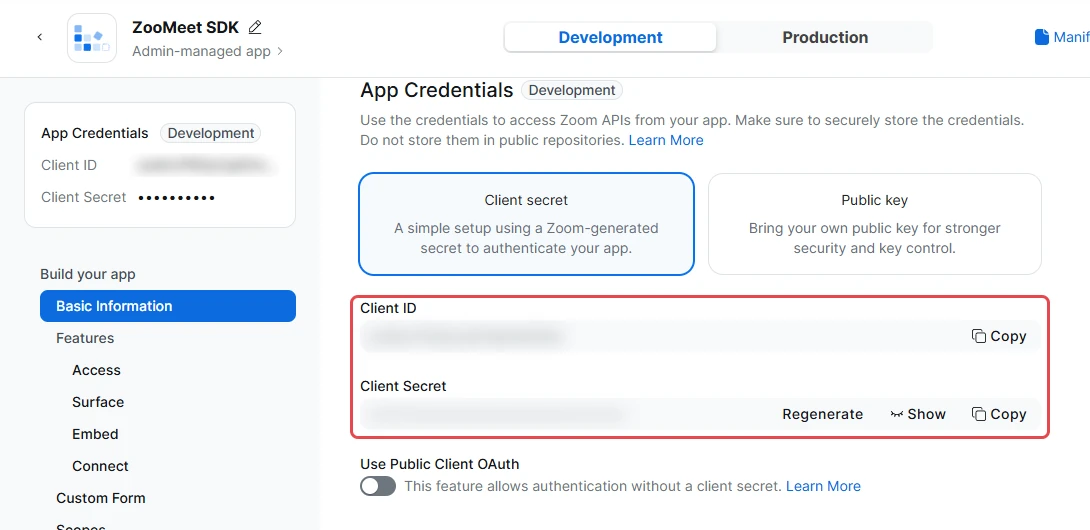
- In Zoom, open Basic Information and scroll to App Credentials.
- Click Copy next to Client ID and paste it into Client ID on the ZooMeet Meeting SDK card.
- Click Copy next to Client Secret and paste it into Client secret.
- In ZooMeet, click Save keys. The button stays greyed out until both fields are filled.
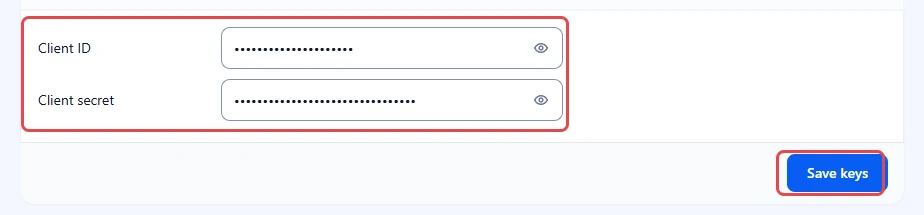
If you paste the Server-to-Server OAuth keys here by mistake, the card warns: These match the Server-to-Server OAuth keys above. A Meeting SDK app issues its own pair.
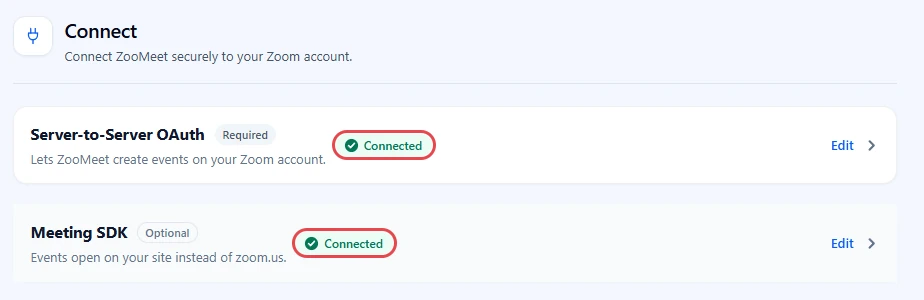
Note: Zoom cannot be asked whether SDK keys work, because they sign a token on your server rather than being swapped for one. Connected on this card means both keys are saved. The real test is joining a meeting, in Step 11.
Step 10: Confirm both cards are connected #
- On ZooMeet > Settings > Connect, check that both cards show Connected.
Step 11: Test the in-browser join #
Open any public meeting page in a private browser window, the way a visitor sees it.
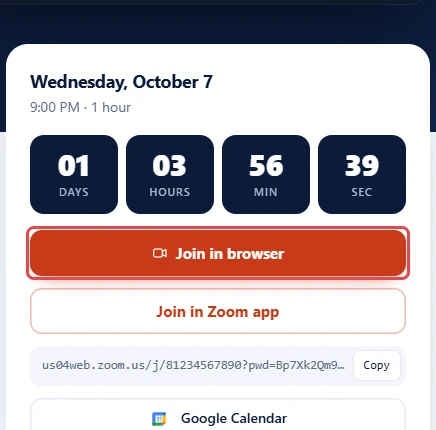
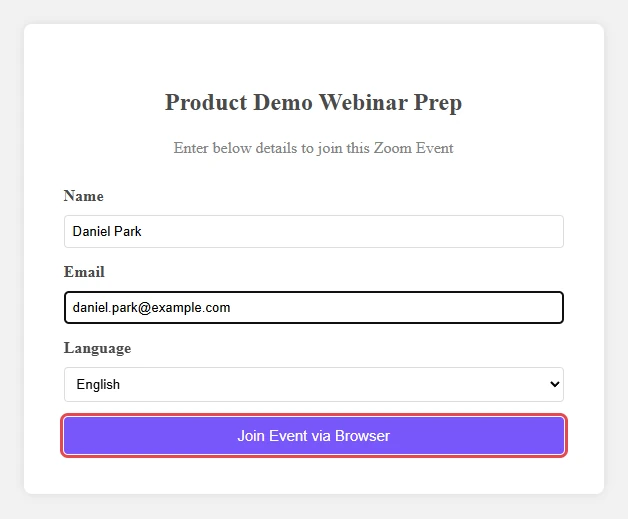
- On the meeting page, click Join in browser. It opens in a new tab.
- Type your Name. Email is optional, and both are filled in for logged-in users.
- Pick a Language for the Zoom controls.
- Click Join Event via Browser.
If the host has not started yet, Zoom shows the meeting name, the scheduled time and Waiting for the host to start the meeting. The attendee is let in as soon as the host starts.
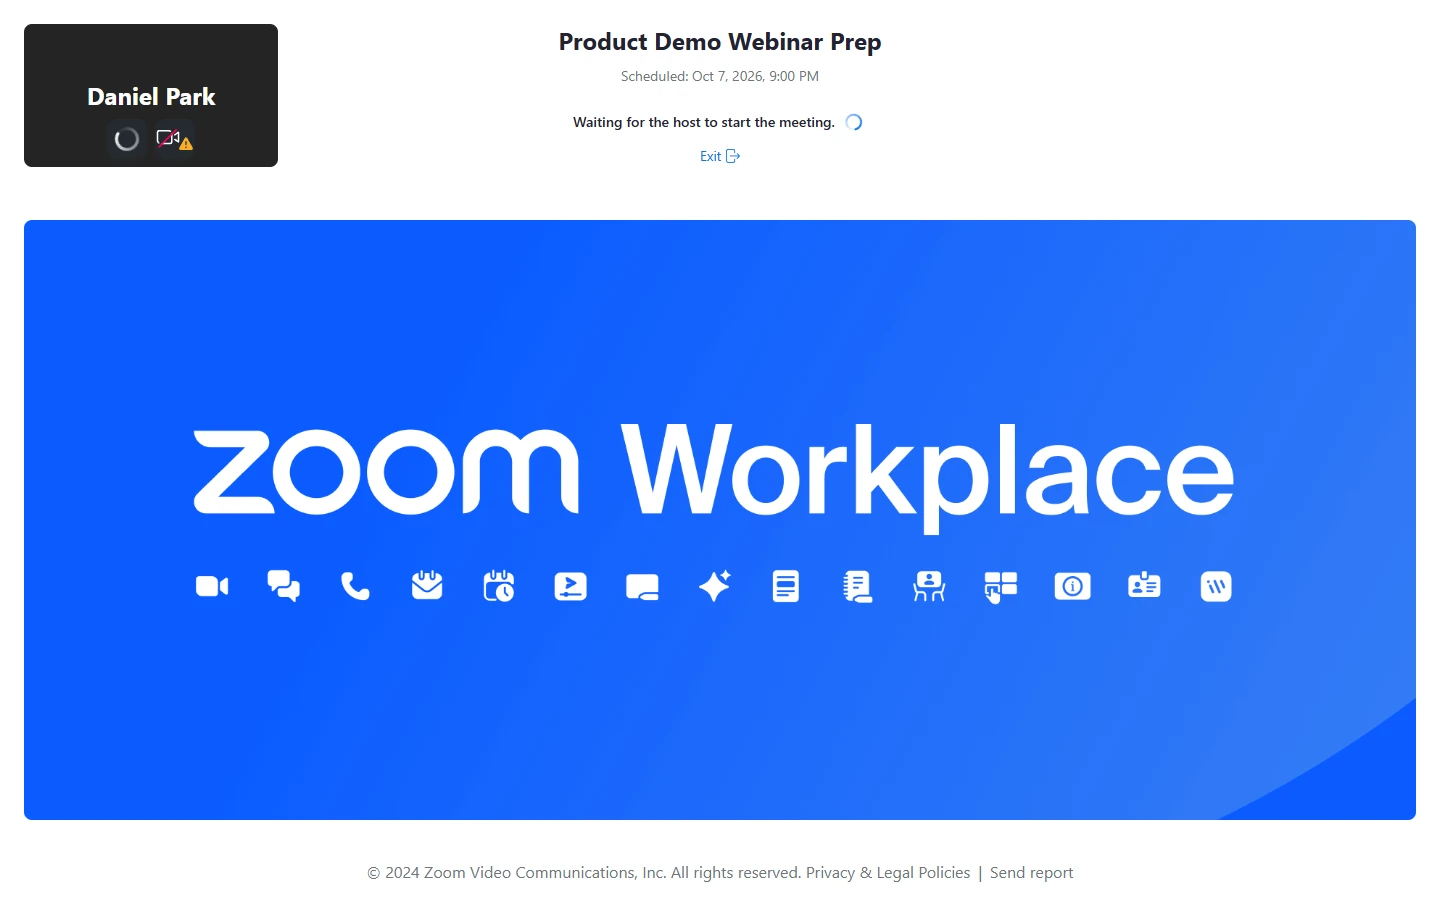
To leave the waiting screen, click Exit. Zoom sends the attendee back to the meeting page.
Inside the meeting #
Once the meeting is running, attendees go through a short preview and then land in the meeting itself, all in the same browser tab.
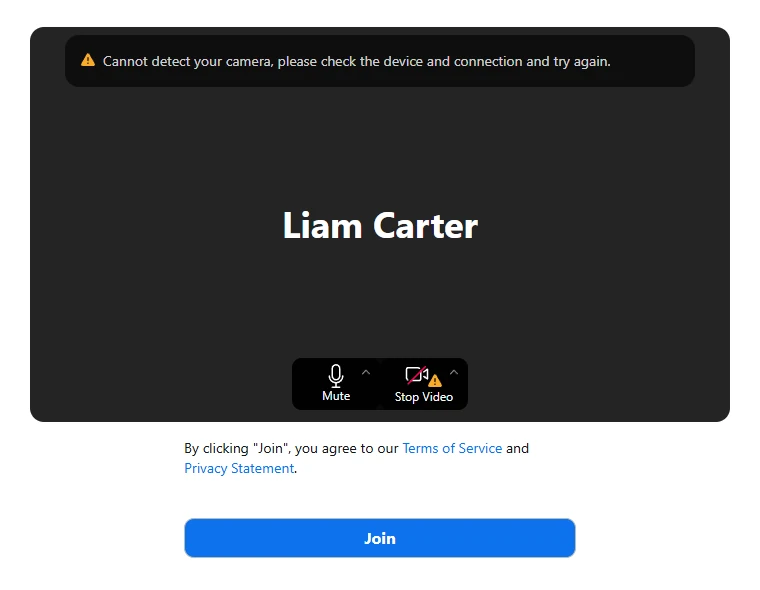
- On the preview screen, check the name on the tile. Use Mute and Stop Video to choose how you enter.
- Click Join.
The meeting fills the tab. The person speaking or the active tile is shown large, and each tile carries the attendee’s name.
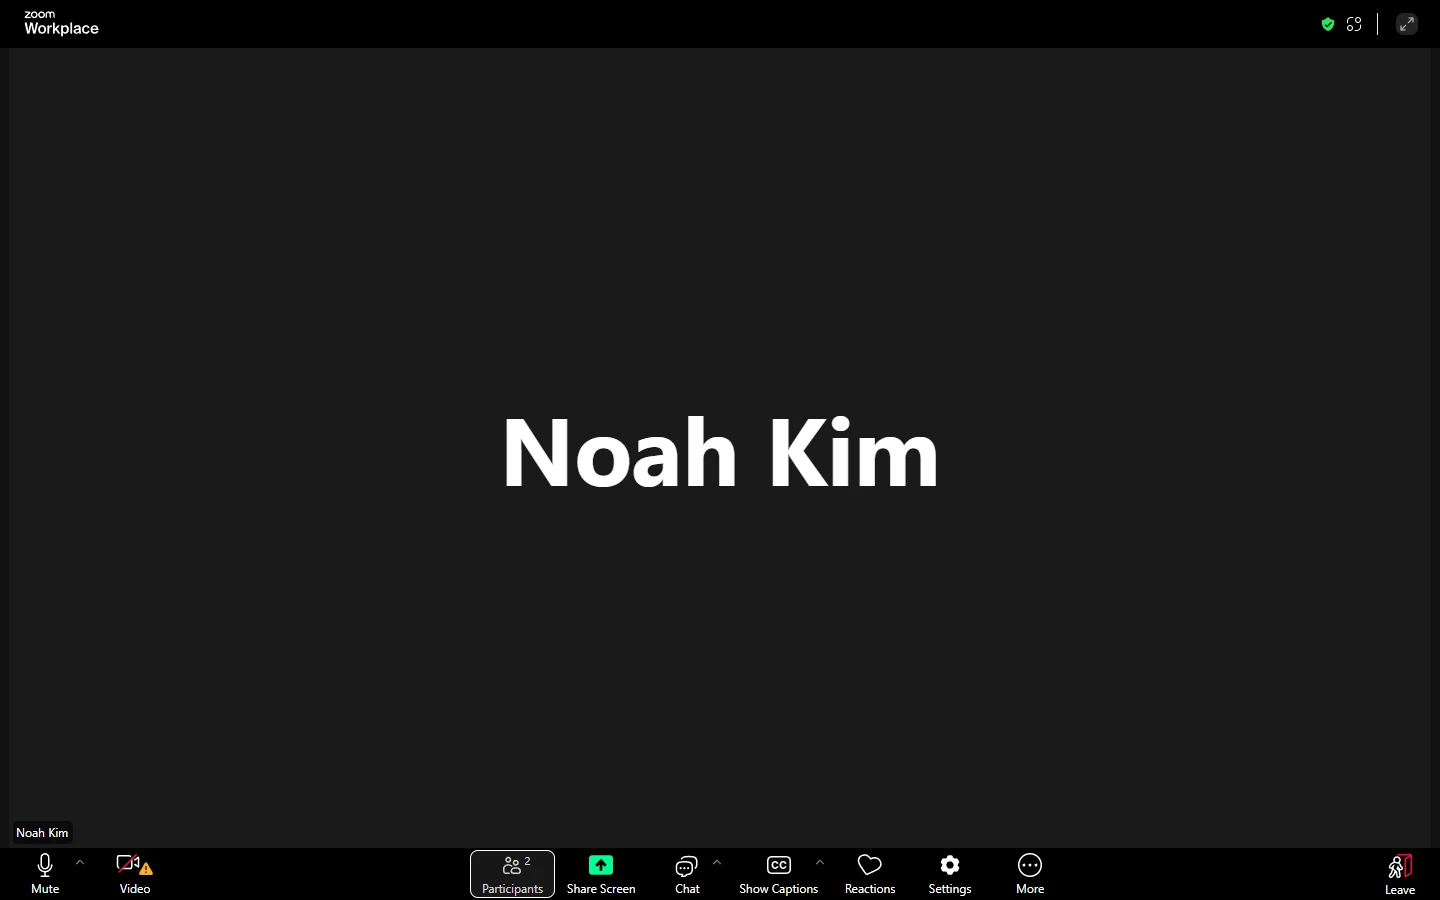
The toolbar along the bottom holds every control:
- Mute turns your microphone on and off. The small arrow next to it picks the microphone and speaker.
- Video turns your camera on and off. A warning sign on it means the browser cannot find or use a camera.
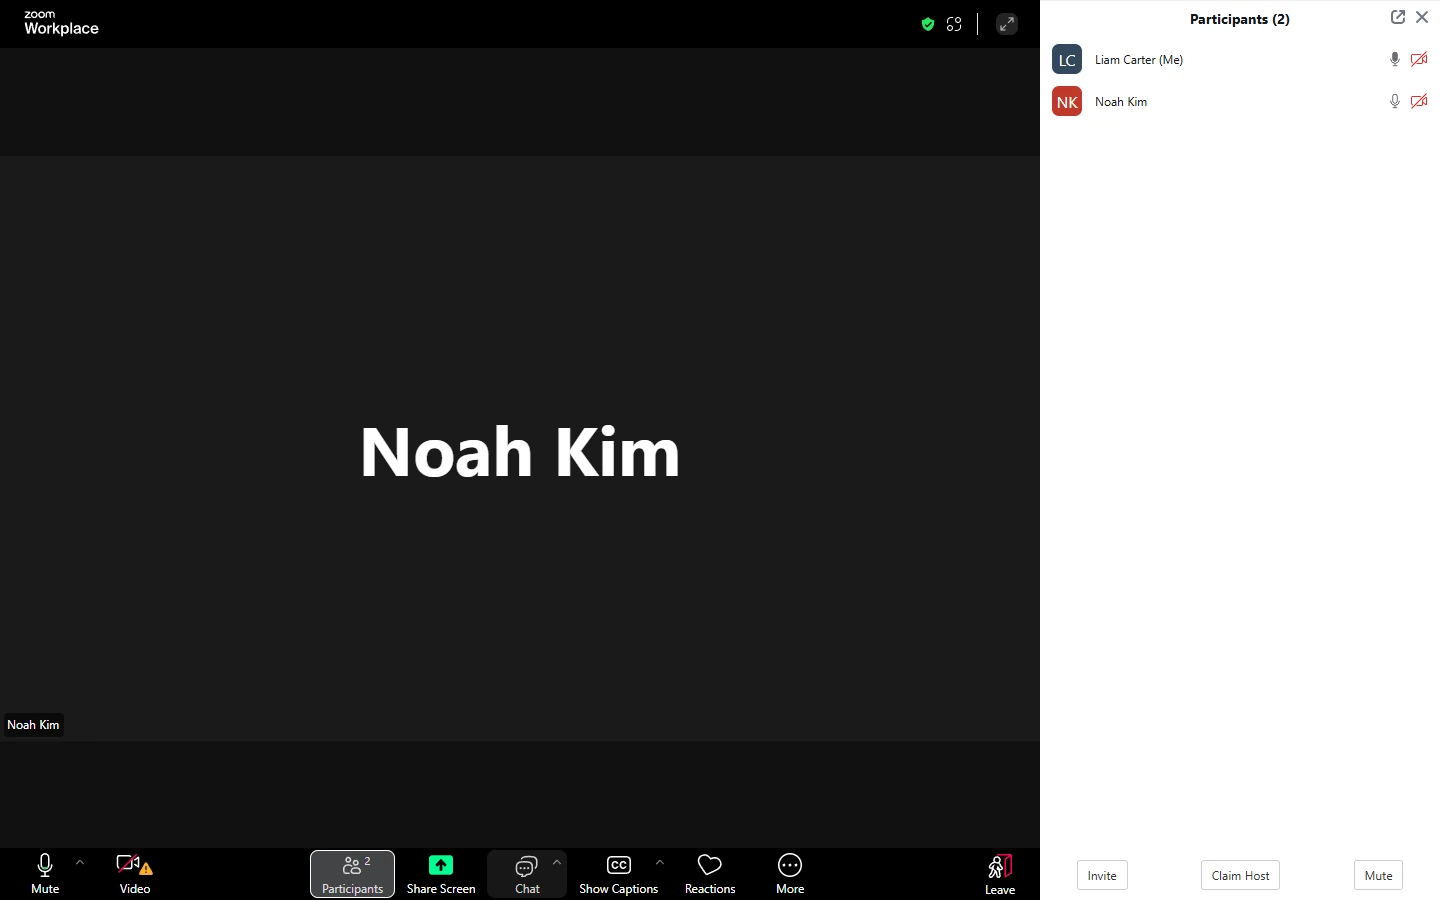
- Participants shows who is in the meeting. The number shows how many people are there.
- Share Screen shares a window, a tab or your whole screen, if the host allows it.
- Chat opens the meeting chat.
- Show Captions turns on live captions, when the account has them.
- Reactions sends a quick emoji reaction.
- Settings and More hold audio, video and view options.
- Leave, at the far right, leaves the meeting.
To see who is in the meeting, click Participants. The panel opens on the right with each person’s initials, name and microphone and camera status. Your own row ends in (Me).
To talk in writing, click Chat, type in the box at the bottom of the panel and press Enter. Messages go to everyone in the meeting.
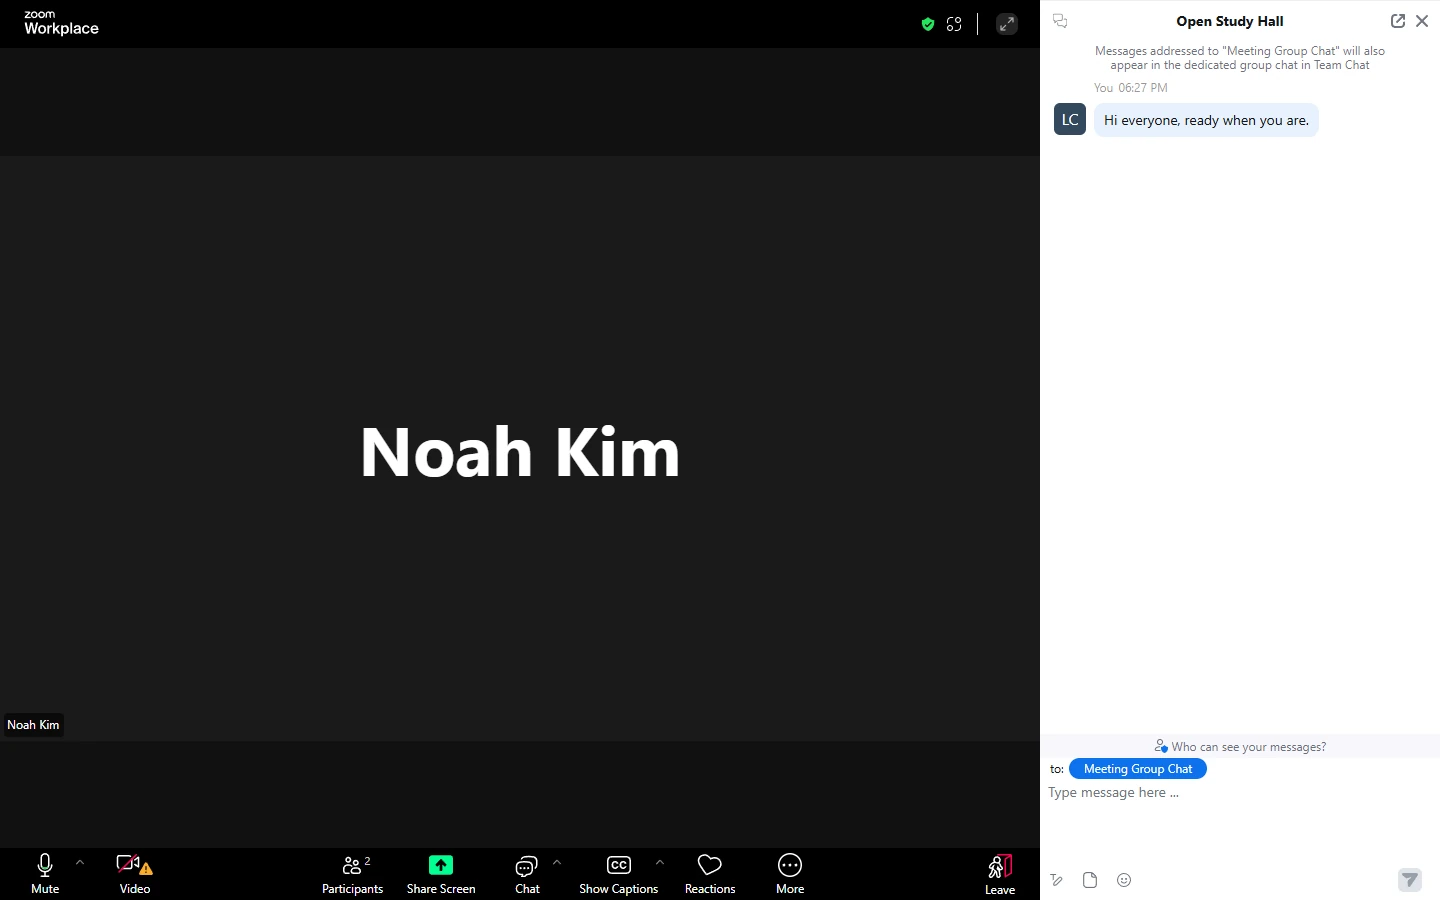
Tip: If Participants, Chat or Leave does not respond to the first click, click it once more. The browser client sometimes needs a moment to take focus.
When you are done:
- Click Leave.
- Click Leave Meeting to confirm, or Cancel to stay.
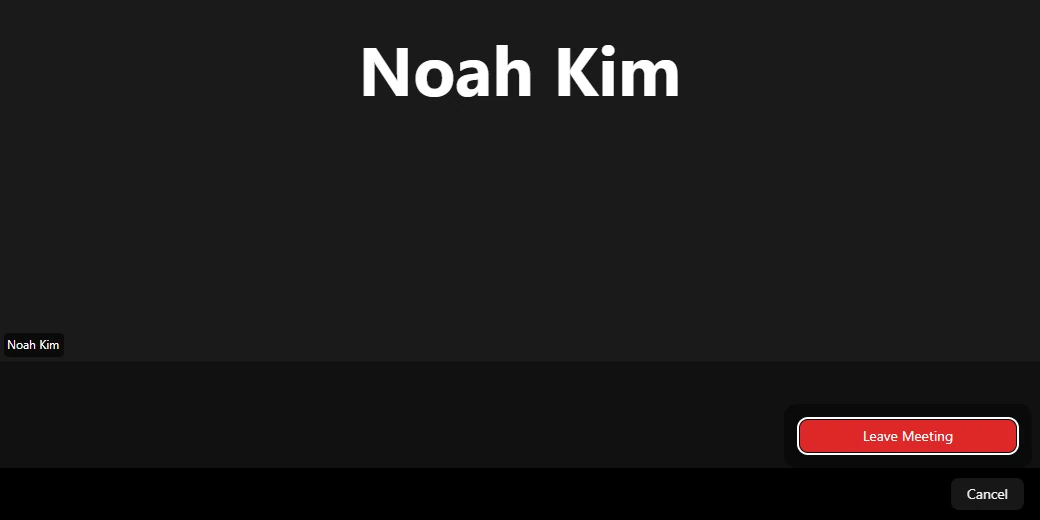
After leaving, Zoom sends the attendee back to the meeting page on your site.
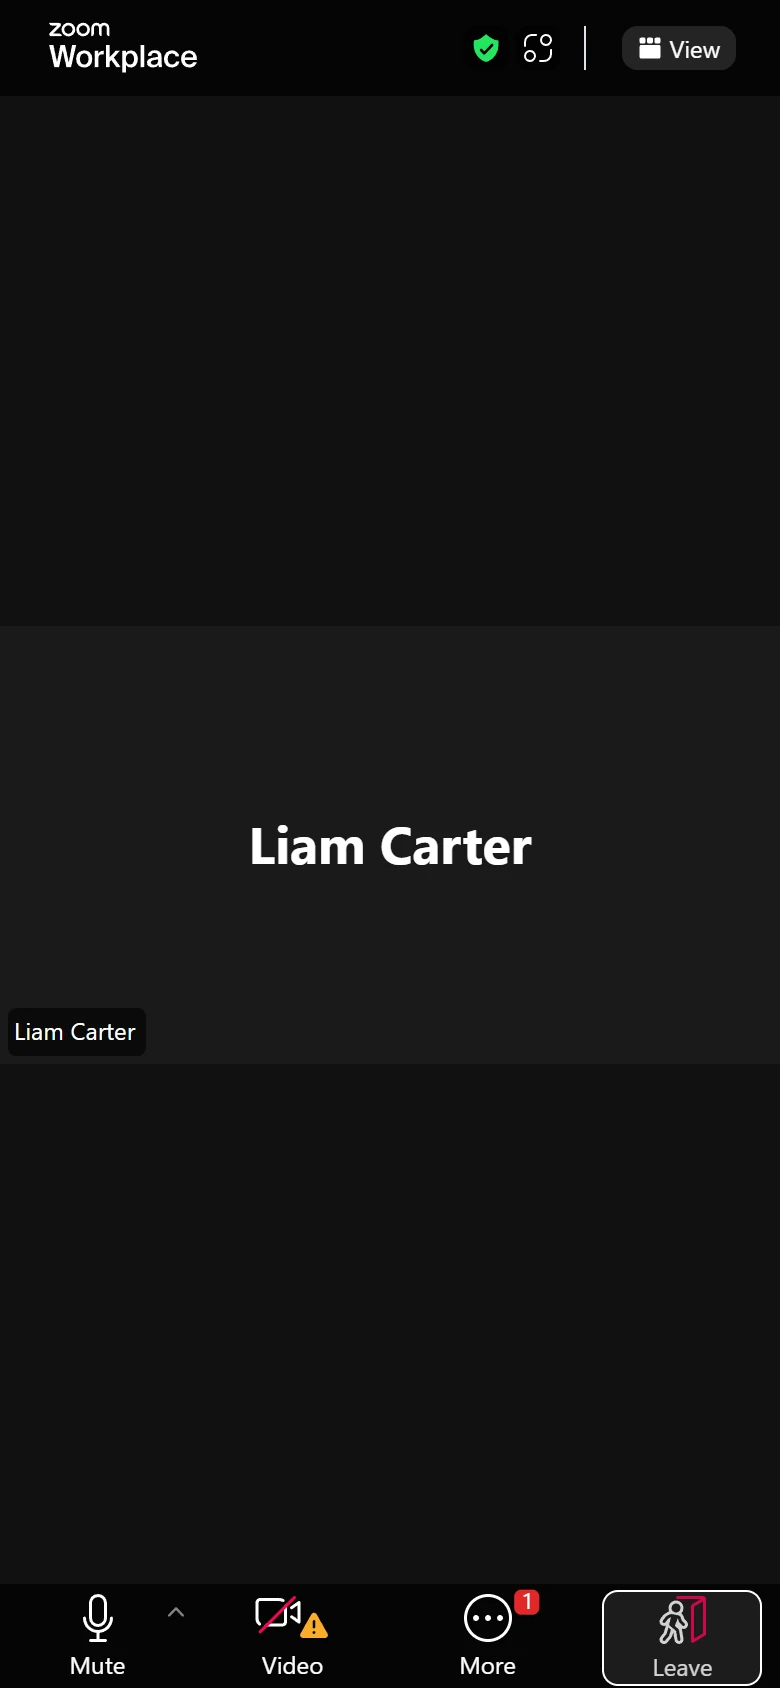
On a phone, the meeting uses the full screen. The toolbar shrinks to Mute, Video, More and Leave, and More holds participants, chat and the other controls.
What visitors see #
- On the meeting page: Join in browser, Join in Zoom app, the meeting link with a Copy button, and a calendar button.
- After Join in browser: a short form, then the Zoom meeting itself, with camera, microphone, chat and screen sharing in the browser.
- When they leave the meeting, Zoom sends them back to the meeting page.
Join buttons only appear to people who are allowed to join. If a meeting needs registration, a purchase or a course enrolment, visitors see that step first.
Benefits of joining in the browser #
- No download: Attendees join from any modern browser, even on locked-down computers.
- People stay on your site: The meeting runs inside your own page, under your address.
- Same access rules: The browser join checks the same rules as the meeting page, so a private meeting stays private.
- The secret stays on your server: ZooMeet signs each join on the server. The SDK secret is never sent to the browser.
Troubleshooting #
There is no Join in browser button #
ZooMeet only shows Join in browser when both Meeting SDK keys are saved, the visitor can join, and the meeting has a Zoom join link.
Check that:
- The Meeting SDK card shows Connected.
- You clicked Save keys after pasting the keys.
- The meeting is published, has not ended, and the visitor passes its access rules.
“Zoom SDK credentials are not configured.” #
The join page could not find both SDK keys. Open Settings > Connect > Meeting SDK, paste the Client ID and Client secret, and click Save keys.
“You do not have access to this event.” #
The meeting is limited to certain people, for example students enrolled in a course, and the visitor is not one of them. This is expected. Log in as an allowed user to test.
“Cannot detect your camera” or a warning sign on Video #
The browser cannot reach a camera. Check that a camera is connected, that no other app is using it, and that the browser has permission for this site (the camera icon in the address bar). Attendees can still join with audio only.
“An unknown error has occurred, please try to refresh this page to rejoin the meeting.” #
This usually means the page was opened over plain http. The Zoom browser client needs HTTPS. Open the meeting page with https:// and join again.
Join in browser fails to start or the meeting never loads #
The Meeting SDK app is not set up the way Zoom expects.
Check that:
- OAuth Redirect URL and OAuth Allow Lists contain the exact URL you copied from ZooMeet.
- Meeting SDK is switched on under Embed in the Zoom app.
- You added the app on Local Test and clicked Allow.
- The keys on the Meeting SDK card come from the ZooMeet SDK app, not from the Server-to-Server OAuth app.
- Your site uses HTTPS.
- Another Zoom plugin is not active on the same site. Two Zoom SDKs on one site can clash.
Zoom asks attendees to sign in #
The meeting has Require authentication to join turned on. Turn it off on the meeting’s Access and controls step if guests should join without a Zoom account.
Frequently asked questions #
Is the Meeting SDK required? #
No. Without it, meeting pages still work and people join through the Zoom app or zoom.us.
Can I use the same keys for both cards? #
No. Each app issues its own Client ID and Client Secret. ZooMeet warns you if you paste the same pair into both cards.
Does the browser join work on phones? #
Yes, in a modern mobile browser. Many people on phones still prefer Join in Zoom app, which ZooMeet shows right below.
Can hosts start the meeting from the browser join page? #
No. The browser join always signs people in as attendees. Hosts start the meeting with Start meeting on the meeting page, or from Zoom.
Security best practices #
- Keep the SDK Client secret private. ZooMeet keeps it on the server and never prints it in the page.
- Use a separate Meeting SDK app for each site.
- If the secret leaks, regenerate it in Zoom, paste the new one, and click Save keys.
- Keep Waiting room or a passcode on for meetings that are not meant to be public.
- Deactivate or delete the Meeting SDK app in Zoom if you stop using Join in browser.
You’re ready to let people join in the browser #
Your meeting pages now offer Join in browser next to Join in Zoom app, and attendees can join without installing anything. Next, create a meeting and try it end to end.


