- Before you begin
- Step 1: Create a Google Cloud project
- Step 2: Enable the Google Drive API
- Step 3: Start the Google Auth Platform setup
- Step 4: Enter the app information
- Step 5: Choose the audience
- Step 6: Add contact information and finish the initial setup
- Step 7: Add the required data access scopes
- Step 8: Add yourself as a test user
- Step 9: Open the OAuth Clients page
- Step 10: Copy the Authorized Redirect URI from DriveHub
- Step 11: Create the Web application OAuth client
- Step 12: Save the Client ID and Client Secret immediately
- Step 13: Add the OAuth credentials to DriveHub
- Step 14: Choose the Google account
- Step 15: Review and approve access
- Step 16: Confirm the account is connected
- Google hasn’t verified this app: what it means
- Troubleshooting
- Frequently asked questions
- Security best practices
- You’re ready to use DriveHub
DriveHub can connect Google Drive to WordPress in two ways: Automatic and Manual. This guide covers the Manual connection method, which uses your own Google Cloud project and OAuth credentials.
Manual mode is the best choice when you need access to existing files and folders in your Google Drive, want to use your own Google API quota, or prefer to manage the Google application yourself.
By the end of this guide, you will have:
- A Google Cloud project for DriveHub
- The Google Drive API enabled
- A configured Google OAuth consent screen
- A Web application OAuth client
- Your Client ID and Client Secret saved in DriveHub
- A connected Google Drive account inside WordPress
Estimated setup time: 10–15 minutes. You do not need to enable Google Cloud billing for the basic OAuth setup described in this guide.
Before you begin #
Make sure you have:
- A WordPress website with DriveHub installed and activated
- Administrator access to the WordPress dashboard
- A Google account with access to the Drive you want to connect
- Permission to create a project in Google Cloud
- An HTTPS-enabled website
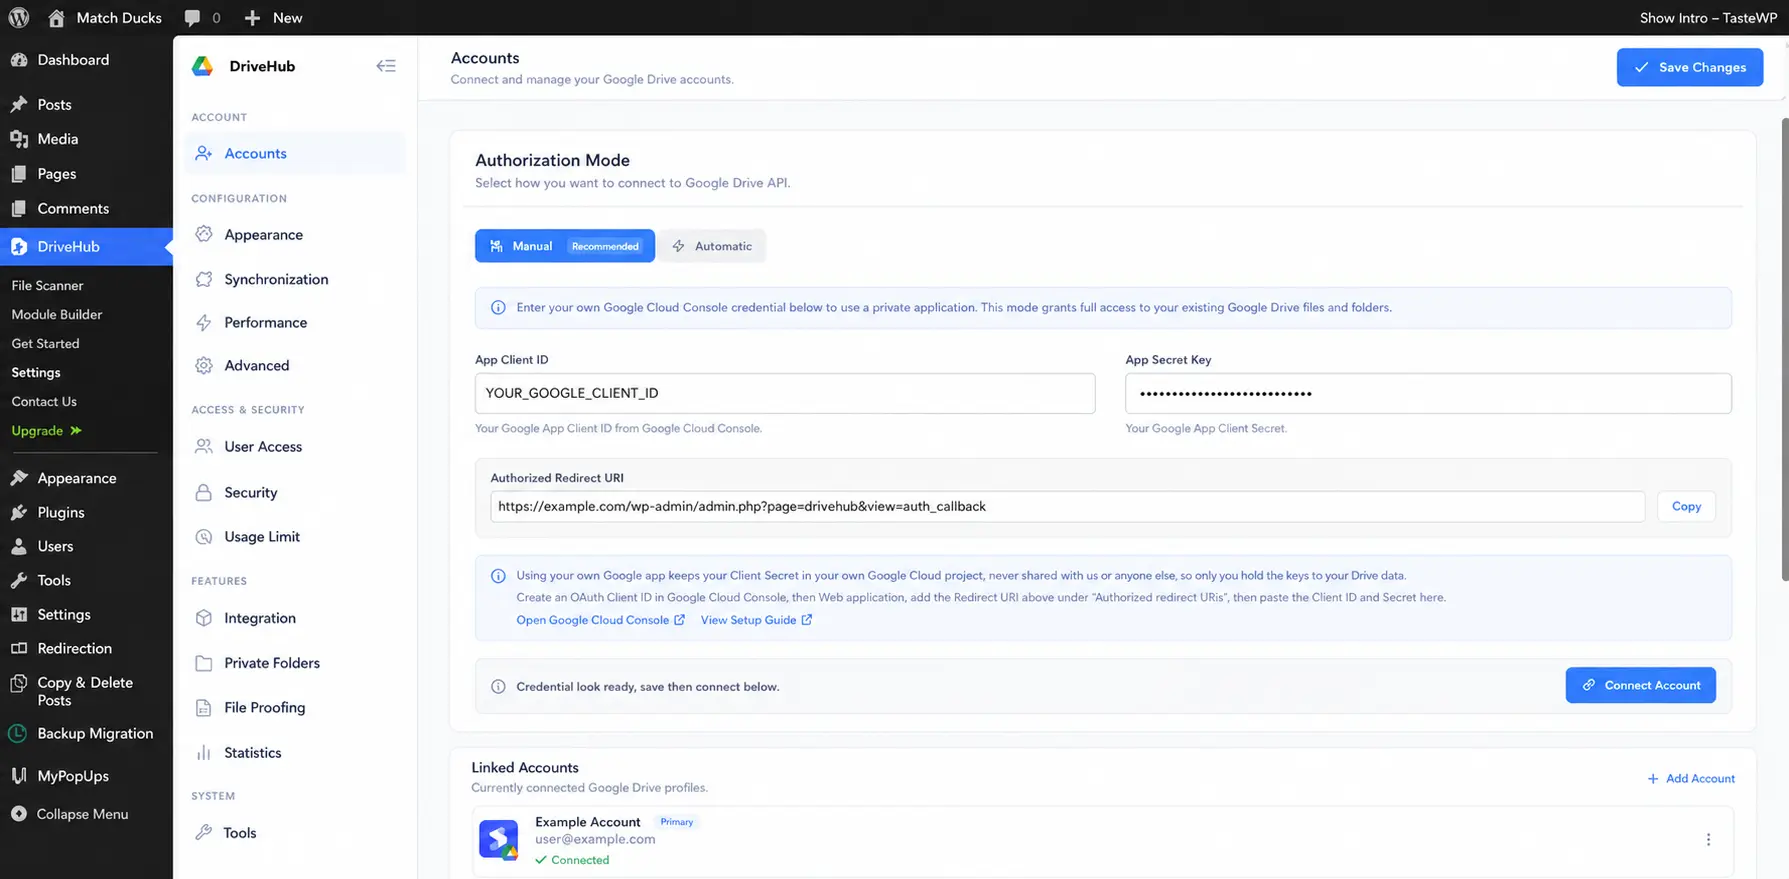
Open your WordPress dashboard and go to:
DriveHub → Settings → Accounts → Manual
Keep this page open in a separate tab. You will return to it several times during setup.
Step 1: Create a Google Cloud project #
- Open the Google Cloud Console in a new browser tab.
- Sign in with the Google account that will manage the DriveHub integration.
- Click the project selector in the top navigation bar.
- Click New Project.
- Enter a recognizable project name, such as DriveHub.
- If Google asks for an organization or location, choose the appropriate option for your account. Personal Google accounts can usually leave No organization selected.
- Click Create.
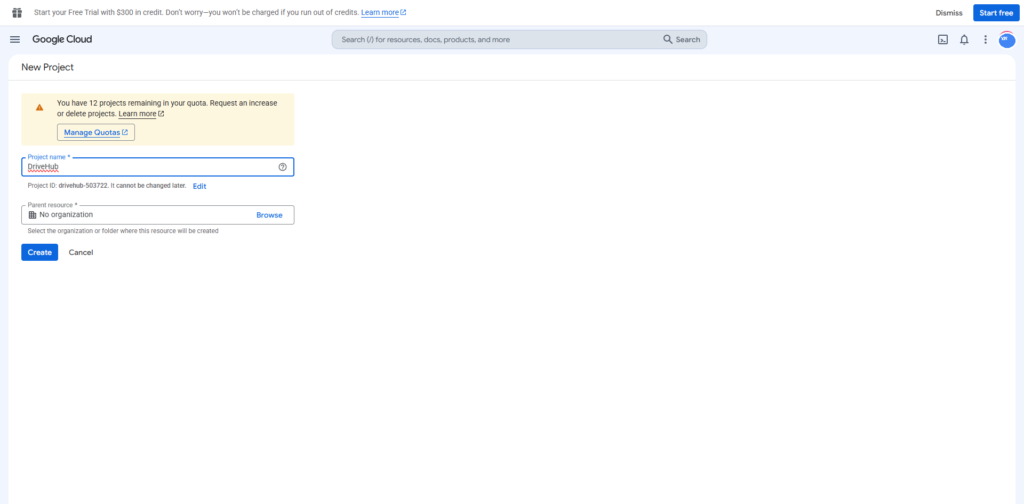
After Google creates the project, open the project selector again and confirm that the new DriveHub project is selected.
Important: APIs and OAuth credentials belong to the currently selected Google Cloud project. Check the selected project before continuing.
Step 2: Enable the Google Drive API #
DriveHub cannot access Google Drive until the Google Drive API is enabled for your project.
- In Google Cloud Console, open the navigation menu.
- Go to APIs & Services → Library.
- Search for Google Drive API.
- Open Google Drive API from the results.
- Click Enable.
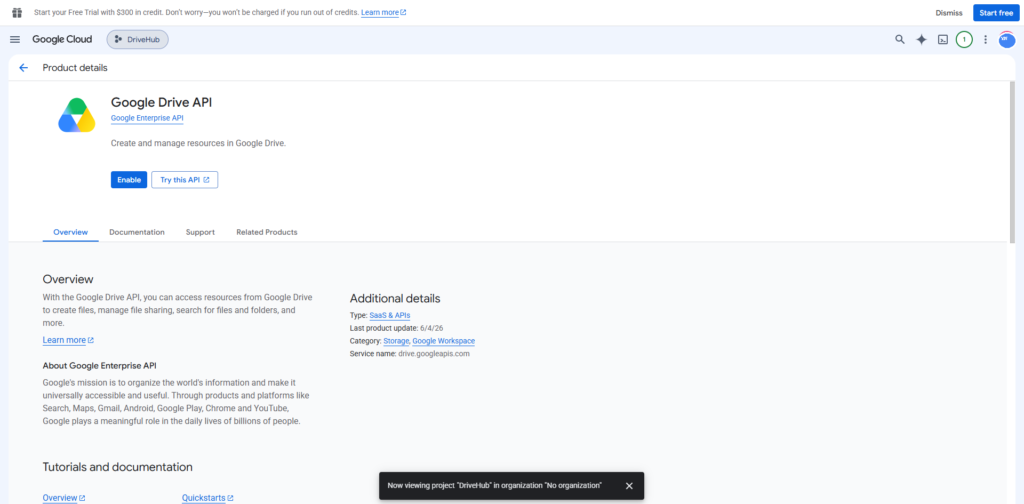
Wait until Google finishes enabling the API before moving to the next step.
Step 3: Start the Google Auth Platform setup #
Google uses the OAuth consent screen to show users which application is requesting access and what permissions it needs.
- Open Google Auth Platform in the Google Cloud Console.
- Select Overview from the left menu.
- If this is a new project, click Get started.
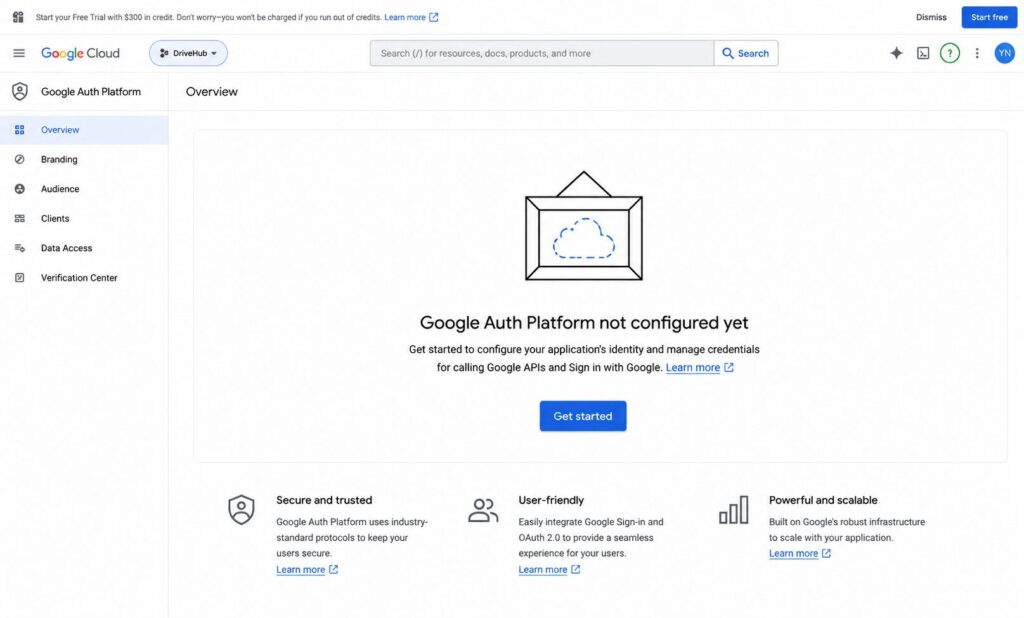
Google’s interface may use the labels Google Auth Platform, OAuth consent screen, or APIs & Services, depending on the account and interface version. The settings are part of the same OAuth configuration.
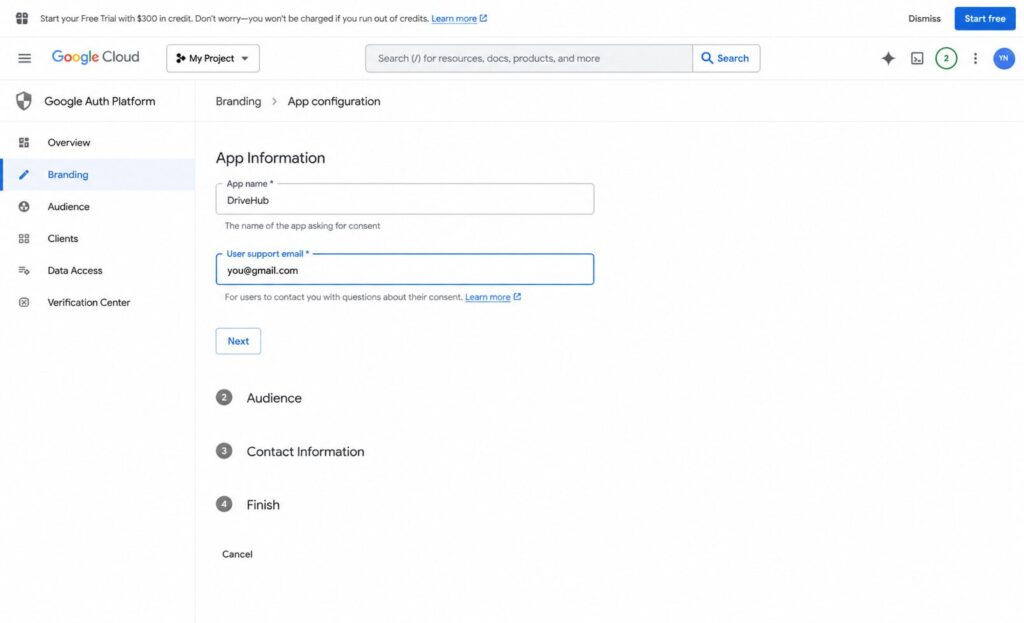
Step 4: Enter the app information #
Under App Information:
- Enter DriveHub as the app name. You can use another descriptive name if preferred.
- Select a User support email that you monitor.
- Click Next.
The app name is displayed during Google authorization, so choose a name users will recognize.
Step 5: Choose the audience #
Google will ask who can use the application.
- Choose External when using a personal Google account or when people outside your Google Workspace organization may connect.
- Choose Internal only when you use Google Workspace and every intended user belongs to the same organization.
For most WordPress websites, External is the correct option.
Select the audience and click Next.
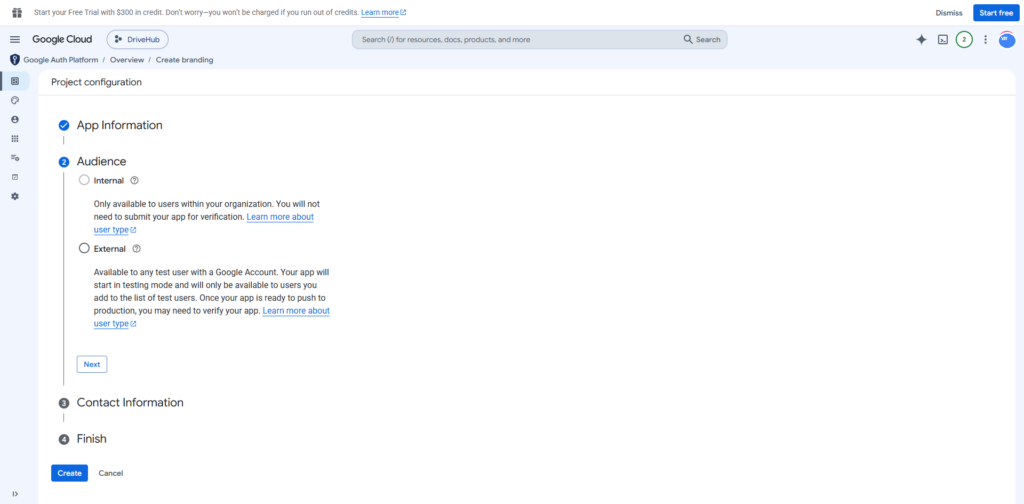
Note: An External app normally begins in testing mode. While it remains in testing, only accounts added as test users can complete authorization.
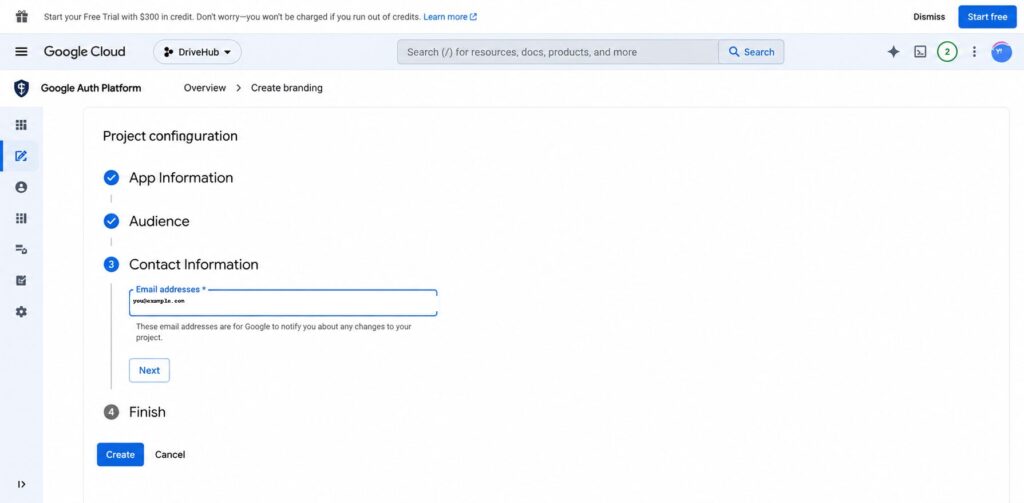
Step 6: Add contact information and finish the initial setup #
- Enter an email address under Contact Information. Google uses this address for important notices about the project.
- Click Next.
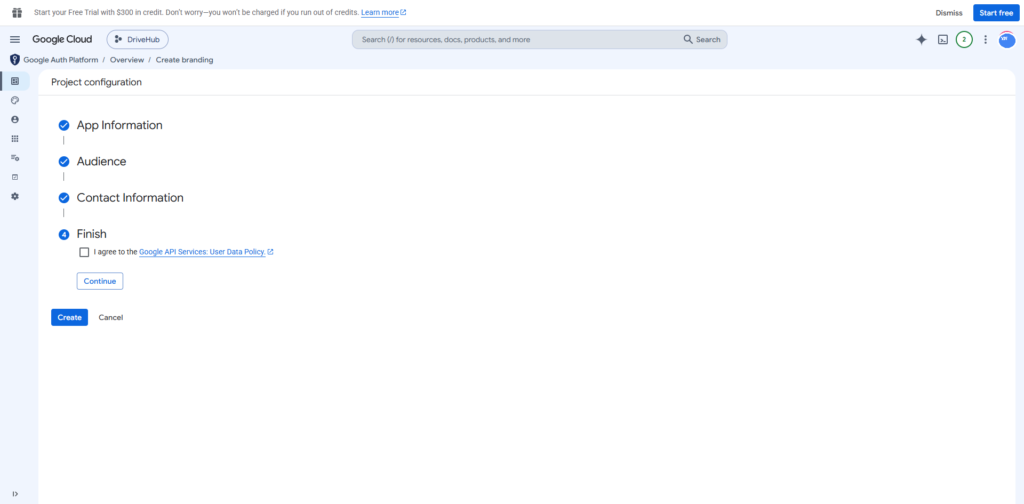
On the Finish step:
- Review the information you entered.
- Read the Google API Services User Data Policy.
- If you agree, select the agreement checkbox.
- Click Continue and complete the setup.
Step 7: Add the required data access scopes #
Scopes determine what DriveHub can access after a user approves the connection.
- In Google Auth Platform, open Data Access.
- Click Add or remove scopes.
- Search for and select the scopes required by your DriveHub Manual connection.
- Save the changes.
Select these scopes for the Manual connection:
https://www.googleapis.com/auth/drive— allows DriveHub to access and manage the Google Drive files available to the connected account.https://www.googleapis.com/auth/userinfo.email— identifies the email address of the connected Google account.https://www.googleapis.com/auth/userinfo.profile— reads basic profile information for the connected account.openid— securely identifies the Google account during sign-in.
Click Update, review the selected scopes, and save the changes before continuing.
Security note: Manual mode uses your own Google Cloud application. Treat the Client Secret like a password and never publish it, email it, or include it in a public screenshot.
Step 8: Add yourself as a test user #
If you selected External and your app is in testing mode, add the Google account you plan to connect:
- Open Audience in Google Auth Platform.
- Find the Test users section.
- Click Add users.
- Enter the Google account email address that will connect to DriveHub.
- Save the changes.
If you skip this step, Google may block authorization with an access-denied message.
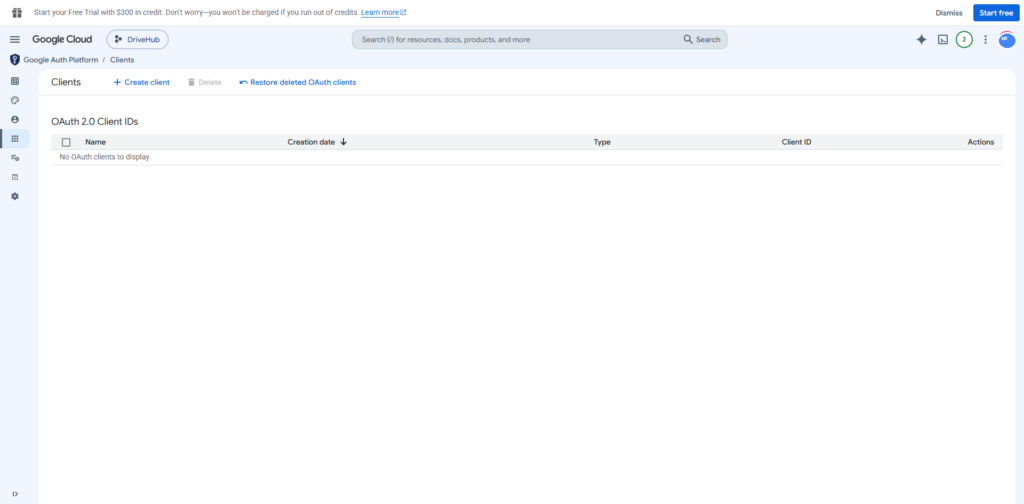
Step 9: Open the OAuth Clients page #
- In Google Auth Platform, select Clients.
- Click Create client.
Step 10: Copy the Authorized Redirect URI from DriveHub #
Return to your WordPress dashboard and open:
DriveHub → Settings → Accounts → Manual
Find Authorized Redirect URI and click Copy.
The URL will be similar to:
https://example.com/wp-admin/admin.php?page=drivehub&drivehub_auth=successYour actual URL may look different. Always copy it directly from your own DriveHub settings.
Do not manually type or modify the redirect URI. Google requires an exact match, including
https://, the domain, path, query parameters, and any trailing slash.
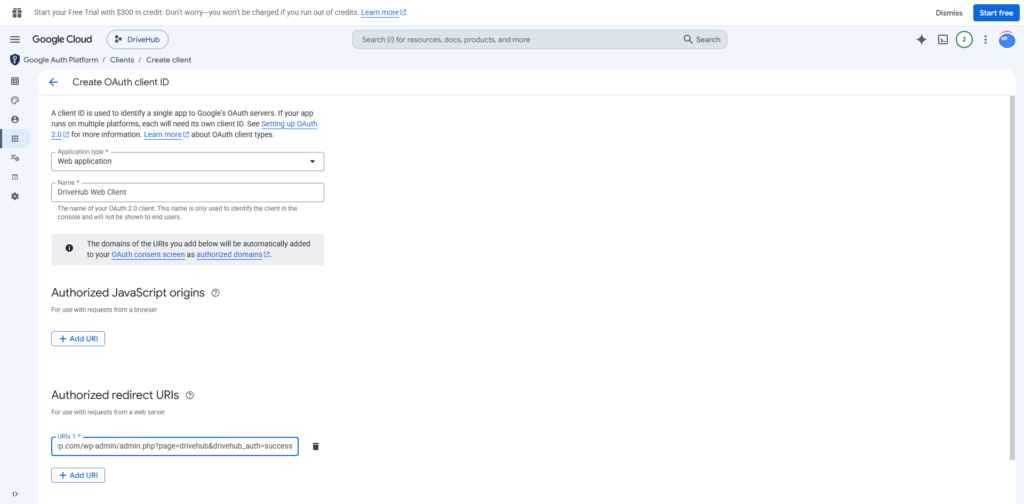
Step 11: Create the Web application OAuth client #
On the Create OAuth client ID page:
- Set Application type to Web application.
- Enter a name, such as DriveHub Web Client.
- Leave Authorized JavaScript origins empty unless another part of your setup specifically requires it.
- Under Authorized redirect URIs, click Add URI.
- Paste the exact URI copied from DriveHub.
- Click Create.
Step 12: Save the Client ID and Client Secret immediately #
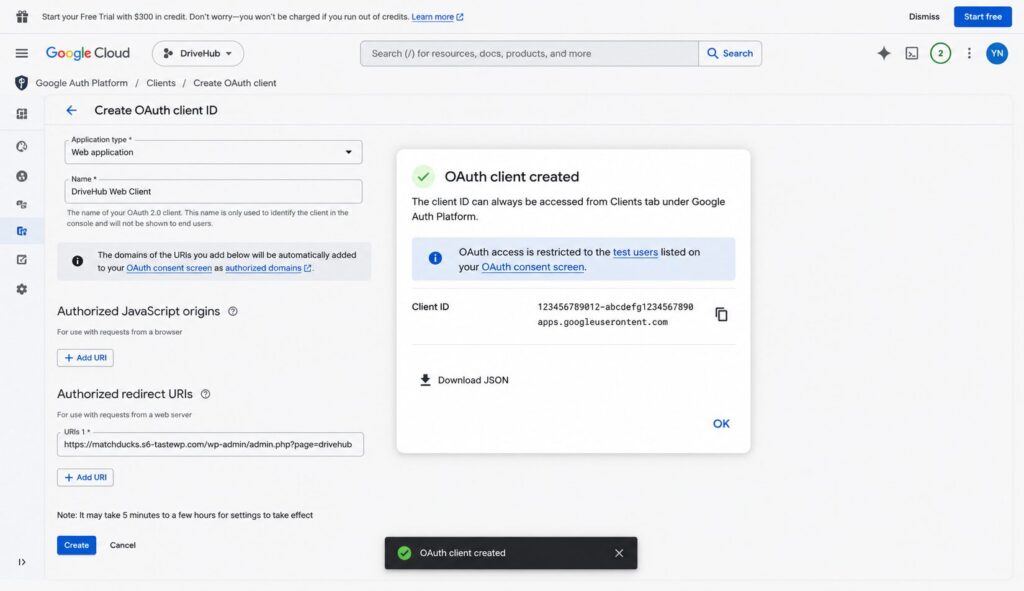
After the OAuth client is created, Google displays the new credentials.
Copy and securely store:
- Client ID
- Client Secret
If Google offers a Download JSON option, download the file and store it securely. Do not upload this JSON file to WordPress or share it publicly.
Important: For newer OAuth clients, Google shows the full Client Secret only when it is created. Copy or download it immediately. If you lose it, you may need to create a new secret from the client details page.
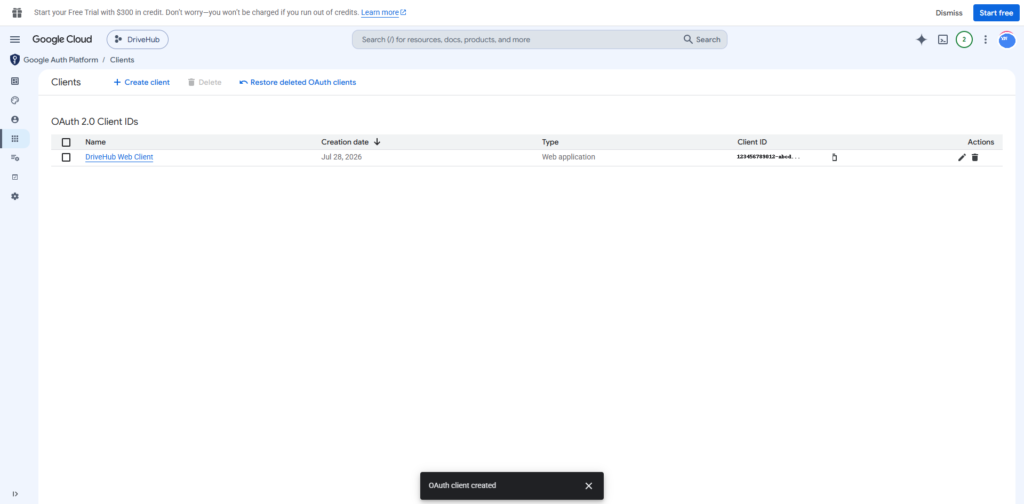
After closing the confirmation, the new client appears on the Clients page.
Step 13: Add the OAuth credentials to DriveHub #
Return to DriveHub → Settings → Accounts → Manual.
- Paste the Google Client ID into App Client ID.
- Paste the Google Client Secret into App Secret Key.
- Click Save Changes.
- Wait for DriveHub to confirm that the credentials were saved.
- Click Connect Account.
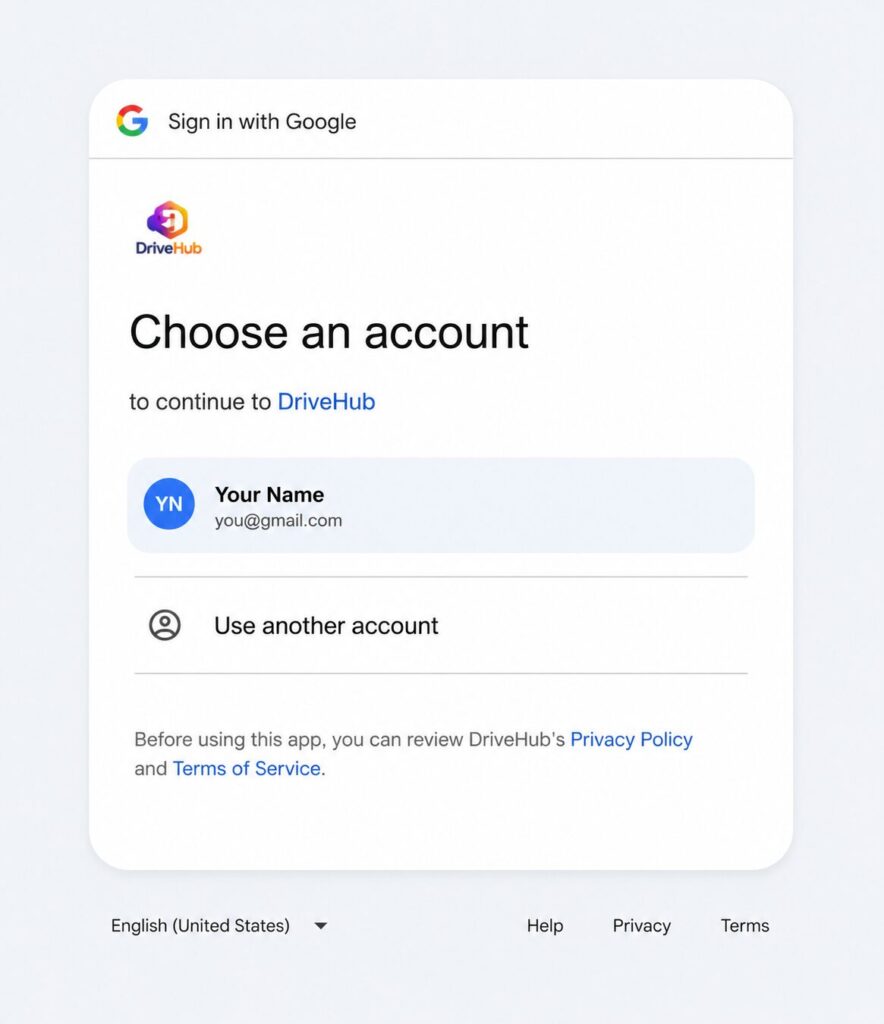
Step 14: Choose the Google account #
Google will open an authorization screen.
- Select the Google account you added as a test user.
- If the account is not listed, click Use another account.
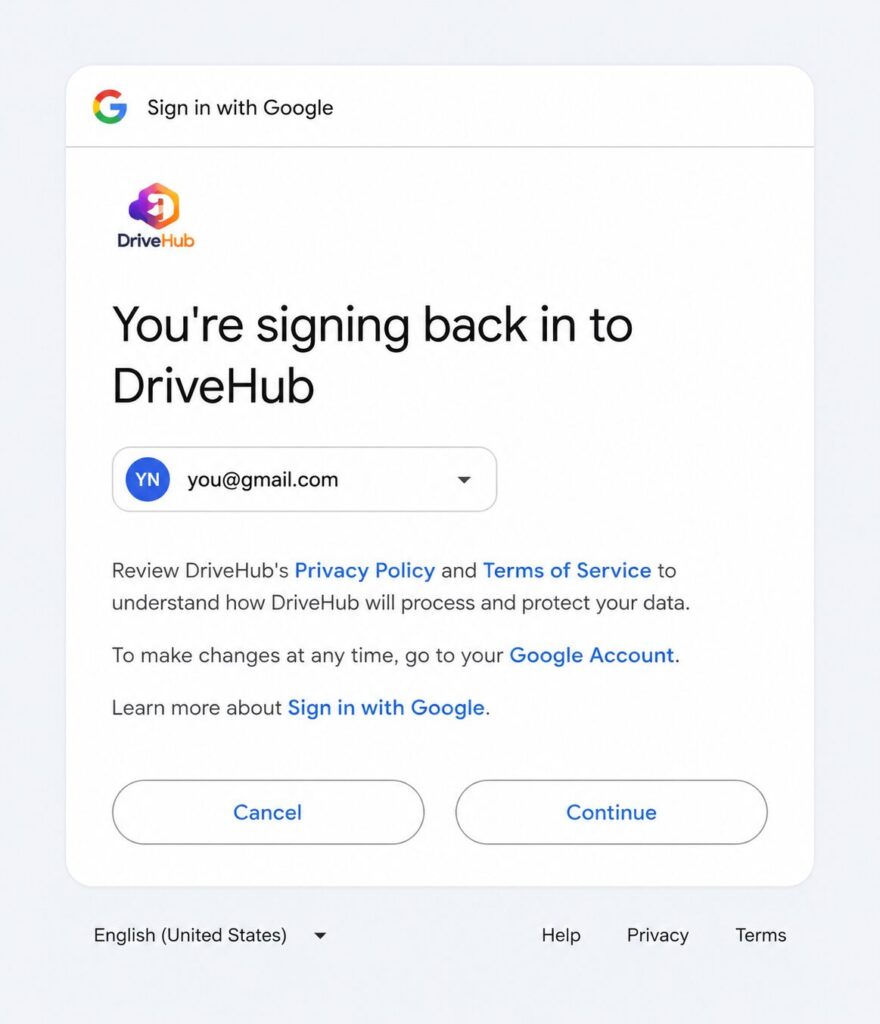
Google may display an additional “signing back in” page for an account that previously authorized DriveHub. If it appears, confirm the correct account and click Continue.
Step 15: Review and approve access #
Google will show which account and services DriveHub wants to access.
- Confirm that the correct Google account is displayed.
- Review the requested permissions carefully.
- Click Continue to approve the connection.
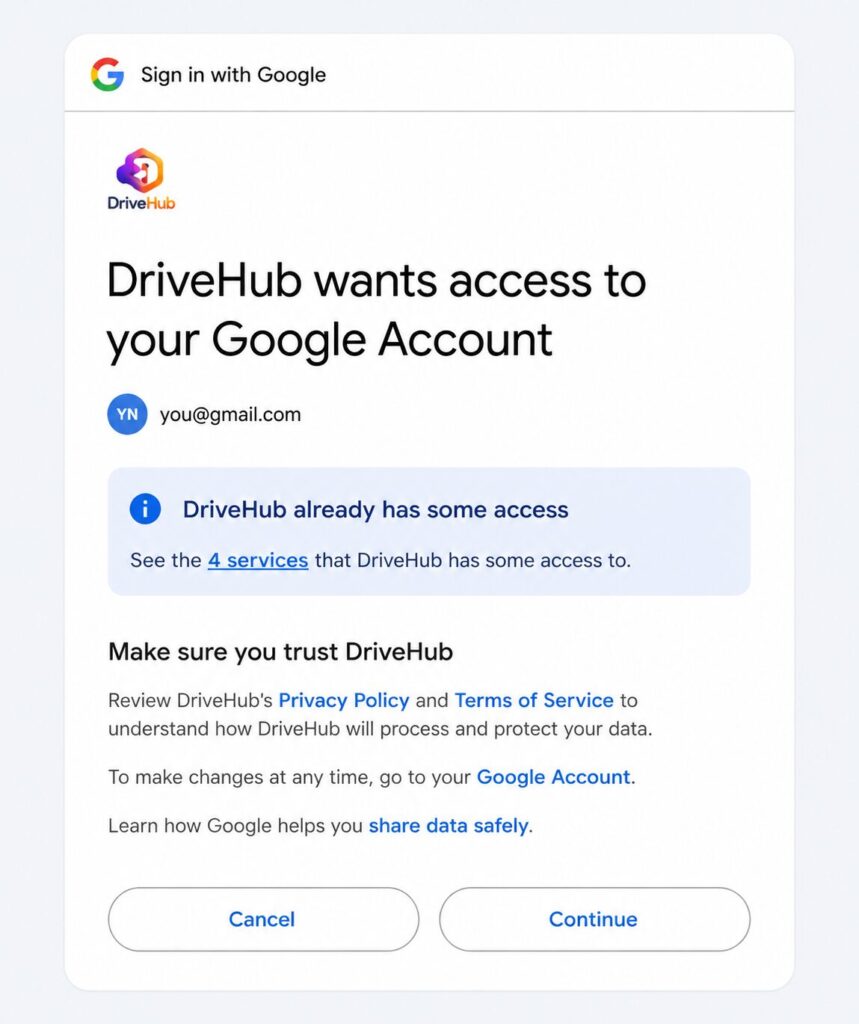
Only approve the request if the application name, account, and permissions are what you expect.
Step 16: Confirm the account is connected #
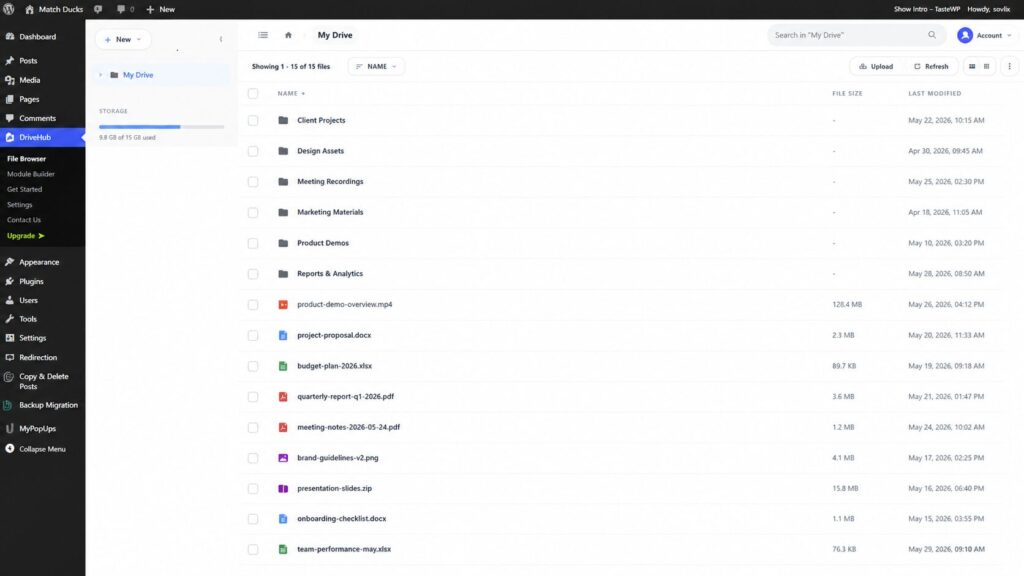
After authorization, Google redirects you to WordPress. In DriveHub, the Google account should appear under Linked Accounts with a green Connected status.
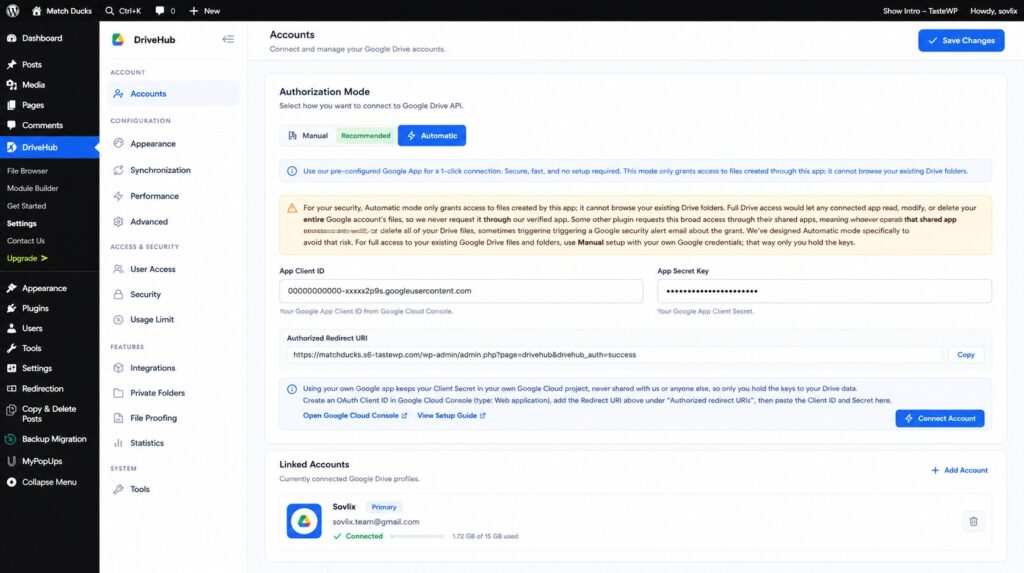
To verify the integration, open DriveHub → File Browser. Your permitted Google Drive files and folders should now be available.
Google hasn’t verified this app: what it means #
A newly created External OAuth app may display a warning that Google has not verified it. This does not automatically mean the app is unsafe; it means Google has not completed its verification process for public use.
For a private setup or testing:
- Keep the application in testing mode.
- Add every account that needs access as a test user.
- Continue only when you recognize the Google Cloud project and created the OAuth client yourself.
For a public integration used by customers or people outside your organization, you may need to publish and verify the OAuth application. Google may request a verified domain, homepage, privacy policy, terms of service, scope justification, and a video showing the complete authorization flow.
Troubleshooting #
Error 400: redirect_uri_mismatch #
This error means the URI sent during authorization does not exactly match the URI saved in the Google OAuth client.
Check that:
- You copied the URI from DriveHub → Settings → Accounts → Manual.
- The URI uses
https://. - The domain matches your WordPress site exactly, including
wwwif used. - No character, query parameter, or slash is missing.
- The URI was added under Authorized redirect URIs, not Authorized JavaScript origins.
- You edited the OAuth client from the correct Google Cloud project.
Save the corrected URI, wait a few minutes, and try connecting again.
Error 403: access_denied #
If the OAuth app is in testing mode, confirm that the Google account is listed under Audience → Test users. Also make sure you selected the same account during authorization.
Invalid Client ID or Client Secret #
- Copy the Client ID again from Google Auth Platform.
- Make sure you did not paste the Client ID into the Secret field or vice versa.
- Remove spaces before or after both values.
- Confirm the credentials belong to the same project where the Google Drive API is enabled.
- If the full Client Secret is no longer available, create a new secret and update DriveHub.
The Connect Account button does not appear #
- Confirm both credential fields are complete.
- Click Save Changes and wait for the success message.
- Refresh the Accounts page.
- Check whether a validation message appears below either field.
The Google Drive API is disabled #
Return to APIs & Services → Library → Google Drive API and click Enable. Confirm that the DriveHub project is selected first.
The account connects, but files do not appear #
- Refresh the DriveHub File Browser.
- Confirm you connected the intended Google account.
- Review the scopes configured under Data Access.
- Disconnect and reconnect the account after changing OAuth scopes.
- Clear any WordPress or server cache that may affect the admin interface.
Google shows the consent screen again #
Google may ask for consent again if you changed scopes, created a new OAuth client, revoked access, or connected a different Google account. Review the request and continue only if the details are correct.
Frequently asked questions #
Do I need a paid Google Cloud account? #
No. Creating the OAuth application and enabling the Google Drive API for this setup does not normally require a paid Google Cloud plan. Google API usage limits still apply.
Why should I use DriveHub Manual mode? #
Manual mode uses your own Google Cloud project and credentials. It is the appropriate option when DriveHub needs to work with existing files and folders in your Google Drive account.
Can I connect more than one Google Drive account? #
If your DriveHub plan supports multiple accounts, use Add Account in the Accounts settings and authorize each Google account separately.
Why does Google show an unverified app warning? #
A newly created External OAuth application may remain in testing mode until it is published or verified. Add the account as a test user and continue only when you recognize the project and created the OAuth credentials yourself.
What should I do if I lose the Client Secret? #
Create a new Client Secret from the OAuth client details in Google Auth Platform, save it securely, and replace the old value in DriveHub.
Security best practices #
- Never place the Client Secret in public documentation, screenshots, support tickets, or a Git repository.
- Restrict WordPress administrator access to trusted users.
- Remove unused test users and OAuth clients.
- Rotate the Client Secret if it is exposed.
- Keep DriveHub, WordPress, and other plugins updated.
- Review connected applications periodically in your Google Account security settings.
You’re ready to use DriveHub #
Your Google Drive account is now connected to WordPress through your own Google Cloud application. You can manage the OAuth client, API access, test users, and credentials from your Google Cloud project while using DriveHub to work with Google Drive content inside WordPress.


