- Before You Begin
- How ZooMeet Connects with Zoom
- Below you can see all required scopes:
- Account
- Meetings
- Cloud Recordings
- Reports
- Users
- Zoom Events
- Webinars
- Connect ZooMeet to Zoom
- Part 2: Enable Join in Browser (Meeting SDK)
- Before You Begin
- Step 1: Open Zoom App Marketplace
- Step 2: Create a New App
- Step 3: Create a General App
- Step 4 : Name Your App
- Step 5 : Configure Basic Information
- Step 6: Copy the Redirect URL from ZooMeet
- Step 7: Add OAuth Redirect URLs
- Step 8: Enable the Meeting SDK
- Step 9: Add the Required Permission
- Step 10: Activate Your App
- Step 11: Copy Your Meeting SDK Credentials
- Step 12: Connect the Meeting SDK to ZooMeet
- Step 13: Verify the Connection
- Test the Join in Browser Feature
Learn how to connect your Zoom account to ZooMeet and enable all Zoom-powered features, including meeting creation, webinar management, cloud recordings, and Join in Browser.
Before You Begin #
Before connecting ZooMeet to Zoom, make sure you have:
- An active Zoom account
- Administrator access to your Zoom account
- Administrator access to your WordPress website
- ZooMeet installed and activated
- HTTPS (SSL) enabled on your website
Important
Zoom requires HTTPS. Connections made from non-SSL websites may fail during authentication.
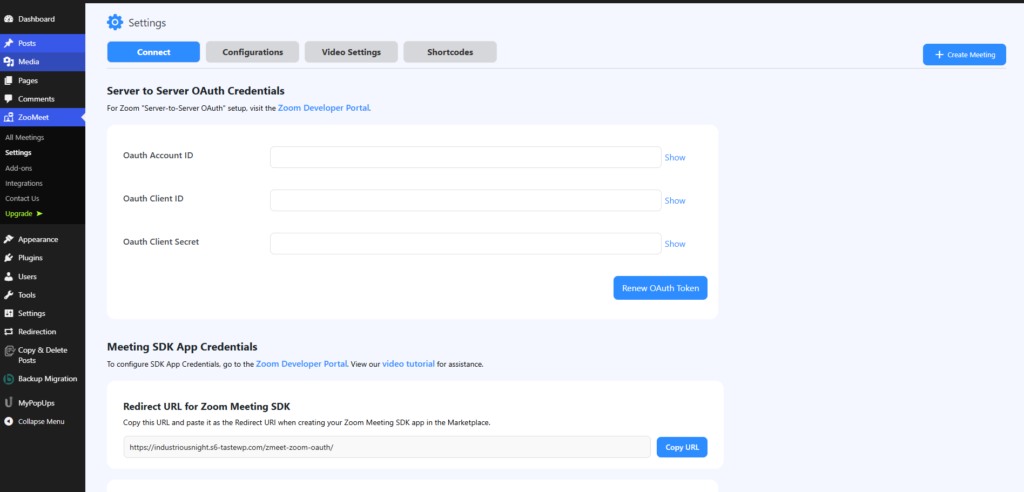
How ZooMeet Connects with Zoom #
ZooMeet uses two separate Zoom applications because Zoom separates API access from browser-based meeting functionality.
| App | Purpose | Required |
|---|---|---|
| Server-to-Server OAuth | Create meetings, webinars, recordings, users | ✅ Yes |
| Meeting SDK (General App) | Join Zoom meetings directly from your website | Optional |
Tip
If you only need to create Zoom meetings, you only need the Server-to-Server OAuth App.
If you also want visitors to join meetings directly from your website, configure the Meeting SDK App as well.
Part 1: Create a Server-to-Server OAuth App
Step 1: Open Zoom Marketplace #
Sign in to the Zoom App Marketplace using your administrator account.
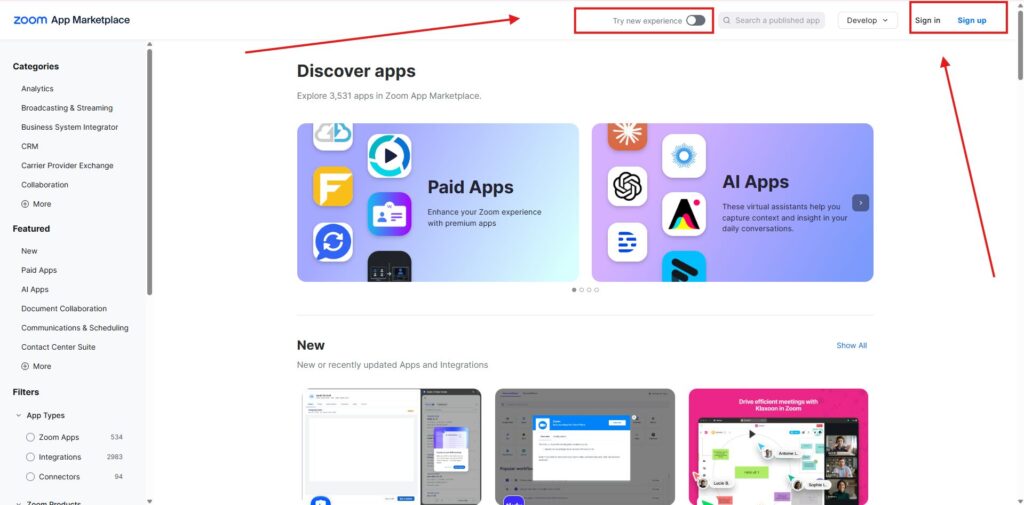
Step 2: Create a New App #
From the top navigation, click
Develop → Build App
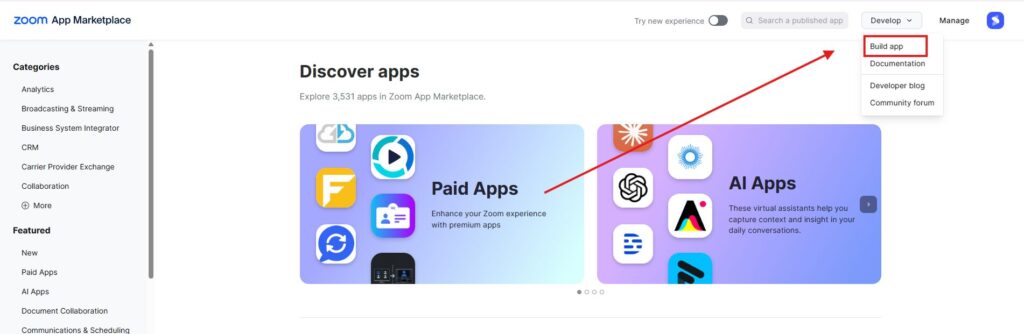
Step 3: Select Server-to-Server OAuth #
Locate Server-to-Server OAuth and click Create.
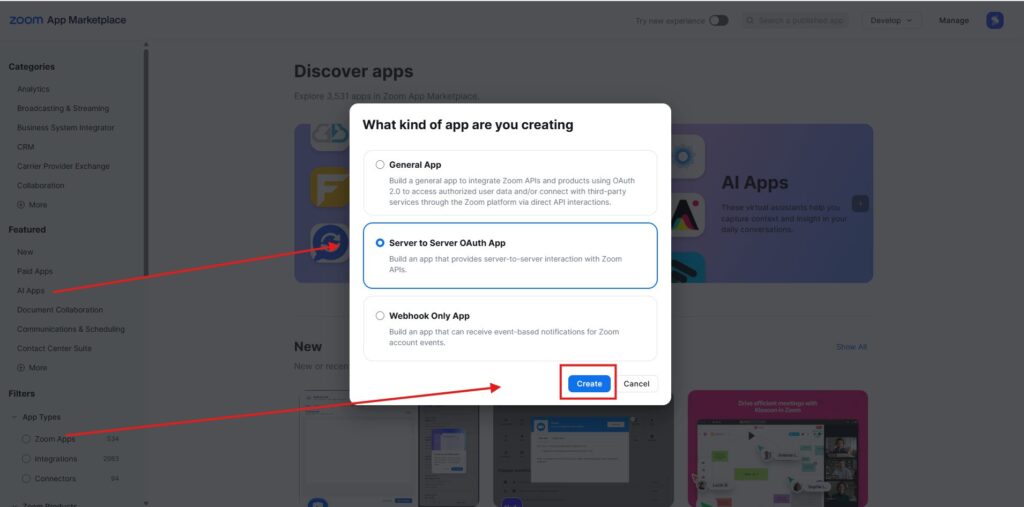
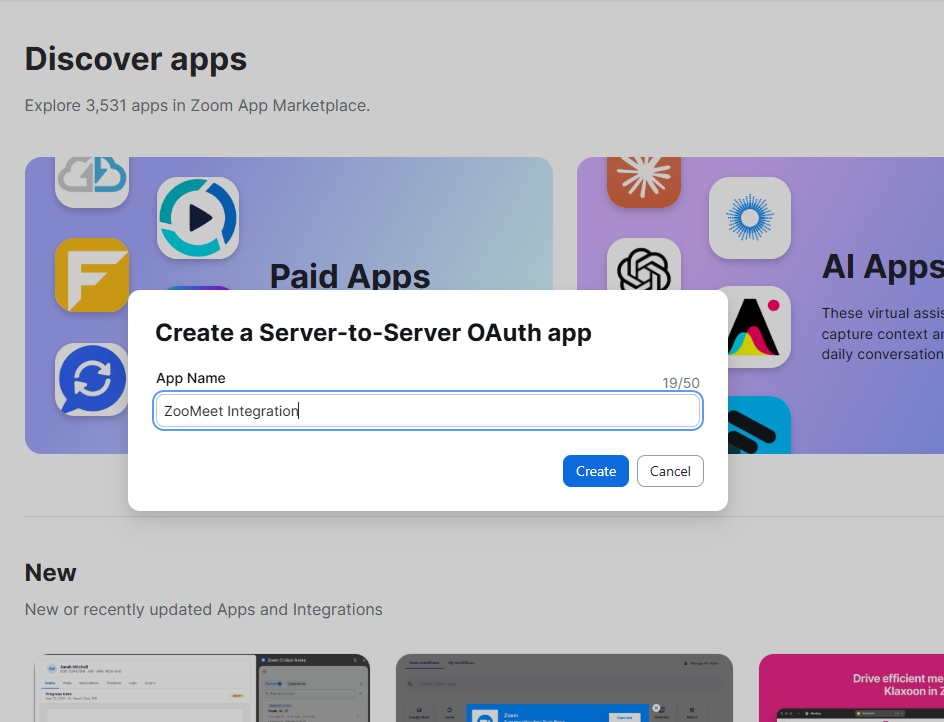
Step 4: Name Your App #
Choose any descriptive name.
Example:
- ZooMeet
- ZooMeet Integration
- Company Zoom Integration
This name is only for your own reference.
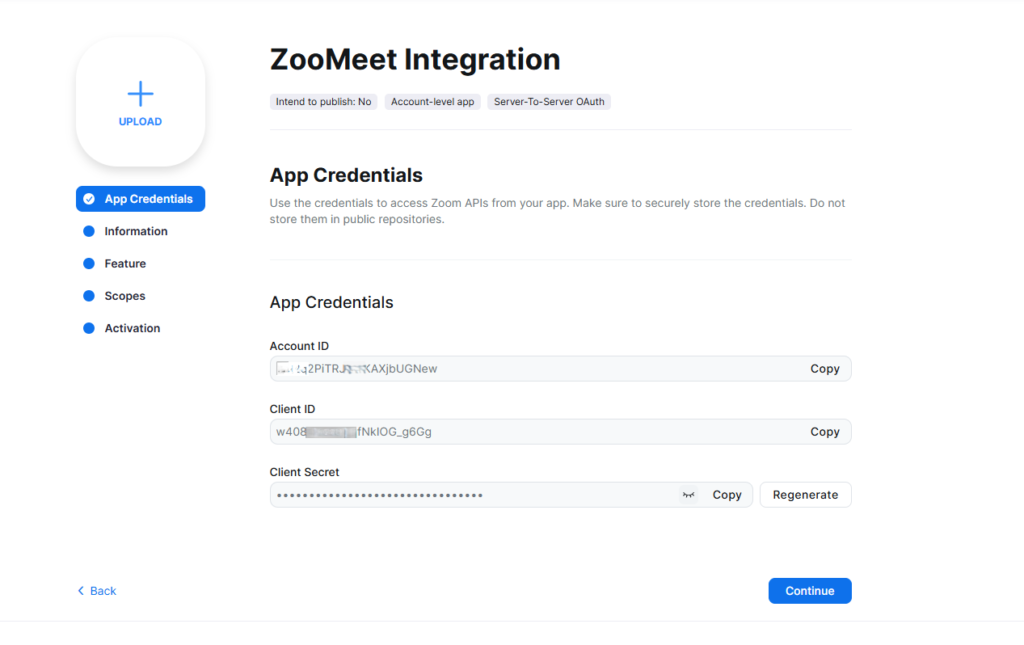
Step 5: Copy App Credentials #
After creating the application, Zoom generates three credentials.
You’ll need all of them inside ZooMeet.
| Credential | Description |
|---|---|
| Account ID | Your Zoom account identifier |
| Client ID | OAuth client ID |
| Client Secret | OAuth client secret |
Important
Keep these credentials private. Anyone with access to them can authenticate with your Zoom account.
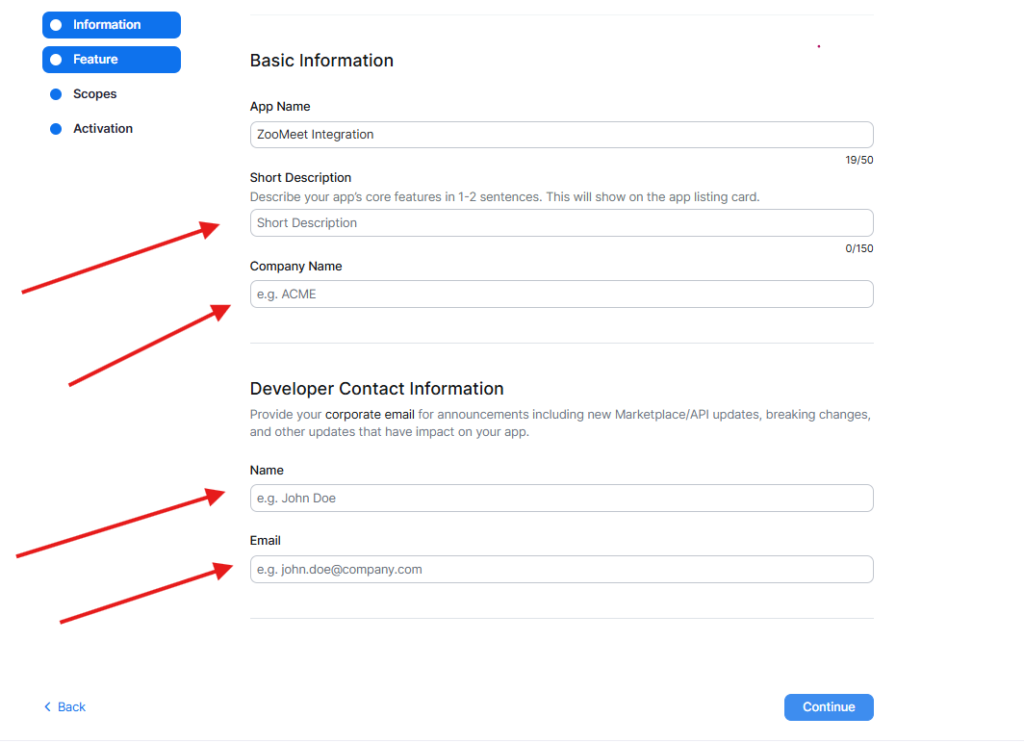
Step 6: Complete Basic Information #
Fill in:
- Company Name
- Developer Name
- Developer Email
These fields are required by Zoom before your application can be activated.
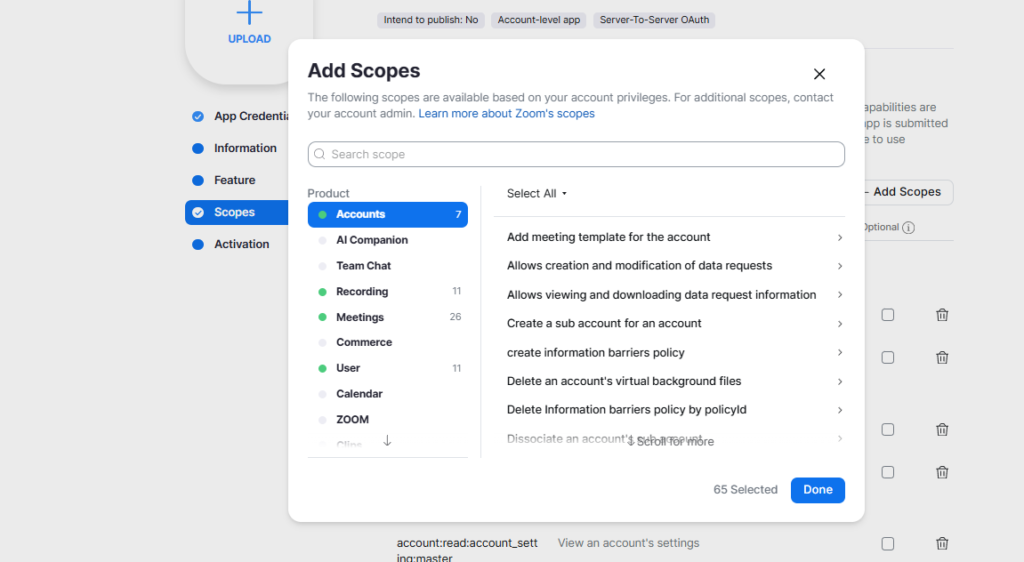
Step 7: Configure Required API Scopes #
ZooMeet requires several Zoom API permissions.
Without these permissions, Zoom will reject API requests and features such as meeting creation, webinar management, recordings, or user synchronization may not work correctly.
Click
Scopes → Add Scopes
Why are these scopes required? #
ZooMeet supports:
- Creating meetings
- Updating meetings
- Deleting meetings
- Webinar management
- Cloud recordings
- Registration
- User synchronization
- Reports
- Zoom Events
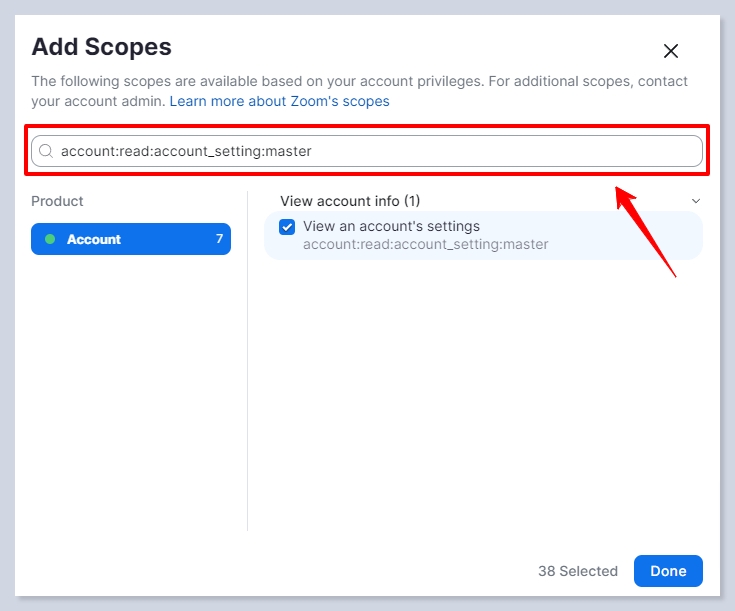
Each feature requires specific Zoom API permissions. You can use the searchbar of the scopes menu to fasten the process:
Below you can see all required scopes: #
During the Scopes step of creating your Server-to-Server OAuth app, add all of the following permissions.
Important
ZooMeet requires these scopes to create and manage meetings, webinars, recordings, users, reports, and other Zoom resources. Missing any required scope may result in permission errors or unavailable features.
Account #
View account information #
- View account settings
account:read:account_setting:admin - View master account settings
account:read:account_setting:master - View account settings
account:read:settings:admin
View and manage account information #
- Update account settings
account:update:settings:admin
View and manage sub accounts #
- Update account options
account:update:options:admin - Update account owner
account:update:owner:master - Update master account settings
account:update:settings:master
Meetings #
View all user meeting summaries #
- View meeting summaries
meeting:read:summary:admin
View meeting invitation details #
- View meeting invitations
meeting:read:invitation:admin
View all user meetings #
- View meeting chat messages
meeting:read:chat_message:admin - View meeting invitations
meeting:read:invitation:admin - View meetings
meeting:read:list_meetings:admin - View upcoming meetings
meeting:read:list_upcoming_meetings:admin - View meeting details
meeting:read:meeting:admin
View and manage all user meetings #
- Delete meeting
meeting:delete:meeting:admin - Delete registrant
meeting:delete:registrant:admin - Update meeting
meeting:update:meeting:admin - Update registrant status
meeting:update:registrant_status:admin - Update meeting status
meeting:update:status:admin - Create invite links
meeting:write:invite_links:admin - Create meeting
meeting:write:meeting:admin - Add registrant
meeting:write:registrant:admin
Meeting Tokens #
- View live streaming token
meeting:read:live_streaming_token:admin - View local archiving token
meeting:read:local_archiving_token:admin
Meeting Registrants #
- View registrant
meeting:read:registrant:admin - View registrants
meeting:read:list_registrants:admin
View and manage sub-account meetings #
- Delete meeting
meeting:delete:meeting:master - Delete registrant
meeting:delete:registrant:master - View meetings
meeting:read:list_meetings:master - View registrants
meeting:read:list_registrants:master - View meeting
meeting:read:meeting:master - View registrant
meeting:read:registrant:master - Update meeting
meeting:update:meeting:master - Update registrant status
meeting:update:registrant_status:master - Create meeting
meeting:write:meeting:master - Add registrant
meeting:write:registrant:master
Cloud Recordings #
View all user recordings #
- View recordings
recording:read:admin - View recording files
cloud_recording:read:list_recording_files:admin - View account recordings
cloud_recording:read:list_account_recordings:admin
View and manage all user recordings #
- Recover meeting recordings
cloud_recording:update:recover_meeting_recordings:admin - Recover single recording
cloud_recording:update:recover_single_recording:admin - Delete recording file
cloud_recording:delete:recording_file:admin - Delete meeting recording
cloud_recording:delete:meeting_recording:admin
View and manage sub-account recordings #
- View recording files
cloud_recording:read:list_recording_files:master - View user recordings
cloud_recording:read:list_user_recordings:master - Delete meeting recording
cloud_recording:delete:meeting_recording:master - Delete recording file
cloud_recording:delete:recording_file:master
Archived Recordings #
- View archived files
archiving:read:archived_files:admin
Reports #
View report data #
- View webinar reports
report:read:webinar:admin
View sub-account report data #
- View webinar reports
report:read:webinar:master
Users #
View all user information #
- View email addresses
user:read:email:admin - View assistants
user:read:list_assistants:admin - View permissions
user:read:list_permissions:admin - View users
user:read:list_users:admin - View user settings
user:read:settings:admin - View user token
user:read:token:admin - View user
user:read:user:admin
View user’s ZAK token #
- View ZAK token
user:read:zak:admin
View users and manage users #
- Delete user
user:delete:user:admin - Update user
user:update:user:admin - Create user
user:write:user:admin
View and manage sub-account users #
- Delete user
user:delete:user:master - View users
user:read:list_users:master - View user
user:read:user:master - Update user
user:update:user:master - Create user
user:write:user:master
Zoom Events #
Manage event speaker information #
- Delete speaker
zoom_events:delete:speaker:admin - Update speaker
zoom_events:update:speaker:admin - Create speaker
zoom_events:write:speaker:admin
View all events information #
- View event
zoom_events:read:event:admin - View events
zoom_events:read:list_events:admin - View access links
zoom_events:read:list_access_links:admin
Webinars #
View all user webinars #
- View alerts
webinar:read:alert:admin - View webinars
webinar:read:list_webinars:admin - View registrants
webinar:read:list_registrants:admin - View participants
webinar:read:participant:admin - View registrant
webinar:read:registrant:admin - View webinar
webinar:read:webinar:admin
View and manage all user webinars #
- Delete registrant
webinar:delete:registrant:admin - Delete webinar
webinar:delete:webinar:admin - Update registrant status
webinar:update:registrant_status:admin - Update webinar status
webinar:update:status:admin - Update webinar
webinar:update:webinar:admin - Create invite links
webinar:write:invite_links:admin - Add registrant
webinar:write:registrant:admin - Create webinar
webinar:write:webinar:admin
View and manage sub-account webinars #
Create webinarwebinar:write:webinar:master
Delete registrantwebinar:delete:registrant:master
View registrantswebinar:read:list_registrants:master
View webinarswebinar:read:list_webinars:master
View registrantwebinar:read:registrant:master
View webinarwebinar:read:webinar:master
Update registrant statuswebinar:update:registrant_status:master
Update webinarwebinar:update:webinar:master
Create invite linkswebinar:write:invite_links:master
Add registrantwebinar:write:registrant:master
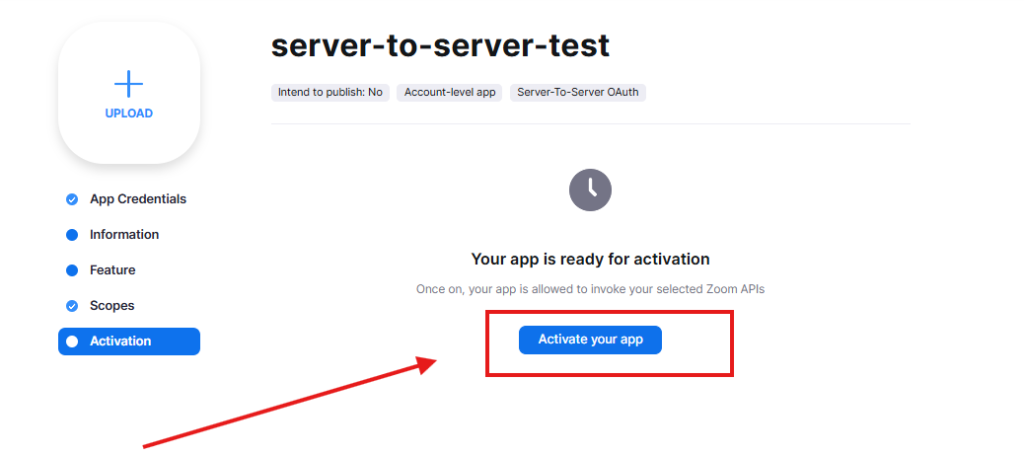
Step 8: Activate Your App #
Once all required information has been completed, open the Activation page and click
Activate your App
Connect ZooMeet to Zoom #
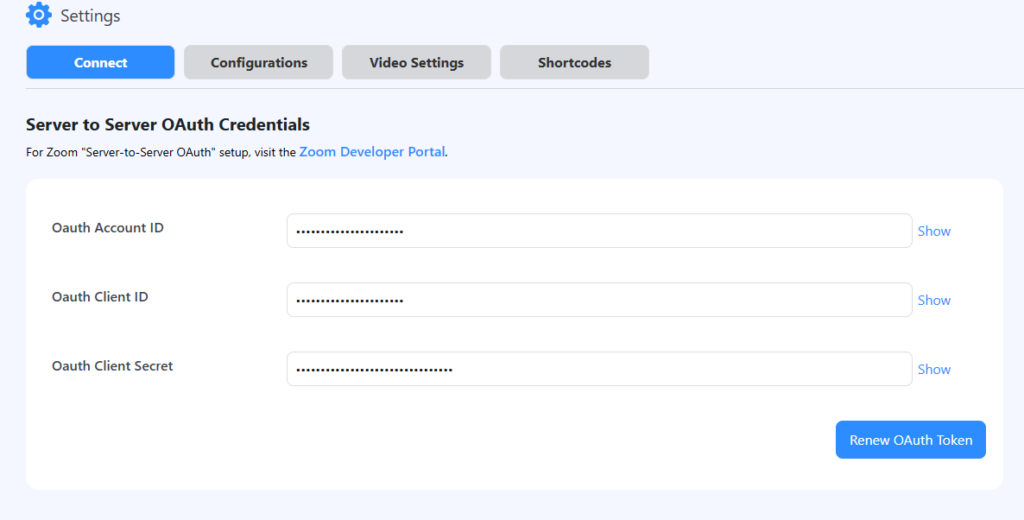
Return to your WordPress dashboard.
Navigate to
ZooMeet → Settings → Connect
Under Server-to-Server OAuth Credentials, enter:
- Account ID
- Client ID
- Client Secret
Click Save Settings.
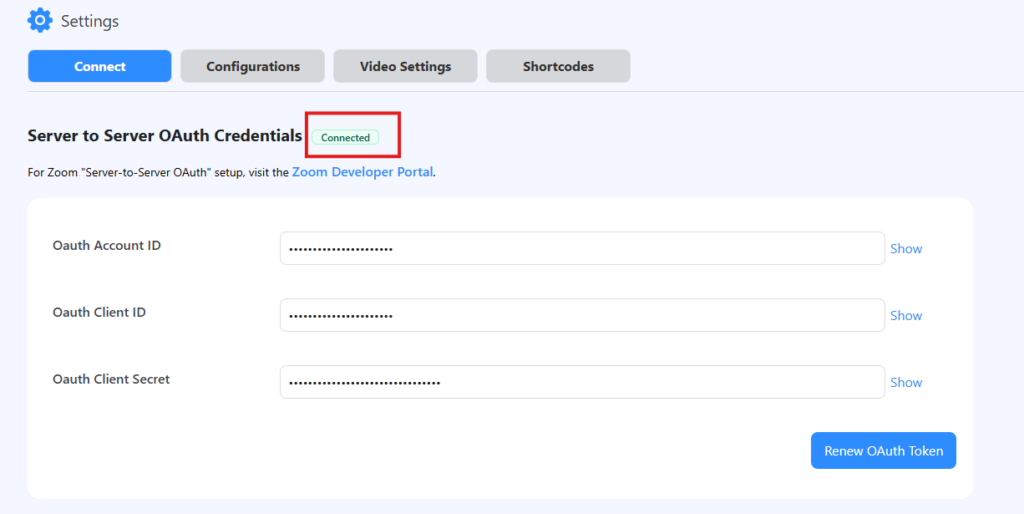
If everything is configured correctly, ZooMeet will display a green Connected badge.
Part 2: Enable Join in Browser (Meeting SDK) #
The Join in Browser feature allows attendees to join Zoom meetings directly from your website without installing the Zoom desktop application.
To enable this feature, you must create a General App (Meeting SDK) in the Zoom App Marketplace and connect it to ZooMeet.
Note: This step is optional. If you only need to create Zoom meetings from WordPress, you can skip this section. The Meeting SDK is only required for the Join in Browser feature.
Before You Begin #
Before creating the Meeting SDK app, ensure that:
- You have already connected your Server-to-Server OAuth app.
- Your website is using HTTPS (SSL).
- You have administrator access to your Zoom account.
Step 1: Open Zoom App Marketplace #
Visit the Zoom App Marketplace and sign in using your Zoom administrator account.
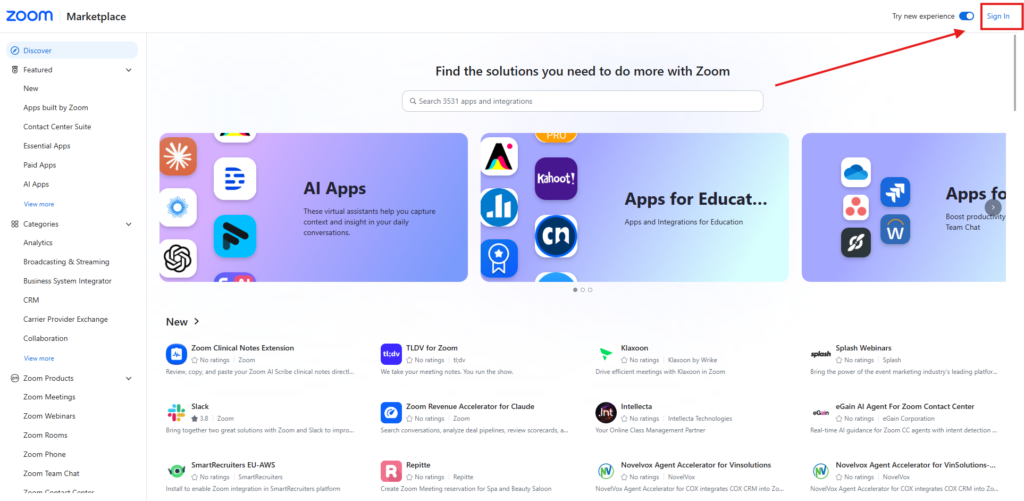
Step 2: Create a New App #
After signing in:
- Click Develop from the top navigation.
- Select Build App.
Step 3: Create a General App #
From the list of available app types:
- Locate General App.
- Click Create.
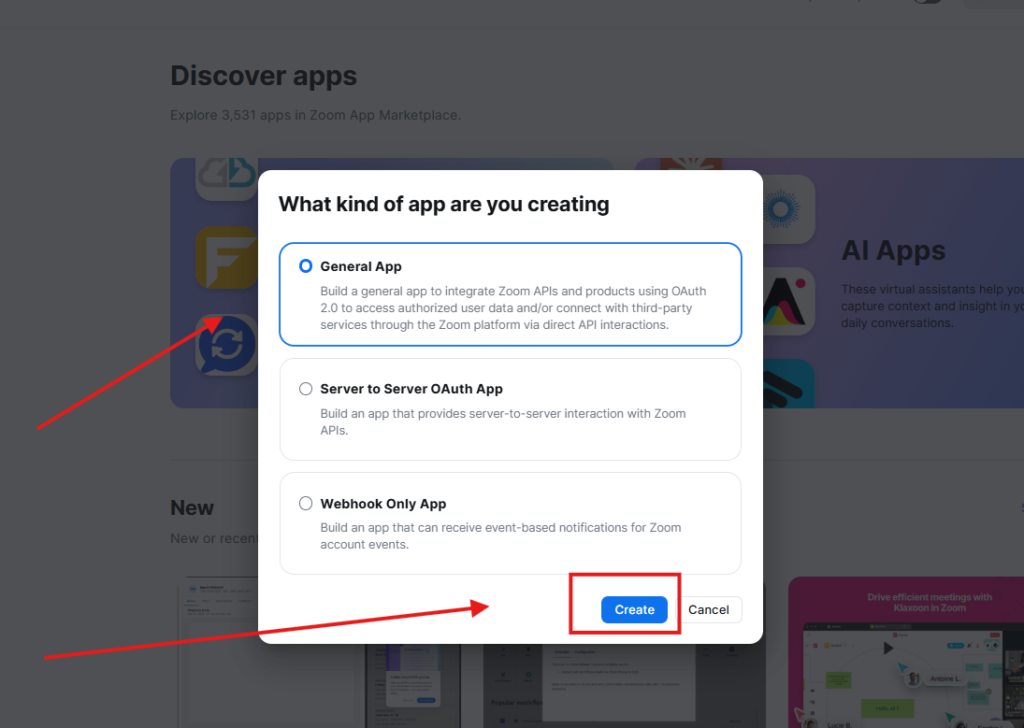
Highlight the General App card and the Create button.
Important
Do not select Server-to-Server OAuth. The General App is required for the Meeting SDK.
Step 4 : Name Your App #
On the opened page, name the App according to your needs:
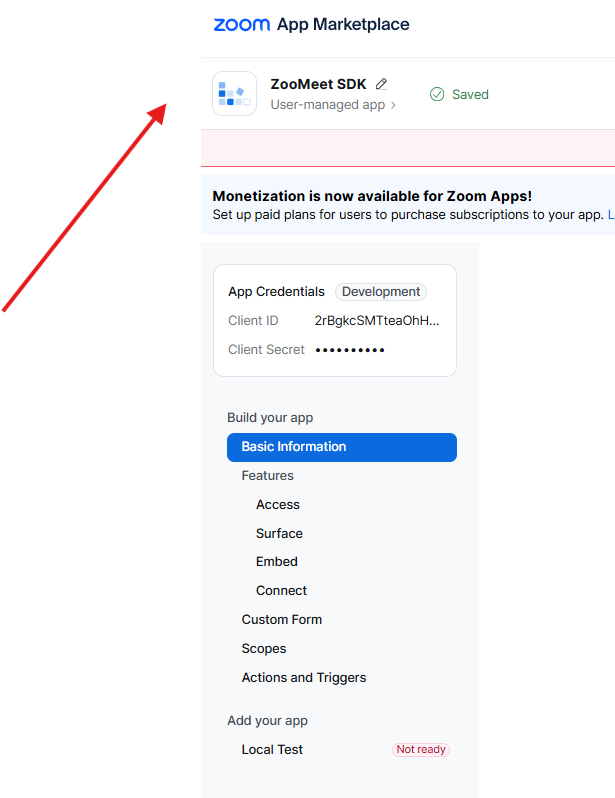
App name field with an example name entered.
Step 5 : Configure Basic Information #
On the Basic Information page:
Under Select how the app is managedanaged by, select:
Admin-managed
Click Save.
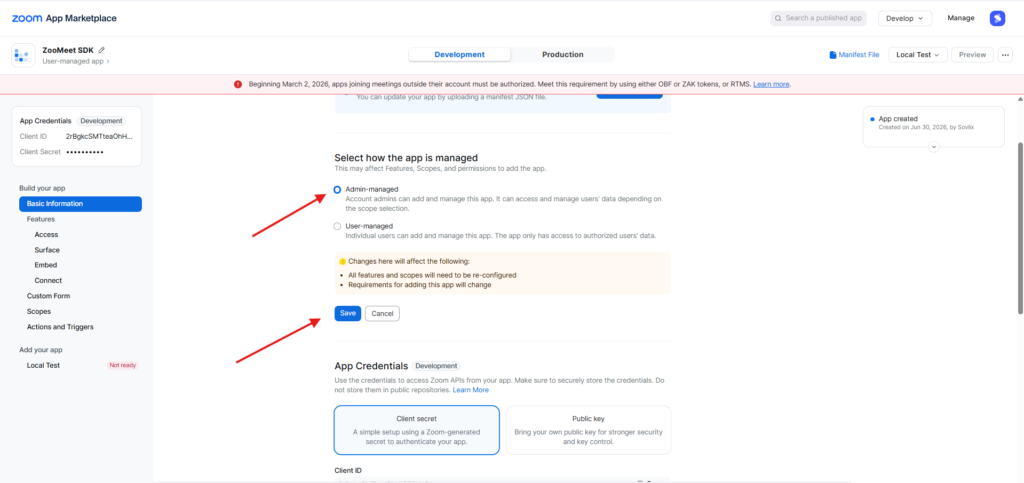
Show Admin-managed selected with the Save button highlighted.
Step 6: Copy the Redirect URL from ZooMeet #
Open your WordPress dashboard.
Navigate to:
ZooMeet → Settings → Connect
Scroll down to the Meeting SDK App Credentials section.
Locate:
Redirect URL for Zoom Meeting SDK
Click Copy URL.
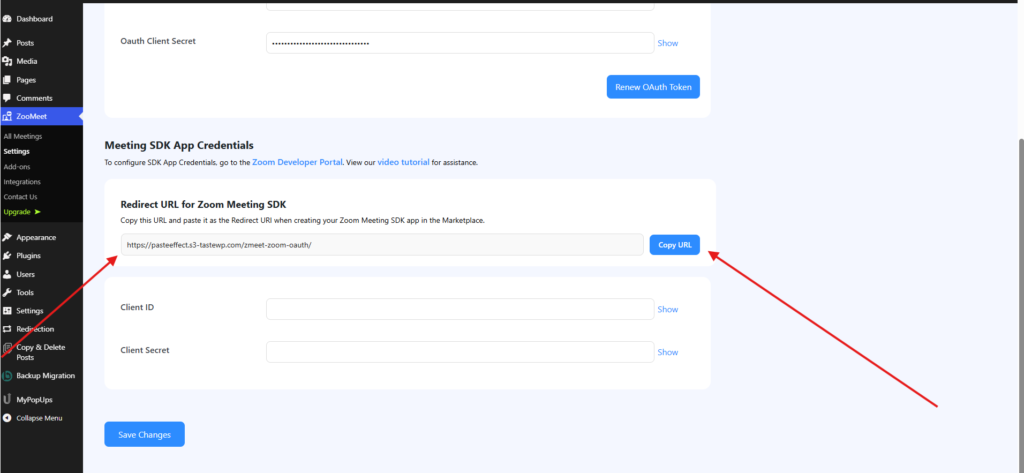
ZooMeet Connect page showing the Redirect URL and Copy URL button.
Step 7: Add OAuth Redirect URLs #
Return to your Zoom General App.
Under Basic Information, locate:
- OAuth Redirect URL
- OAuth Allow List
Paste the copied ZooMeet URL into both fields.
Click Save.
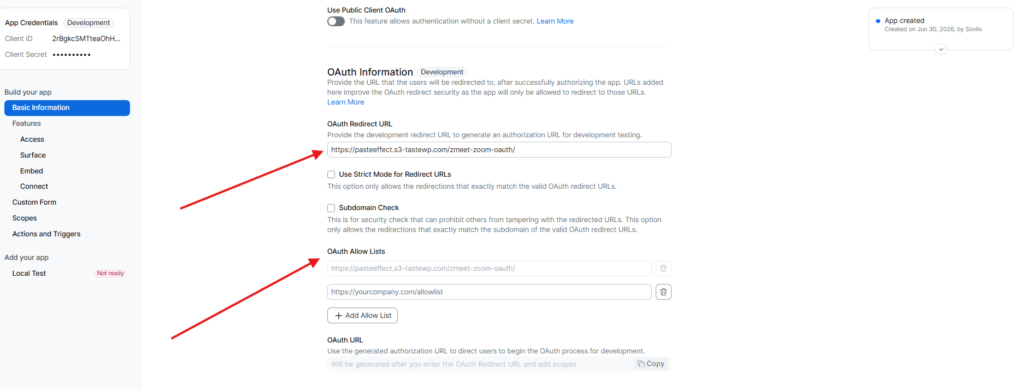
Show the Redirect URL pasted into both the OAuth Redirect URL and OAuth Allow List fields.
Important
The Redirect URL must exactly match the URL generated by ZooMeet. Even a small difference may cause authentication to fail.
Step 8: Enable the Meeting SDK #
From the left sidebar, open:
Embed
Enable the following option:
Enable Meeting SDK #
Click Save.
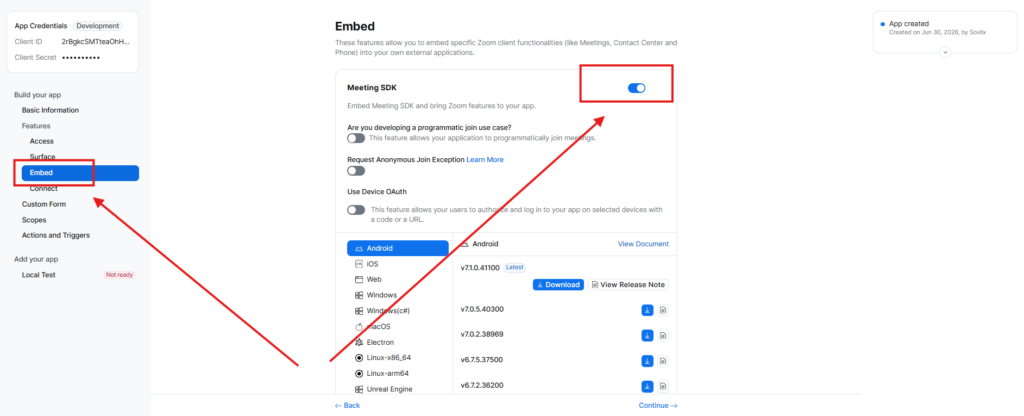
Show the Meeting SDK toggle enabled.
Step 9: Add the Required Permission #
Open the Scopes tab.
Click Add Scopes.
Search for:
user:read:zak:adminSelect the permission and click Done.
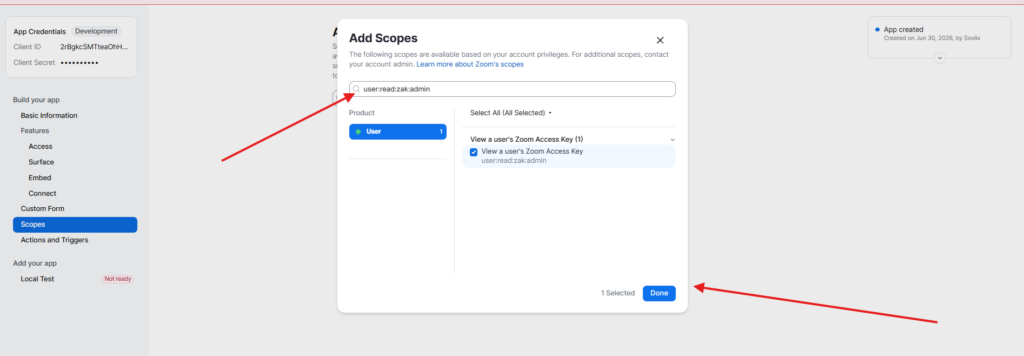
Show the Add Scopes dialog with user:read:zak:admin selected.
Note: This permission allows ZooMeet to retrieve the Zoom Access Key (ZAK) required for authenticated browser-based meetings.
Step 10: Activate Your App #
After completing all required settings:
- Open the Activation tab.
- Click Activate your App.
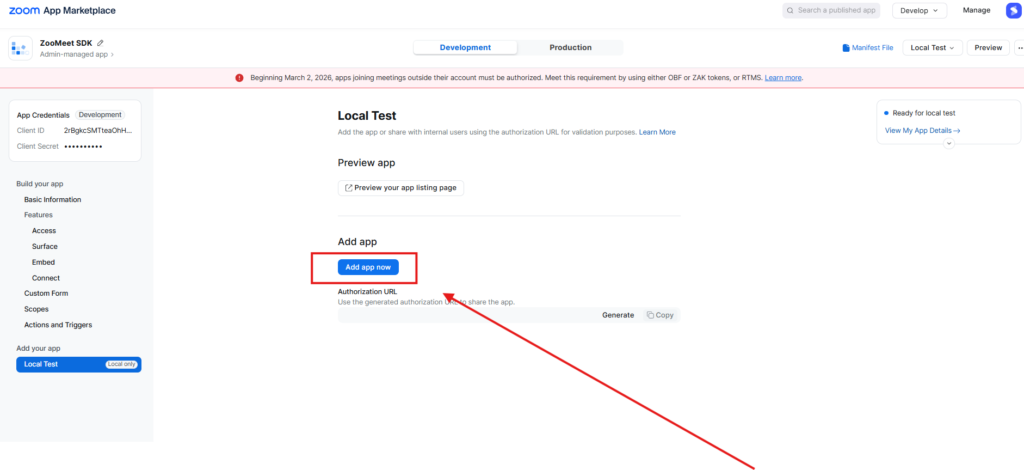
Activation page with the Activate your App button highlighted.
Step 11: Copy Your Meeting SDK Credentials #
Open the App Credentials section.
Copy the following values:
- Client ID
- Client Secret
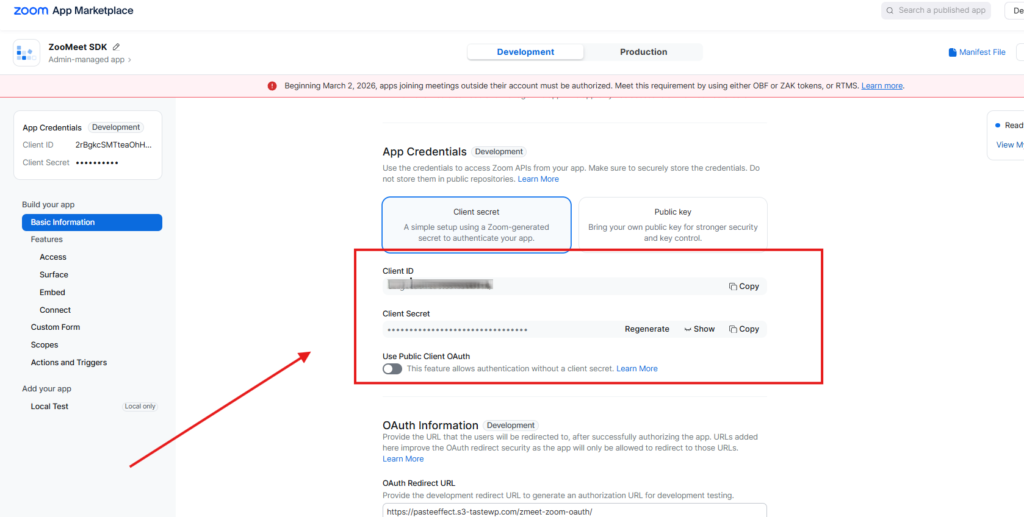
App Credentials page showing the Client ID and Client Secret.
Step 12: Connect the Meeting SDK to ZooMeet #
Return to your WordPress dashboard.
Navigate to:
ZooMeet → Settings → Connect
Under Meeting SDK App Credentials, enter:
- Client ID
- Client Secret
Click Save Settings.
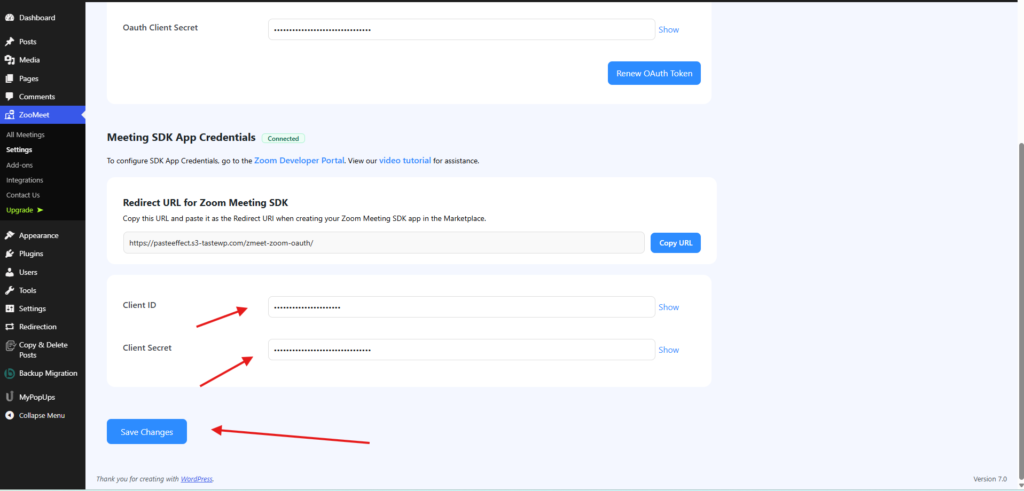
Meeting SDK credentials section in ZooMeet with both fields completed.
Step 13: Verify the Connection #
After saving your credentials, ZooMeet will automatically verify the connection.
If everything is configured correctly, a green Connected badge will appear next to the Meeting SDK App Credentials section.
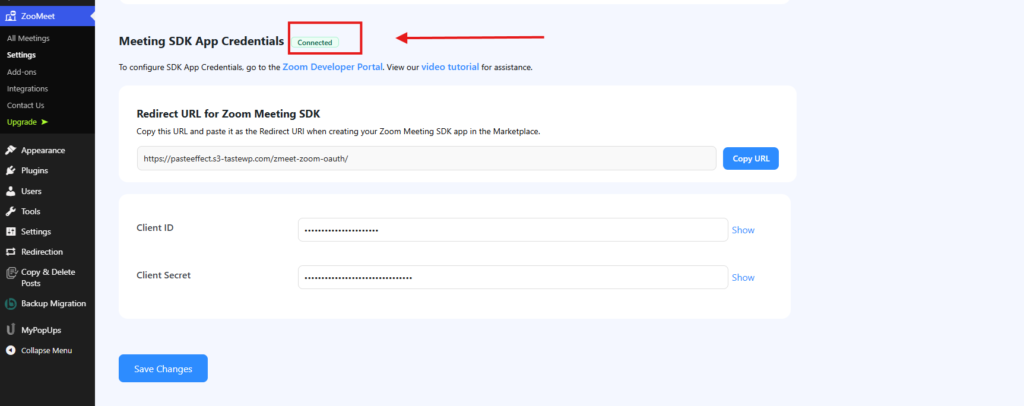
ZooMeet Connect page displaying the green Connected status.
Test the Join in Browser Feature #
To verify that the Meeting SDK is working correctly:
- Create a new Zoom meeting in ZooMeet.
- Open the meeting page on your website.
- Click Join Meeting.
- Select Join in Browser.
If the meeting opens directly inside your browser without launching the Zoom desktop application, the Meeting SDK has been configured successfully.
Frontend meeting page showing the Join in Browser button.
Troubleshooting #
“Join in Browser” button is not visible #
Check that:
- The Meeting SDK app has been connected successfully.
- The Meeting SDK feature is enabled in your Zoom General App.
- Your website is using HTTPS.
Authentication failed #
Verify that:
- The OAuth Redirect URL matches the URL generated by ZooMeet.
- The same URL has been added to the OAuth Allow List.
- The app has been activated.
Connection failed #
Double-check that you entered the correct Client ID and Client Secret from the General App (Meeting SDK), not from your Server-to-Server OAuth app.


