- Step 1: Install DriveHub and Connect Google Drive
- Step 2: Add a New Module
- Step 3: Choose the Embed Documents Module
- Step 4: Select Your Documents (Source Tab)
- Step 5: Choose File Rules (Filter Tab)
- Step 6: Set Up the Viewer (Advanced Tab)
- Step 7: Choose Who Can Do What (Permissions Tab)
- Step 8: Save Your Module
- Step 9: Add the Viewer to a Page
- Step 10: See the Documents on Your Website
- Benefits of Embedding Google Drive Documents
If you’re looking for a simple way to show PDFs, Docs, Sheets or Slides from Google Drive right inside a page, you’re in the right place. You can easily do this with DriveHub.
The Embed Documents module puts a document viewer on your page, so visitors can read a brochure or a guide without downloading anything. When you pick more than one file, DriveHub shows them as cards above the viewer, and visitors switch between them with one click.
Here is an easy, step-by-step guide to help you set it all up!
Step 1: Install DriveHub and Connect Google Drive #
First, make sure DriveHub is installed and your Google account is connected:
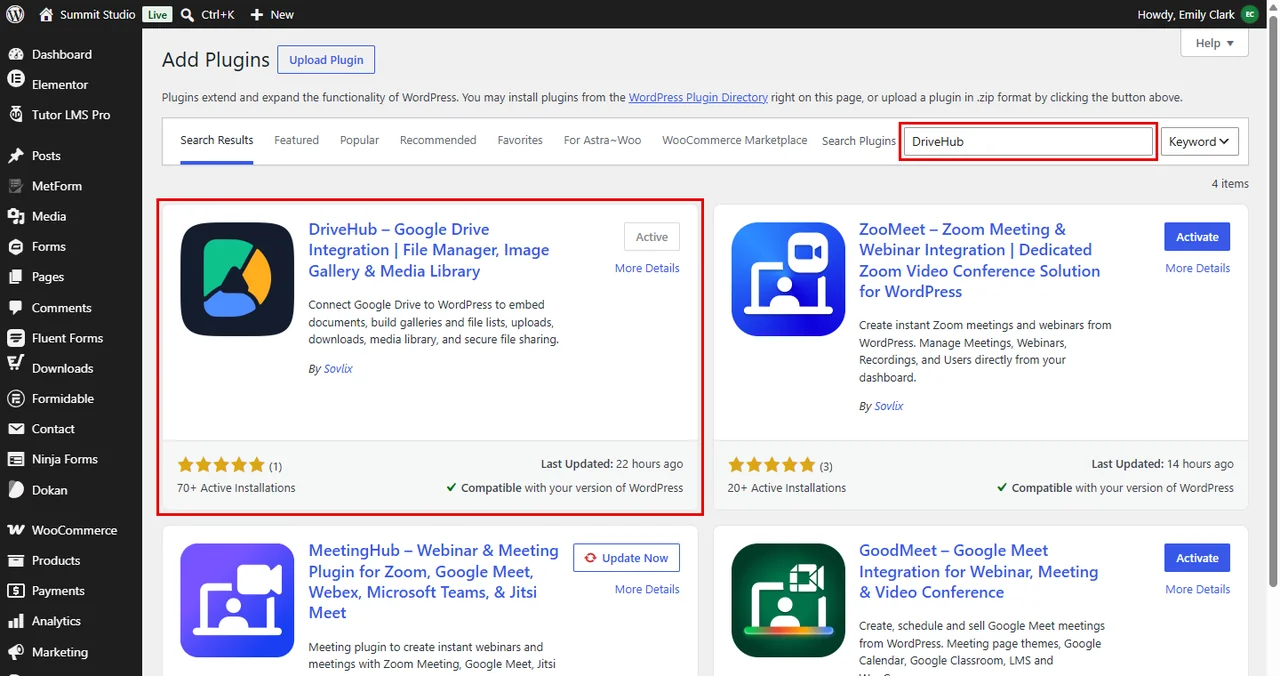
- From your WordPress admin, click on Plugins > Add New.
- Search for DriveHub.
- Click Install and then Activate.
- Follow the setup screen to add your Google account.
Read our step by step setup guide to avoid any confusion.
Step 2: Add a New Module #
Each embedded viewer on your website is a module. Let’s create one:
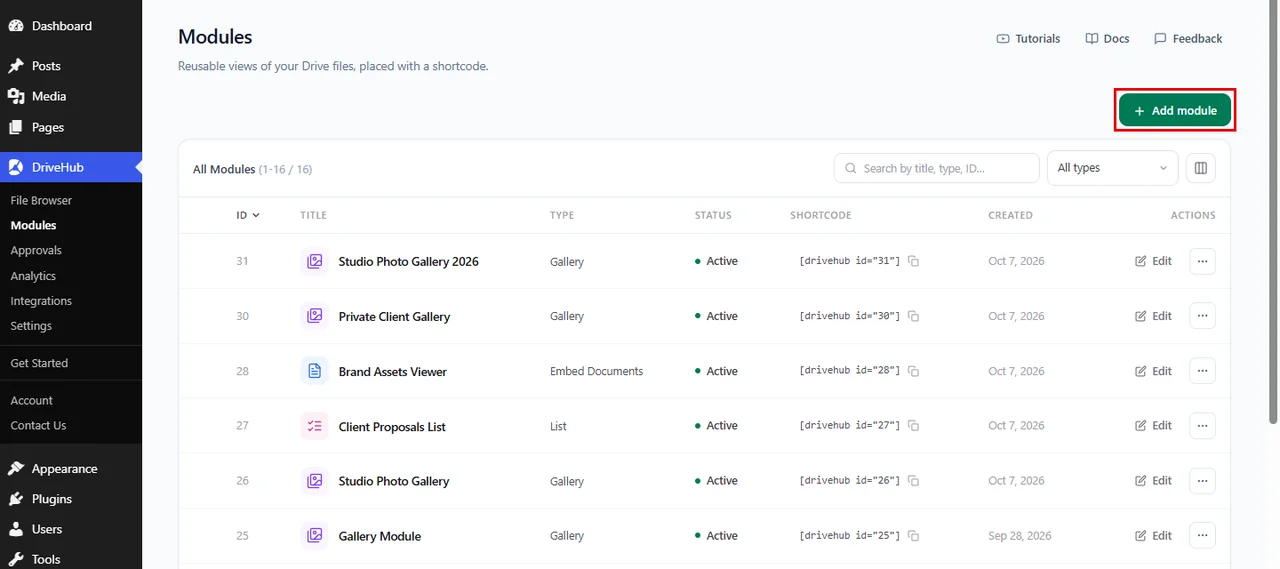
- Go to DriveHub > Modules from your WP-Admin.
- Click on Add module at the top right.
Step 3: Choose the Embed Documents Module #
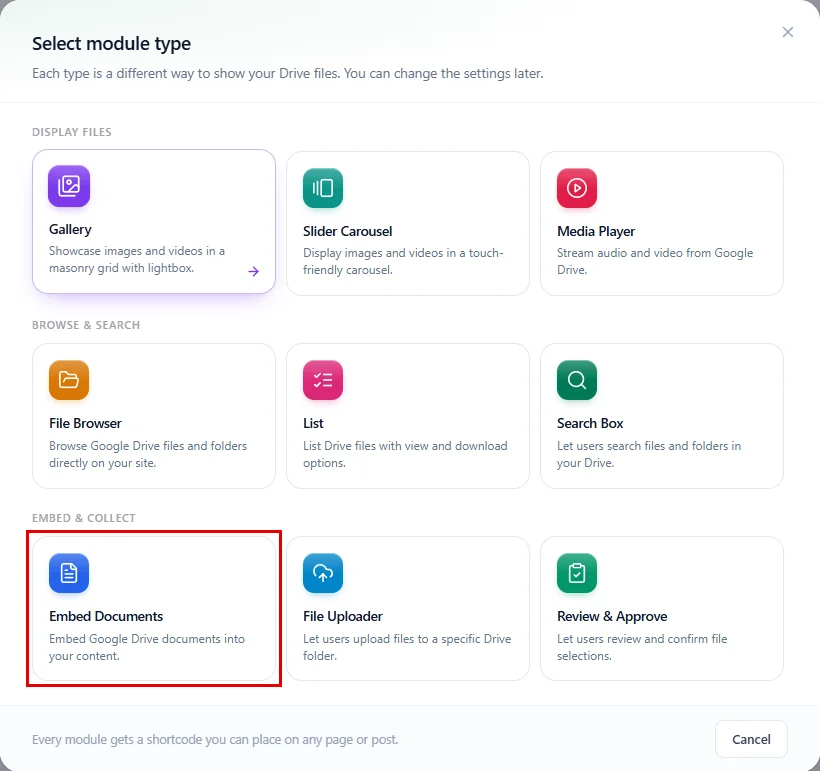
A window opens with all the module types:
- Under Embed & Collect, click on Embed Documents.
The module editor opens on the Source step. Give your module a name you will recognise later:
- Click on the name at the top and type a new one (for example, Brand Assets Viewer).

Step 4: Select Your Documents (Source Tab) #
In this step, you pick the documents visitors will read:
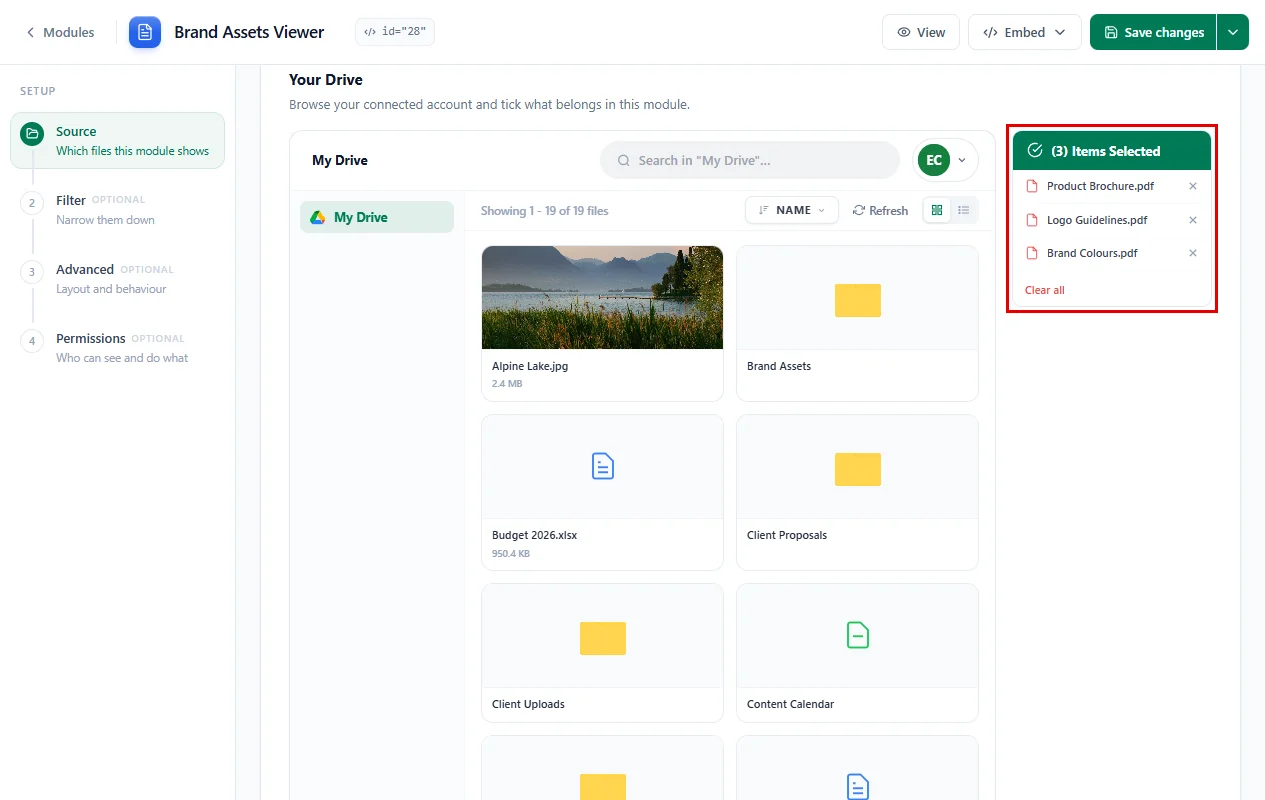
- Scroll down to Your Drive.
- Open a folder and tick each file you want to show. We picked Product Brochure.pdf, then Logo Guidelines.pdf and Brand Colours.pdf from the Brand Assets folder.
- Check the Items Selected panel on the right. The files show up here in the order visitors will see them, and you can remove one with the x next to it.
Above Your Drive you will also find Use Private Files and Use ACF field Files. They take the files from each user’s private folder or from an ACF field instead of your selection. Leave them off for a normal embed.
Step 5: Choose File Rules (Filter Tab) #
This tab is optional, but handy when you picked a folder. Every rule here changes which documents visitors get:
- Click on Filter in the left menu.
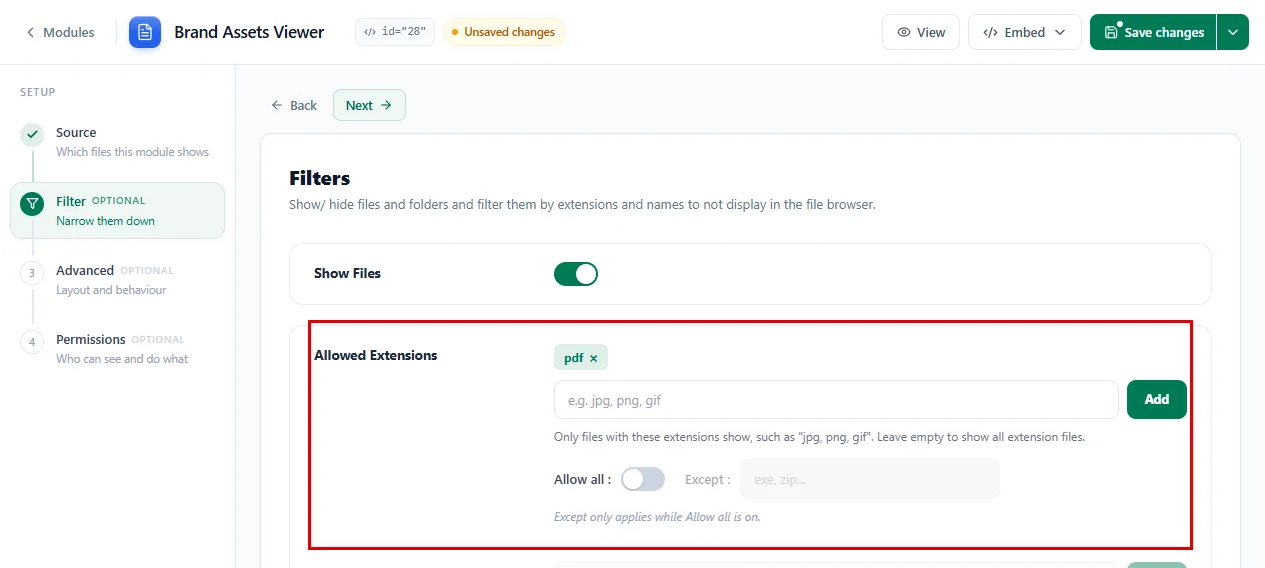
- Allowed Extensions: to show only some file types, turn off Allow all, type a type (like pdf) and click Add. To hide just a few types instead, keep Allow all on and type them in Except.
- Allowed Names: works the same way for file names, and you can use wildcards such as
brand*. - Maximum Item Count: the most documents the viewer shows. Leave it empty to show them all.
Step 6: Set Up the Viewer (Advanced Tab) #
Now let’s decide how the viewer looks:
- Click on Advanced in the left menu.
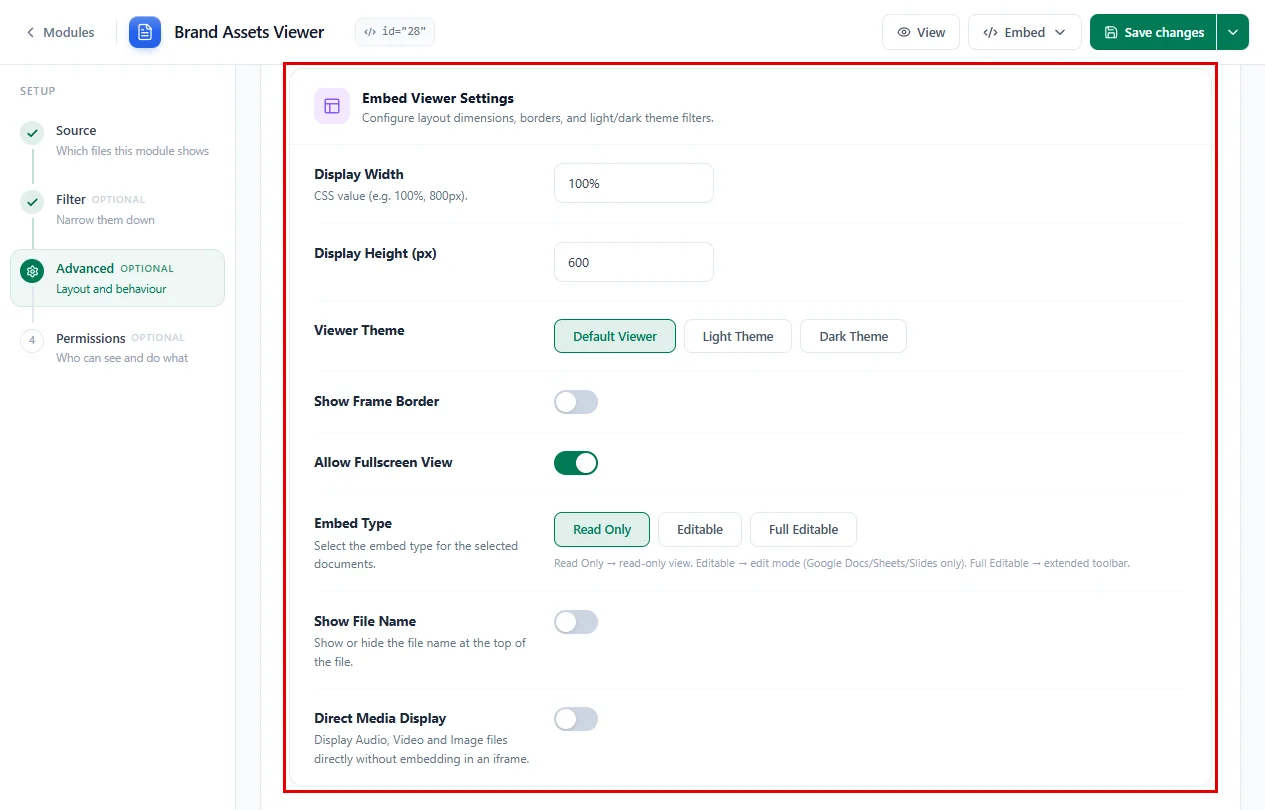
- Scroll to Embed Viewer Settings and set:
- Display Width: how wide the viewer is, as a CSS value like
100%or800px. - Display Height (px): how tall the viewer is (600 by default).
- Viewer Theme: Default Viewer uses soft grey panels, Light Theme keeps everything plain white, and Dark Theme turns the cards, toolbar and viewer frame dark.
- Show Frame Border: sets the document inside a rounded, bordered frame with a little space around it.
- Allow Fullscreen View: shows the full screen button at the top right. Turn it off to hide that button.
- Embed Type: Read Only shows the document without editing. Editable and Full Editable open Google Docs, Sheets and Slides in edit mode (with a shorter or the full toolbar). PDFs always stay read only.
- Show File Name: shows the name and size of the open document in a bar above the viewer.
- Direct Media Display: plays video and audio files in your page’s own player instead of the Google viewer. Turn it on if a video or audio file does not play.
Note: Editable embeds only work for visitors who have edit access to the file in Google Drive. For a public page, keep Read Only.
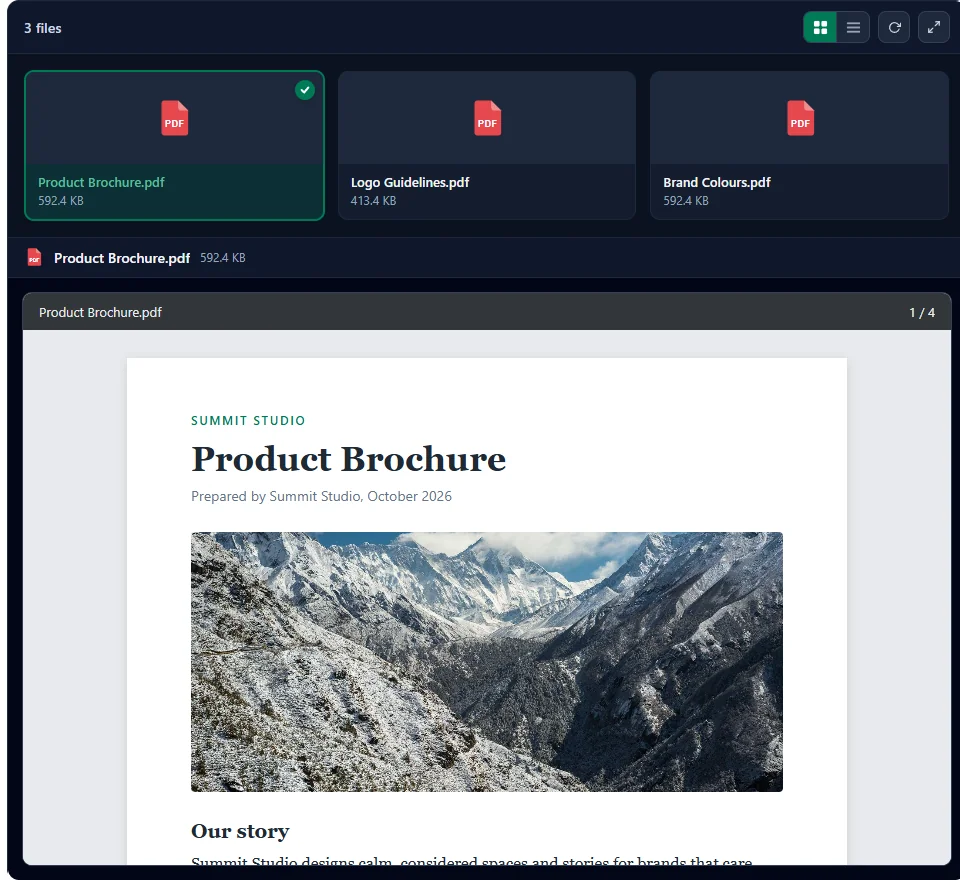
Here is the same viewer with Dark Theme, Show Frame Border and Show File Name turned on:
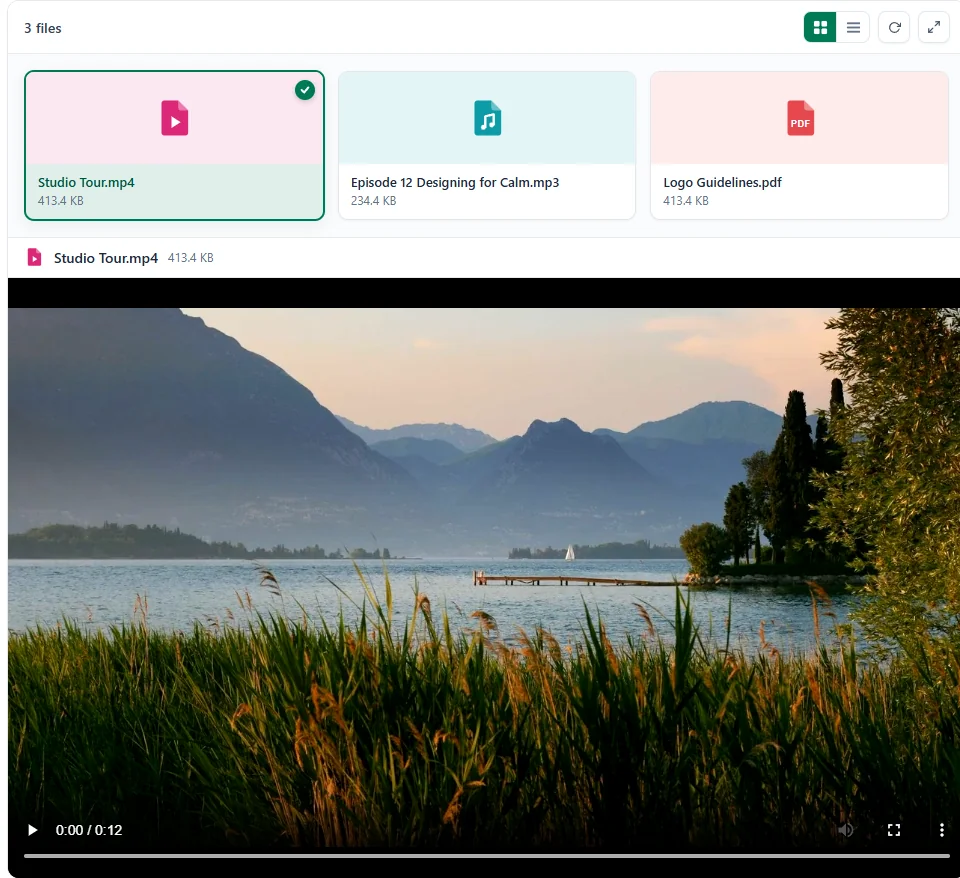
And with Direct Media Display on, a video plays right in the page:
Step 7: Choose Who Can Do What (Permissions Tab) #
Here, you decide who can see the viewer and save the files:
- Click on Permissions in the left menu.
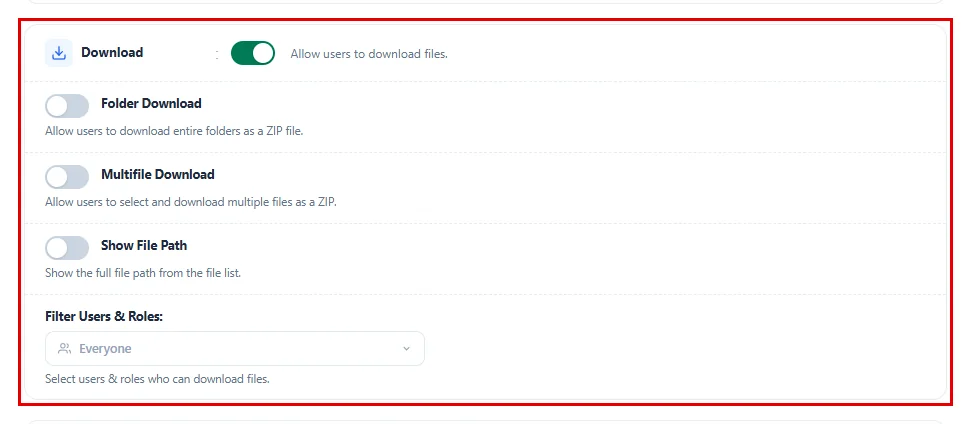
- Keep Download on if visitors may save the files. The download button then shows in the full screen view. Use Filter Users & Roles to allow it for some users only.
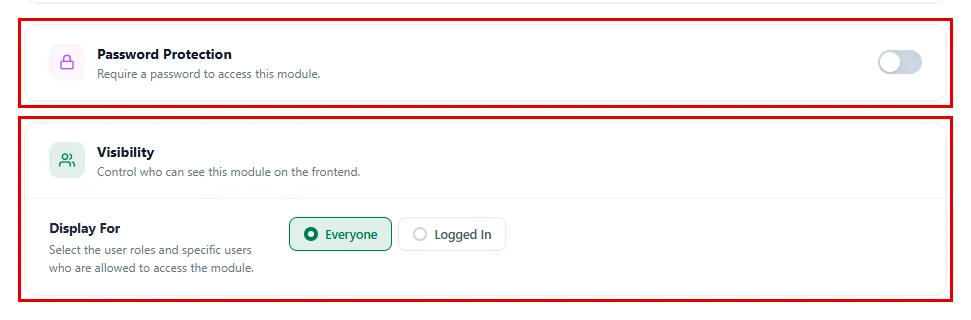
Scroll down for the last two cards:
- Password Protection: asks visitors for a password before they see the documents.
- Visibility: under Display For, choose Everyone or Logged In.
Step 8: Save Your Module #
Don’t forget to save your work:
- Click on Save changes at the top right.

Step 9: Add the Viewer to a Page #
You can copy the shortcode, or let DriveHub add it to a page for you:
- Click on Embed at the top of the editor.
- To place it yourself, click Copy shortcode and paste it into any page or post. It looks like
[drivehub id="28"]; your number may be different. - Or click on Add to a page, then on Create a new page. (Pick Choose an existing page instead to add the viewer to a page you already have.)
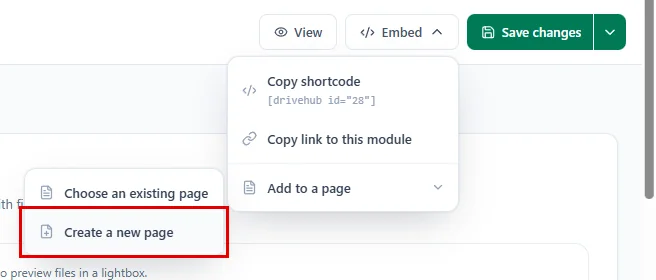
The Create New Page window opens:
- Type a Page Title (for example, Brand Assets).
- Click on Create Page.
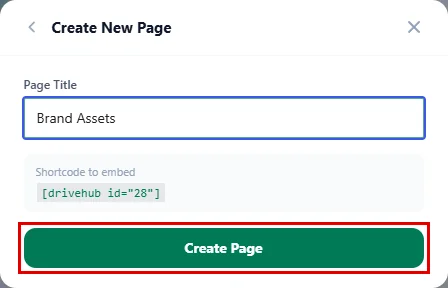
DriveHub creates a draft page with the shortcode already in it and shows Shortcode added to the page. Open it with Edit Page, then click Publish when you are ready. You can also add the module with the block editor or the classic editor.
Step 10: See the Documents on Your Website #
And that’s it. Visit your page and you will see a card for each document, with the first one open in the viewer below:
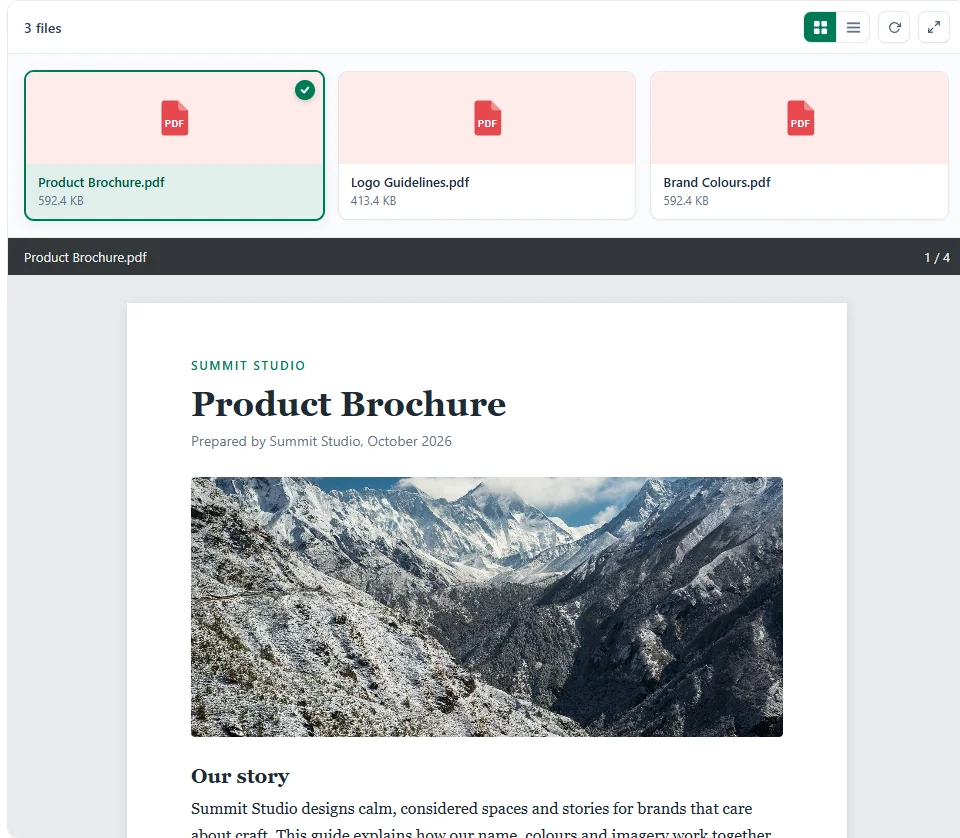
Visitors can:
- Click a card to open that document in the viewer.
- Switch between the card view and a list view with the buttons at the top right.
- Click the reload button if a document does not load the first time.
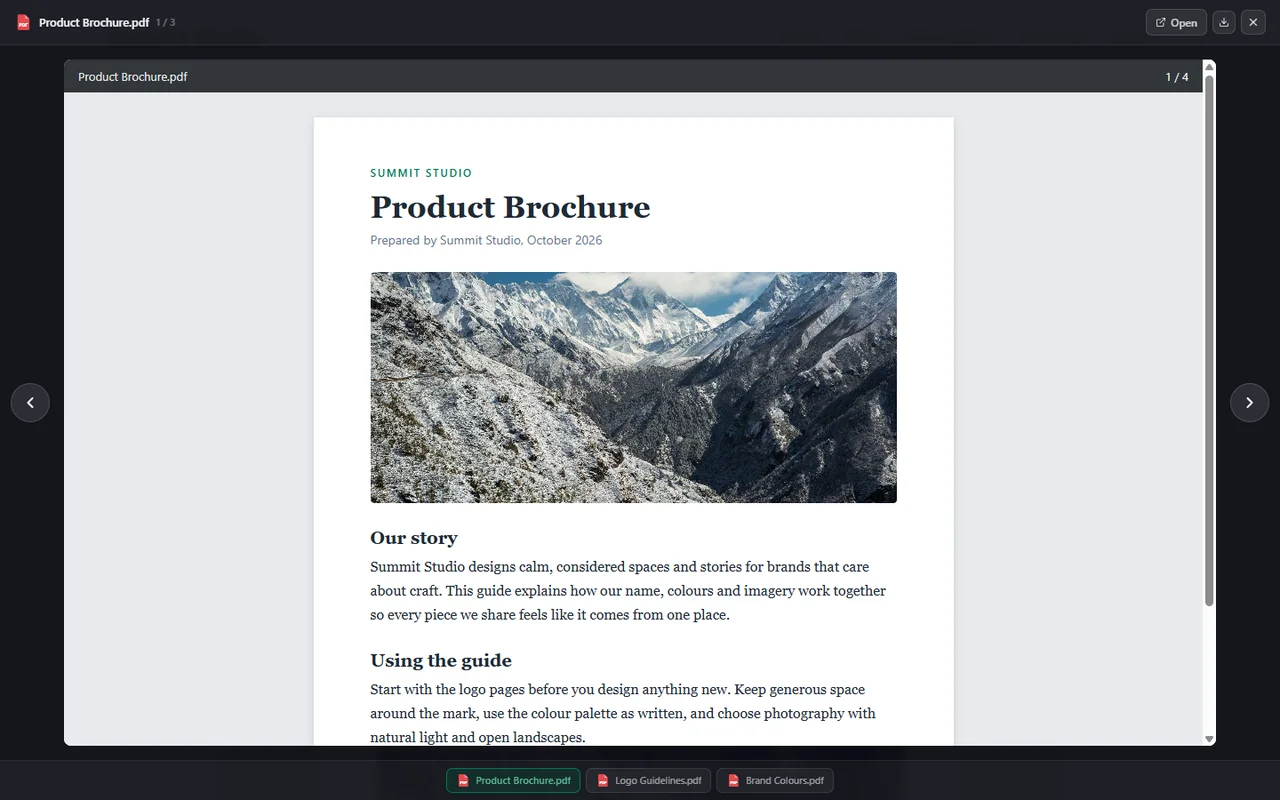
- Click the full screen button (when Allow Fullscreen View is on) to read the document in a large window, move between files with the arrows, open it in Google Drive with Open, or download it.
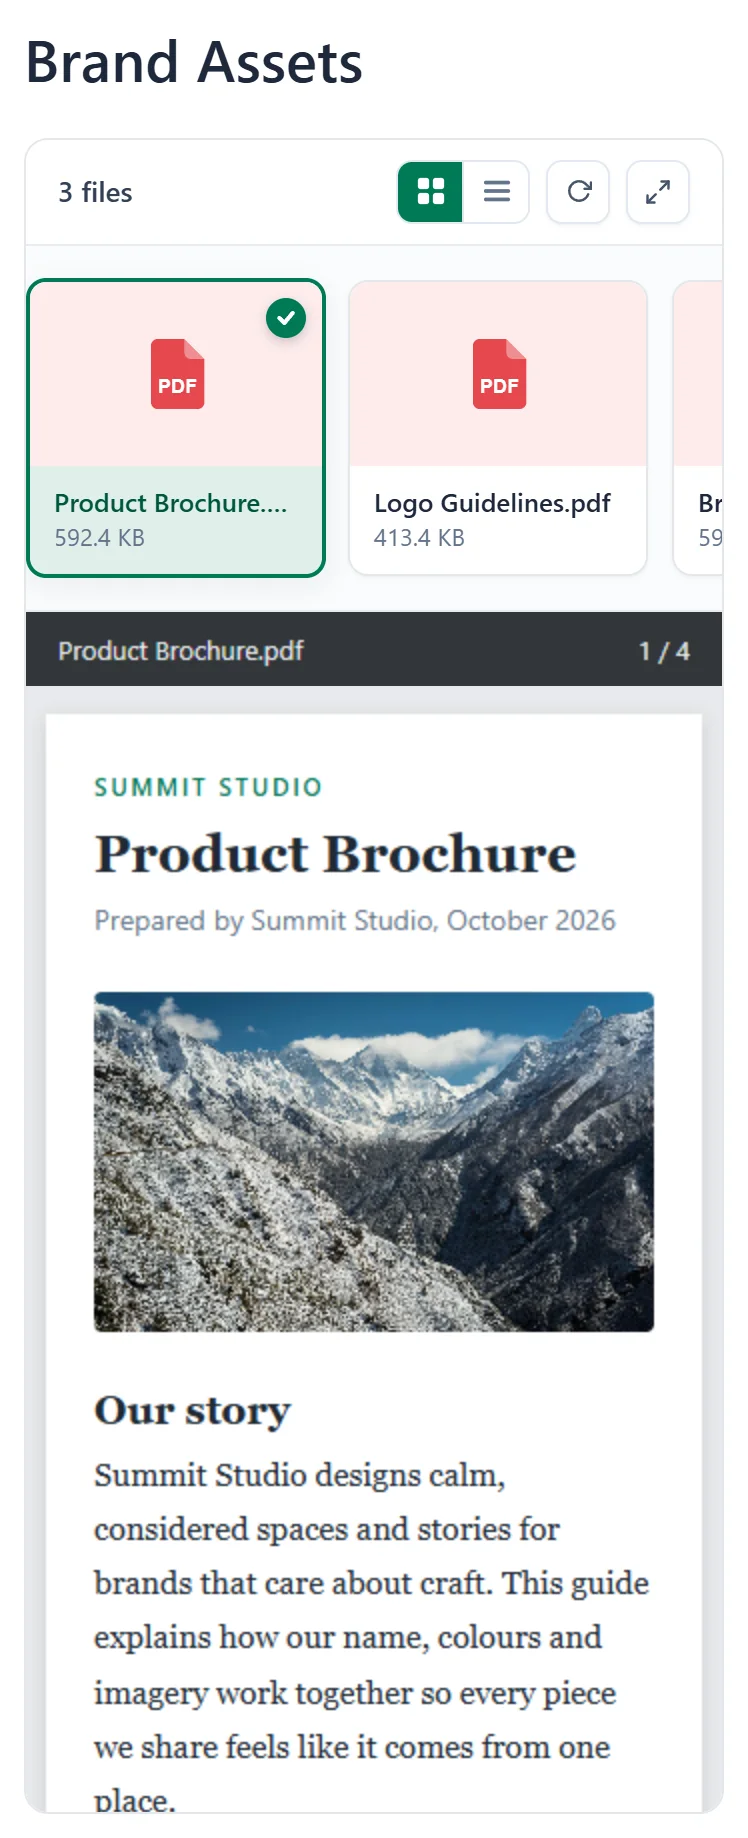
On a phone, the cards scroll sideways and the viewer fills the screen width:
Benefits of Embedding Google Drive Documents #
- No downloads needed: Visitors read the document right on your page.
- One place for many files: Several documents share one tidy viewer.
- Always the latest version: Update the file in Google Drive and your page follows.
- Save WordPress storage: Big PDFs stay in Google Drive, not in your Media Library.
- You stay in control: Turn downloads on or off and choose who can see the viewer.
With DriveHub, putting your brochures and guides on your website takes just a few clicks.
Related guides:


