- Before you begin
- Step 1: Open All Events
- Step 2: Name the meeting (Name and type)
- Step 3: Choose the date and time (Date and time)
- Step 4: Decide who can join (Access and controls)
- Step 5: Design the meeting page (Page design)
- Step 6: Create the meeting
- Step 7: See the meeting page
- Manage your meetings
- Benefits of creating meetings with ZooMeet
- Troubleshooting
- Frequently asked questions
- You're ready to run your first Zoom meeting
With Zoom connected, your first meeting takes a few minutes. You fill in a short form in WordPress, and ZooMeet creates the meeting in Zoom and builds a meeting page on your site at the same time.
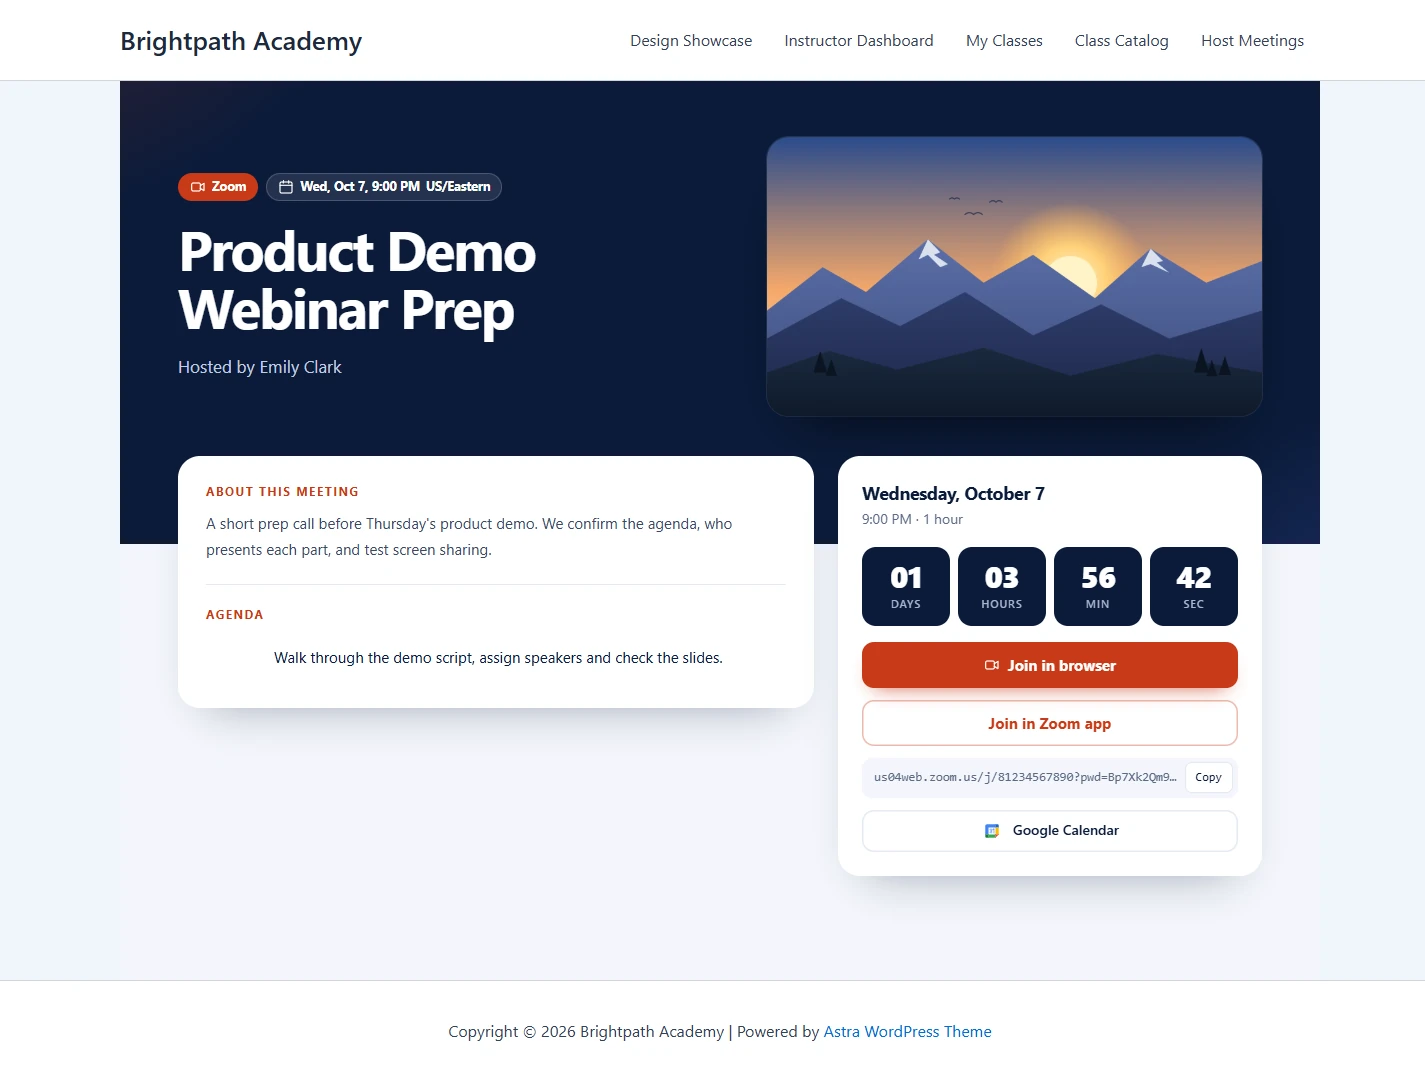
The meeting page carries the date, a countdown, the join buttons and your description. You share one address, and people join from there, in the Zoom app or right in the browser.
By the end of this guide, you will have:
- A Zoom meeting created from WordPress
- A meeting page on your site with a countdown and join buttons
- A cover image and description that make the page look finished
- A clear idea of how to find, view, edit and delete meetings in All Events
Estimated setup time: 5 minutes. Only the name and the start time matter; every other field arrives with a working default from ZooMeet settings.
Before you begin #
Make sure you have:
- ZooMeet installed and activated
- Zoom connected. See How to connect Zoom with ZooMeet using Server-to-Server OAuth.
- An administrator account on your WordPress site
- ZooMeet Pro, if you want registration or recurring meetings
Let’s get started.
Step 1: Open All Events #
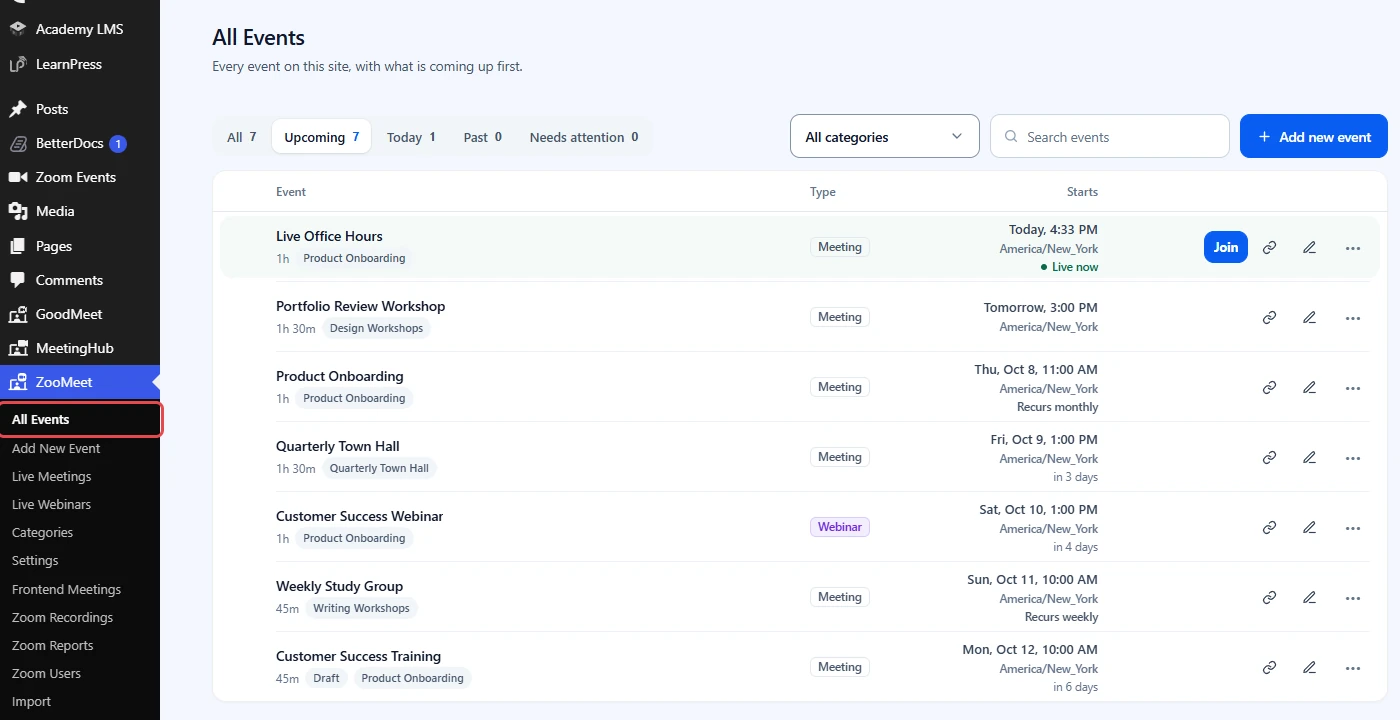
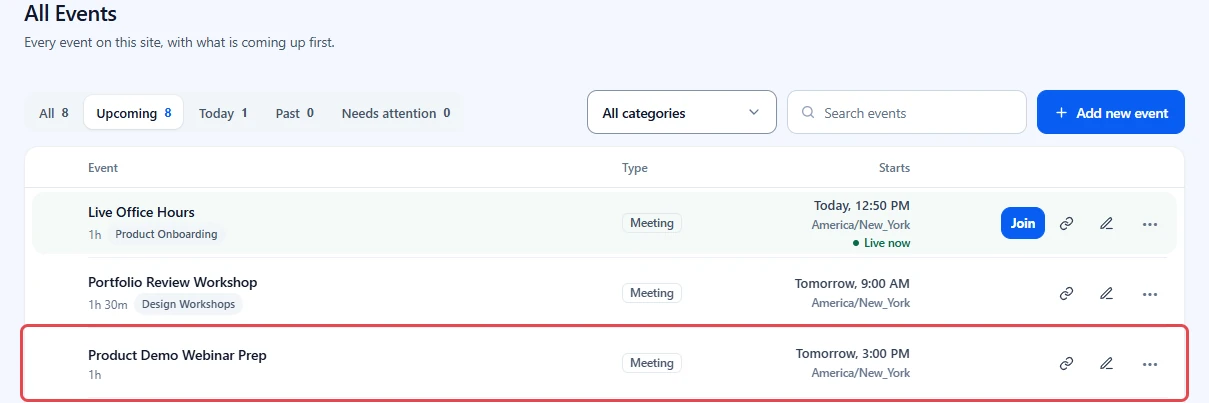
All Events is home base for every meeting and webinar on the site. It opens on the Upcoming tab, so the next meeting is always at the top.
- In the WordPress admin menu, go to ZooMeet > All Events.
- Look over the list. Each row shows the event name, its length, its categories, its Type (Meeting or Webinar) and when it Starts. A recurring meeting says how often it recurs under its start time, for example Recurs weekly.
Step 2: Name the meeting (Name and type) #
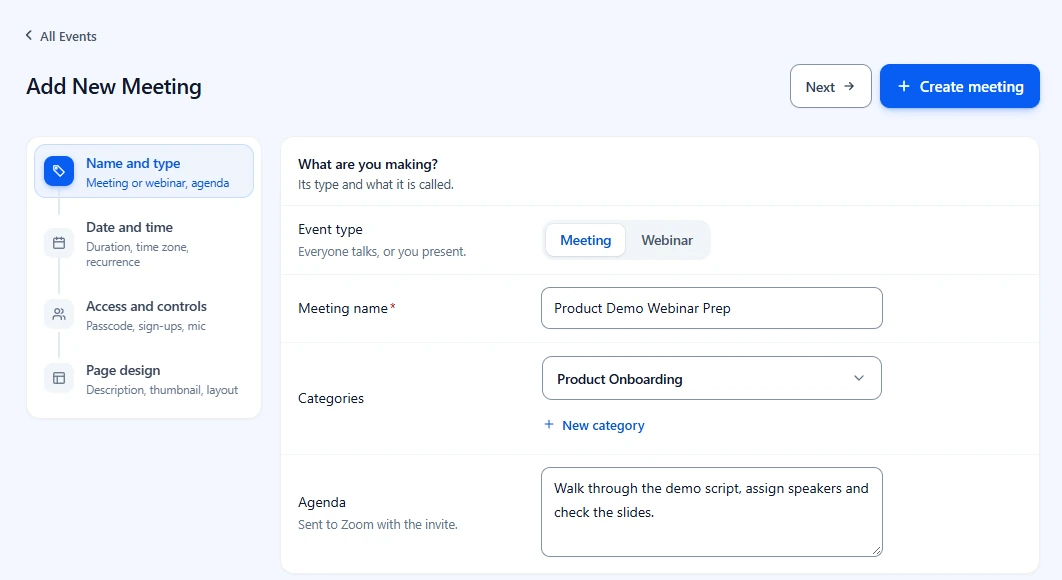
The form has four steps, listed on the left. You can jump between them at any time, and your answers stay as you go. Access and controls and Page design are marked Optional.
- At the top right of All Events, click Add new event. You can also go straight to ZooMeet > Add New Event in the admin menu.

The first step asks What are you making?
- Under Event type, keep Meeting, or pick Webinar if you present to an audience. Webinars need a Zoom Webinars licence.
- In Meeting name, replace Untitled meeting with a clear title, for example
Product Demo Webinar Prep. - Open the Categories dropdown and tick one or more categories if you group your meetings, for example Product Onboarding. It is optional. To add one on the spot, click + New category. If the site has no categories yet, the dropdown reads No categories yet. See How to organize Zoom meetings with categories in ZooMeet.
- Add an Agenda. Zoom sends it with the invite.
- Click Next, or click Date and time on the left.
Note: The event type cannot be changed after the meeting is created.
Step 3: Choose the date and time (Date and time) #
The start time decides when the countdown ends. This step asks When is it?
- Under Starts, click Today, Tomorrow or Next week, then pick the time in the clock field. You can also pick any date in the calendar field.
- Check Time zone. It starts with the time zone from ZooMeet settings.
- Under Duration, click 30 min, 45 min or 1 hour. The shortcut fills the hour and minute dropdowns for you. For another length, pick the values in the dropdowns.
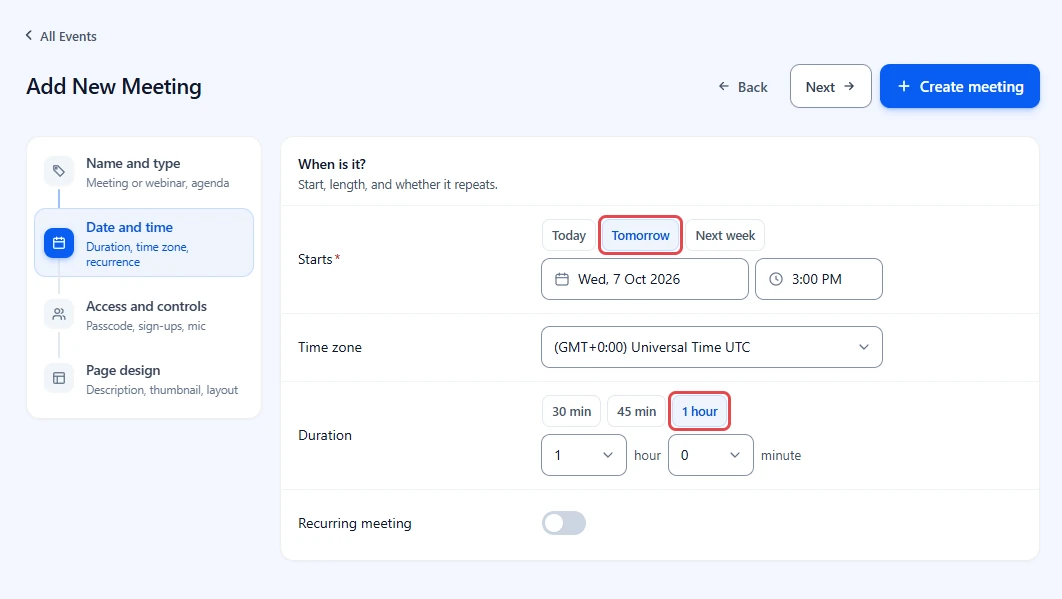
Note: Minutes can be 0, 15, 30, 40 or 45.
To repeat the meeting, turn on Recurring meeting. Starts stays on screen, and the recurrence options open below. See How to set up recurring Zoom meetings with ZooMeet. Requires ZooMeet Pro.
Step 4: Decide who can join (Access and controls) #
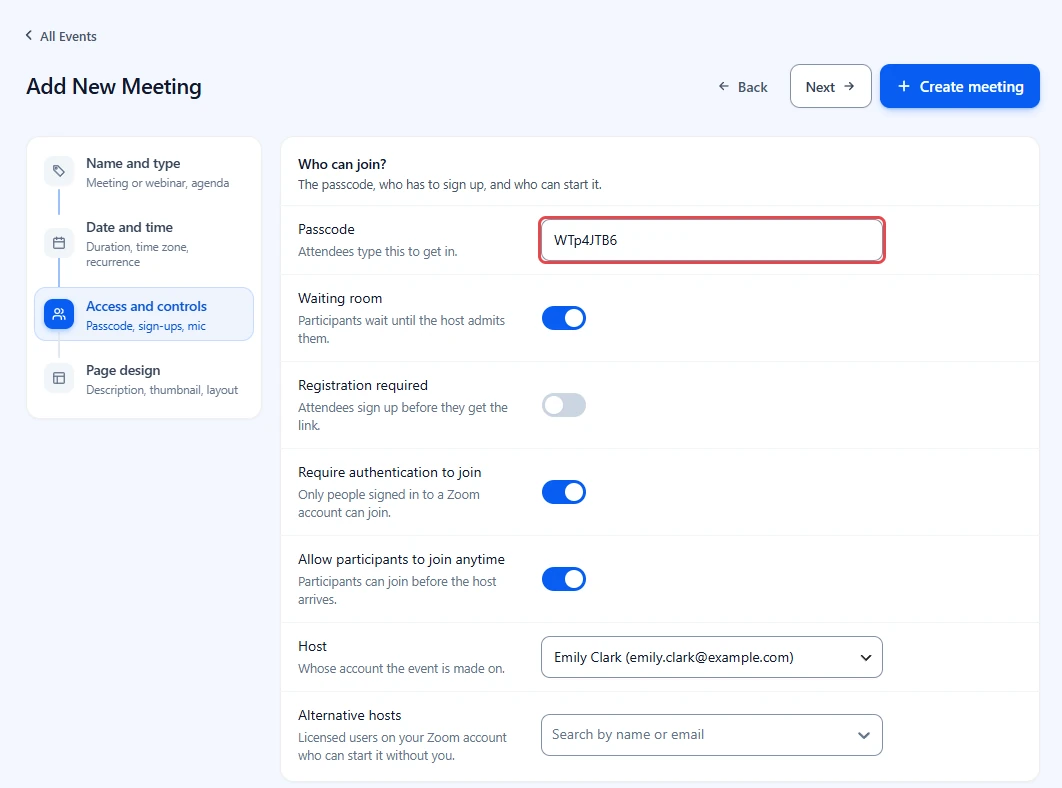
This step asks Who can join? Every field has a working default from Settings > Events, so you can skip it for a first meeting.
- Click Access and controls on the left.
- Check the Passcode. ZooMeet fills in a random one, up to 10 characters. Attendees type it to get in, and the join link on the meeting page already includes it.
- Leave Waiting room on if you want to let people in yourself.
- Turn on Registration required if attendees should sign up before they get the link.
- Turn on Require authentication to join only if every attendee has a Zoom account. Only people signed in to Zoom can join.
- Turn on Allow participants to join anytime if attendees may join before you arrive.
- Check Host, the Zoom user the meeting is created on. Add Alternative hosts if other licensed users on your Zoom account may start it without you.
Note: Registration required requires ZooMeet Pro.
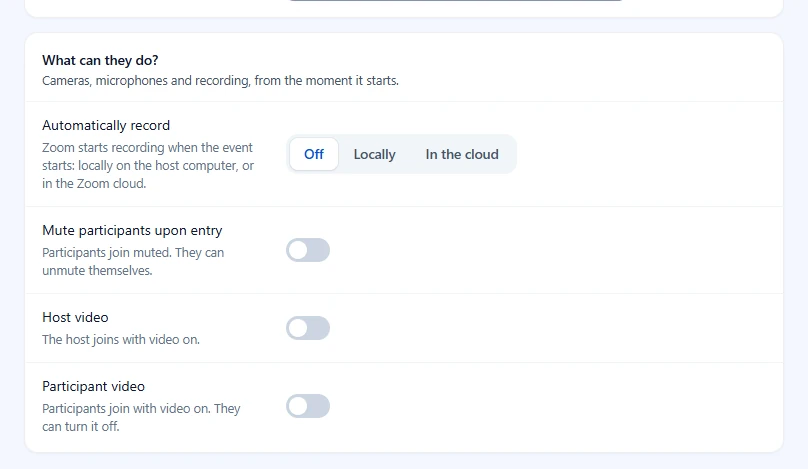
Further down, the same step has a second card, What can they do?
- Pick Automatically record: Off, Locally (on the host’s computer) or In the cloud.
- Turn on Mute participants upon entry, Host video or Participant video as you like.
Note: If a course integration is on, this step also shows Add to a course, so the meeting appears on a course page or lesson.
Step 5: Design the meeting page (Page design) #
This step asks What do visitors see? Everything here changes the page on your site, not the Zoom meeting.
- Click Page design on the left.
- Leave Event theme on Site default, or pick another theme for this meeting.
- In Description, write what the meeting is for and what to bring. It shows above the join button. This is the WordPress editor you know from posts: use the Paragraph menu and the toolbar for headings, bold, lists and links, click Add media to insert an image, and switch between Visual and Code to edit the HTML. Drag the bottom right corner to make the box taller.
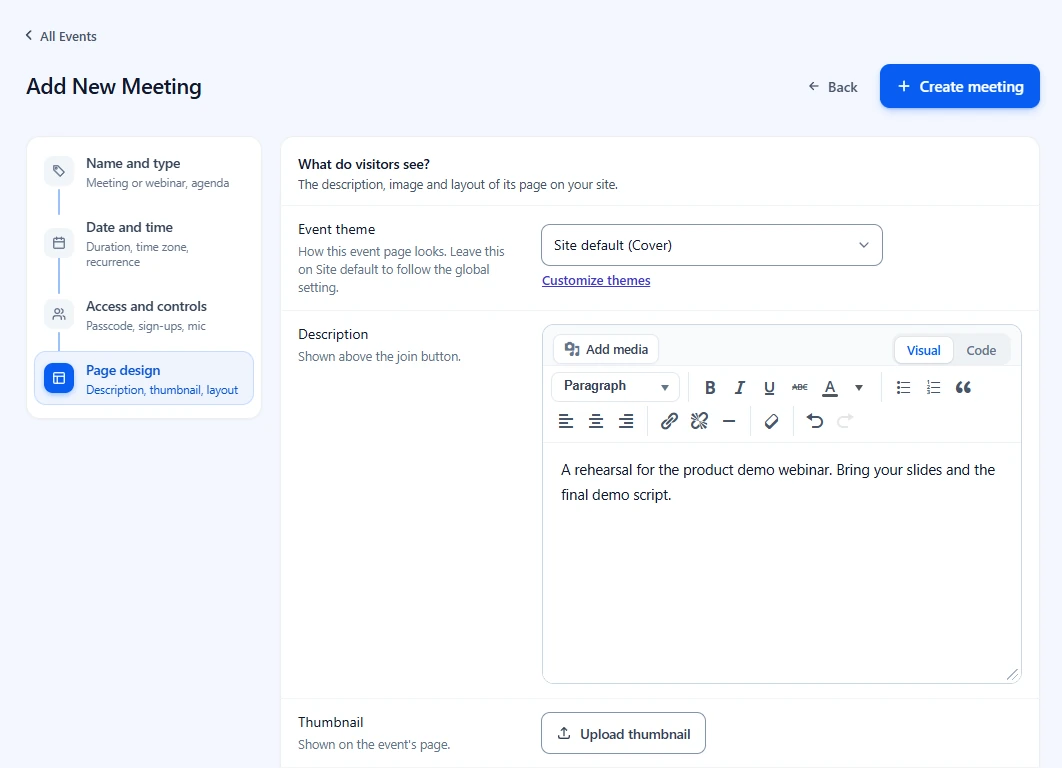
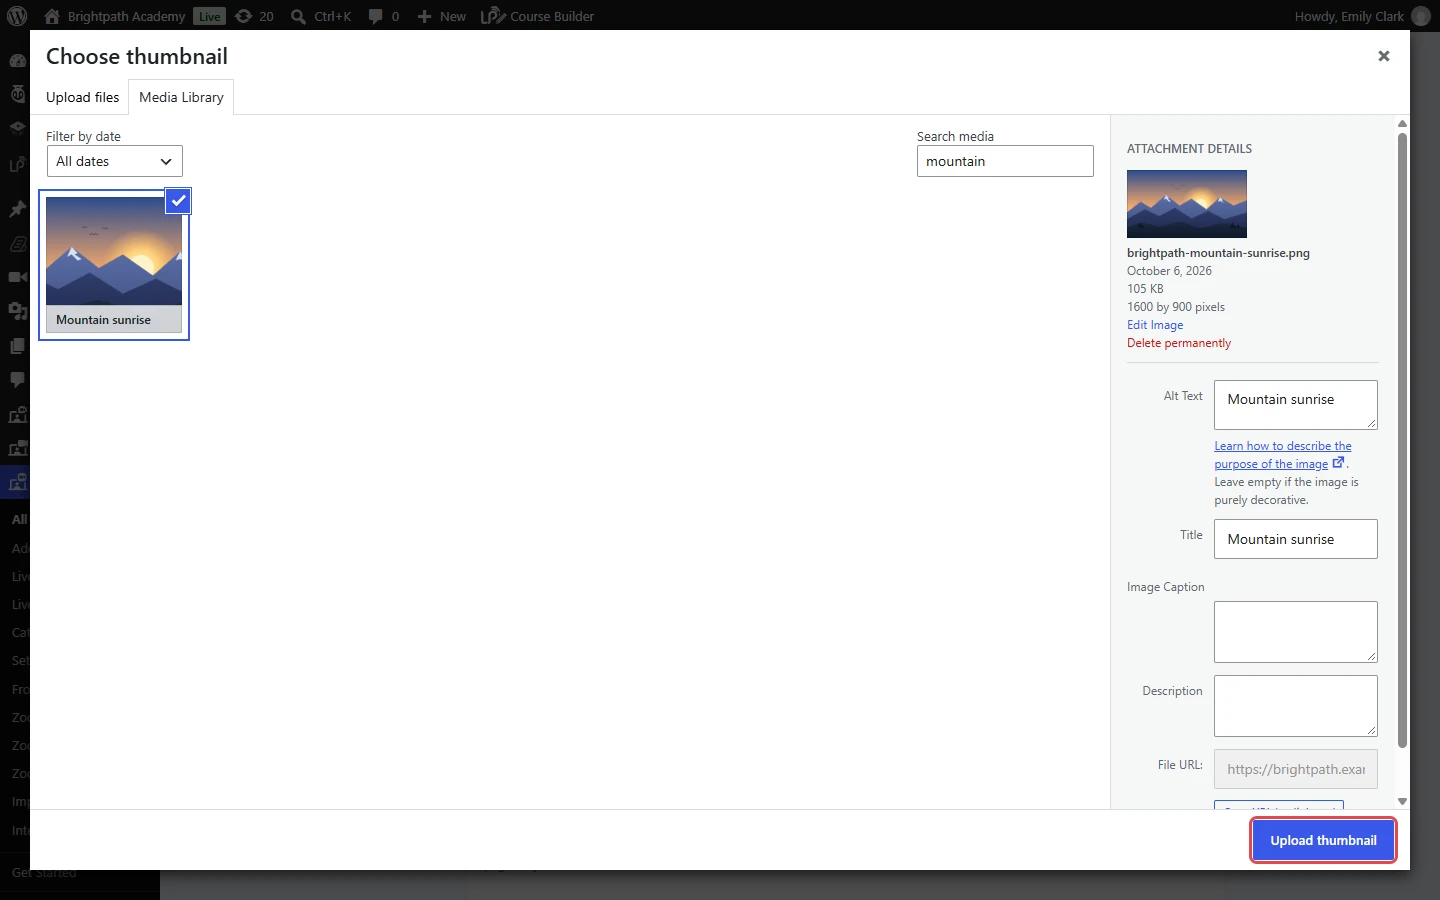
- Next to Thumbnail, click Upload thumbnail.
- In Choose thumbnail, open Media Library and pick an image, or upload one under Upload files.
- Click Upload thumbnail at the bottom right.
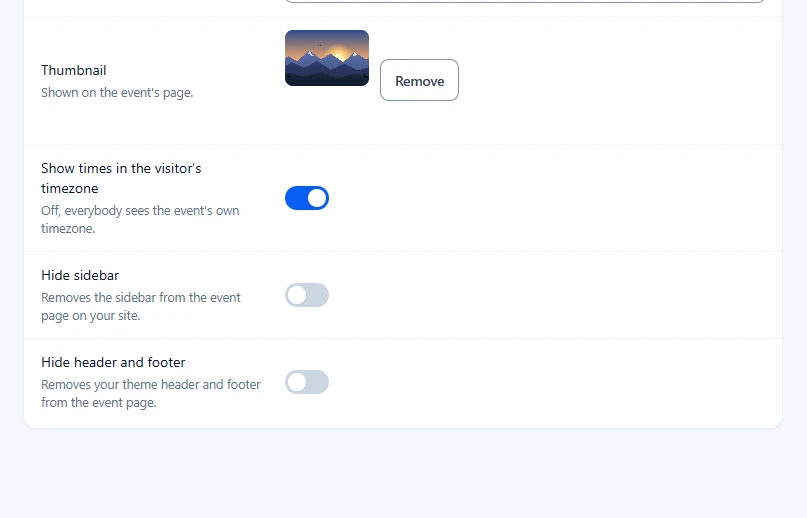
- Leave Show times in the visitor’s timezone on, so everyone sees the time in their own zone.
- Turn on Hide sidebar or Hide header and footer for a cleaner page.
Step 6: Create the meeting #
ZooMeet sends the meeting to Zoom first, then saves it in WordPress.
- Click Create meeting at the top right. It is there on every step.
- Wait while the button reads Creating.

When it is done, you see Meeting created and you are back on All Events, with the new meeting in the list.
Step 7: See the meeting page #
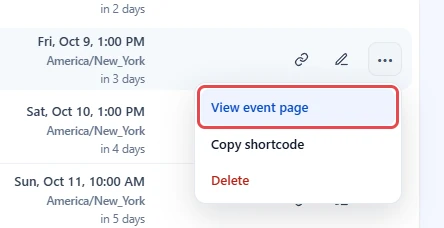
- Hover over the meeting row and click More actions (•••).
- Click View event page.
- Open the page in a private browser window to see it the way visitors do.
Manage your meetings #
Find a meeting #
- Click a tab to filter the list: All, Upcoming, Today, Past or Needs attention. Each tab shows a count.
- Type in Search events to find a meeting or webinar by title.
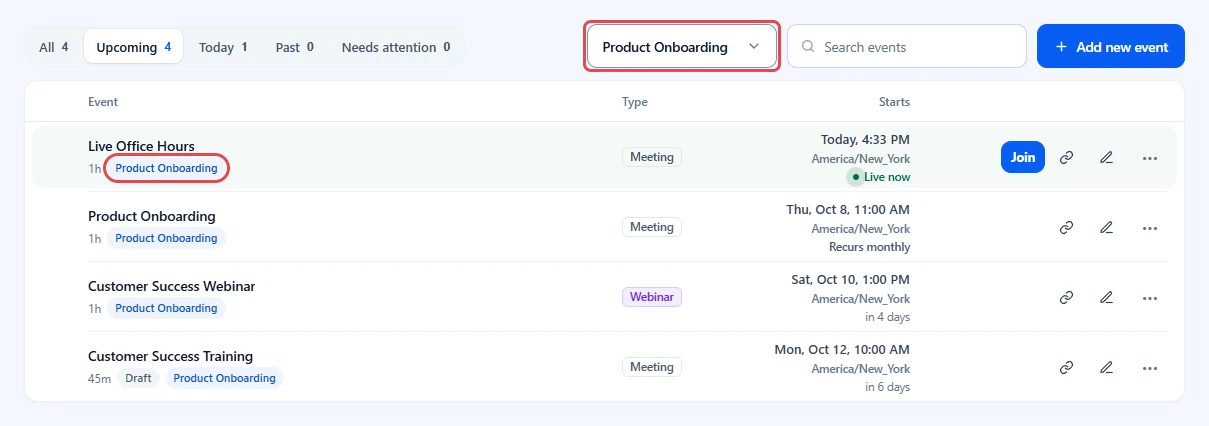
- Once your meetings have categories, open Filter by category and pick one, or click a category tag on a row. Click the tag again, or pick All categories, to see every meeting.
A meeting page that is not published yet, for example one imported from Zoom as a draft, shows a Draft label next to its name. Draft pages are hidden from visitors. To put one live, click More actions (•••) on its row, then Publish. Only the page changes; the Zoom meeting stays as it is.
Use the row actions #
Hover over a row to see its actions.
- Click the chain icon to copy the meeting page address.
- Click the pencil icon to edit the meeting. Clicking the meeting name does the same.
- Click More actions (•••) for View event page, Copy shortcode and Delete. A draft also shows Publish.
Edit a meeting #
- Click the meeting name, or the pencil icon.
- Change what you need in Edit Meeting. It has the same four steps.
- Click Update meeting. ZooMeet updates the meeting in Zoom too.
Delete a meeting #
- Hover over the row, click More actions (•••), then Delete.
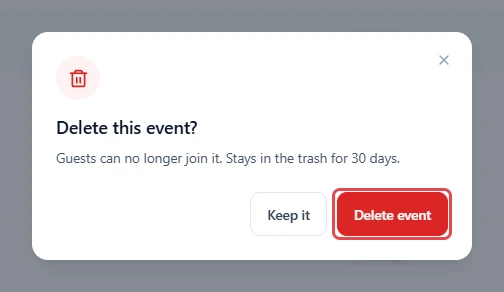
- Read Delete this event? Guests can no longer join it, and it stays in the trash for 30 days.
- Click Delete event to confirm, or Keep it to cancel.
Benefits of creating meetings with ZooMeet #
- Meeting and page from one form: You never copy a Zoom link into WordPress by hand.
- An address that does not change: People get a page on your site. You can edit details without resending anything.
- Two ways in: Attendees join in the Zoom app or right in the browser.
- Sensible defaults: Only the name and time need your attention.
Troubleshooting #
“Give the event a name before creating it.” #
Meeting name is empty. Go back to Name and type, enter a name, and click Create meeting again.
The event was not created #
Zoom refused the request. The message on the form names the reason. Your answers stay on the form.
Check that:
- Settings > Connect shows Connected on the Server-to-Server OAuth card.
- The start date and time are in the future.
- For a webinar, the host has a Zoom Webinars licence.
- The Zoom app has the meeting and webinar scopes. See How to connect Zoom with ZooMeet using Server-to-Server OAuth.
The meeting is shorter than I set #
On a free Zoom account, meetings end after 40 minutes whatever you set. On a paid account, open the meeting, go to Date and time, check the hour and minute dropdowns, and click Update meeting.
There is no Join in browser button #
Add the Meeting SDK keys. See How to set up the Zoom Meeting SDK for Join in browser in ZooMeet.
Frequently asked questions #
Do I have to fill in every step? #
No. Only Meeting name and Starts matter. Every other field arrives with a default from Settings > Events.
Can I change the meeting after it is created? #
Yes. Open it, change any field and click Update meeting. Zoom updates too. Only the event type is fixed.
Can visitors see the passcode? #
The join link on the meeting page includes it, so anyone who can see the page can join. Limit who sees the page with registration or access rules if the meeting is private.
Can I put the meeting on another page? #
Yes. Use Copy shortcode from the row menu and paste it into any page or post.
You’re ready to run your first Zoom meeting #
Your meeting exists in Zoom and has its own page on your site, with a cover image, countdown and join buttons. Share the page, or place it anywhere with the shortcode. Next, make meetings repeat or set the defaults every new meeting starts with.


