- Before you begin
- Step 1: Install and activate GoodMeet
- Step 2: Connect your Google account
- Step 3: Open Frontend Meetings
- Step 4: Choose the page members use
- Step 5: Check that the page is live
- Step 6: Pick the instructor dashboard page
- Step 7: Choose who counts as an instructor
- Step 8: Open the dashboard as an instructor
- Step 9: Open Meetings and click Add new
- Step 10: Fill in the basics (Basics)
- Step 11: Set the date and time (Date and time)
- Step 12: Choose a theme and create the meeting (Page design)
- Step 13: Check the Frontend Meetings page
- What visitors see
- Benefits of front-end meetings with GoodMeet
- Troubleshooting
- Frequently asked questions
- You're ready to let instructors run their own meetings
Instructors can schedule Google Meet classes without opening wp-admin. You give them a page on your site where they create, list and edit their own meetings.
You set up two things. The Frontend Meetings page is where any member with teaching rights hosts meetings. The Instructor dashboard is a full teaching space with meetings, classes, students and attendance. Both use the same meetings, and every meeting still gets its Google Meet link and calendar event.
By the end of this guide, you will have:
- GoodMeet and GoodMeet Pro installed and connected to Google
- A live Frontend Meetings page, linked from your menu
- An instructor dashboard page your teachers work from
- The roles that count as instructors chosen
- An instructor creating a meeting from the front end
- A clear idea of what logged-out visitors see
Estimated setup time: 5 minutes. You can reuse pages you already have, so nothing on your site moves.
Note: Requires GoodMeet Pro. Without Pro, the Frontend Meetings screen and the Page setup section only describe what Pro adds.
Before you begin #
Make sure you have:
- An administrator account on your WordPress site
- A Google account you can connect to GoodMeet
- At least one user who will teach, for example with the GoodMeet Instructor or Tutor Instructor role
- A menu on your site, if you want a menu link to the meeting page
Let’s get started.
Step 1: Install and activate GoodMeet #
GoodMeet installs from the WordPress plugin directory. Front-end meetings live in GoodMeet Pro, so you add that right after.
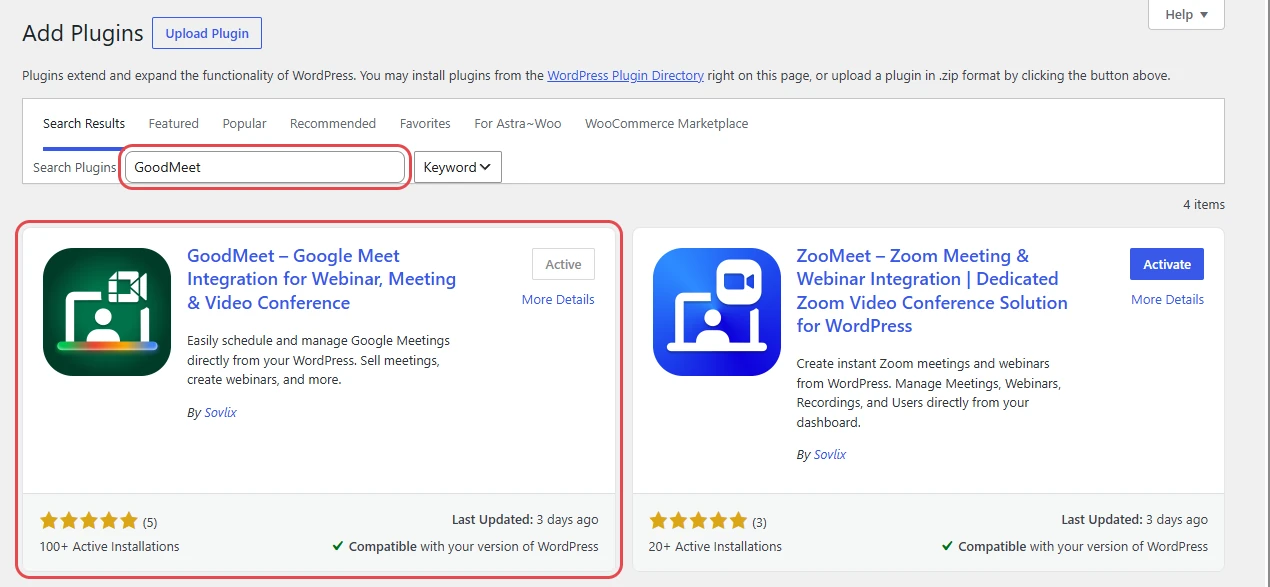
- In the WordPress admin menu, go to Plugins > Add New Plugin.
- Search for GoodMeet.
- Click Install Now, then Activate.
To use the Pro features in this guide, add GoodMeet Pro from inside GoodMeet. There is nothing to upload.
- In WordPress admin, open GoodMeet and click Upgrade, then complete the checkout.
- Go to GoodMeet > Account. Your license shows there, and GoodMeet offers to install GoodMeet Pro.
- Install GoodMeet Pro, then activate it. If GoodMeet shows Activate Pro, click it.
Note: If you already have a license, open GoodMeet > Account and install Pro from there. GoodMeet shows Download Pro when your license is active but Pro is not installed yet.
Step 2: Connect your Google account #
Instructors cannot get a Meet link until GoodMeet is connected to Google. If you already did this, skip to Step 3.
- Go to GoodMeet > Settings and click Connect.
- On the Google Cloud Credentials card, upload the JSON file from your Google Cloud project.
- Click Continue to Google.
- Choose your Google account and approve access.
Read our step-by-step Google setup guide for the full walkthrough.
Now comes the main part: giving members a page to create meetings on.
Step 3: Open Frontend Meetings #
The Frontend Meetings screen sets up the page and tells you whether it is live.
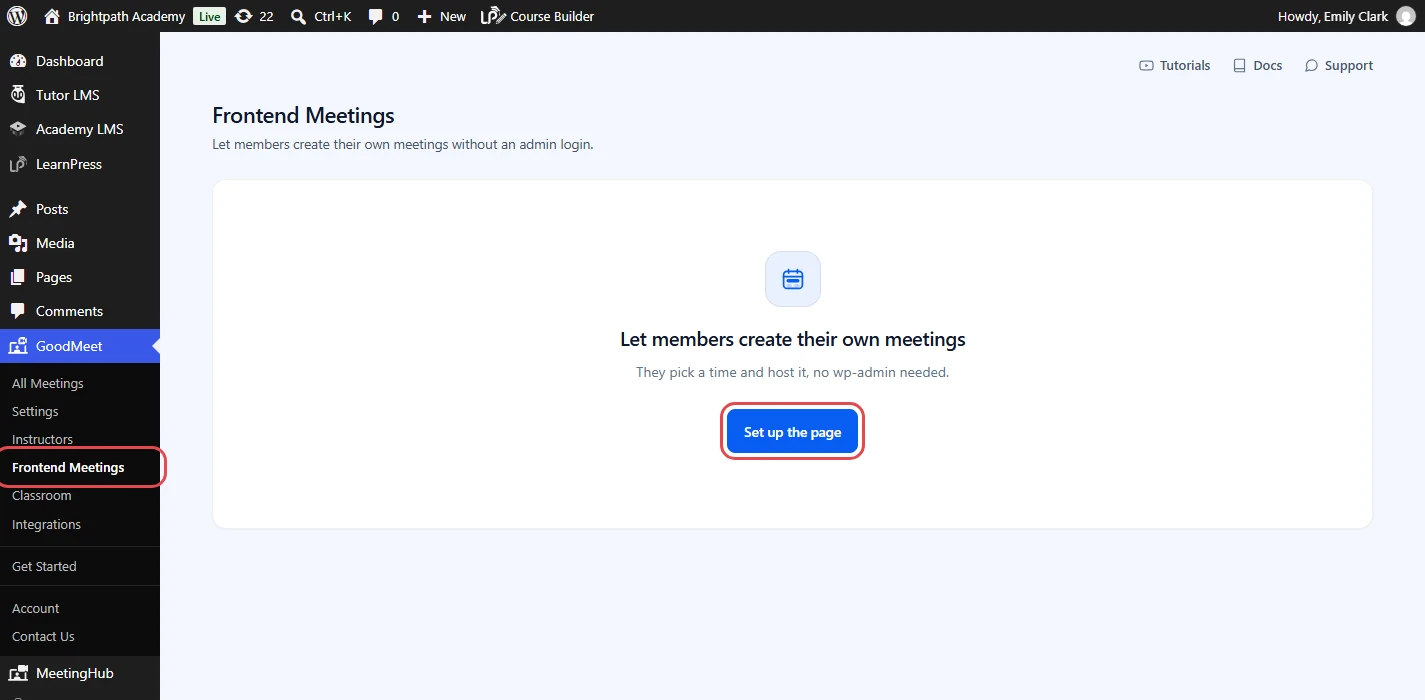
- In the WordPress admin menu, go to GoodMeet > Frontend Meetings.
- The first time, the screen shows Let members create their own meetings. Click Set up the page.
Step 4: Choose the page members use #
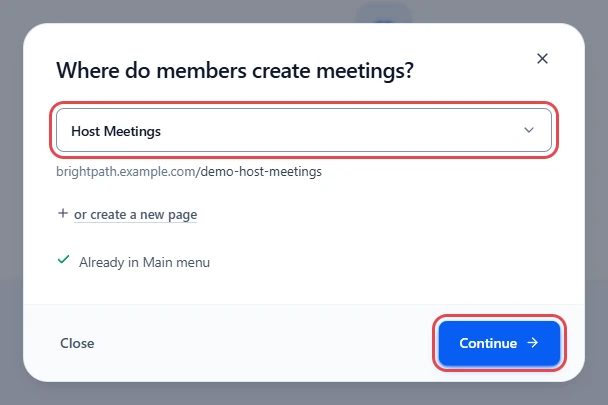
The setup window asks Where do members create meetings? You can reuse a page you already have or let GoodMeet make one.
- Open the page list and pick an existing page, for example Host Meetings. Or click or create a new page.
- If you want a menu link, tick Also add it to your menu. If the page is already in that menu, you see Already in and the menu name instead of a checkbox.
- Click Continue.
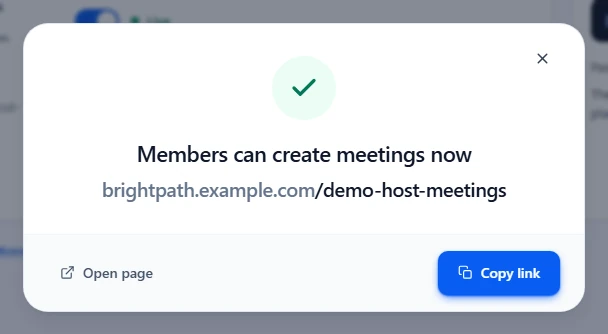
GoodMeet adds the meeting form to the page if it is not there yet. When it is done, you see Members can create meetings now.
Tip: The page uses the [goodmeet_frontend-meeting] shortcode. If you pick a page that already has it, GoodMeet reuses that page as it is.
Step 5: Check that the page is live #
Close the window. The Frontend Meetings screen now shows where things stand, so you can spot a problem at a glance.
- Check that Let members create meetings is on, with a green Live label.
- Check Page. You can choose another page here at any time.
- Check In menu, which names the menu that links to the page.
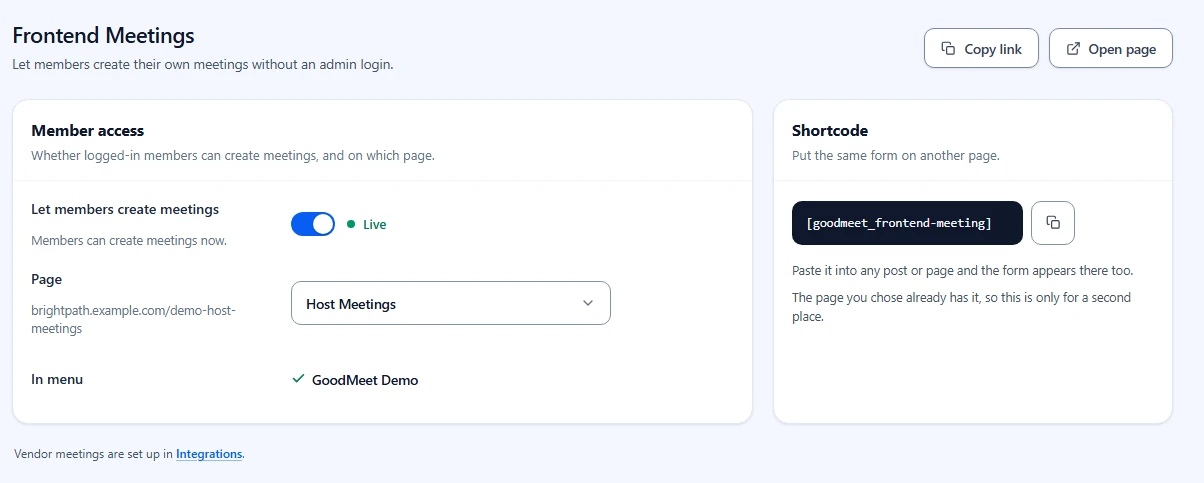
Note: Members cannot create meetings while the switch is off. A draft or private page also keeps members out until you publish it.
Step 6: Pick the instructor dashboard page #
The instructor dashboard is a full teaching space: meetings, classes, students, attendance and settings, all on one page of your site.
- Go to GoodMeet > Settings.
- Under Frontend, click Page setup.
- In Dashboard pages, choose a page next to Instructor dashboard, or click Create page.
- Do the same for Student dashboard if your students need their own page.
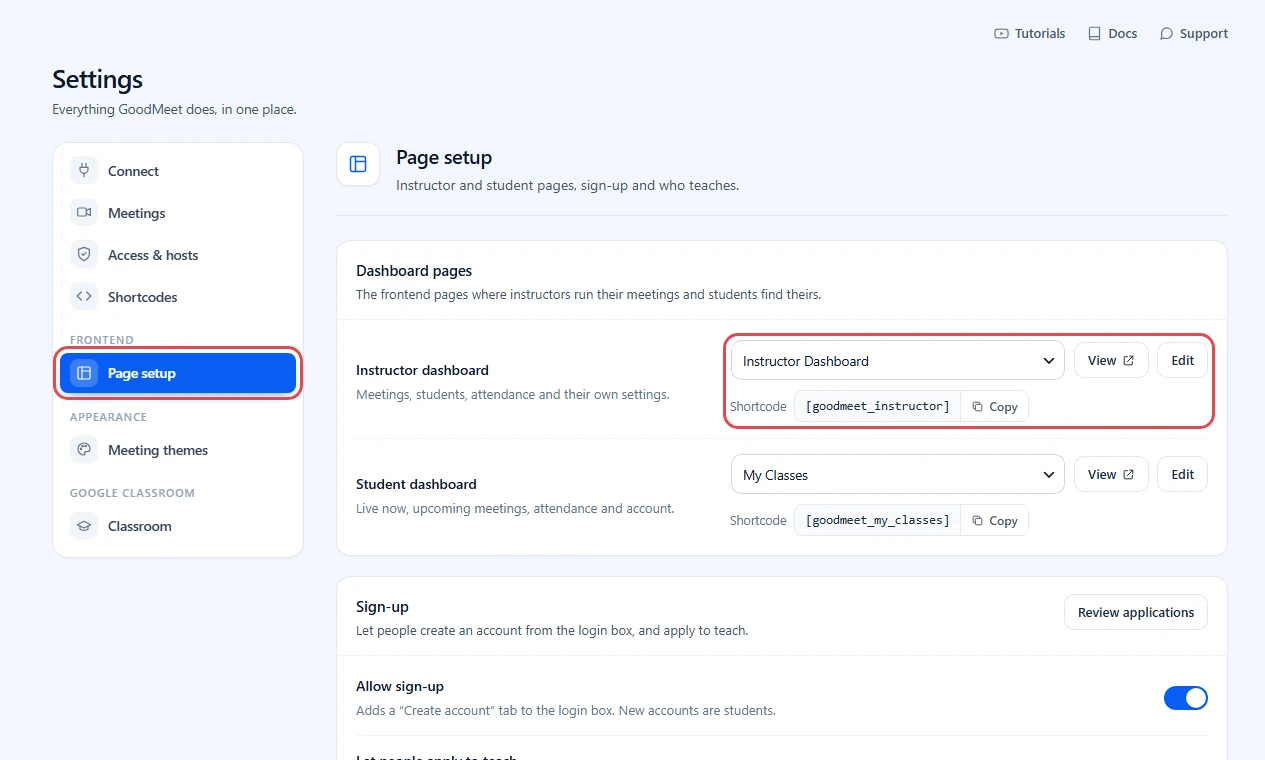
Tip: The Shortcode under each row puts the same dashboard on another page: [goodmeet_instructor] for instructors and [goodmeet_my_classes] for students.
Step 7: Choose who counts as an instructor #
GoodMeet only shows the teaching tools to roles you tick here. Everyone else gets the student side.
- Scroll down to Sign-up and Instructors on the same page.
- Under Roles that count as instructors, tick every role that should teach, for example GoodMeet Instructor, Tutor Instructor or Instructor (LearnPress).
- Turn on Allow sign-up if visitors may create an account. New accounts are students.
- Turn on Let people apply to teach if you want to accept teacher applications.
- Leave Approve instructors automatically off to review each application under GoodMeet > Instructors.
- Click Save changes in the bar that appears at the bottom.
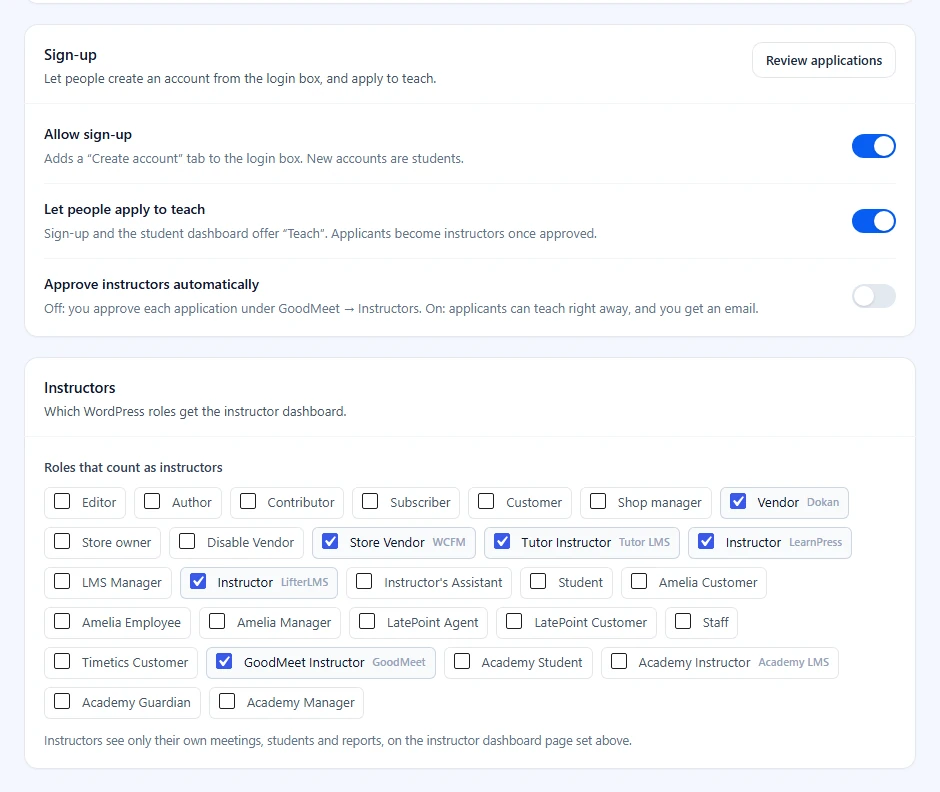
Important: Users with these roles can create meetings even if their role cannot write posts. GoodMeet grants that right only for its own meeting requests.
To review applications, see How to manage instructors in GoodMeet.
Step 8: Open the dashboard as an instructor #
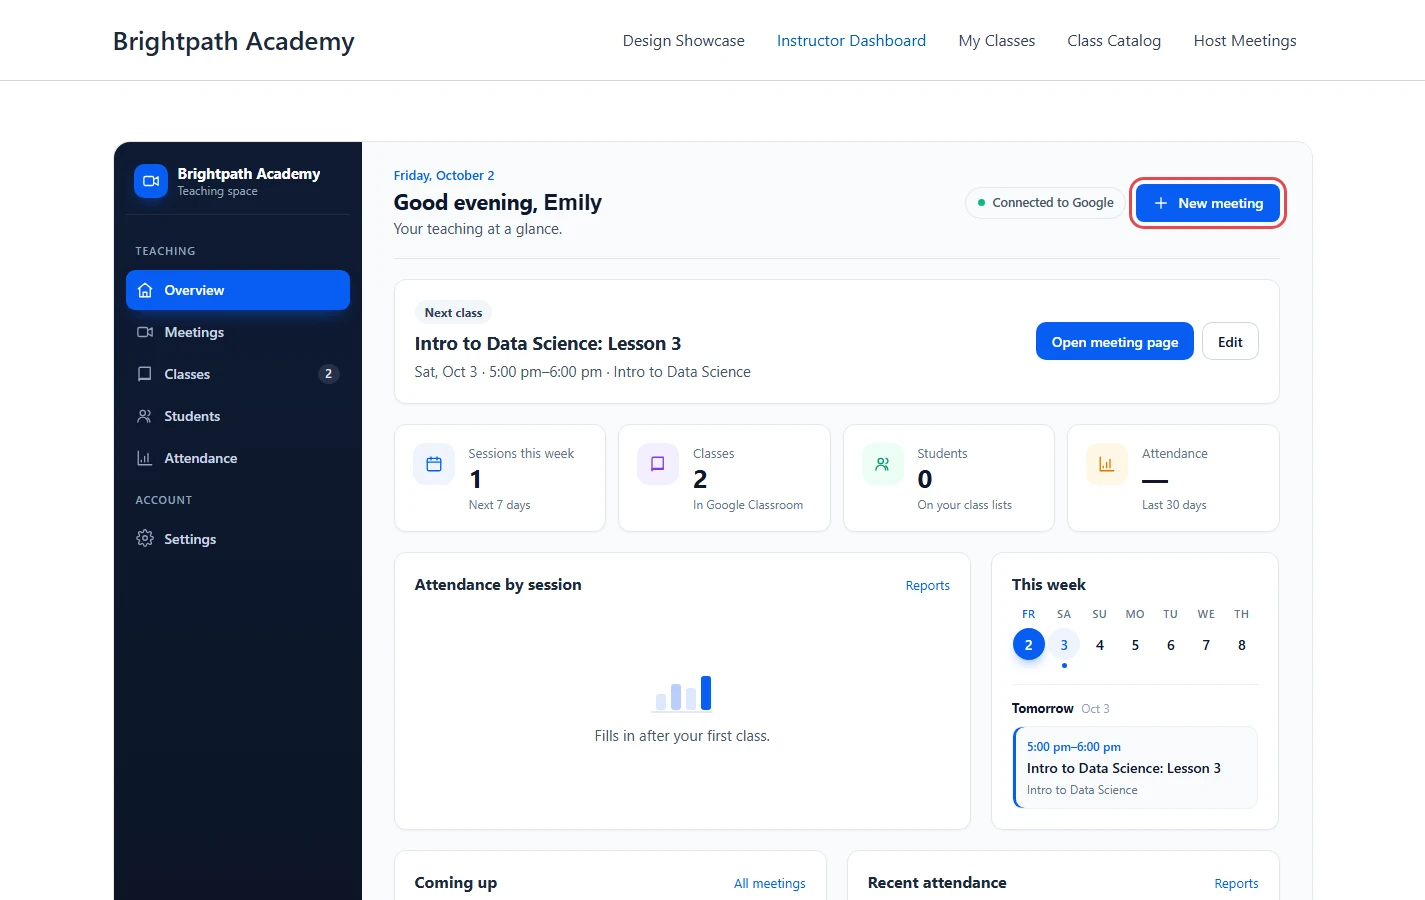
Now look at it the way your instructors will. Log in as an instructor and open the instructor dashboard page.
- Check the overview. It greets the instructor and shows the next class.
- Check the Connected to Google label, which confirms new meetings will get a Meet link.
- Click New meeting to start a meeting from here, or go to the meeting list first.
Step 9: Open Meetings and click Add new #
The meeting list is where instructors find, copy and edit everything they host.
- In the sidebar, click Meetings.
- Use the tabs All, Upcoming, Today, Past and Needs attention to filter the list.
- Click Add new.
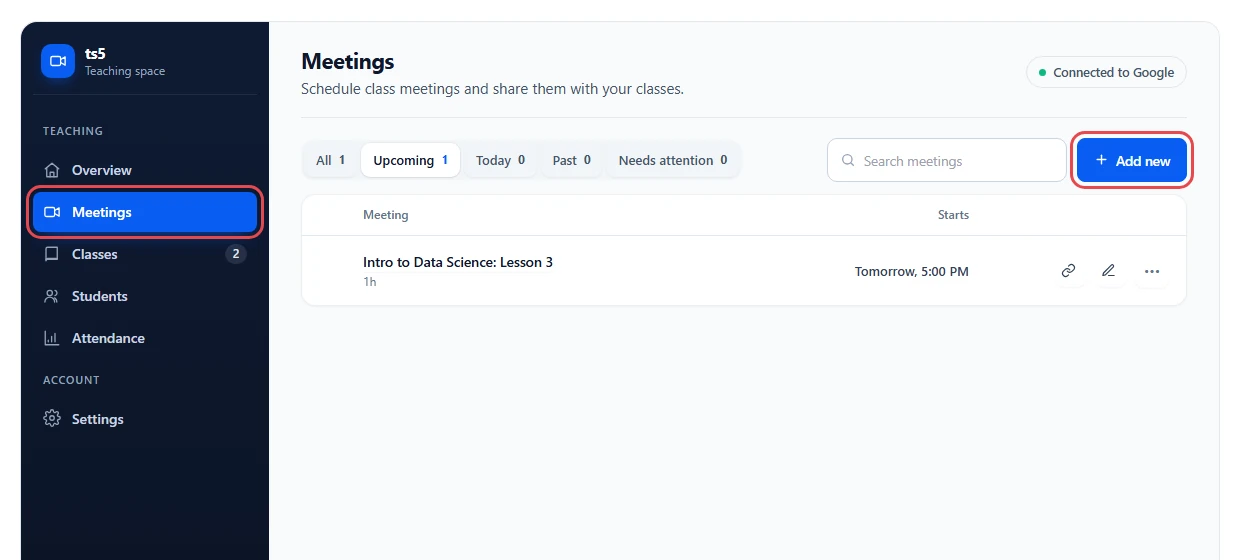
Note: Instructors see only their own meetings, students and reports.
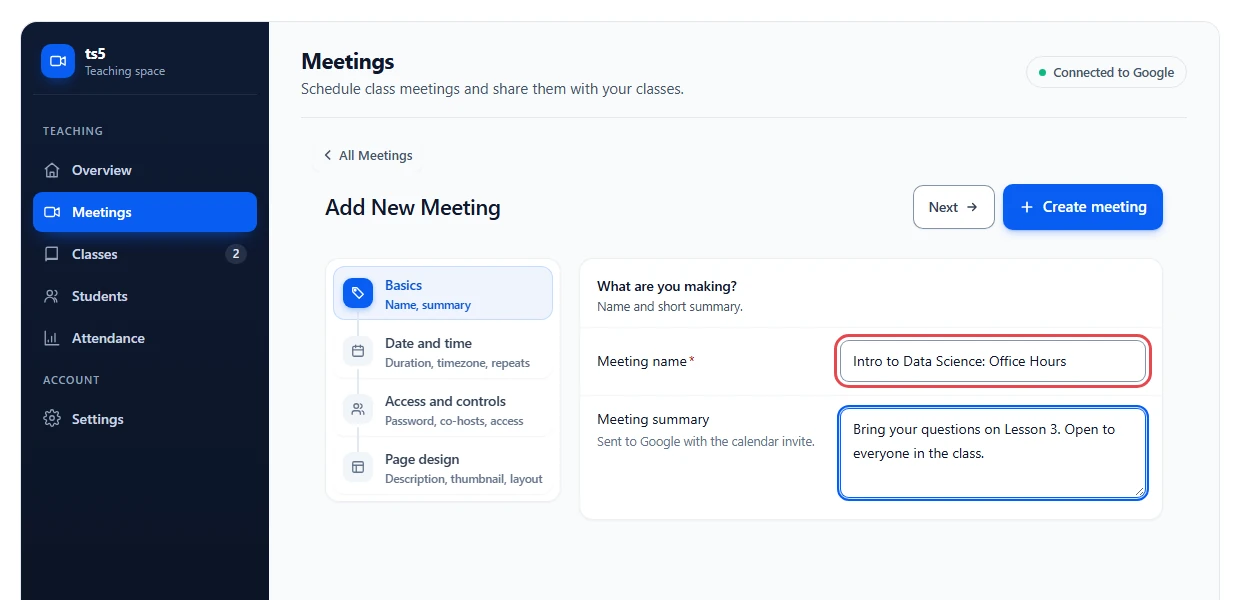
Step 10: Fill in the basics (Basics) #
The form has four steps on the left: Basics, Date and time, Access and controls and Page design. Only the first two are required.
- Type the Meeting name.
- Add a Meeting summary. Google sends it with the calendar invite.
- Click Next.
Step 11: Set the date and time (Date and time) #
The start time and time zone decide when students can join and what the calendar invite says.
- Under Starts, pick Today, Tomorrow or Next week, or choose a date and time.
- Pick a Duration: 30 min, 45 min or 1 hour, or set hours and minutes.
- Check the Time zone and the Notification reminder.
- Turn on Recurring meeting for a weekly class.
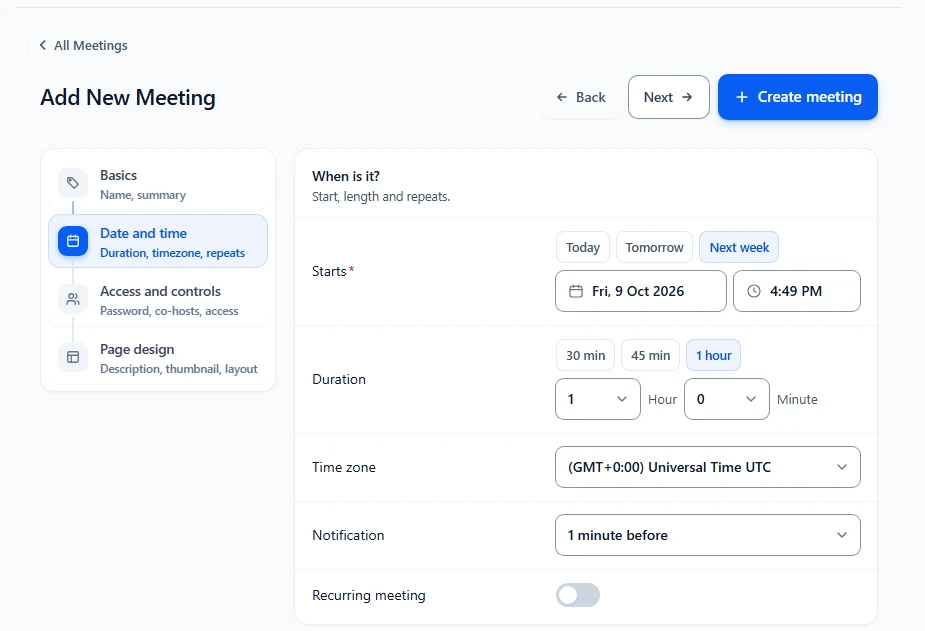
Access and controls is optional. It holds Should register, Send updates, Password, Co-hosts, Page access, Google Classroom and Add to a course.
Step 12: Choose a theme and create the meeting (Page design) #
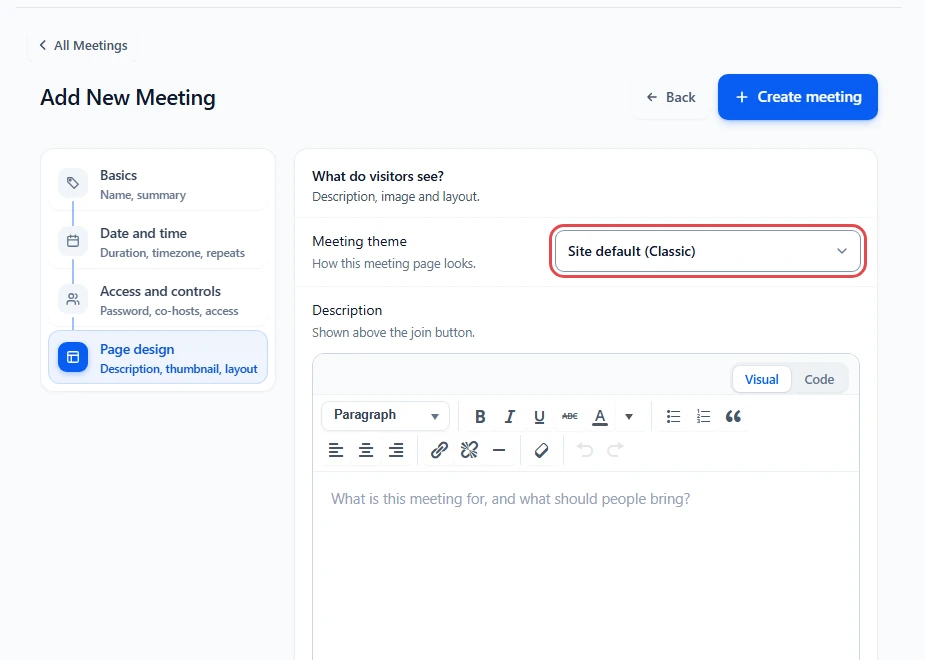
The theme only changes how the meeting page looks. It never changes the Meet link.
- Open Page design.
- In Meeting theme, keep Site default or pick a theme such as Paper, Lesson or Keynote.
- Add a Description, a Thumbnail and layout options if you like.
- Click Create meeting.
GoodMeet shows Meeting created and returns to the meeting list. The meeting already has its Google Meet link and calendar event.
Step 13: Check the Frontend Meetings page #
The page from Step 4 shows the same meeting list and form, inside your site theme.
- Open the page, for example Host Meetings, while logged in as an instructor.
- Check that All Meetings lists the instructor’s meetings, soonest first.
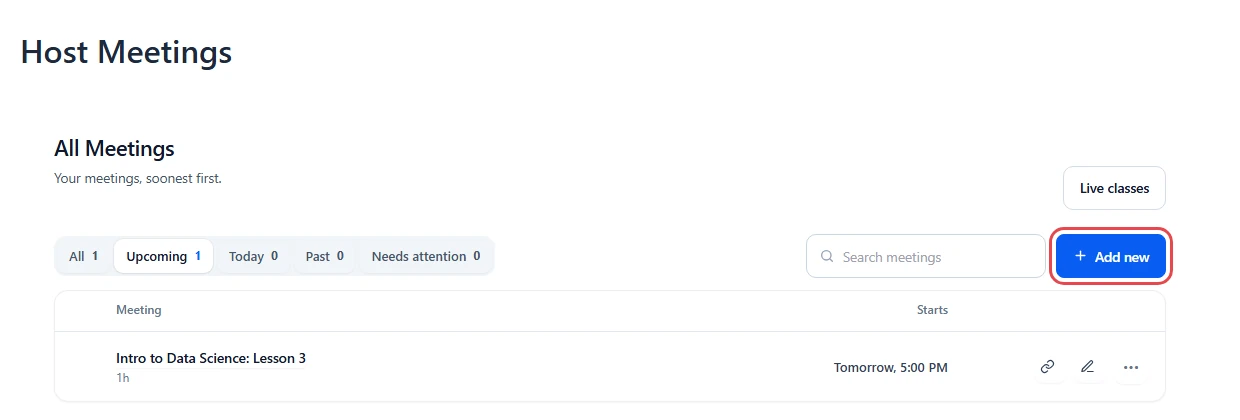
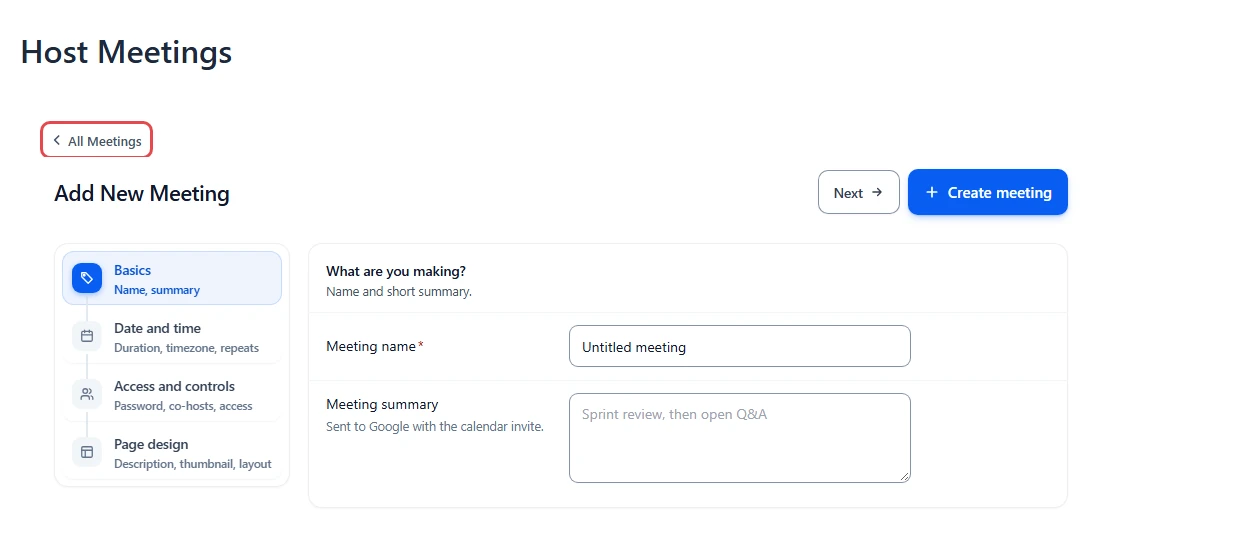
- Click Add new. The form opens on the same page, with All Meetings at the top to go back.
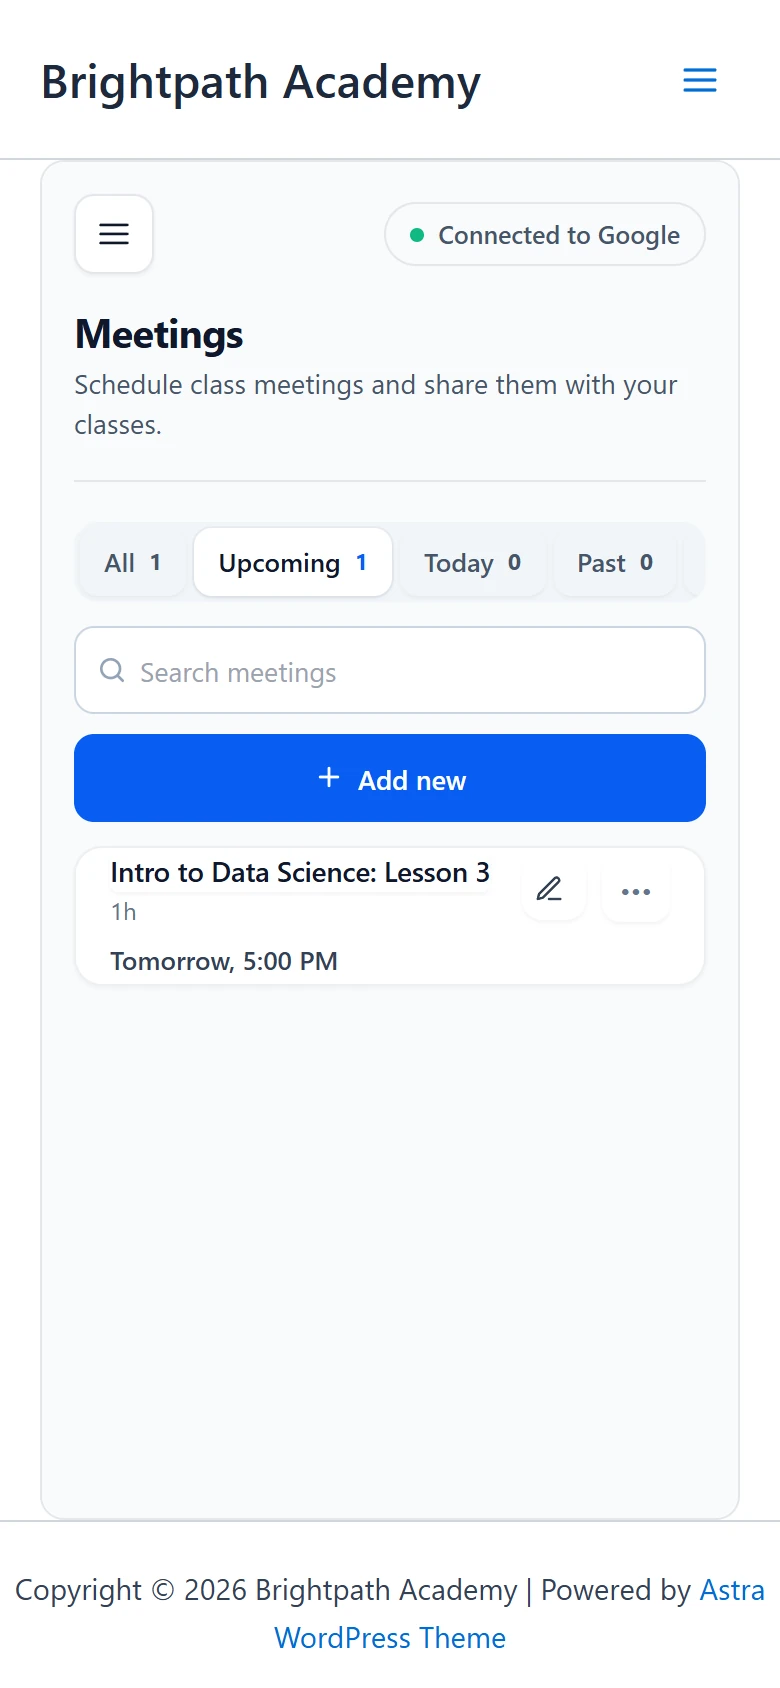
On a phone, the list stacks into cards and Add new spans the full width.
What visitors see #
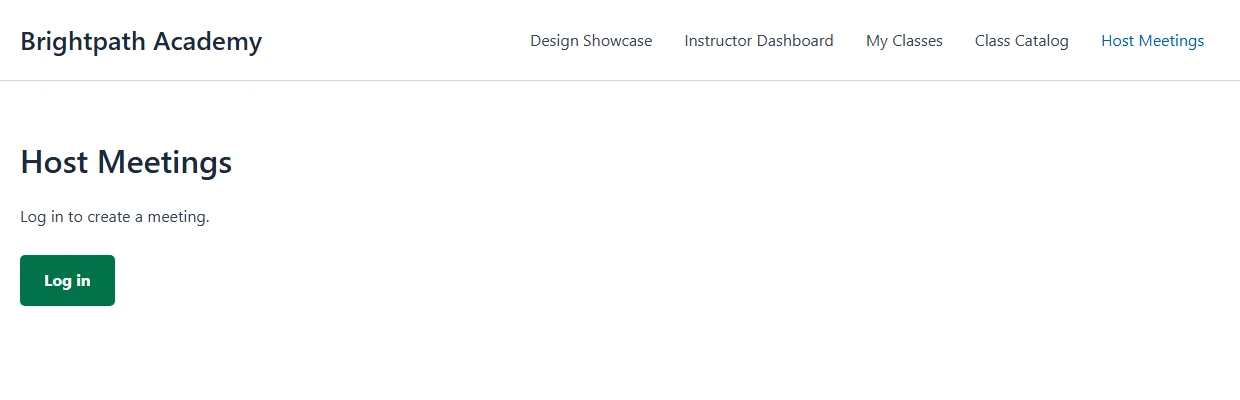
Visitors who are not logged in never see the form. The page shows Log in to create a meeting. and a Log in button. After they log in, WordPress brings them back to the same page.
On the instructor dashboard page, logged-out visitors see a sign-in form instead. After they sign in, GoodMeet brings them back to the dashboard.
Benefits of front-end meetings with GoodMeet #
- No admin accounts for teachers: Instructors schedule classes from your site, so you never hand out wp-admin access.
- Fewer requests in your inbox: Teachers create and edit their own meetings instead of asking you.
- Meet links from the start: Every meeting gets its Meet link and calendar event as soon as it is created.
- Each instructor sees their own data: Meetings, students and reports stay separate per instructor.
Troubleshooting #
The Frontend Meetings page shows “Not live” #
The page is a draft, private, or no longer has the form.
- Publish the page, or
- Click Put the form back on the Frontend Meetings screen.
“The page is gone” #
The page you chose was deleted, so links to it lead nowhere.
- Click Set up a new page.
- Pick or create another page and click Continue.
A logged-in member cannot create meetings #
Their role cannot write posts and is not ticked as an instructor.
- Go to Settings > Page setup.
- Tick their role under Roles that count as instructors.
- Click Save changes.
The instructor dashboard offers to apply to teach instead of showing meetings #
GoodMeet treats the user as a student, because their role is not in Roles that count as instructors.
Check that:
- Their role is ticked in Page setup, or
- Their application is approved under GoodMeet > Instructors.
The dashboard has no Classes, Students or Attendance #
Those sections come from Google Classroom, which is off. Turn on Google Classroom to show them. Meetings work without it.
“Could not create the meeting” #
GoodMeet could not reach Google, often because the Google connection expired or was reset. Ask an administrator to open GoodMeet > Settings > Connect and confirm Google Meet is connected.
Frequently asked questions #
Do instructors need wp-admin access? #
No. Instructors work entirely from the front-end pages. The GoodMeet Instructor role only needs to read the site.
Can instructors see other instructors’ meetings? #
No. Each instructor sees only the meetings they created. Administrators see every meeting in All Meetings.
Can I use both the instructor dashboard and the Frontend Meetings page? #
Yes. They share the same meetings. The dashboard adds classes, students and attendance around them.
Can I put the form on more than one page? #
Yes. Copy [goodmeet_frontend-meeting] from the Shortcode card and paste it into any page or post.
Can instructors change the meeting theme’s colours? #
No. Instructors pick a theme per meeting. Colours and fonts are set by an administrator under Settings > Meeting themes.
You’re ready to let instructors run their own meetings #
Your instructors now create, find and edit their Google Meet meetings on a page of your site. Each meeting gets its Meet link and calendar event automatically. Next, review teacher applications, pick a look for those meetings, or link meetings to classes.


