How to Integrate Google Meet With WordPress: Complete Guide

Google Meet does not have a native WordPress integration. You can copy a meeting link and paste it into a page, but that is as far as the default experience goes. There is no scheduling from your dashboard, no embedded join button, no registration system, and no way to sell access to a session.
GoodMeet is a WordPress plugin that changes this. It connects your site to the Google Meet API and Google Calendar API. You create meetings from your WordPress dashboard, publish them on any page, and manage who can join.
This guide covers everything: connecting your Google account, scheduling meetings, embedding shortcodes, requiring registration, running live LMS classes, and selling sessions through WooCommerce.
Table of Contents
Quick Answer: How to Integrate Google Meet with WordPress
To integrate Google Meet with WordPress, install GoodMeet from the WordPress plugin directory, connect your Google account using a Google Cloud project, and start creating meetings from your dashboard.
Each meeting gets a Google Meet link, a Google Calendar event, and its own page on your site. Pro features add WooCommerce ticket sales, LMS live classes, registration forms, and multivendor support.
What Can You Do with Google Meet on WordPress?
Once GoodMeet is installed and connected, here is what you can do directly from WordPress:
- Schedule Google Meet meetings from your WordPress dashboard
- Publish a dedicated meeting page with a countdown timer and join button
- Embed meetings on any page or post using shortcodes
- Sync every meeting to Google Calendar automatically
- Require visitors to register before they see the meeting link (Pro)
- Control page access by user role or with a password (Pro)
- Sell seats to webinars or consultations through WooCommerce (Pro)
- Add live video classes to Tutor LMS, LearnPress, Academy LMS, or LifterLMS (Pro)
- Let vendors or instructors create and sell their own sessions via Dokan or WCFM (Pro)
- Post meetings to Google Classroom class streams (free for basic; Pro for full features)
What Is GoodMeet?
GoodMeet is developed by Sovlix. It connects WordPress to the Google Meet API and Google Calendar API, letting you manage video meetings without leaving your dashboard.
Free plan includes:
- Meeting creation and scheduling
- Automatic Google Calendar sync
- Two meeting page themes (Classic and Paper)
- Meeting list shortcode and single-meeting shortcode
- Google Classroom stream posting
GoodMeet Pro adds:
- 12 additional meeting page themes
- Recurring meetings
- Registration forms with password-gated access
- Role-based page access and co-host management
- WooCommerce ticket sales and bookings
- Live classes for Tutor LMS, LearnPress, Academy LMS, and LifterLMS
- Multivendor support: Dokan, WCFM, and MultiVendorX
- Instructor and student front-end dashboards
How to Integrate Google Meet with WordPress Using GoodMeet
The setup has two steps: install the plugin, then connect your Google account.
Step 1: Install GoodMeet
- In your WordPress dashboard, go to Plugins > Add New Plugin.
- Search for “GoodMeet”.
- Click Install Now, then Activate.
You can also download the plugin from wordpress.org/plugins/goodmeet and install it via Plugins > Add New Plugin > Upload Plugin.
Your All-in-One
Google Meet Solution
Start free on WordPress.org. Upgrade whenever you’re ready to sell, scale, or automate.
Step 2: Connect Your Google Account
Connecting requires a free Google Cloud project. No billing is needed. Your site must be on HTTPS (localhost is also accepted). Full steps: how to connect Google Meet to WordPress.
- In GoodMeet > Settings > Connect, find the Google Cloud Credentials card and copy the redirect URL shown.
- Go to console.cloud.google.com. Create a new project and name it (for example, “GoodMeet”).
- Enable the Google Calendar API and Google Meet API in that project.
- Set up the Google Auth Platform with your app name and support email. Choose External for public sites, or Internal for Google Workspace-only.
- Add the required scopes: Calendar, Calendar Events, Meet space, userinfo email, and openid.
- Under Audience > Test users, add the Google account that will own your meetings.
- Create an OAuth client. Choose Web application, leave JavaScript Origins empty, and paste the redirect URL from GoodMeet under Authorized Redirect URIs.
- Download the client JSON file and upload it to GoodMeet.
- Click Continue to Google, select the test account, and approve the permissions.
- Confirm the GoodMeet Settings card shows “Connected” with Google Meet and Google Calendar both active.
Note: Google may display an “unverified app” warning during connection. This is expected for your own Google Cloud project. Click Advanced > Go to [your app name] to continue. If you are in testing mode, the approval may expire after around 7 days. Return to Settings > Connect and click Continue to Google to reapprove.
How to Schedule Google Meet Meetings from WordPress
Once Google is connected, create your first meeting. Full steps: how to create a Google Meet meeting in WordPress.
- Go to GoodMeet > All Meetings and click Add New.
- Enter a meeting name (required) and an optional summary.
- Set the start date, duration, time zone, and reminder notification.
- Configure access settings: registration, password, co-hosts, and page access (most require Pro).
- Choose a meeting page theme and add a description or thumbnail image.
- Click Create Meeting. GoodMeet contacts Google first. If Google accepts, the meeting is saved.
Each meeting generates three things automatically:
- A Google Meet link for joining the video call
- A Google Calendar event on your connected account
- A meeting page on your WordPress site, with a countdown timer, join button, and your description
To set defaults for all future meetings (timezone, notifications, access rules), see how to set default meeting settings.
How to Embed Google Meet Meetings on Your Website
GoodMeet includes shortcodes and a block for embedding meetings anywhere in WordPress. For the complete list of attributes and examples, see how to embed Google Meet meetings with shortcodes.
| Shortcode | What It Does | Plan |
| [goodmeet-google-meeting-list] | Searchable, sortable table of all meetings (10 per page) | Free |
| [goodmeet-google-meeting id=”…”] | Single meeting with countdown, join button, and details. Supports hide_details, hide_timer, and hide_calendar attributes. | Free |
| [goodmeet_frontend-meeting] | Meeting form and list for front-end hosts who create their own meetings | Pro |
| [goodmeet_dashboard] | Instructor or student dashboard, based on logged-in user role | Pro |
| [goodmeet_classes] | Class catalog for Google Classroom. Supports columns and per_page attributes. | Pro + Classroom |
The block editor also has a Google Meet block. It saves a snapshot of the meeting details, so update it manually if the meeting time changes. The shortcode always stays current.
How to Manage Meeting Access and Registration
GoodMeet gives you two ways to control who can join. Both are Pro features.
Registration Forms
Turn on “Should register” in the meeting’s Access and Controls section. Visitors see a form asking for their name and email. After submitting, GoodMeet emails them the meeting password. They enter their email and password to reveal the Join Google Meet button. Full details: how to require registration for Google Meet meetings.
How registration works in brief:
- Visitor enters name and email on the meeting page
- GoodMeet sends a “Meeting Registration Details” email with the password and meeting page link
- Visitor signs in with their email and password to access the join button
- Each sign-in lasts one day in that browser
Page Access by Role
Separately, Page access controls who can open the meeting page at all. Options: Everyone (default), Logged in, or By role. If you choose By role with no roles selected, only the host and admins can open it. Full details: how to control meeting access and co-hosts.
Co-Hosts
Add co-hosts by user account or email. Co-hosts get host controls in the meeting, including the ability to admit, mute, and remove participants, and they skip the waiting room. Note: co-hosts require a paid Google Workspace plan. Free Gmail and Starter accounts cannot use co-host features.
How to Create Google Meet Live Classes
GoodMeet Pro supports live video classes in Tutor LMS, LearnPress, Academy LMS, and LifterLMS. The steps below use Tutor LMS as an example. For the full guide, see how to add Google Meet live classes to Tutor LMS.
- Install and activate Tutor LMS and GoodMeet Pro, then connect your Google account.
- Go to GoodMeet > Integrations and turn on the Tutor LMS switch.
- Create a meeting in GoodMeet > All Meetings.
- Under Access and Controls, select the course or lesson to attach the meeting to.
- Set who can join: “Course students” limits access to enrolled students, course instructors, and admins. “Anyone with link” removes that restriction.
- Click Create Meeting.
What students see:
- Course page visitors see a Live sessions list with dates and an “Enroll to join” option
- Enrolled students see a “Join now” button when the session is live
- Inside a lesson, a live class card shows a countdown in the final 24 hours
- Ended sessions with a recording show a “Watch recording” link
Instructors can also create and attach meetings from the Tutor LMS dashboard or course builder directly.
Google Classroom: GoodMeet also integrates with Google Classroom. You can post meetings to a class stream, let students log in with Google Classroom credentials, and display a class catalog on your site. See how to use Google Classroom with WordPress for setup steps.
How to Sell Google Meet Meetings with WooCommerce
GoodMeet Pro lets you charge for access to meetings, consultations, or webinars through WooCommerce. Full guide: how to sell Google Meet meetings with WooCommerce.
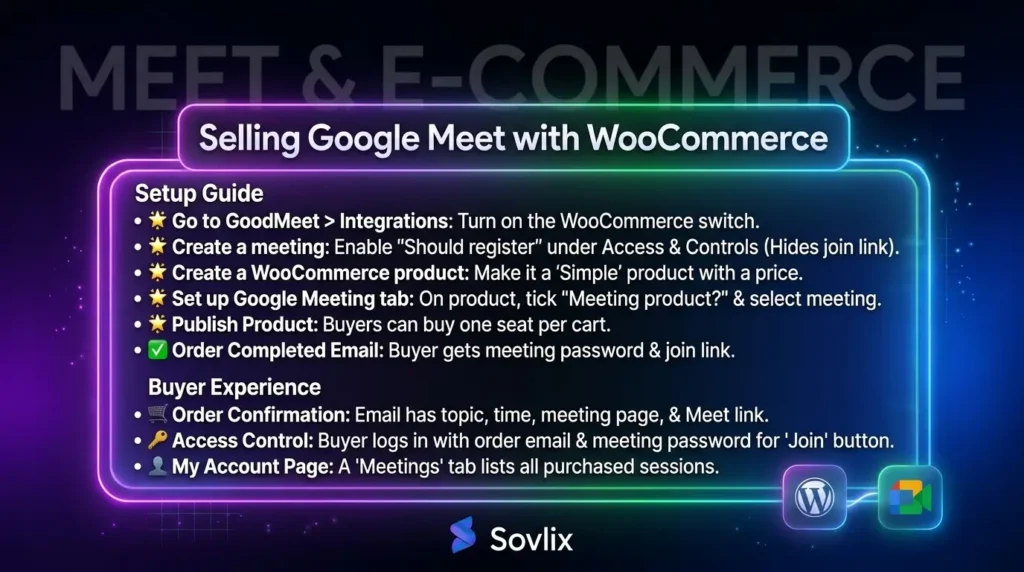
- Go to GoodMeet > Integrations and turn on the WooCommerce switch.
- Create a meeting and enable “Should register” under Access and Controls. This hides the join link from non-buyers.
- Create a WooCommerce Simple product with a price.
- On the product’s Google Meeting tab, tick “Meeting product?” and select your meeting.
- Publish the product. Buyers can purchase one seat per cart.
- When an order is marked Completed, the buyer receives the meeting password and join link by email.
Buyer experience after purchase:
- Order confirmation email includes the meeting topic, start time, meeting page link, and Google Meet link
- Buyer logs in with their order email and meeting password to access the join button
- Their My Account page shows a Meetings tab listing all purchased sessions
How to Let Vendors Sell Google Meet Meetings
If you run a multi-instructor or marketplace site, GoodMeet Pro works with Dokan, WCFM, and MultiVendorX. Each vendor gets their own meeting dashboard and can create and sell sessions independently. Full guide: how to let Dokan vendors sell Google Meet meetings.
- Install WooCommerce and Dokan (or WCFM or MultiVendorX).
- Install GoodMeet and GoodMeet Pro.
- Go to GoodMeet > Integrations and turn on the Dokan switch.
- Choose whether vendors use the site’s shared Google account or connect their own calendar.
Once enabled, each approved vendor sees a Google Meeting menu in their dashboard. They can create meetings, link them to WooCommerce products, and sell seats. Dokan payouts apply as they do for any product. Vendors only see their own meetings.
👉 Read More: 5 Best WordPress Meeting Plugins
Google Meet WordPress Plugin vs. Pasting Meeting Links Manually
Many site owners start by copying a Google Meet link and pasting it into a page or email. Here is what that approach can and cannot do compared to GoodMeet.
| Feature | Manual Meeting Link | GoodMeet |
| Meeting page on your site | No | Yes, created automatically for every meeting |
| Google Calendar sync | Copy link manually to calendar | Automatic on every meeting |
| Countdown timer for attendees | No | Yes, on every meeting page |
| Embed on any page or post | Paste raw link only | Yes, via shortcodes or block editor |
| Registration and access control | Not possible | Yes (Pro): name, email, password gate |
| Sell access to meetings | Not possible | Yes (Pro): WooCommerce ticket sales |
| LMS live classes | Not possible | Yes (Pro): Tutor LMS, LearnPress, and others |
| Multi-instructor or marketplace | Not possible | Yes (Pro): Dokan, WCFM, MultiVendorX |
| Recurring meetings | Manual every time | Yes (Pro): set a recurrence rule once |
Frequently Asked Questions
Is GoodMeet free?
Yes. GoodMeet has a free plan on the WordPress plugin directory. It includes meeting creation, Google Calendar sync, two page themes, and shortcodes. Pro features like registration forms, WooCommerce sales, LMS live classes, and multivendor support require a paid plan. Pro starts at $39/year for 1 site.
Does GoodMeet work with any LMS?
GoodMeet Pro supports Tutor LMS, LearnPress, Academy LMS, and LifterLMS. Each integration adds a live sessions area to courses and lessons. Students see join buttons when a session is live. If your LMS is not on this list, you can still link meetings manually using shortcodes or the Google Meet block.
Do I need a paid Google account?
No. The Google Cloud project setup is free and requires no billing. However, co-host functionality requires a paid Google Workspace plan. Free Gmail accounts and Google Workspace Starter accounts cannot add co-hosts to meetings.
Can attendees join without a Google account?
Yes. Attendees do not need a Google account to join a meeting. They click the Join Google Meet link and join as a guest. If you have enabled “Should register,” they need to enter their name and email first to receive the meeting password.
What happens if I switch to a different Google account?
Older meetings stay on the previous account’s Google Calendar and keep their original Meet links. New meetings will be created on the newly connected account. GoodMeet does not move old meetings between accounts, so the links for past meetings will still work.
Conclusion
Pasting a Google Meet link into a page gets you started, but it does not scale. You cannot collect registrations, sell seats, run structured LMS classes, or let instructors manage their own sessions.
GoodMeet gives WordPress sites a full Google Meet workflow: from scheduling to embedding to selling. The free plan covers the basics for any site. Pro is worth considering if you run paid consultations, online courses, or a multi-instructor marketplace.